Transactional Email

If you have the transactional email add-on, you can send emails over a dedicated IP address for commerce receipts, account updates, terms of service changes, and other essential business transactions.

Transactional emails are for relationship-based interactions, unlike marketing emails, which are typically used to promote content.

Methods for sending transactional email

There are three ways to implement transactional email:

Method Overview Example use case
In-app transactional Email Create transactional emails using HubSpot's email editor.

This provides the same benefits of standard HubSpot emails, such as smart content, personalization and templates.

Learn more about setting up transactional emails in-app.
Send a policy update email to your customers with a link to a new policy page. This is a service update, not a marketing email, so you don't need to include subscription links (e.g CAN-SPAM links). You don't need to use any custom properties or info from external systems.
SMTP API
Send transactional email through your own site or app while also tracking email performance and create contact information within HubSpot. The optional ability to create contact information is based on the smtp token creation.

Learn more in SMTP API section below 

Send an account signup confirmation email from a separate transactional email system, while also tracking email performance and creating contacts in HubSpot.
Single-send API A combination of in-app transactional email and SMTP API.

Create transactional emails using HubSpot's email editor, and add custom external tokens to your email which you can send to HubSpot via the API.

Learn more in the single-send API below 
Send a purchase receipt email to your customer using HubSpot. The email is triggered when the purchase is made, and passes custom values from another system (e.g. purchased item and purchase total). In addition, track the performance of this email in HubSpot.

Please note: any contacts who are CC'd on a transactional email will not be tracked and the email will not appear on the record timeline of the CC'd contact.

SMTP API

Transactional email sent using the SMTP API is automatically triggered by specific criteria, like making a purchase on an e-commerce website. This API integrates with any internal or third-party systems to both trigger the email and incorporate data stored outside of HubSpot (e.g. shipping info or purchase price). The email is sent from your system, but is wrapped with HubSpot tracking codes that allow full engagement tracking and measurement.

To send an email using the SMTP API, you need to use an SMTP API token to get login credentials for the HubSpot SMTP server. Once you log in to the server, you can send the email over SMTP. If you haven't created any SMTP API tokens, you'll first need to generate a new token. If you've already created SMTP API tokens, learn about the different methods for getting your tokens through the API. After getting your token, learn about how to log in to HubSpot's SMTP server.

Any domains you use as the From Address of your emails must be connected as an email sending domain in HubSpot. You will encounter an error if you send transactional emails through the SMTP API using a domain that isn't authorized to send on behalf of your HubSpot account.

Please note: all methods in the SMTP API require an OAuth token for authentication.

If you prefer, all of the methods below for creating, retrieving, deleting, and resetting passwords for SMTP API tokens can be done within your HubSpot account, rather than the API.

Create a new SMTP API token

To create a new SMTP API token, make a POST request to /marketing/v3/transactional/smtp-tokens/.

The request body must be a JSON-formatted object with the following properties:

  • createContact: indicates whether a contact should be created for email recipients.
  • campaignName: a name for the campaign associated with the SMTP API token.

The response includes an SMTP token object, which contains:

  • id: username to log into the HubSpot SMTP server.
  • createdBy: email address of the user that sent the token creation request.
  • password: the password for logging in to the HubSpot SMTP server.
  • emailCampaignId: identifier assigned to the campaign provided in the token creation request.
  • createdAt: timestamp generated when a token is created.
  • createContact: indicates whether a contact should be created for email recipients.
  • campaignName: the name of the campaign associated with the token.

With your token created, you can log in to HubSpot's SMTP server using the id and password values.

A token's password can only be retrieved at the time of creation. If you lose the password, or want to set a new password, you'll need to reset the token's password

Please note: SMTP API tokens generated through the public API expire after 12 months. Once expired, they're automatically deleted. Tokens created directly within your HubSpot account do not expire automatically.

Retrieving SMTP tokens

Below are the available methods of getting token data using the API.

List SMTP API tokens by campaign

To get either a list of tokens by campaign name, or get a single token by campaign ID, make a GET request to /marketing/v3/transactional/smtp-tokens.

You'll also need to include either a campaignName or emailCampaignId parameter with the request. You can find all request details in the Endpoints tab at the top of this article.

Response details

The response contains results and paging as its top-level fields:

  • results: a collection of SmtpApiTokenView containing:
    • id: username to log into the HubSpot SMTP server.
    • createdBy: email address of the user that sent the token creation request.
    • emailCampaignId: identifier assigned to the campaign provided in the token creation request.
    • createdAt: timestamp generated when a token is created.
    • createContact: indicates whether a contact should be created for email recipients.
    • campaignName: the name of the campaign associated with the token.
  • paging: contains a next.after field that can be used to request more results.

Query a single SMTP API token

To query a single SMTP API token by ID, make a GET request to /marketing/v3/transactional/smtp-tokens/{tokenId}.

Response details

The response includes SmtpApiTokenView, which contains:

  • id: username to log into the HubSpot SMTP server.
  • createdBy: email address of the user that sent the token creation request.
  • emailCampaignId: identifier assigned to the campaign provided in the token creation request.
  • createdAt: timestamp generated when a token is created.
  • createContact: indicates whether a contact should be created for email recipients.
  • campaignName: the name of the campaign associated with the token.


Manage existing tokens

After creating tokens, you can reset a password or delete the token using the API.

Reset password

To reset a token password, make a POST request to /marketing/v3/transactional/smtp-tokens/{tokenId}/password-reset.

The response includes SmtpApiTokenView, which contains:

  • id: username to log into the HubSpot SMTP server.
  • createdBy: email address of the user that sent the token creation request.
  • emailCampaignId: identifier assigned to the campaign provided in the token creation request.
  • createdAt: timestamp generated when a token is created.
  • createContact: indicates whether a contact should be created for email recipients.
  • campaignName: the name of the campaign associated with the token.

Delete a token

To delete a single SMTP API token, make a DELETE request to  /marketing/v3/transactional/smtp-tokens/{tokenId}. 

The response does not include any content.


Log in to HubSpot's SMTP server

Below are the details for logging in to HubSpot's SMTP server, using the username (id) and password provided by your token.

  • SMTP Hostname:
    • If you're not based in the EU, use smtp.hubapi.com for the hostname.
    • If you're based in the EU, use smtp-eu1.hubapi.com for the hostname.
  • SMTP Port:
    • For STARTTLS, you can use port 25 or 587.
    • For direct TLS, use port 465.
  • SMTP User Name: provided in the ID field
  • SMTP Password: provided in the password field


Single-send API

The Single-Send API sends template emails created in the HubSpot email tool using a JSON-formatted POST request. Any emails sent through this API will be automatically associated with contact records based on email address. If there's no contact with a matching email address, a new contact with that email will be created. If you want to send emails without creating contacts, use the SMTP API.

Create and publish your email template

The Single-Send API sends template emails created in the HubSpot email tool using a JSON-formatted POST request. Any emails sent through this API will be automatically associated with contact records based on email address. If there's no contact with a matching email address, a new contact with that email will be created. If you want to send emails without creating contacts, use the SMTP API.

First, set up your email in HubSpot. After you create the email, you can set the recipient details, including any contact or custom properties set up in the email template, in the body of the API request. Before you can make the API request, you'll need the ID of the email:

  • If you leave the email drafted without publishing it, you can get the email ID from the URL when you're in the email editor. The ID is the final numeric value before the final slash character (/) in the URL (e.g., https://app.hubspot.com/email/{PORTAL_ID}/edit/{EMAIL_ID}/settings).

email-id-for-drafted-single-send-api-email

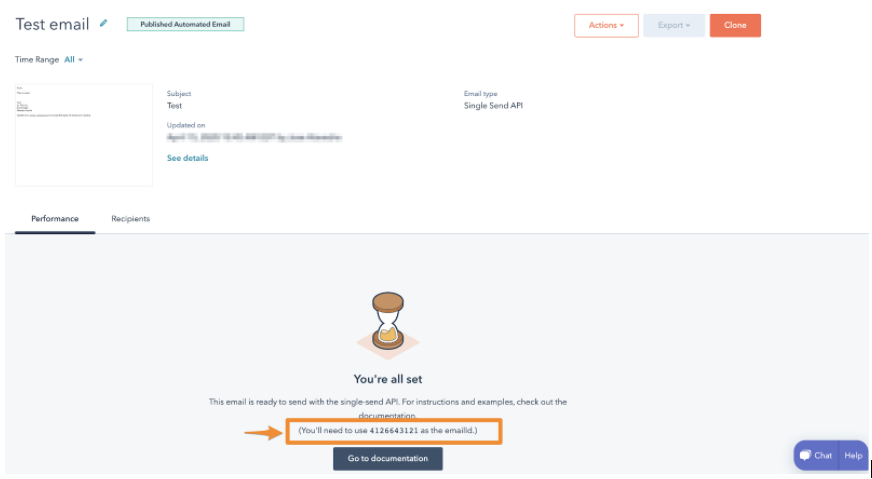
  • If you publish your email, you can copy the email ID from the email details page.

Screen Shot 2020-04-15 at 1.00.37 PM

Please note: HubSpot does not save the HTML/JSON sent through this API. You can review the email template from the recipient contact's timeline, but if you want to keep a record of the email's contents, it's recommended to add a BCC to the email.

Send your email using the single-send API

To send an email with the Single-Send API, make a POST request to /marketing/v3/transactional/single-email/send.

The response contains the following fields:

    • requestedAt: the timestamp of when the send was requested.
  • status: the status of the send request. Includes PENDING, PROCESSING, CANCELED, and COMPLETE.

Request properties

The request body must be a JSON-formatted object with the following properties:

  • emailId
  • message
  • contactProperties
  • customProperties

emailId

The emailId field contains the transactional email's content ID, which can be found in HubSpot's email tool.

message

The message field is a JSON object containing anything that you want to override. At the minimum, you must include the to field.

Message object fields:

  • to: the recipient of the email
  • from: the "From" header for the email. You can define a from name with the following format: "from":"Sender Name <sender@hubspot.com>"
  • sendId: the ID of a particular send. Only one email with a given sendId will be sent per account, so you can include this field to prevent duplicate email sends.
  • replyTo:  a JSON list of "Reply-To" header values for the email.
  • cc: a JSON list of email addresses to send as Cc.
  • bcc: a JSON list of email addresses to send as Bcc.

contactProperties

The contactProperties field is a JSON map of contact property values. Each contact property value contains a name and value. Each property will be set on the contact record and will be visible in the template under:

name-token-in-template-for-transactional-email

Use these properties when you want to set a contact property while you’re sending the email. For example, when sending a receipt you may want to set a last_paid_date property, as the sending of the receipt will have information about the last payment.

{ "emailId": 4126643121, "message": { "to": "jdoe@hubspot.com" "sendId": "6" }, "contactProperties": { "last_paid_date": "2022-03-01", "firstname": "jane" } }

customProperties

The customProperties field is a JSON map of key-value properties. These properties are generally related to the email itself, not the contact receiving the email. They will not appear in the web page version of the email, or in the view of the email from the contact's timeline. These properties are also not stored in HubSpot and will only be included in the sent email.

Each key in the customProperties field can be referenced in the template using a HubL expression for fields contained within the custom variable (e.g., {{custom.NAME_OF_PROPERTY}} ).

For example, if your email template references two properties, purchaseUrl and productName, you could provide the associated values for these properties with the following request body:

{ "emailId": 4126643121, "message": { "to": "jdoe@hubspot.com" "sendId": "6" }, "customProperties": { "purchaseUrl": "https://example.com/link-to-product", "productName": "vanilla" } }

You can then reference these properties in your email template:

<!doctype html> <html> <p> Congrats on purchasing some of the best ice cream around. </p> <a href={{custom.purchaseUrl}}>{{custom.productName}}</a> </html>

The customProperties field only supports arrays when used with programmable email content. In your email template, you can reference the items defined in your customProperties field by using a HubL expression (e.g., using a for loop to render each item in a list). For example, if the customProperties you included in your request body was structured like the following JSON snippet below:

{ "emailId": 4126643122, "message": { "to": "jdoe@hubspot.com" "sendId": "7" }, "customProperties": { "exampleArray": [ {"firstKey": "someValue", "secondKey": "anotherValue"}, {"firstKey": "value1", "secondKey": "value2" } ] } }

You could then reference the values for each item in exampleArray with the following HubL code:

<!doctype html> <html> <p> Thanks for your recent purchase! Here are the details of the items you'll be receiving: </p> <ul> {% for item in custom.exampleArray %} <li>First key: {{ item.firstKey }}, Second key: {{item.secondKey}}</li> {% endfor %} </ul> </html>

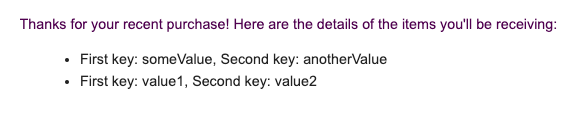
Once sent, the transactional email would render the contents of the associated programmable email template as follows:

example-transactional-email-with-customProperties-array

Query the status of an email send

To get the status of the email send, make a GET request to https://api.hubapi.com/marketing/v3/email/send-statuses/{statusId}

The response contains the following fields:

    • sendResult: an enumeration that represents the email's send status. The possible values are listed below.
    • requestedAt: the timestamp from when the send was requested.
  • startedAt: the timestamp when the send began processing.
  • completedAt: the timestamp when the send completed.
  • statusId: an identifier that can be used to query the status of the send.
  • status: the status of the send request. Includes PENDING, PROCESSING, CANCELED, and COMPLETE.
  • eventId: if sent, the ID and created timestamp of the sent event.

sendResult

The sendResult is an enumeration that reflects the result of an email send attempt. Its possible values are:

  • SENT: the email was sent successfully.
  • QUEUED: the email was queued and will send as the queue gets processed.
  • PORTAL_SUSPENDED: due to Acceptable Use Policy violations, the HubSpot customer's email has been suspended.
  • INVALID_TO_ADDRESS: the recipient address is invalid. This error will also occur if you attempt to send an email with any of the following role-based prefixes in the email address: abuse, no-reply, noreply, root, spam, security, undisclosed-recipients, unsubscribe, inoc, postmaster, or privacy.
  • BLOCKED_DOMAIN: the domain cannot receive emails from HubSpot at this time.
  • PREVIOUSLY_BOUNCED: the recipient has previously bounced, and the sending logic resulted in no send.
  • PREVIOUS_SPAM: the recipient has previously marked similar email as spam.
  • INVALID_FROM_ADDRESS: the From address is invalid.
  • MISSING_CONTENT: the emailId is invalid, or the emailId corresponds to an email that wasn't set up for Single-Send.
  • MISSING_TEMPLATE_PROPERTIES: there are properties set up in the template that have not been included in the customProperties sent in the request.

Was this article helpful?
This form is used for documentation feedback only. Learn how to get help with HubSpot.