Reference information for creating custom workflow actions.
Scope requirements
When setting up custom workflow actions for your workflows, you’ll need to define the action. Below, find reference information for setting up custom workflow actions, including functions, input fields, and more.You can also skip forward to the following sections:
Functions are snippets of code used to modify payloads before sending them to an API. You can also use functions to parse results from an API. HubSpot’s functions are backed by AWS Lambda. In the following code:
event: contains the data that is passed to the function
exports.main: the method that will be called when the function is run.
When setting up a function, the functionSource format will be in string. Ensure that the characters in the code have been escaped.Generally, the definition of a function will follow the format:
Input field definitions will adhere to the following format:
name: the internal name of the input field, separate from its label. The label displayed in the UI must be defined using the labels section of the custom action definition.
type: the type of value required by the input.
fieldType: how the input field should be rendered in the UI. Input fields mimic CRM properties, learn more about valid type and fieldType combinations
supportedValueTypes have two valid values:
OBJECT_PROPERTY: the user can select a property from the enrolled object or an output from a previous action to use as the value of the field.
STATIC_VALUE: this should be used in all other cases. It denotes that the user must enter a value themselves.
isRequired: this determines whether the user must give a value for this input or not
Input field definitions should be formatted as follows:
Instead of hard coding field options, you can also fetch external data with external data fields. For example, you can retrieve a list of meeting projects or a list of products to serve as inputs.
Please note:To pass input data to other inputs, you must define their relationship using inputFieldDependencies. Learn more about defining your custom action.
The workflow object type the action is being used in.
inputFieldName
The input field you’re fetching options for.
inputFields
The values for the fields that have already been filled out by the workflow user.
q
The search query provided by the user. This should be used to filter the returned options. This will only be included if the previous option fetch returned searchable: true and the user has entered a search query.
after
The pagination cursor. This will be the same pagination cursor that was returned by the previous option fetch; it can be used to keep track of which options have already been fetched.
The expected response should be formatted as follows:
When true, the workflows app will render a search field to allow a user to filter the available options by a search query. When a search query is entered, options will be re-fetched with that search term in the request payload under fetchOptions.q.
Default:false.
after
The pagination cursor. If this is provided, the workflows app will render a button to load more results at the bottom of the list of options when a user is selecting an option, and when the next page is loaded this value will be included in the request payload under fetchOptions.after.
In the code above, note that there’s pagination being set to limit the number of returned options. This instructs the workflow that more options can be loaded.In addition, the list of options is made searchable by including searchable:true.
When included, this function will apply to each input field. You can apply it to a specific input field by specifying an id in the function definition.
The workflow object type the action is being used in.
inputFieldName
The input field you’re fetching options for.
inputFields
The values for the fields that have already been filled out by the workflow user.
q
The search query provided by the user. This should be used to filter the returned options. This will only be included if the previous option fetch returned searchable: true and the user has entered a search query.
after
The pagination cursor. This will be the same pagination cursor that was returned by the previous option fetch; it can be used to keep track of which options have already been fetched.
To parse the response into an expected format, per the external data fields, use a POST_FETCH_OPTIONS function. The definition for a POST_FETCH_OPTIONS function is the same as a PRE_FETCH_OPTIONS function. When external data fetch options are defined, a dropdown menu will be rendered in the input options for the action.
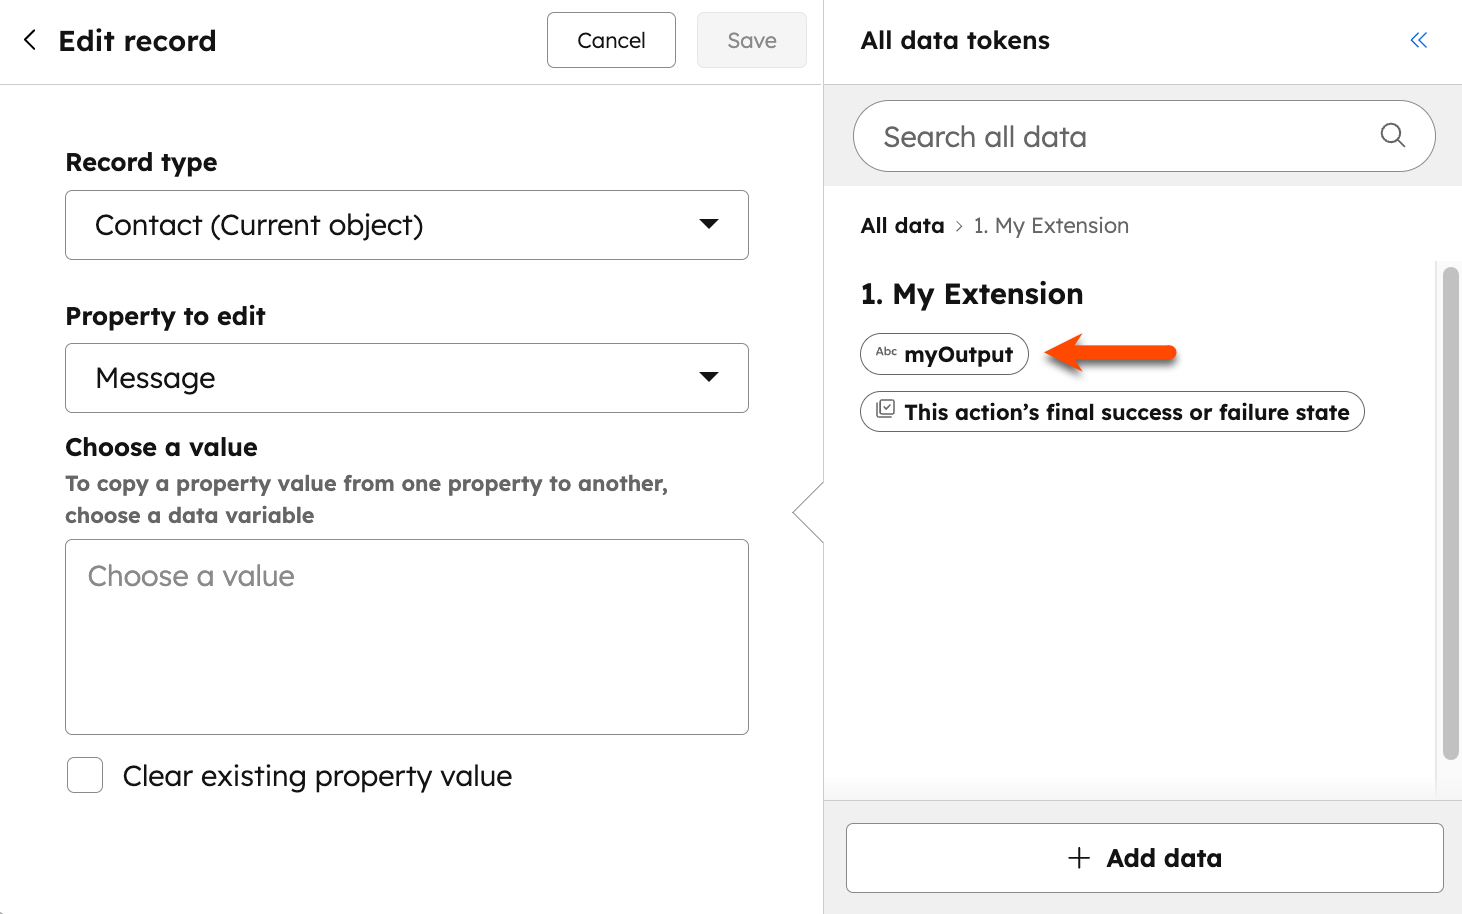
Use output fields to configure output values from your custom action to use in other actions. The definition for output fields is similar to the definition for input fields:
name: how this field is referenced in other parts of the custom action. The label displayed in the UI must be defined using the `labels` section of the custom action
type: the type of value required by the input.
fieldType: is how the input field should be rendered in the UI. Input fields mimic CRM properties, learn more about valid type and fieldType combinations
When using an output field, values are parsed from the response from the actionURL. For example, you can use the Edit record workflow action to copy output fields to an existing property in HubSpot.
Use labels to add text to your outputs or inputs in the workflow editor. Labels are loaded into HubSpot’s language service and may take a few minutes to display. Accounts set to different regions or languages will display the label in the corresponding language, if available.
labels: copy describing what the action’s fields represent and what the action does. English labels are required, but labels can be specified in any of the following supported languages as well: French (fr), German (de), Japanese (ja), Spanish (es), Brazilian Portuguese (pt-br), and Dutch (nl).
actionName: the action’s name shown in the Choose an action panel in the workflow editor.
actionDescription: a detailed description for the action shown when the user is configuring the custom action.
actionCardContent: a summarized description shown in the action’s card.
appDisplayName: The name of the section in the Choose an action panel where all the actions for the app are displayed. If appDisplayName is defined for multiple actions, the first one found is used.
inputFieldLabels: an object that maps the definitions from inputFields to the corresponding labels the user will see when configuring the action.
outputFieldLabels: an object that maps the definitions from outputFields to the corresponding labels shown in the workflows tool.
inputFieldDescriptions: an object that maps the definitions from inputFields to the descriptions below the corresponding labels.
executionRules: an object that maps the definitions from your executionRules to messages that will be shown for action execution results on the workflow history. Learn more about execution rules.
Label definitions should be formatted as follows:
{ "labels": { "en": { "actionName": "Create Widget", "actionDescription": "This action will create a new widget in our system. So cool!", "actionCardContent": "Create widget {{widgetName}}", "appDisplayName": "My App Display Name", "inputFieldLabels": { "widgetName": "Widget Name", "widgetOwner": "Widget Owner" }, "outputFieldLabels": { "outputOne": "First Output" }, "inputFieldDescriptions": { "widgetName": "Enter the full widget name. I support <a href=\"https://hubspot.com\">links</a> too." }, "executionRules": { "alreadyExists": "The widget with name {{ widgetName }} already exists" } } }}
outputFields: the values of the output fields defined earlier. These values can be used in later actions.
hs_execution_state: an optional special value that can added to outputFields. It is not possible to specify a retry, only the following values can be added:
SUCCESS
FAIL_CONTINUE
BLOCK
ASYNC
SUCCESS and FAIL_CONTINUE indicate that the action has completed and the workflow should move on to the next action to execute. If no execution state is specified, status codes will be used to determine the result of an action:
2xx status codes: the action has completed successfully.
4xx status codes: the action has failed. The exception is 429 Rate Limited status codes, which are re-treated as retries, and the Retry-After header is respected.
5xx status codes: there was a temporary problem with the service, and the action will be retried at a later time. An exponential backoff system is used for retries. Retries will continue for up to 3 days before failing.
Use custom actions to block workflow execution. Instead of executing the next action in the workflow after receiving a completed (2xx or 4xx status code) response from your service, the workflow will stop executing for a specific enrollment until a request is sent to continue.When blocking, you can specify a value for the hs_default_expiration field. After which, your custom action will be considered expired. The execution of the workflow will then resume. Actions following your custom action will be executed, even if the blocked action is not completed.To block a custom action, your action execution response must have the following format:
The final execution state. This is a required field. The valid values for this field are SUCCESS to indicate that your custom action completed successfully, and FAIL_CONTINUE to indicate that there is a problem with your custom action execution.
Specify rules on your action to determine which message displays on the workflow’s history page when the action executes.The rules will be matched against the output values from your action. These output values should be provided in the actionURL’s response body, in the following format:
The actual messages can be specified in the labels section of the custom action:
{ "labels": { "executionRules": { "alreadyExists": "The widget with name {{ widgetName }} already exists", "widgetWrongSize": "Wrong widget size", "widgetInvalidSize": "Invalid widget size" } }}
The executionRules will be tested in the order provided. If there are multiple matches, only the message from the first rule that matches is displayed to the user.The rule matches when the execution output corresponds to a specified value in the rule. For example, consider this set of executionRules:
[ { // This matches the key of a label on the action's `labels.LANGUAGE.executionRules` map "labelName": "alreadyExists", "conditions": { "errorCode": "ALREADY_EXISTS" } }, { "labelName": "widgetWrongSize", "conditions": { "errorCode": "WIDGET_SIZE", "sizeError": ["TOO_SMALL", "TOO_BIG"] } }, { "labelName": "widgetInvalidSize", "conditions": { "errorCode": "WIDGET_SIZE" } }]
With the above, the following matches would occur:
{"errorCode": "ALREADY_EXISTS", "widgetName": "Test widget"}: this would match the first rule, since errorCode is equal to ALREADY_EXISTS. In this instance, even though there is a widgetName output, it isn’t used in the rule definition so any value is allowed.
{"errorCode": "WIDGET_SIZE", "sizeError": "TOO_SMALL"}: this would match the second rule, since TOO_SMALL is one of the matching sizeErrors, and errorCode is WIDGET_SIZE.
{"errorCode": "WIDGET_SIZE", "sizeError": "NOT_A_NUMBER"}: this would match the third rule, since even though the errorCode is WIDGET_SIZE, the sizeError does not match any of the values specified by the second rule (TOO_SMALL or TOO_BIG).
This matching mechanism allows you to specify fallback errors, so that you can have specific errors for important errors, but fall back to more generic error messages for less common errors.
Last modified on March 31, 2026
Was this page helpful?
⌘I
Assistant
Responses are generated using AI and may contain mistakes.