> ## Documentation Index
> Fetch the complete documentation index at: https://developers.hubspot.com/docs/llms.txt
> Use this file to discover all available pages before exploring further.
---
id: 62b7e0d7-f678-4f05-9d94-b0ea85f45b02
---
# Workflows | Custom code actions
> Instructions for using custom code actions in workflows
If you have a ***Data Hub*** *Professional* or *Enterprise* account, use the *Custom code* action in workflows to write and execute JavaScript or Python (*beta*). With custom code actions, you can extend workflow functionality within and outside of HubSpot.
* Custom code actions support JavaScript using the [Node.js runtime framework](https://docs.aws.amazon.com/lambda/latest/dg/lambda-nodejs.html).
* If you're using Python for your custom code action, the custom code action will use the [Python runtime framework](https://docs.aws.amazon.com/lambda/latest/dg/lambda-python.html).
When an action executes, the runtime compute is managed through a serverless function by HubSpot and [AWS Lambda](https://aws.amazon.com/lambda/features/#:~:text=AWS%20Lambda%20is%20a%20serverless,scale%2C%20performance%2C%20and%20security.).
If you encounter any general issues implementing your custom code action, reach out to [HubSpot support](https://knowledge.hubspot.com/help-and-resources/get-help-with-hubspot). However, if you're facing any issues with your written custom code, it's recommended to search and post on the [HubSpot Developer's Forum](https://community.hubspot.com/t5/HubSpot-Developers/ct-p/developers) to get help with troubleshooting your code.
## Custom code action examples
To see examples of custom code actions, review [HubSpot's Programmable Automation Use Cases Library](https://www.hubspot.com/data-hub-use-cases). Some examples include, but are not limited to:
* Weighted lead rotation with custom weights
* Formatting international phone numbers
* Archiving or deleting contacts
* Deduplicating contacts
* Completing all tasks for a closed deal
## Supported libraries
### Node.js supported libraries
If you're using Node.js, the following libraries are available for use within the code action. These libraries can be loaded using the normal `require()` function at the top of your code.
* `@hubspot/api-client`: `^10`
* `async`: `^3.2.0`
* `aws-sdk`: `^2.744.0`
* `axios`: `^1.2.0`
* `lodash`: `^4.17.20`
* `mongoose`: `^6.8.0`
* `mysql`: `^2.18.1`
* `redis`: `^4.5.1`
* `request`: `^2.88.2`
* `bluebird`: `^3.7.2`
* `random-number-csprng`: `^1.0.2`
* `googleapis`: `^67.0.0`
**Please note:**
The v4 Associations API is supported in Version 9.0.0 or later of the Node.js HubSpot Client and in Version 8 of the Node.js HubSpot Client.
### Python supported libraries
If you're using Python, load the following libraries with an import statement at the top of your code. The import statement should be formatted as `from [libraryname] import [item]`, such as `from redis.client import redis`.
* `requests 2.28.2`
* `@hubspot/api-client ^8`
* `google-api-python-client 2.74.0`
* `mysql-connector-python 8.0.32`
* `redis 4.4.2`
* `nltk 3.8.1`
If you're using anything from the standard library, you can use `import`, such as `import os`.
## Add a custom code action to your workflow
You can add a custom code action to your workflow manually or by using Breeze Assistant. When adding [actions to your workflow with AI](https://knowledge.hubspot.com/workflows/use-ai-assistants-in-workflows#use-breeze-assistant-to-add-and-edit-workflow-actions), if Breeze Assistant is unable to identify an appropriate action, a custom code action may be automatically suggested.
### Add a custom code action using Breeze Assistant
You can use Breeze Assistant to create and add a custom code action to your workflow. For example, you can use the prompt: *I want to build a workflow that extracts the area code from the phone number of a contact and saves it to the Area Code custom property using a custom code action*.
* In your HubSpot account, navigate to **Automation** > **Workflows**.
* Click the **name** of a workflow, or [create a new workflow](https://knowledge.hubspot.com/workflows/create-workflows).
* In the workflow editor, click the **+** **plus** **icon**.
* In the left panel, in the *Build with AI* field, enter your your **prompt**.
* It is strongly recommended to include additional information in your prompt such as your preferred language, what object properties to use as inputs, and expected output data.
* If a preferred language is not specified, the generated code will default to JavaScript.
When reviewing your code, you can make updates using Breeze Assistant or directly in the code in the action panel. After adding your action with Breeze Assistant, you can add any required secrets such as API keys or tokens in the action editor. Breeze Assistant will reference secrets by name in the code but will not store or view the actual values.
You can also test the action against a sample record from Breeze Assistant via the initial prompt or a follow-up. Running a test through Breeze Assistant will execute the action against a real CRM record and can update the selected test record.
### Add a custom code action manually
You can add a custom code action to a workflow using AI or manually:
* In your HubSpot account, navigate to **Automation** > **Workflows**.
* Click the **name** of a workflow, or [create a new workflow](https://knowledge.hubspot.com/workflows/create-workflows).
* In the workflow editor, click the **+** **plus** **icon** to add a workflow action.
* In the left panel, search for and select **Custom code**.
## Set up your custom code action
After adding your custom code action, continue configuring your custom code action:
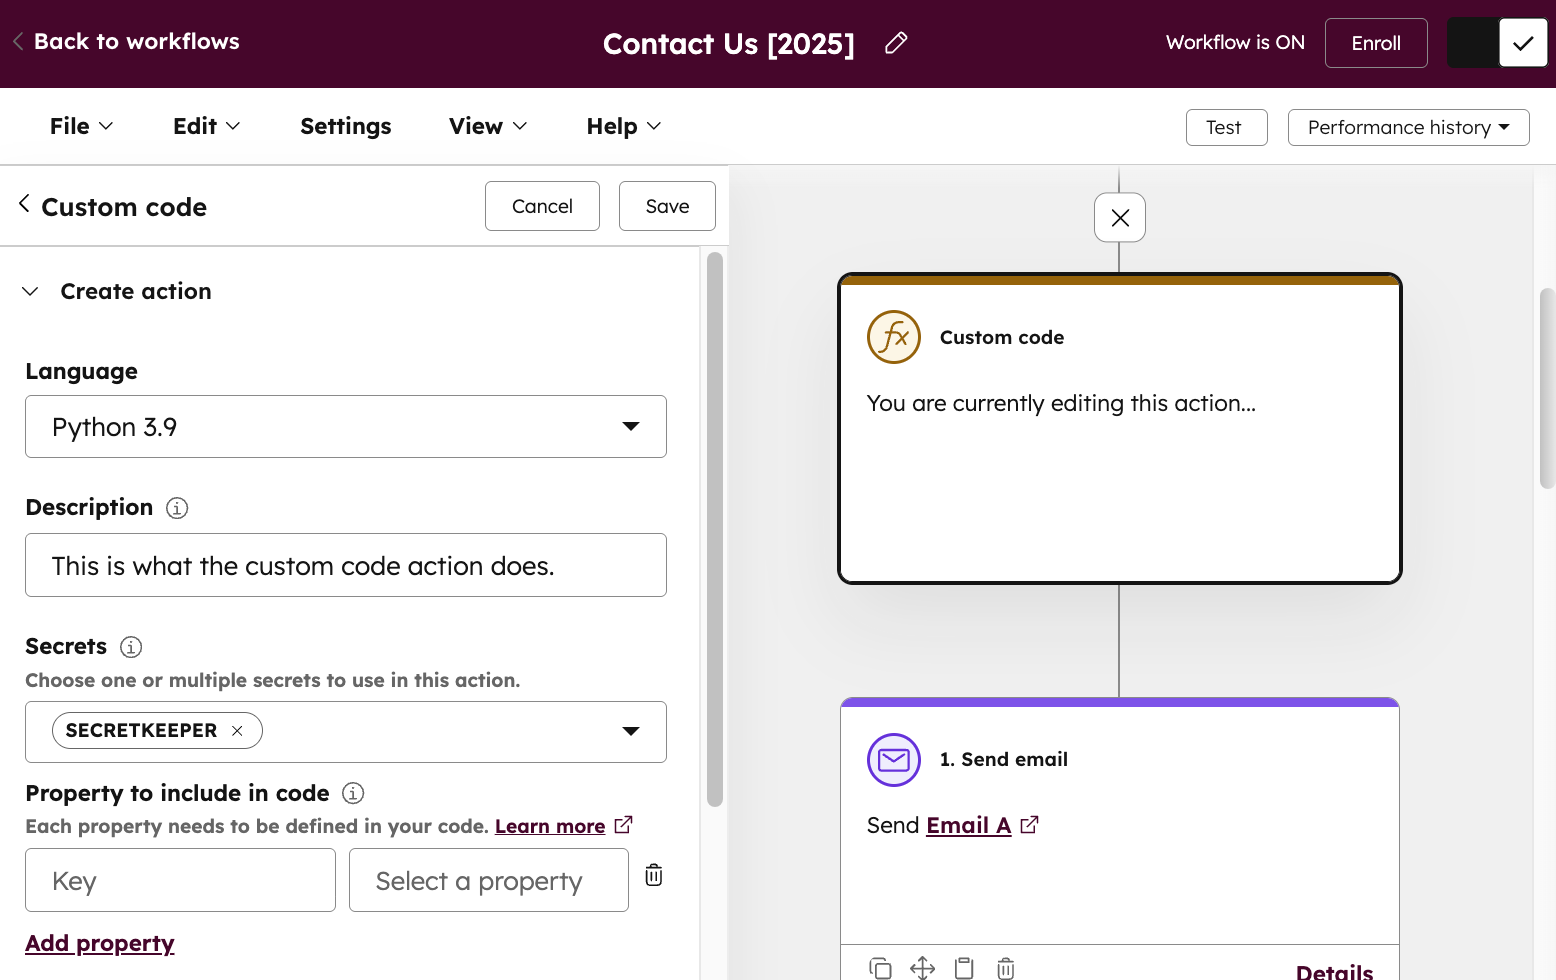
* **Language:** by default, custom code actions will use *Node.js*. If you’re in the Python beta and want to build your action with Python, click the **Language** dropdown menu, then select **Python**.
* **Description:** enter a description for your custom workflow action. This description will appear in the corresponding workflow action card.
* **Secret:** use a [secret](#secrets) with your custom code action, such as a [private app access token](/apps/legacy-apps/private-apps/overview). The app must include the respective scopes of any data that you're trying to pull from HubSpot, such as `contacts` or `forms`. Learn more about [HubSpot private apps](/apps/legacy-apps/private-apps/overview).
* To use an existing secret, click **Add secret**. Then, select the **checkbox** next to the secret that you'd like to add.
* To add a new secret, click **Add secret**. In the dialog box, enter the **Secret name** and **Secret value**. Then, click **Save**. You can now select this secret in future custom code actions.
* To edit or delete existing secrets, click **Manage secrets**.
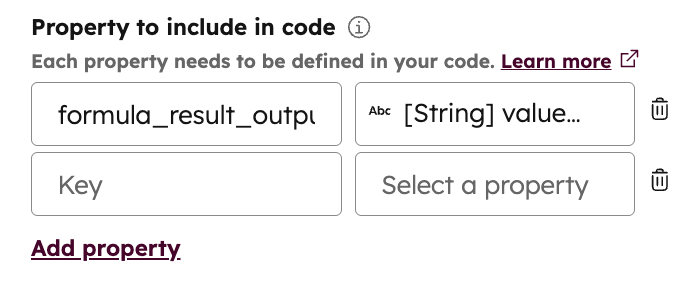
* **Properties to include in code:** to include [properties](#add-hubspot-properties) in your custom code:
* Click the **Select a property**, then select a **property** from the data panel. You can use existing properties or [previously formatted property values](https://knowledge.hubspot.com/workflows/format-your-data-with-workflows) in the workflow.
* After selecting your property, enter a Property **name** to use in your code. Learn how to [reference a property in your custom code](#add-hubspot-properties-to-your-custom-code).
* To add another property, click **Add property**. Each property can only be added once and must have a unique *Variable ID*. You can use up to 50 properties with your custom code.
* To delete a property, click the **delete** icon.
* **Code:** enter your JavaScript or Python. To see examples of custom code, review [HubSpot's Programmable Automation Use Cases Library](https://www.hubspot.com/data-hub-use-cases).
* **Data outputs:** define [data outputs](#data-outputs) that can be used as inputs later in the workflow, for example with an [*Edit records*](https://knowledge.hubspot.com/workflows/choose-your-workflow-actions#edit-records) action:
* Under *Data outputs*, click **Add output**.
* Click the **Data type** dropdown menu, and select a **type** of data.
* In the **Name** field, enter a name for the data output.
* To add multiple outputs, click **Add output**.
**Please note:**
The code field will not display lint errors when using Python.
 When building custom code actions, keep the following in mind:
* The `def main(event):` function is called when the code snippet action is executed.
* The event argument is an object containing details for the workflow execution.
* The `callback()` function is used to pass data back to the workflow. It should be called in the `exports.main` function. This can only be used with Node.js.
The `event` object will contain the following data:
```json theme={null}
//example payload
{
"origin": {
// Your portal ID
"portalId": 1, // Your custom action definition ID
"actionDefinitionId": 2
},
"object": {
// The type of CRM object that is enrolled in the workflow
"objectType": "CONTACT", // The ID of the CRM object that is enrolled in the workflow
"objectId": 4
},
// A unique ID for this execution.
"callbackId": "ap-123-456-7-8"
}
```
### Secrets
Use secrets in your code to reference information that shouldn't be widely shared. Typically, a means of authentication, such as a [private app access token](/apps/legacy-apps/private-apps/overview).
You can manage the secrets your function has access to directly in the workflow action definition.
* When using multiple secrets within a custom code, the total length of all secret values must not exceed 1000 characters.
* If you're using a test account, you must use OAuth or a private app token. Developer API keys will not work for test accounts, and will result in the following error: *Authentication credentials not found. This API supports OAuth 2.0 authentication...*
When building custom code actions, keep the following in mind:
* The `def main(event):` function is called when the code snippet action is executed.
* The event argument is an object containing details for the workflow execution.
* The `callback()` function is used to pass data back to the workflow. It should be called in the `exports.main` function. This can only be used with Node.js.
The `event` object will contain the following data:
```json theme={null}
//example payload
{
"origin": {
// Your portal ID
"portalId": 1, // Your custom action definition ID
"actionDefinitionId": 2
},
"object": {
// The type of CRM object that is enrolled in the workflow
"objectType": "CONTACT", // The ID of the CRM object that is enrolled in the workflow
"objectId": 4
},
// A unique ID for this execution.
"callbackId": "ap-123-456-7-8"
}
```
### Secrets
Use secrets in your code to reference information that shouldn't be widely shared. Typically, a means of authentication, such as a [private app access token](/apps/legacy-apps/private-apps/overview).
You can manage the secrets your function has access to directly in the workflow action definition.
* When using multiple secrets within a custom code, the total length of all secret values must not exceed 1000 characters.
* If you're using a test account, you must use OAuth or a private app token. Developer API keys will not work for test accounts, and will result in the following error: *Authentication credentials not found. This API supports OAuth 2.0 authentication...*
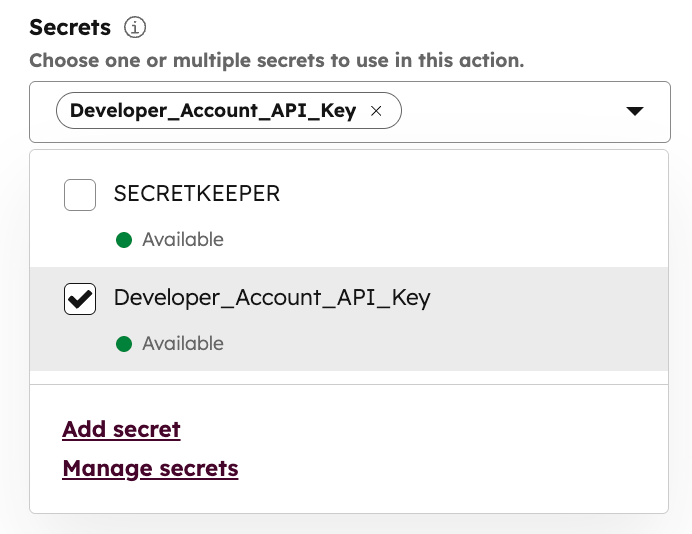 Once added, the secrets will be available as environment variables, which can be accessed in the custom code, as shown below:
```js theme={null}
const hubspot = require("@hubspot/api-client");
exports.main = (event, callback) => {
return callback(processEvent(event));
};
function processEvent(event) {
// secrets can be accessed via environment variables
const hubspotClient = new hubspot.Client({
accessToken: process.env.secretName,
});
hubspotClient.crm.contacts.basicApi
.getById(event["object"]["objectId"], ["email", "phone"])
.then(results => {
let email = results.body["properties"]["email"];
let phone = results.body["properties"]["phone"];
// ...
})
.catch(err => {
console.error(err);
});
}
```
### Add HubSpot properties
To fetch object properties in your custom code action, instead of using HubSpot's API, you can add these properties directly in the workflow action definition.
Add properties and set property names to reference properties in your code. Once added, the property can be referenced in the custom code. You can add up to 50 properties in each custom code action.
Once added, the secrets will be available as environment variables, which can be accessed in the custom code, as shown below:
```js theme={null}
const hubspot = require("@hubspot/api-client");
exports.main = (event, callback) => {
return callback(processEvent(event));
};
function processEvent(event) {
// secrets can be accessed via environment variables
const hubspotClient = new hubspot.Client({
accessToken: process.env.secretName,
});
hubspotClient.crm.contacts.basicApi
.getById(event["object"]["objectId"], ["email", "phone"])
.then(results => {
let email = results.body["properties"]["email"];
let phone = results.body["properties"]["phone"];
// ...
})
.catch(err => {
console.error(err);
});
}
```
### Add HubSpot properties
To fetch object properties in your custom code action, instead of using HubSpot's API, you can add these properties directly in the workflow action definition.
Add properties and set property names to reference properties in your code. Once added, the property can be referenced in the custom code. You can add up to 50 properties in each custom code action.
 ```javascript example.js theme={null}
const email = event.inputFields['email'];
```
```python example.py theme={null}
email = event.get('inputFields').get('email')
```
### Data outputs
In the function, define output fields to be used later in the workflow. Then, select the data output type (e.g., number, string, boolean, datetime, enum, date phone number) and input the field you want to output.
The output fields should be part of a json object formatted accordingly, depending on the language used:
```javascript example.js theme={null}
callback({
outputFields: {
email: email,
phone: phone,
},
});
```
```python example.py theme={null}
return {
"outputFields": {
"email": email,
"phone": phone
}
}
```
```javascript example.js theme={null}
const email = event.inputFields['email'];
```
```python example.py theme={null}
email = event.get('inputFields').get('email')
```
### Data outputs
In the function, define output fields to be used later in the workflow. Then, select the data output type (e.g., number, string, boolean, datetime, enum, date phone number) and input the field you want to output.
The output fields should be part of a json object formatted accordingly, depending on the language used:
```javascript example.js theme={null}
callback({
outputFields: {
email: email,
phone: phone,
},
});
```
```python example.py theme={null}
return {
"outputFields": {
"email": email,
"phone": phone
}
}
```
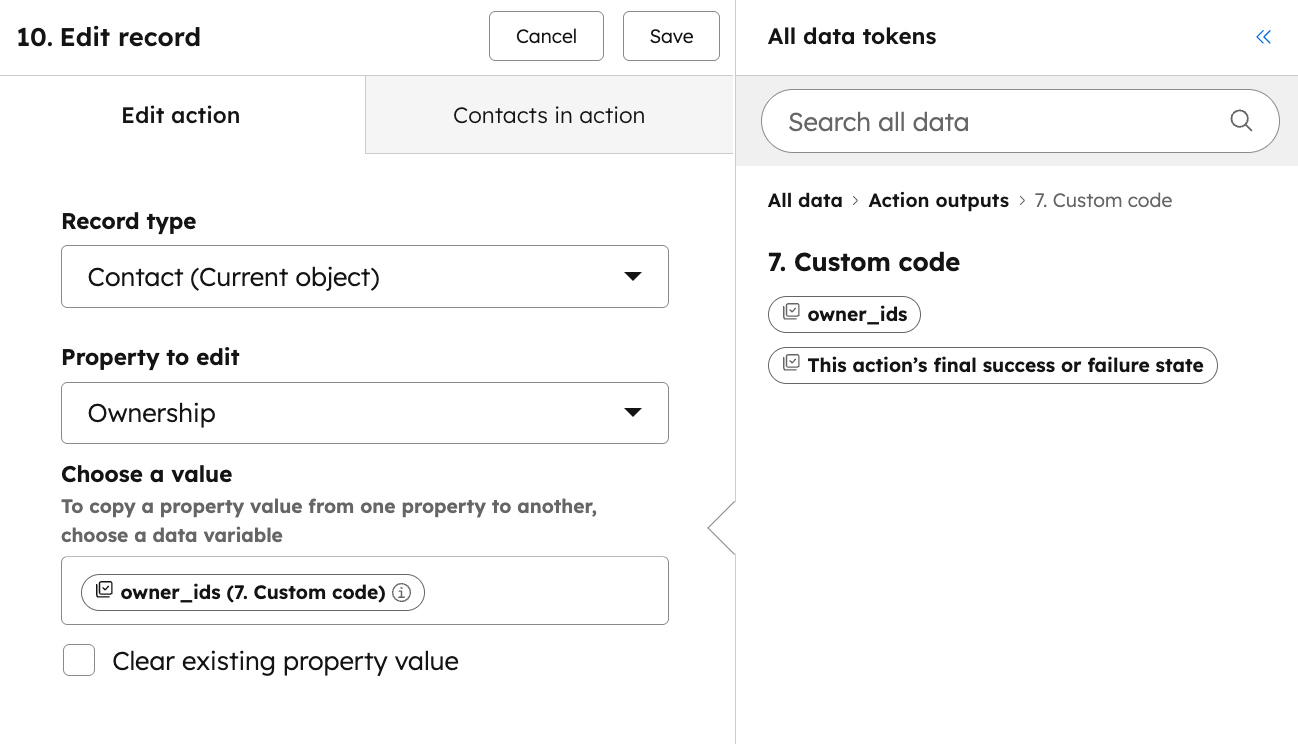
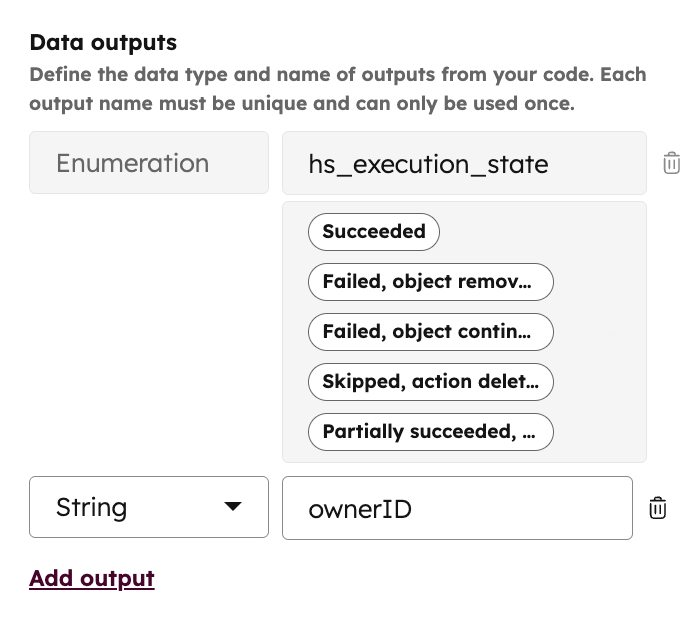 You can then use the output from your code action as an input to the *Edit records* action. This removes the need to make another API call to store the value as a property on your object.
Do take note of the following when defining your output:
* If your data output type is in string format, the limit for string output values is 65,000 characters. Exceeding this limit will result in an `OUTPUT_VALUES_TOO_LARGE` error.
* If you're using the *Edit records* action, take note of [compatible source and target properties](https://knowledge.hubspot.com/workflows/compatible-source-and-target-properties-for-copying-property-values-in-workflows).
* When updating date properties:
* If you're using an output to update a datetime property, the output will need to be in [UNIX millisecond format](https://developers.hubspot.com/docs).
* If you're using an output to update a date property instead of a datetime, the output will need to be in [UNIX millisecond format](https://developers.hubspot.com/docs) and the time on the date will need to be set to midnight UTC.
`currentDate.setUTCHours(0,0,0,0)`
You can then use the output from your code action as an input to the *Edit records* action. This removes the need to make another API call to store the value as a property on your object.
Do take note of the following when defining your output:
* If your data output type is in string format, the limit for string output values is 65,000 characters. Exceeding this limit will result in an `OUTPUT_VALUES_TOO_LARGE` error.
* If you're using the *Edit records* action, take note of [compatible source and target properties](https://knowledge.hubspot.com/workflows/compatible-source-and-target-properties-for-copying-property-values-in-workflows).
* When updating date properties:
* If you're using an output to update a datetime property, the output will need to be in [UNIX millisecond format](https://developers.hubspot.com/docs).
* If you're using an output to update a date property instead of a datetime, the output will need to be in [UNIX millisecond format](https://developers.hubspot.com/docs) and the time on the date will need to be set to midnight UTC.
`currentDate.setUTCHours(0,0,0,0)`
 ### Set a rate limit for your action
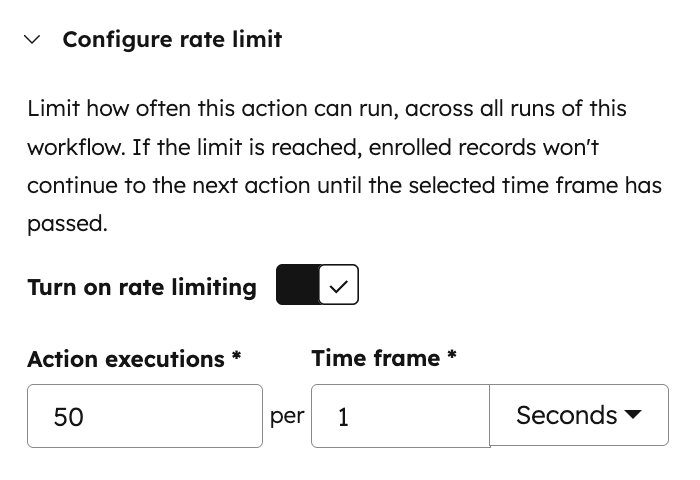
Set a rate limit to determine how often the custom code action should execute. The rate limit will also impact all following actions in the workflow after the custom code action.
* In the workflow editor, click the **custom code action**.
* At the bottom, click **Configure rate limit** to expand the rate limit section.
* Click to toggle the **Turn on rate limiting** switch on. By default, this setting is turned off.
* Set up your rate limit:
* **Action executions:** set the maximum number of executions per time period.
* **Time frame:** set the time frame for your rate limit. You can set this time frame to *Seconds*, *Minutes*, or *Hours*.
If your action is paused due to the rate limit, it will not execute and the following error will appear in the [workflow's action logs:](https://knowledge.hubspot.com/workflows/understand-your-workflow-details-page#action-logs) *This action has been paused to stay within the configured rate limit. It will resume on \[date and time].*
### Set a rate limit for your action
Set a rate limit to determine how often the custom code action should execute. The rate limit will also impact all following actions in the workflow after the custom code action.
* In the workflow editor, click the **custom code action**.
* At the bottom, click **Configure rate limit** to expand the rate limit section.
* Click to toggle the **Turn on rate limiting** switch on. By default, this setting is turned off.
* Set up your rate limit:
* **Action executions:** set the maximum number of executions per time period.
* **Time frame:** set the time frame for your rate limit. You can set this time frame to *Seconds*, *Minutes*, or *Hours*.
If your action is paused due to the rate limit, it will not execute and the following error will appear in the [workflow's action logs:](https://knowledge.hubspot.com/workflows/understand-your-workflow-details-page#action-logs) *This action has been paused to stay within the configured rate limit. It will resume on \[date and time].*
 ### Test the action
When adding a custom code action to a workflow, test the action to ensure that your code runs as expected before turning the workflow on. When testing a custom code action, you'll start by selecting a record to test the code with, then run the code.
This test will run only the code in your custom action, not any of the other actions in the workflow. When the code is finished running, you can view the code outputs and the log of your test.
**Please note:**
When testing your custom code, the code will run and any changes will apply to the selected test record. It's recommended to create a dedicated test record if you want to avoid updating your live records.
To test a custom code action:
* In the workflow editor, click the **custom code action**.
* At the bottom, click **Test action** to expand the testing section.
* Click the **Object** dropdown menu, then select a **record** to test your code with.
* If you're using [previously formatted property values](https://knowledge.hubspot.com/workflows/format-your-data-with-workflows) in the workflow, enter a **test value** for the formatted data.
### Test the action
When adding a custom code action to a workflow, test the action to ensure that your code runs as expected before turning the workflow on. When testing a custom code action, you'll start by selecting a record to test the code with, then run the code.
This test will run only the code in your custom action, not any of the other actions in the workflow. When the code is finished running, you can view the code outputs and the log of your test.
**Please note:**
When testing your custom code, the code will run and any changes will apply to the selected test record. It's recommended to create a dedicated test record if you want to avoid updating your live records.
To test a custom code action:
* In the workflow editor, click the **custom code action**.
* At the bottom, click **Test action** to expand the testing section.
* Click the **Object** dropdown menu, then select a **record** to test your code with.
* If you're using [previously formatted property values](https://knowledge.hubspot.com/workflows/format-your-data-with-workflows) in the workflow, enter a **test value** for the formatted data.
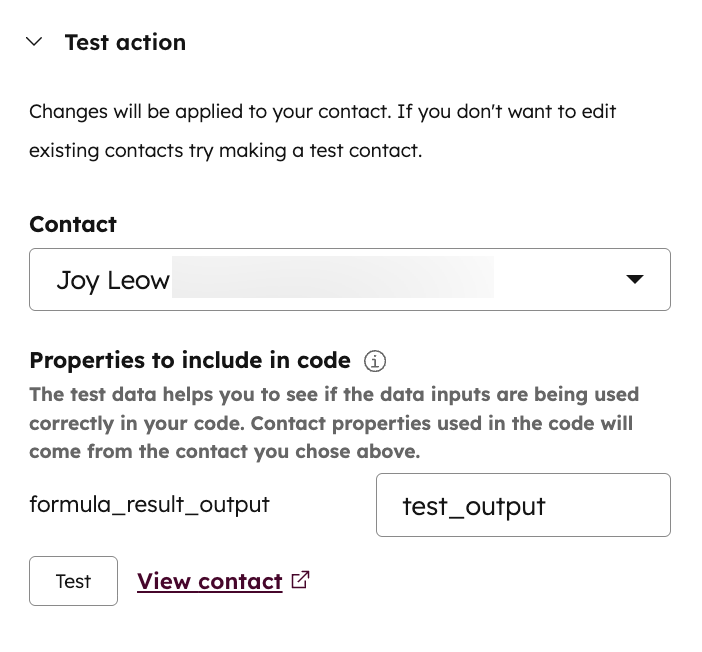 * To run the code, click **Test**.
* In the dialog box, confirm that you want to test your code against the selected record by clicking **Test**.
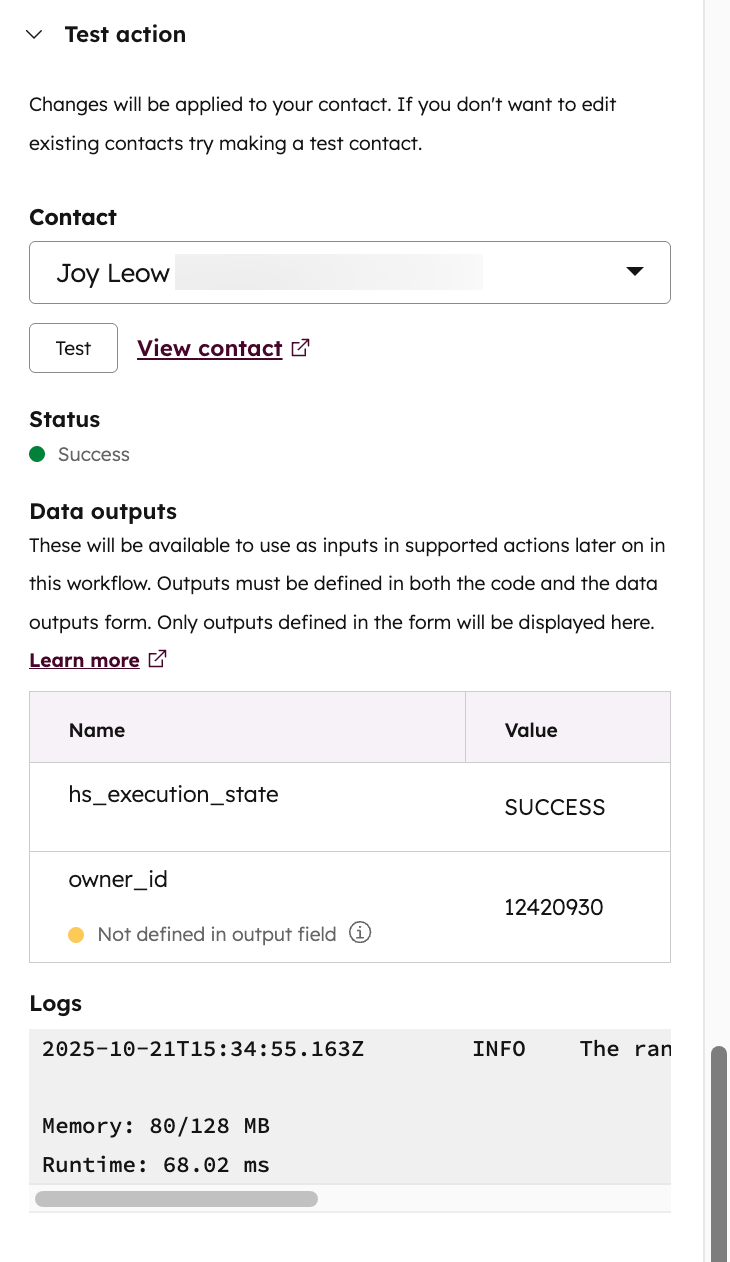
* Once your code is done running, the results of your test will appear:
* **Status:** the success or failure status of your custom code action.
* **Data outputs:** the values that resulted for your defined data outputs. An alert will display next to any outputs that the code generated which weren't defined either in the *Data outputs* section or in the code editor. You'll need to add those outputs in order to use them later in the workflow.
* **Logs:** information about the test itself, such as how much memory the action took to execute and the total runtime.
* After testing the action, click **Save**.
* To run the code, click **Test**.
* In the dialog box, confirm that you want to test your code against the selected record by clicking **Test**.
* Once your code is done running, the results of your test will appear:
* **Status:** the success or failure status of your custom code action.
* **Data outputs:** the values that resulted for your defined data outputs. An alert will display next to any outputs that the code generated which weren't defined either in the *Data outputs* section or in the code editor. You'll need to add those outputs in order to use them later in the workflow.
* **Logs:** information about the test itself, such as how much memory the action took to execute and the total runtime.
* After testing the action, click **Save**.
 ### Logging
After setting up your custom code action, and turning on the workflow, to see the output of the logs from your custom code action, learn how to review your workflow's [action logs](https://knowledge.hubspot.com/workflows/understand-your-workflow-details-page#action-logs).
## Custom code action execution details
### Limitations
Custom code actions must:
* Finish running within 20 seconds.
* Can only use up to 128 MB of memory.
* Use OAuth or a private app token, if you're using a test account. Developer API keys will not work for test accounts.
Exceeding these limits will result in an error.
### Retries
You may need to fetch object properties using the HubSpot API or to call other HubSpot API endpoints in your custom code action. Similar to other API calls, you must comply with [HubSpot's API rate limits](/developer-tooling/platform/usage-guidelines).
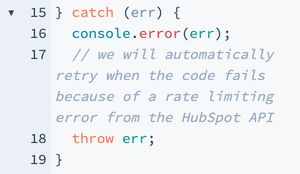
* If you're using Node.js and encounter a rate limiting error but you want HubSpot to retry your call, you'll need to throw the error in the `catch` block of your custom code action.
### Logging
After setting up your custom code action, and turning on the workflow, to see the output of the logs from your custom code action, learn how to review your workflow's [action logs](https://knowledge.hubspot.com/workflows/understand-your-workflow-details-page#action-logs).
## Custom code action execution details
### Limitations
Custom code actions must:
* Finish running within 20 seconds.
* Can only use up to 128 MB of memory.
* Use OAuth or a private app token, if you're using a test account. Developer API keys will not work for test accounts.
Exceeding these limits will result in an error.
### Retries
You may need to fetch object properties using the HubSpot API or to call other HubSpot API endpoints in your custom code action. Similar to other API calls, you must comply with [HubSpot's API rate limits](/developer-tooling/platform/usage-guidelines).
* If you're using Node.js and encounter a rate limiting error but you want HubSpot to retry your call, you'll need to throw the error in the `catch` block of your custom code action.
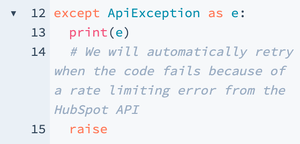
 * If you're using Python and encounter a rate limiting error but you want HubSpot to retry your call, you'll need to raise the error in the `except` block of your custom code action.
 **Please note:**
If the call fails due to a rate limiting error, or a 429 or 5XX error from [axios](https://www.npmjs.com/package/axios) or [@hubspot/api-client](https://www.npmjs.com/package/@hubspot/api-client), HubSpot will reattempt to execute your action for up to three days, starting one minute after failure. Subsequent failures will be retried at increasing intervals, with a maximum gap of eight hours between tries.
### Caveats
If you're using Node.js for your custom code, take note of the following:
* **Generating random numbers:** if you're using [Math.random](https://developer.mozilla.org/en-US/docs/Web/JavaScript/Reference/Global_Objects/Math/random) to generate random numbers, users may see the same numbers generated across different executions. This is because Math.random is seeded by the current time. Since HubSpot may enroll many objects into a workflow at the same time and clear the state on every execution, different executions end up seeding Math.random in the same way. Instead, you can use the [random-number-csprng 1.0.2](https://www.npmjs.com/package/random-number-csprng) library which guarantees cryptographically secure pseudo-random number generation.
* **Variable re-use:** to save memory, any variables declared outside the `exports.main` function may be re-used for future executions of the custom code action. This is useful when connecting to external services like a database, but any logic or information that needs to be unique to each execution of the custom code action should be inside the `exports.main` function.
If you're using Python for your custom code, take note of the following caveats:
* **Variable re-use:** similar to the above, any variables declared outside the `def main` function may be re-used for future executions of the custom code action.
* If you've declared a variable outside the `def main` function but do not plan on altering it, you can reference the variable directly.
* If you plan on altering a variable, you can declare the variable within the `def main` function with a global keyword before referencing it.
```python theme={null}
a = 1
def main(event):
global a
a += 1
```
## Code samples
Use the code samples below to begin using custom code workflow actions. Alternatively, review [HubSpot's Programmable Automation Use Cases Library](https://www.hubspot.com/data-hub-use-cases).
```js theme={null}
const hubspot = require('@hubspot/api-client');
exports.main = async (event, callback) => {
/*****
How to use secrets
Secrets are a way for you to save API keys or private apps and set them as a variable to use anywhere in your code
Each secret needs to be defined like the example below
*****/
const hubspotClient = new hubspot.Client({
accessToken: process.env.SECRET_NAME
});
let phone;
try {
const ApiResponse = await hubspotClient.crm.contacts.basicApi.getById(event.object.objectId, ["phone"]);
phone = ApiResponse.properties.phone;
} catch (err) {
console.error(err);
// We will automatically retry when the code fails because of a rate limiting error from the HubSpot API.
throw err;
}
/*****
How to use inputs
Inputs are a way for you to take data from any actions in your workflow and use it in your code instead of having to call the HubSpot API to get that same data.
Each input needs to be defined like the example below
*****/
const email = event.inputFields['email'];
/*****
How to use outputs
Outputs are a way for you to take data from your code and use it in later workflows actions
Use the callback function to return data that can be used in later actions.
Data won't be returned until after the event loop is empty, so any code after this will still execute.
*****/
callback({
outputFields: {
email: email,
phone: phone
}
});
}
// A sample event may look like:
{
"origin": {
// Your portal ID
"portalId": 1,
// Your custom action definition ID
"actionDefinitionId": 2,
},
"object": {
// The type of CRM object that is enrolled in the workflow
"objectType": "CONTACT",
// The ID of the CRM object that is enrolled in the workflow
"objectId": 4,
},
"inputFields": {
// The property name for defined inputs
},
// A unique ID for this execution
"callbackId": "ap-123-456-7-8"
}
```
```python theme={null}
import os
from hubspot import HubSpot
from hubspot.crm.contacts import ApiException
def main(event):
# How to use secrets
# Secrets are a way for you to save API keys or private apps and set them as a variable to use anywhere in your code
# Each secret needs to be defined like the example below
hubspot = HubSpot(access_token=os.getenv('SECRET_NAME'))
phone = '' try: ApiResponse = hubspot.crm.contacts.basic_api.get_by_id(event.get('object').get('objectId'), properties=["phone"]) phone = ApiResponse.properties.get('phone') except ApiException as e: print(e)
# We will automatically retry when the code fails because of a rate limiting error from the HubSpot API.
raise
# How to use inputs
# Inputs are a way for you to take data from any actions in your workflow and use it in your code instead of having to call the HubSpot API to get that same data.
# Each input needs to be defined like the example below
email = event.get('inputFields').get('email')
# How to use outputs
# Outputs are a way for you to take data from your code and use it in later workflows actions
# Use the callback function to return data that can be used in later actions.
# Data won't be returned until after the event loop is empty, so any code after this will still execute.
return { "outputFields": { "email": email, "phone": phone } }
# A sample event may look like:
# {
# "origin": {
# # Your portal ID
# "portalId": 1,
# # Your custom action definition ID
# "actionDefinitionId": 2,
# },
# "object": {
# # The type of CRM object that is enrolled in the workflow
# "objectType": "CONTACT",
# # The ID of the CRM object that is enrolled in the workflow
# "objectId": 4,
# },
# "inputFields": {
# # The property name for defined inputs
# },
# # A unique ID for this execution
# "callbackId": "ap-123-456-7-8"
# }
```
**Please note:**
If the call fails due to a rate limiting error, or a 429 or 5XX error from [axios](https://www.npmjs.com/package/axios) or [@hubspot/api-client](https://www.npmjs.com/package/@hubspot/api-client), HubSpot will reattempt to execute your action for up to three days, starting one minute after failure. Subsequent failures will be retried at increasing intervals, with a maximum gap of eight hours between tries.
### Caveats
If you're using Node.js for your custom code, take note of the following:
* **Generating random numbers:** if you're using [Math.random](https://developer.mozilla.org/en-US/docs/Web/JavaScript/Reference/Global_Objects/Math/random) to generate random numbers, users may see the same numbers generated across different executions. This is because Math.random is seeded by the current time. Since HubSpot may enroll many objects into a workflow at the same time and clear the state on every execution, different executions end up seeding Math.random in the same way. Instead, you can use the [random-number-csprng 1.0.2](https://www.npmjs.com/package/random-number-csprng) library which guarantees cryptographically secure pseudo-random number generation.
* **Variable re-use:** to save memory, any variables declared outside the `exports.main` function may be re-used for future executions of the custom code action. This is useful when connecting to external services like a database, but any logic or information that needs to be unique to each execution of the custom code action should be inside the `exports.main` function.
If you're using Python for your custom code, take note of the following caveats:
* **Variable re-use:** similar to the above, any variables declared outside the `def main` function may be re-used for future executions of the custom code action.
* If you've declared a variable outside the `def main` function but do not plan on altering it, you can reference the variable directly.
* If you plan on altering a variable, you can declare the variable within the `def main` function with a global keyword before referencing it.
```python theme={null}
a = 1
def main(event):
global a
a += 1
```
## Code samples
Use the code samples below to begin using custom code workflow actions. Alternatively, review [HubSpot's Programmable Automation Use Cases Library](https://www.hubspot.com/data-hub-use-cases).
```js theme={null}
const hubspot = require('@hubspot/api-client');
exports.main = async (event, callback) => {
/*****
How to use secrets
Secrets are a way for you to save API keys or private apps and set them as a variable to use anywhere in your code
Each secret needs to be defined like the example below
*****/
const hubspotClient = new hubspot.Client({
accessToken: process.env.SECRET_NAME
});
let phone;
try {
const ApiResponse = await hubspotClient.crm.contacts.basicApi.getById(event.object.objectId, ["phone"]);
phone = ApiResponse.properties.phone;
} catch (err) {
console.error(err);
// We will automatically retry when the code fails because of a rate limiting error from the HubSpot API.
throw err;
}
/*****
How to use inputs
Inputs are a way for you to take data from any actions in your workflow and use it in your code instead of having to call the HubSpot API to get that same data.
Each input needs to be defined like the example below
*****/
const email = event.inputFields['email'];
/*****
How to use outputs
Outputs are a way for you to take data from your code and use it in later workflows actions
Use the callback function to return data that can be used in later actions.
Data won't be returned until after the event loop is empty, so any code after this will still execute.
*****/
callback({
outputFields: {
email: email,
phone: phone
}
});
}
// A sample event may look like:
{
"origin": {
// Your portal ID
"portalId": 1,
// Your custom action definition ID
"actionDefinitionId": 2,
},
"object": {
// The type of CRM object that is enrolled in the workflow
"objectType": "CONTACT",
// The ID of the CRM object that is enrolled in the workflow
"objectId": 4,
},
"inputFields": {
// The property name for defined inputs
},
// A unique ID for this execution
"callbackId": "ap-123-456-7-8"
}
```
```python theme={null}
import os
from hubspot import HubSpot
from hubspot.crm.contacts import ApiException
def main(event):
# How to use secrets
# Secrets are a way for you to save API keys or private apps and set them as a variable to use anywhere in your code
# Each secret needs to be defined like the example below
hubspot = HubSpot(access_token=os.getenv('SECRET_NAME'))
phone = '' try: ApiResponse = hubspot.crm.contacts.basic_api.get_by_id(event.get('object').get('objectId'), properties=["phone"]) phone = ApiResponse.properties.get('phone') except ApiException as e: print(e)
# We will automatically retry when the code fails because of a rate limiting error from the HubSpot API.
raise
# How to use inputs
# Inputs are a way for you to take data from any actions in your workflow and use it in your code instead of having to call the HubSpot API to get that same data.
# Each input needs to be defined like the example below
email = event.get('inputFields').get('email')
# How to use outputs
# Outputs are a way for you to take data from your code and use it in later workflows actions
# Use the callback function to return data that can be used in later actions.
# Data won't be returned until after the event loop is empty, so any code after this will still execute.
return { "outputFields": { "email": email, "phone": phone } }
# A sample event may look like:
# {
# "origin": {
# # Your portal ID
# "portalId": 1,
# # Your custom action definition ID
# "actionDefinitionId": 2,
# },
# "object": {
# # The type of CRM object that is enrolled in the workflow
# "objectType": "CONTACT",
# # The ID of the CRM object that is enrolled in the workflow
# "objectId": 4,
# },
# "inputFields": {
# # The property name for defined inputs
# },
# # A unique ID for this execution
# "callbackId": "ap-123-456-7-8"
# }
```