> ## Documentation Index
> Fetch the complete documentation index at: https://developers.hubspot.com/docs/llms.txt
> Use this file to discover all available pages before exploring further.
---
id: 9340ff0f-b2ae-4168-ab71-579133c2aa37
---
# Feature flags
> Learn how to use the feature flags API to streamline migration from legacy CRM cards.
export const PostmanCard = ({title, collectionId}) => {
return ;
};
If you've built a [legacy public app](/apps/legacy-apps/public-apps/overview) that includes [legacy CRM cards](/api-reference/legacy/crm/extensions/crm-cards/guide), and you'd like to migrate your app to the latest version of the developer platform, you can leverage the feature flags API to provide a smooth migration experience for users who installed your app.
This functionality is mainly focused on legacy public apps that are already listed on the [HubSpot Marketplace](https://ecosystem.hubspot.com/marketplace/apps). If your app is not listed in the HubSpot Marketplace, you can begin creating new app cards after [migrating your app](/apps/developer-platform/build-apps/migrate-an-app/migrate-an-existing-public-app) without needing to set any feature flags on your account.
If you do want to selectively control which accounts can access your app's new cards, you can use the [feature flag API](#feature-flag-api-reference) to control each account's `flagState`.
## Migrate a public app to the developer projects framework
Using the CLI, you'll migrate an existing production public app to the projects framework. App features that are supported by projects, such as auth configuration and webhooks, will be included automatically in the migration.
### Prerequisites
This guide assumes that you meet the following criteria:
* You have an existing public app that has not yet been converted to the developer projects framework.
* You are ready to migrate your public app to the developer projects framework, enabling the creation of UI extensions for your app. If you want to start with a dry run of the migration, you can instead make a copy of your app in a project by running `hs project clone-app`.
* You have [set up your local environment for project development](/developer-tooling/local-development/hubspot-cli/install-the-cli) and set your developer account as the default in the CLI.
* To view your connected accounts, run `hs accounts list` in the terminal. The terminal will list all currently connected accounts, along with the default.
* If your developer account is connected but not the default, run `hs accounts use `.
### Migrate legacy public app to the projects framework
To begin migration, you'll switch your public app to be configured using projects. This process will preserve the original auth credentials, and all other existing app features, HubSpot Marketplace listings, and app installs. No changes are required in your app backend, and customers will not experience any interruptions in service.
* Ensure you've installed the latest version (v7.6.0 or greater) of the HubSpot CLI by running the following command:
```shell theme={null}
npm i -g @hubspot/cli@latest
```
* With your developer account connected to the CLI and set as the default, run the command below:
```shell theme={null}
hs project migrate-app
```
* Select the **public app** that you'd like to migrate. This will create a new project containing a single public app component that represents the current state of your app.
* Enter a **name** and **local path** for your project, then press **Enter**. The terminal will then display a message to outline the migration process and confirm your intention to convert the app.
* Press **Enter** to confirm that you're ready to proceed with migration.
* The migration process will then begin, and the terminal will display the migration status. The migration includes:
* Creating the project in your HubSpot account.
* Converting the project-supported features of the app to source code files, which you can use int he future to update feature configuration.
* Building and deploying the new project (Build #1), which completes the association between the public app and its project. This will preserve the original auth credentials, all app features, HubSpot Marketplace listing, and installs.
* Downloading the new project source files to the specified local directory.
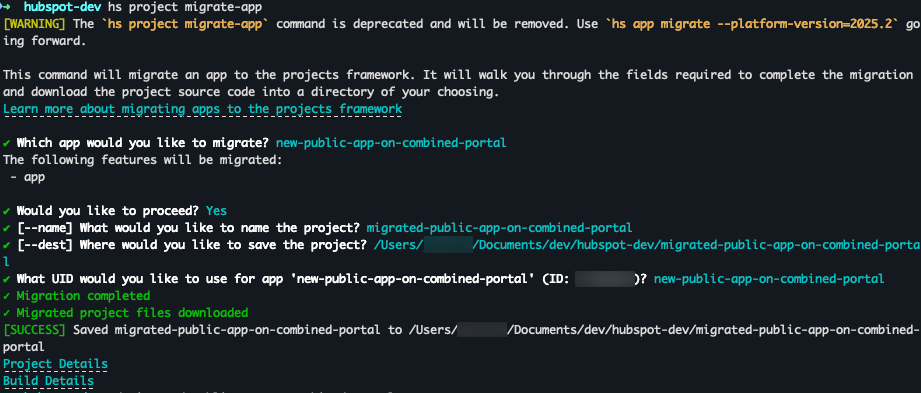 With build #1 succeeded, you'll now have captured your original app's configuration state. As you continue to build your app and UI extensions, you can always safely revert to this state by redeploying build #1 by running the `hs project deploy --buildId=1` command.
Before you can begin UI extension development and run a local development server, deploy the successful build by running `hs project deploy`.
```shell theme={null}
hs project deploy
```
After migration, features defined in the project source code will no longer be editable through HubSpot’s app management UI or developer APIs. You’ll instead need to manage those locally through the project using `hs project upload`. Other features, such as custom workflow actions or timeline events, can continue to be managed in the developer account app settings UI as before.
With the app successfully migrated, you can now update the public app with app cards. Learn more about creating app cards on the latest version of the developer platform [here](/apps/developer-platform/add-features/ui-extensions/extension-points/app-cards/overview).
## Workflow for HubSpot Marketplace apps
If your app is listed on the [HubSpot Marketplace](https://ecosystem.hubspot.com/marketplace/apps), your migrated app will automatically have a feature flag enabled that controls access to app cards in the accounts where the app is installed. You'll need to use the feature flag API to selectively enable accounts to use the new app cards. By default, app cards for listed public apps are restricted to a maximum of five accounts.
### Development workflow
To start developing new app cards without impacting production accounts, first [create a test account](/getting-started/account-types#developer-test-accounts) within your developer account if you haven't done so yet. Then, using your developer account's developer API key, set your test account's feature flag to `ON` by making a `POST` request to the [feature flag API](/api-reference/legacy/app-management/feature-flags/flags/update-feature-flag).
```shell theme={null}
curl -XPUT -s --json '{"flagState": "ON"}' 'https://api.hubapi.com/feature-flags/v3/{appId}/flags/hs-release-app-cards/portals/{portalId}?hapikey={developerApiKey}'
```
With your test account feature flag configured, you'll be able to view new app cards in HubSpot as you develop your UI extensions.
* Start the local development server by running the following command:
```shell theme={null}
hs project dev
```
* Select your developer test account, then press **Enter**. The terminal will update with a message displaying the status of the development server. You can press **q** at any time to end the server.
* When you're satisfied with your updates, upload your changes to your developer account.
```shell theme={null}
hs project upload
```
* When the build succeeds, deploy your changes by running the command below:
```shell theme={null}
hs project deploy
```
Alternatively, you can run both upload and deploy commands at the same time by running `hs project upload && hs project deploy`. You can also enable automatic deploy on successful build in the project's settings in your HubSpot account.
You can continue testing your app and its new cards in additional accounts by using the feature flag API to set the `flagState` to `ON`, as shown in the first step above. You can enable this flag for up to five accounts, including beta customers.
If at any point you want to start over, you can always safely revert the app by redeploying build #1 with the `hs project deploy --buildId=1` command.
Once you've sufficiently tested your updated app, you'll need to submit it for review by emailing the following required information to [app-card-review@hubspot.com](mailto:app-card-review@hubspot.com):
* Production app ID
* Build ID
* Hub ID of your developer account
* Hub ID of the test account where the app is installed
* Credentials or access to any third-party platform necessary to test the app card, if applicable
* Demo video or detailed instructions of how users will interact with the card (such as a quick [Loom](https://www.loom.com/))
* Additional context or details HubSpot might need that aren't covered by the above
After submitting your app for review, invite `app-card-review@hubspot.com` as a user to your test account where the app is installed. Grant this user all the permissions necessary to fully test your app cards (for simplicity, Super Admin is recommended). A member of the review team will then test your app card and provide feedback if changes are needed. You'll continue to work with [app-card-review@hubspot.com](mailto:app-card-review@hubspot.com) to address provided feedback until all additional app card criteria are met.
Once your app is approved, you can begin distributing it in the HubSpot Marketplace, and you will not need to resubmit it for approval when making future changes.
After receiving approval for unlimited distribution from the App Card marketplace review process, your app will be ready for distribution. Before proceeding with app distribution, it's recommended to consider the following:
* If your app previously included a legacy CRM card in the sidebar, consider [adding card update guidance](#add-card-update-guidance) so that users can seamlessly add your new cards and remove the old ones.
* It’s recommended to [gradually roll out your app card updates](#gradually-roll-out-your-app-cards) to catch any issues before distributing to the full install base. You can also [roll out to all installed accounts](#roll-out-to-all-accounts-simultaneously) at the same time.
* As your install base begins using your new app cards, you can [hide legacy CRM cards](#4.d-hiding-classic-crm-cards) from the onboarded accounts. The final step of migration is to delete the old cards from the app.
### Rollout strategies
#### Add card update guidance
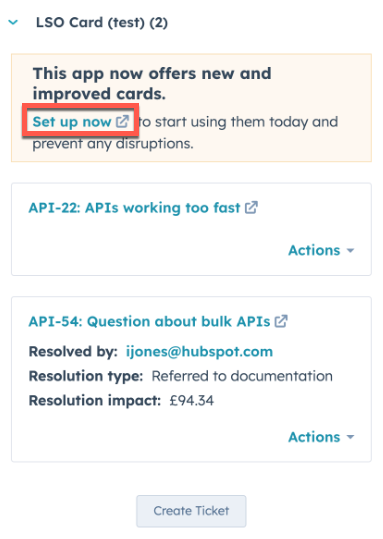
To help users migrate to your new cards, HubSpot includes a default update state that you can apply to your classic cards. This update includes messaging to indicate that the card has available updates.
For account admins, a link to the app's settings page will be included. Non-admin users will see similar messaging, but will be guided to contact their account admin to assist with setup.
| Admin view | Non-admin view |
| -------------------------------------------------------------------------------------------------------------------------------------------------------------------------------------------------- | ---------------------------------------------------------------------------------------------------------------------------------------------------------------------------------------------------------- |
|  |  |
To add this state to your classic cards, include `"showMigrationMessage": "true"` in the card's JSON response. This should be included at the top-level of the response.
```json theme={null}
response.status(200).send({"showMigrationMessage": "true", "results": [crmCardDetails]});
```
Alternatively, you can build your own custom update state by manually updating the card's JSON response directly, or even using the feature flag API for conditional responses.
With the default update state enabled for your classic cards, their content will be replaced, and you can walk through what the end-user experience will be for super admins who want to upgrade to your new cards:
* In the test account, navigate to a CRM record that contains your classic card.
* On the CRM record, locate the card, then click the **Set up now** link to navigate to the app settings page.
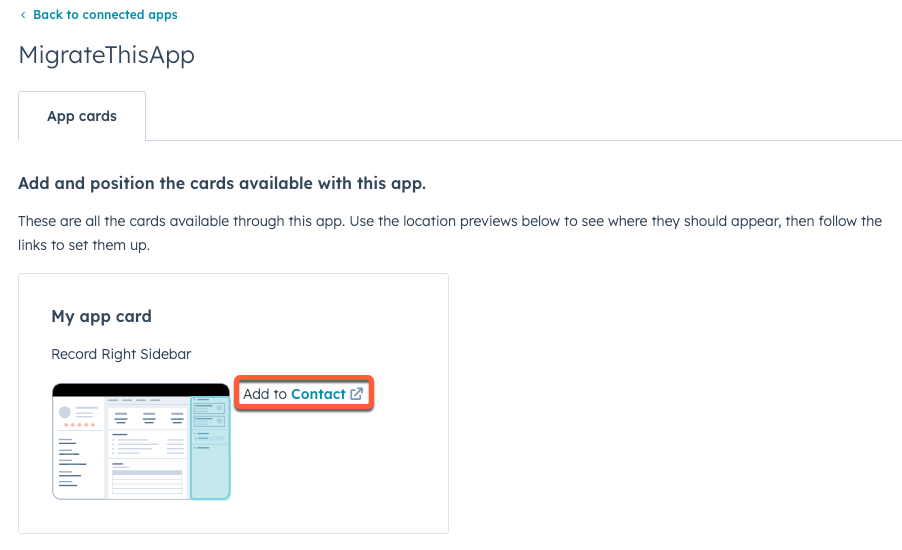
* The app settings page will display all available cards. Click the **link** provided for each card to navigate to the customization page for that object.
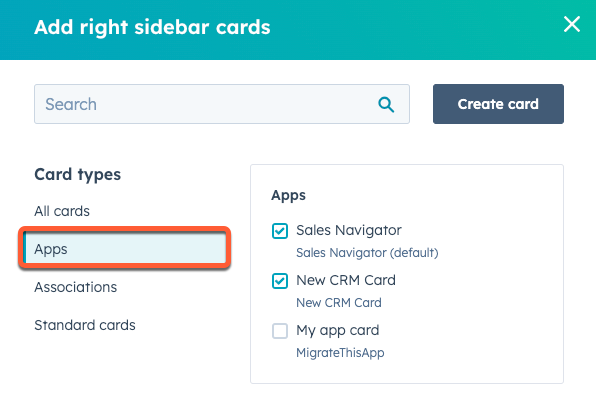
* Users can then proceed to customize their record pages as needed. They can find your new cards within the *Apps* section of the customization sidebar.
* After adding the new card, the old card can be removed by locating it in the view editor then clicking **Remove**. Alternatively, you can [hide the old card from the account](#4.d-hiding-classic-crm-cards) using the feature flag API.
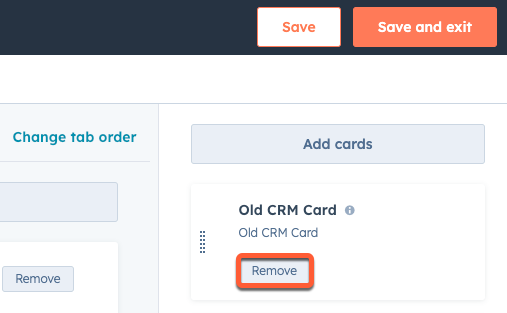
Learn more about the card updating user experience on [HubSpot's Knowledge Base](https://knowledge.hubspot.com/integrations/install-and-manage-app-cards).
#### Gradually roll out app cards
Using the feature flag API endpoints, you can gradually roll out your app in two ways:
* [Roll out app cards to new installs](#roll-out-to-new-installs)
* [Roll out app cards to a subset of accounts](#roll-out-to-a-subset-of-accounts)
##### Roll out to new installs
To roll out your app cards to new installs only, you'll use the feature flag API to turn off the `hs-release-app-cards` feature flag for all existing installs. Then, you'll switch the flag's state to `ON` so that new installs have the flag enabled by default.
**Please note:** the `hs-release-app-cards` flag will apply for all app cards included in the app. You cannot selectively release individual cards within an app.
* For the first request, set the `flagState` to `OFF` for all accounts that currently have the app installed. You'll need to gather the `portalId` for all existing installed accounts, then make a `POST` request to `https://api.hubapi.com/feature-flags/v3/{appId}/flags/hs-release-app-cards/portals/batch/upsert?hapikey={developerAPIKey}`.
```json theme={null}
{
"portalStates": [
{
"portalId": 1234,
"flagState": "OFF"
},
{
"portalId": 4567,
"flagState": "OFF"
},
{
"portalId": 78910,
"flagState": "OFF"
}
]
}
```
```shell theme={null}
curl --request POST \
--url 'https://api.hubapi.com/feature-flags/v3/0/flags/hs-release-app-cards/portals/batch/upsert?hapikey={developerAPIKey}' \
--header 'content-type: application/json' \
--data '{
"portalStates": [
{
"portalId": 1234,
"flagState": "OFF"
},
{
"portalId": 4567,
"flagState": "OFF"
},
{
"portalId": 78910,
"flagState": "OFF"
}
]
}'
```
* With existing app installs set to `OFF`, you can now set the `defaultState` to `ON`. To do so, make a `PUT` request to `https://api.hubapi.com/feature-flags/v3/{appId}/flags/hs-release-app-cards?hapikey={developerAPIKey}`
```json theme={null}
{
"defaultState": "ON"
}
```
```shell theme={null}
curl -- request PUT \
--url 'https://api.hubapi.com/feature-flags/v3/{appId}/flags/hs-release-app-cards?hapikey={developerAPIKey}' \
--header 'content-type: application/json' \
--data '{
"defaultState": "ON"
}'
```
* Once you feel confident in new customer adoption, you can begin to remove customer `portalIds` that you switched to the `OFF` state by making a `POST` request to `https://api.hubapi.com/feature-flags/v3/{appId}/flags/hs-release-app-cards/portals/batch/delete?hapikey={developerAPIKey}` with the account IDs you want to remove from the `OFF` list.
```json theme={null}
{
"portalIds": [1234, 4567, 78910]
}
```
```shell theme={null}
curl --request POST \
--url 'https://api.hubapi.com/feature-flags/v3/{appId}/flags/hs-release-app-cards/portals/batch/delete?hapikey={developerAPIKey}' \
--header 'content-type: application/json; \
--data '{
"portalIds": [
1234,
4567,
78910
]
}'
```
To check which accounts still have their flag set to `OFF`, you can make a `GET` request to `/feature-flags/v3/{appId}/flags/hs-release-app-cards/portals/{portalId}`. Learn more in the [feature flag API reference documentation](/api-reference/legacy/app-management/feature-flags/portal-flag-states/get-accounts-with-flag-state).
* When all previously added accounts have been deleted using the above endpoint, you'll have successfully completed the rollout and finished migration. At this point, you can safely delete your feature flag by making a `DELETE` request to `https://api.hubapi.com/feature-flags/v3/{appId}/flags/hs-release-app-cards?hapikey={developerAPIKey}`.
```shell theme={null}
curl --request DELETE \
--url 'https://api.hubapi.com/feature-flags/v3/{appId}/flags/hs-release-app-cards?hapikey={developerAPIKey}'
```
#### Roll out to a subset of accounts
Alternatively, rather than starting with new installs, you can selectively enable your app cards for a subset of accounts that have your app installed. To do so, you'll need to have a list of the account IDs for all existing public app installs. With that list, you can make a `POST` request to `https://api.hubapi.com/feature-flags/v3/{appId}/flags/hs-release-app-cards/portals/batch/upsert?hapikey={developerAPIKey}` and set their `flagState` to `ON`.
```json theme={null}
{
"portalStates": [
{
"portalId": 1234,
"flagState": "ON"
},
{
"portalId": 4567,
"flagState": "ON"
},
{
"portalId": 78910,
"flagState": "ON"
}
]
}
```
```shell theme={null}
curl --request POST \
--url 'https://api.hubapi.com/feature-flags/v3/{appId}/flags/hs-release-app-cards/portals/batch/upsert?hapikey={developerAPIKey}' \
--header 'content-type: application/json' \
--data '{
"portalStates": [
{
"portalId": 1234,
"flagState": "ON"
},
{
"portalId": 4567,
"flagState": "ON"
},
{
"portalId": 78910,
"flagState": "ON"
}
]
}'
```
You can continue making this request for subsets of accounts until all accounts have been migrated. Then, you can delete your feature flag by making a `DELETE` request to `https://api.hubapi.com/feature-flags/v3/{appId}/flags/hs-release-app-cards?hapikey={developerAPIKey}`.
```shell theme={null}
curl --request DELETE \
--url 'https://api.hubapi.com/feature-flags/v3/{appId}/flags/hs-release-app-cards?hapikey={developerAPIKey}'
```
#### Roll out to all accounts simultaneously
To release your app cards to all installed accounts simultaneously, delete the app's feature flag by making a `DELETE` request to `https://api.hubapi.com/feature-flags/v3/{appId}/flags/hs-release-app-cards?hapikey={developerAPIKey}`.
```shell theme={null}
curl --request DELETE \
--url 'https://api.hubapi.com/feature-flags/v3/{appId}/flags/hs-release-app-cards?hapikey={developerAPIKey}'
```
### Hiding legacy CRM cards
In addition to using the feature flags API to roll out app cards to your install base, you can also use it to facilitate the removal of legacy CRM cards by setting the `hs-hide-crm-cards` flag. For example, for existing installs, you may want to continue showing the old cards to remind users to upgrade to your new cards, but then hide them from new installs and accounts that have upgraded.
**Please note:** the `hs-hide-crm-cards` flag will apply for all legacy CRM cards included in the app. You cannot selectively hide individual legacy CRM cards within an app.
To use the `hs-hide-crm-cards` flag to manage legacy CRM card access:
* Make a `PUT` request to set your app's `defaultState` to `OFF`. This initializes the app flag and ensures that the app's legacy CRM cards will be visible in every existing and new installed account.
```json theme={null}
{
"defaultState": "OFF"
}
```
```shell theme={null}
curl --request PUT \
--url 'https://api.hubapi.com/feature-flags/v3/{appId}/flags/hs-hide-crm-cards?hapikey={developerAPIKey}' \
--header 'content-type: application/json' \
--data '{
"defaultState": "OFF"
}'
```
* Next, set the `flagState` to `OFF` for all accounts that currently have the app installed. In the request body, you'll provide a `portalId` for each account.
```json theme={null}
{
"portalStates": [
{
"portalId": 1234,
"flagState": "OFF"
},
{
"portalId": 4567,
"flagState": "OFF"
},
{
"portalId": 78910,
"flagState": "OFF"
}
]
}
```
```shell theme={null}
curl --request POST \
--url 'https://api.hubapi.com/feature-flags/v3/{appId}/flags/hs-hide-crm-cards/portals/batch/upsert?hapikey={developerAPIKey}' \
--header 'content-type: application/json' \
--data '{
"portalStates": [
{
"portalId": 1234,
"flagState": "OFF"
},
{
"portalId": 4567,
"flagState": "OFF"
},
{
"portalId": 78910,
"flagState": "OFF"
}
]
}'
```
* With existing app installs set to `OFF`, make another request to set the `defaultState` to `ON`. This prevents new installs from ever seeing the app's legacy CRM cards.
```shell theme={null}
curl --request PUT \
--url 'https://api.hubapi.com/feature-flags/v3/{appId}/flags/hs-hide-crm-cards?hapikey={developerAPIKey}'\
--header 'content-type: application/json' \
--data '{
"defaultState": "ON"
}'
```
* As you observe customers using the new app cards, such as receiving `hubspot.fetch()` calls from their accounts, you can remove them from the `hs-hide-crm-cards` flag list using the request below. Because you hid the legacy CRM cards from new installs, you'll only need to take this step for accounts you previously set to `OFF`.
```json theme={null}
{
"portalIds": [1234, 4567, 78910]
}
```
```shell theme={null}
curl --request POST \
--url 'https://api.hubapi.com/feature-flags/v3/{appId}/flags/hs-hide-crm-cards/portals/batch/delete?hapikey={developerAPIKey}'\
--header 'content-type: application/json' \
--data '{
"portalIds": [
1234,
4567,
78910
]
}'
```
* When all previously added accounts have been removed from the flag list, you can be sure that your entire install base can no longer access the old legacy CRM cards. At this point, you can navigate to the app's settings page in your developer account and [delete the legacy CRM cards](/api-reference/legacy/crm/extensions/crm-cards/guide#delete-a-crm-card).
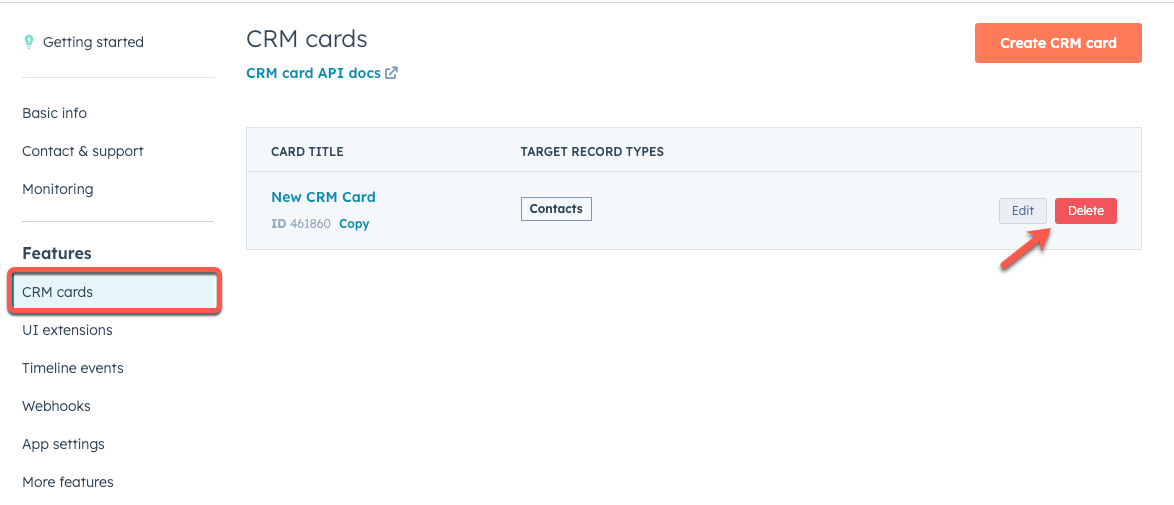
* Finally, make a request to delete the `hs-hide-crm-cards` flag from the app.
```shell theme={null}
curl --request DELETE \
--url 'https://api.hubapi.com/feature-flags/v3/{appId}/flags/hs-hide-crm-cards?hapikey={developerAPIKey}'
```
## Feature flag API reference
Use the feature flag API to control availability of your app cards in customer accounts. All endpoints are under the `https://api.hubapi.com/feature-flags/v3/{appId}` root path. The API currently supports a single App Flag: `hs-release-app-cards`. Attempts to specify other App Flags will receive an error.
View the feature flag API reference endpoint documentation:
* **App flag endpoints:**
* [Retrieve an app's feature flags](/api-reference/legacy/app-management/feature-flags/flags/get-feature-flag)
* [Retrieve accounts with a set flag state](/api-reference/legacy/app-management/feature-flags/portal-flag-states/get-accounts-with-flag-state)
* [Set an app's feature flag](/api-reference/legacy/app-management/feature-flags/flags/update-feature-flag)
* [Delete an app's feature flag](/api-reference/legacy/app-management/feature-flags/flags/delete-feature-flag)
* **Account flag state endpoints:**
* [Delete an account flag state](/api-reference/legacy/app-management/feature-flags/portal-flag-states/delete-portal-flag)
* [Retrieve account flag state](/api-reference/legacy/app-management/feature-flags/portal-flag-states/get-account-flag)
* [Batch delete account flag state](/api-reference/legacy/app-management/feature-flags/portal-flag-states/delete-portal-flag-batch)
* [Batch set account flag state](/api-reference/legacy/app-management/feature-flags/portal-flag-states/upsert-account-flag)
* [Set an account flag state](/api-reference/legacy/app-management/feature-flags/portal-flag-states/update-account-flag)
With build #1 succeeded, you'll now have captured your original app's configuration state. As you continue to build your app and UI extensions, you can always safely revert to this state by redeploying build #1 by running the `hs project deploy --buildId=1` command.
Before you can begin UI extension development and run a local development server, deploy the successful build by running `hs project deploy`.
```shell theme={null}
hs project deploy
```
After migration, features defined in the project source code will no longer be editable through HubSpot’s app management UI or developer APIs. You’ll instead need to manage those locally through the project using `hs project upload`. Other features, such as custom workflow actions or timeline events, can continue to be managed in the developer account app settings UI as before.
With the app successfully migrated, you can now update the public app with app cards. Learn more about creating app cards on the latest version of the developer platform [here](/apps/developer-platform/add-features/ui-extensions/extension-points/app-cards/overview).
## Workflow for HubSpot Marketplace apps
If your app is listed on the [HubSpot Marketplace](https://ecosystem.hubspot.com/marketplace/apps), your migrated app will automatically have a feature flag enabled that controls access to app cards in the accounts where the app is installed. You'll need to use the feature flag API to selectively enable accounts to use the new app cards. By default, app cards for listed public apps are restricted to a maximum of five accounts.
### Development workflow
To start developing new app cards without impacting production accounts, first [create a test account](/getting-started/account-types#developer-test-accounts) within your developer account if you haven't done so yet. Then, using your developer account's developer API key, set your test account's feature flag to `ON` by making a `POST` request to the [feature flag API](/api-reference/legacy/app-management/feature-flags/flags/update-feature-flag).
```shell theme={null}
curl -XPUT -s --json '{"flagState": "ON"}' 'https://api.hubapi.com/feature-flags/v3/{appId}/flags/hs-release-app-cards/portals/{portalId}?hapikey={developerApiKey}'
```
With your test account feature flag configured, you'll be able to view new app cards in HubSpot as you develop your UI extensions.
* Start the local development server by running the following command:
```shell theme={null}
hs project dev
```
* Select your developer test account, then press **Enter**. The terminal will update with a message displaying the status of the development server. You can press **q** at any time to end the server.
* When you're satisfied with your updates, upload your changes to your developer account.
```shell theme={null}
hs project upload
```
* When the build succeeds, deploy your changes by running the command below:
```shell theme={null}
hs project deploy
```
Alternatively, you can run both upload and deploy commands at the same time by running `hs project upload && hs project deploy`. You can also enable automatic deploy on successful build in the project's settings in your HubSpot account.
You can continue testing your app and its new cards in additional accounts by using the feature flag API to set the `flagState` to `ON`, as shown in the first step above. You can enable this flag for up to five accounts, including beta customers.
If at any point you want to start over, you can always safely revert the app by redeploying build #1 with the `hs project deploy --buildId=1` command.
Once you've sufficiently tested your updated app, you'll need to submit it for review by emailing the following required information to [app-card-review@hubspot.com](mailto:app-card-review@hubspot.com):
* Production app ID
* Build ID
* Hub ID of your developer account
* Hub ID of the test account where the app is installed
* Credentials or access to any third-party platform necessary to test the app card, if applicable
* Demo video or detailed instructions of how users will interact with the card (such as a quick [Loom](https://www.loom.com/))
* Additional context or details HubSpot might need that aren't covered by the above
After submitting your app for review, invite `app-card-review@hubspot.com` as a user to your test account where the app is installed. Grant this user all the permissions necessary to fully test your app cards (for simplicity, Super Admin is recommended). A member of the review team will then test your app card and provide feedback if changes are needed. You'll continue to work with [app-card-review@hubspot.com](mailto:app-card-review@hubspot.com) to address provided feedback until all additional app card criteria are met.
Once your app is approved, you can begin distributing it in the HubSpot Marketplace, and you will not need to resubmit it for approval when making future changes.
After receiving approval for unlimited distribution from the App Card marketplace review process, your app will be ready for distribution. Before proceeding with app distribution, it's recommended to consider the following:
* If your app previously included a legacy CRM card in the sidebar, consider [adding card update guidance](#add-card-update-guidance) so that users can seamlessly add your new cards and remove the old ones.
* It’s recommended to [gradually roll out your app card updates](#gradually-roll-out-your-app-cards) to catch any issues before distributing to the full install base. You can also [roll out to all installed accounts](#roll-out-to-all-accounts-simultaneously) at the same time.
* As your install base begins using your new app cards, you can [hide legacy CRM cards](#4.d-hiding-classic-crm-cards) from the onboarded accounts. The final step of migration is to delete the old cards from the app.
### Rollout strategies
#### Add card update guidance
To help users migrate to your new cards, HubSpot includes a default update state that you can apply to your classic cards. This update includes messaging to indicate that the card has available updates.
For account admins, a link to the app's settings page will be included. Non-admin users will see similar messaging, but will be guided to contact their account admin to assist with setup.
| Admin view | Non-admin view |
| -------------------------------------------------------------------------------------------------------------------------------------------------------------------------------------------------- | ---------------------------------------------------------------------------------------------------------------------------------------------------------------------------------------------------------- |
|  |  |
To add this state to your classic cards, include `"showMigrationMessage": "true"` in the card's JSON response. This should be included at the top-level of the response.
```json theme={null}
response.status(200).send({"showMigrationMessage": "true", "results": [crmCardDetails]});
```
Alternatively, you can build your own custom update state by manually updating the card's JSON response directly, or even using the feature flag API for conditional responses.
With the default update state enabled for your classic cards, their content will be replaced, and you can walk through what the end-user experience will be for super admins who want to upgrade to your new cards:
* In the test account, navigate to a CRM record that contains your classic card.
* On the CRM record, locate the card, then click the **Set up now** link to navigate to the app settings page.

* The app settings page will display all available cards. Click the **link** provided for each card to navigate to the customization page for that object.

* Users can then proceed to customize their record pages as needed. They can find your new cards within the *Apps* section of the customization sidebar.

* After adding the new card, the old card can be removed by locating it in the view editor then clicking **Remove**. Alternatively, you can [hide the old card from the account](#4.d-hiding-classic-crm-cards) using the feature flag API.

Learn more about the card updating user experience on [HubSpot's Knowledge Base](https://knowledge.hubspot.com/integrations/install-and-manage-app-cards).
#### Gradually roll out app cards
Using the feature flag API endpoints, you can gradually roll out your app in two ways:
* [Roll out app cards to new installs](#roll-out-to-new-installs)
* [Roll out app cards to a subset of accounts](#roll-out-to-a-subset-of-accounts)
##### Roll out to new installs
To roll out your app cards to new installs only, you'll use the feature flag API to turn off the `hs-release-app-cards` feature flag for all existing installs. Then, you'll switch the flag's state to `ON` so that new installs have the flag enabled by default.
**Please note:** the `hs-release-app-cards` flag will apply for all app cards included in the app. You cannot selectively release individual cards within an app.
* For the first request, set the `flagState` to `OFF` for all accounts that currently have the app installed. You'll need to gather the `portalId` for all existing installed accounts, then make a `POST` request to `https://api.hubapi.com/feature-flags/v3/{appId}/flags/hs-release-app-cards/portals/batch/upsert?hapikey={developerAPIKey}`.
```json theme={null}
{
"portalStates": [
{
"portalId": 1234,
"flagState": "OFF"
},
{
"portalId": 4567,
"flagState": "OFF"
},
{
"portalId": 78910,
"flagState": "OFF"
}
]
}
```
```shell theme={null}
curl --request POST \
--url 'https://api.hubapi.com/feature-flags/v3/0/flags/hs-release-app-cards/portals/batch/upsert?hapikey={developerAPIKey}' \
--header 'content-type: application/json' \
--data '{
"portalStates": [
{
"portalId": 1234,
"flagState": "OFF"
},
{
"portalId": 4567,
"flagState": "OFF"
},
{
"portalId": 78910,
"flagState": "OFF"
}
]
}'
```
* With existing app installs set to `OFF`, you can now set the `defaultState` to `ON`. To do so, make a `PUT` request to `https://api.hubapi.com/feature-flags/v3/{appId}/flags/hs-release-app-cards?hapikey={developerAPIKey}`
```json theme={null}
{
"defaultState": "ON"
}
```
```shell theme={null}
curl -- request PUT \
--url 'https://api.hubapi.com/feature-flags/v3/{appId}/flags/hs-release-app-cards?hapikey={developerAPIKey}' \
--header 'content-type: application/json' \
--data '{
"defaultState": "ON"
}'
```
* Once you feel confident in new customer adoption, you can begin to remove customer `portalIds` that you switched to the `OFF` state by making a `POST` request to `https://api.hubapi.com/feature-flags/v3/{appId}/flags/hs-release-app-cards/portals/batch/delete?hapikey={developerAPIKey}` with the account IDs you want to remove from the `OFF` list.
```json theme={null}
{
"portalIds": [1234, 4567, 78910]
}
```
```shell theme={null}
curl --request POST \
--url 'https://api.hubapi.com/feature-flags/v3/{appId}/flags/hs-release-app-cards/portals/batch/delete?hapikey={developerAPIKey}' \
--header 'content-type: application/json; \
--data '{
"portalIds": [
1234,
4567,
78910
]
}'
```
To check which accounts still have their flag set to `OFF`, you can make a `GET` request to `/feature-flags/v3/{appId}/flags/hs-release-app-cards/portals/{portalId}`. Learn more in the [feature flag API reference documentation](/api-reference/legacy/app-management/feature-flags/portal-flag-states/get-accounts-with-flag-state).
* When all previously added accounts have been deleted using the above endpoint, you'll have successfully completed the rollout and finished migration. At this point, you can safely delete your feature flag by making a `DELETE` request to `https://api.hubapi.com/feature-flags/v3/{appId}/flags/hs-release-app-cards?hapikey={developerAPIKey}`.
```shell theme={null}
curl --request DELETE \
--url 'https://api.hubapi.com/feature-flags/v3/{appId}/flags/hs-release-app-cards?hapikey={developerAPIKey}'
```
#### Roll out to a subset of accounts
Alternatively, rather than starting with new installs, you can selectively enable your app cards for a subset of accounts that have your app installed. To do so, you'll need to have a list of the account IDs for all existing public app installs. With that list, you can make a `POST` request to `https://api.hubapi.com/feature-flags/v3/{appId}/flags/hs-release-app-cards/portals/batch/upsert?hapikey={developerAPIKey}` and set their `flagState` to `ON`.
```json theme={null}
{
"portalStates": [
{
"portalId": 1234,
"flagState": "ON"
},
{
"portalId": 4567,
"flagState": "ON"
},
{
"portalId": 78910,
"flagState": "ON"
}
]
}
```
```shell theme={null}
curl --request POST \
--url 'https://api.hubapi.com/feature-flags/v3/{appId}/flags/hs-release-app-cards/portals/batch/upsert?hapikey={developerAPIKey}' \
--header 'content-type: application/json' \
--data '{
"portalStates": [
{
"portalId": 1234,
"flagState": "ON"
},
{
"portalId": 4567,
"flagState": "ON"
},
{
"portalId": 78910,
"flagState": "ON"
}
]
}'
```
You can continue making this request for subsets of accounts until all accounts have been migrated. Then, you can delete your feature flag by making a `DELETE` request to `https://api.hubapi.com/feature-flags/v3/{appId}/flags/hs-release-app-cards?hapikey={developerAPIKey}`.
```shell theme={null}
curl --request DELETE \
--url 'https://api.hubapi.com/feature-flags/v3/{appId}/flags/hs-release-app-cards?hapikey={developerAPIKey}'
```
#### Roll out to all accounts simultaneously
To release your app cards to all installed accounts simultaneously, delete the app's feature flag by making a `DELETE` request to `https://api.hubapi.com/feature-flags/v3/{appId}/flags/hs-release-app-cards?hapikey={developerAPIKey}`.
```shell theme={null}
curl --request DELETE \
--url 'https://api.hubapi.com/feature-flags/v3/{appId}/flags/hs-release-app-cards?hapikey={developerAPIKey}'
```
### Hiding legacy CRM cards
In addition to using the feature flags API to roll out app cards to your install base, you can also use it to facilitate the removal of legacy CRM cards by setting the `hs-hide-crm-cards` flag. For example, for existing installs, you may want to continue showing the old cards to remind users to upgrade to your new cards, but then hide them from new installs and accounts that have upgraded.
**Please note:** the `hs-hide-crm-cards` flag will apply for all legacy CRM cards included in the app. You cannot selectively hide individual legacy CRM cards within an app.
To use the `hs-hide-crm-cards` flag to manage legacy CRM card access:
* Make a `PUT` request to set your app's `defaultState` to `OFF`. This initializes the app flag and ensures that the app's legacy CRM cards will be visible in every existing and new installed account.
```json theme={null}
{
"defaultState": "OFF"
}
```
```shell theme={null}
curl --request PUT \
--url 'https://api.hubapi.com/feature-flags/v3/{appId}/flags/hs-hide-crm-cards?hapikey={developerAPIKey}' \
--header 'content-type: application/json' \
--data '{
"defaultState": "OFF"
}'
```
* Next, set the `flagState` to `OFF` for all accounts that currently have the app installed. In the request body, you'll provide a `portalId` for each account.
```json theme={null}
{
"portalStates": [
{
"portalId": 1234,
"flagState": "OFF"
},
{
"portalId": 4567,
"flagState": "OFF"
},
{
"portalId": 78910,
"flagState": "OFF"
}
]
}
```
```shell theme={null}
curl --request POST \
--url 'https://api.hubapi.com/feature-flags/v3/{appId}/flags/hs-hide-crm-cards/portals/batch/upsert?hapikey={developerAPIKey}' \
--header 'content-type: application/json' \
--data '{
"portalStates": [
{
"portalId": 1234,
"flagState": "OFF"
},
{
"portalId": 4567,
"flagState": "OFF"
},
{
"portalId": 78910,
"flagState": "OFF"
}
]
}'
```
* With existing app installs set to `OFF`, make another request to set the `defaultState` to `ON`. This prevents new installs from ever seeing the app's legacy CRM cards.
```shell theme={null}
curl --request PUT \
--url 'https://api.hubapi.com/feature-flags/v3/{appId}/flags/hs-hide-crm-cards?hapikey={developerAPIKey}'\
--header 'content-type: application/json' \
--data '{
"defaultState": "ON"
}'
```
* As you observe customers using the new app cards, such as receiving `hubspot.fetch()` calls from their accounts, you can remove them from the `hs-hide-crm-cards` flag list using the request below. Because you hid the legacy CRM cards from new installs, you'll only need to take this step for accounts you previously set to `OFF`.
```json theme={null}
{
"portalIds": [1234, 4567, 78910]
}
```
```shell theme={null}
curl --request POST \
--url 'https://api.hubapi.com/feature-flags/v3/{appId}/flags/hs-hide-crm-cards/portals/batch/delete?hapikey={developerAPIKey}'\
--header 'content-type: application/json' \
--data '{
"portalIds": [
1234,
4567,
78910
]
}'
```
* When all previously added accounts have been removed from the flag list, you can be sure that your entire install base can no longer access the old legacy CRM cards. At this point, you can navigate to the app's settings page in your developer account and [delete the legacy CRM cards](/api-reference/legacy/crm/extensions/crm-cards/guide#delete-a-crm-card).

* Finally, make a request to delete the `hs-hide-crm-cards` flag from the app.
```shell theme={null}
curl --request DELETE \
--url 'https://api.hubapi.com/feature-flags/v3/{appId}/flags/hs-hide-crm-cards?hapikey={developerAPIKey}'
```
## Feature flag API reference
Use the feature flag API to control availability of your app cards in customer accounts. All endpoints are under the `https://api.hubapi.com/feature-flags/v3/{appId}` root path. The API currently supports a single App Flag: `hs-release-app-cards`. Attempts to specify other App Flags will receive an error.
View the feature flag API reference endpoint documentation:
* **App flag endpoints:**
* [Retrieve an app's feature flags](/api-reference/legacy/app-management/feature-flags/flags/get-feature-flag)
* [Retrieve accounts with a set flag state](/api-reference/legacy/app-management/feature-flags/portal-flag-states/get-accounts-with-flag-state)
* [Set an app's feature flag](/api-reference/legacy/app-management/feature-flags/flags/update-feature-flag)
* [Delete an app's feature flag](/api-reference/legacy/app-management/feature-flags/flags/delete-feature-flag)
* **Account flag state endpoints:**
* [Delete an account flag state](/api-reference/legacy/app-management/feature-flags/portal-flag-states/delete-portal-flag)
* [Retrieve account flag state](/api-reference/legacy/app-management/feature-flags/portal-flag-states/get-account-flag)
* [Batch delete account flag state](/api-reference/legacy/app-management/feature-flags/portal-flag-states/delete-portal-flag-batch)
* [Batch set account flag state](/api-reference/legacy/app-management/feature-flags/portal-flag-states/upsert-account-flag)
* [Set an account flag state](/api-reference/legacy/app-management/feature-flags/portal-flag-states/update-account-flag)