> ## Documentation Index
> Fetch the complete documentation index at: https://developers.hubspot.com/docs/llms.txt
> Use this file to discover all available pages before exploring further.

---
id: 7e6e0e04-a514-40e4-8f23-93180b84e49b
---

# CRM API | Timeline events

> Overview and walkthrough of the Timeline API.

export const PostmanCard = ({title, collectionId}) => {
  return <div className="card-condensed-cta">
      <Card title={title ? title : "Postman collection"} href={`https://app.getpostman.com/run-collection/${collectionId}`} horizontal={true} cta="Run in Postman" icon={<svg xmlns="http://www.w3.org/2000/svg" width={25} height={25} preserveAspectRatio="xMidYMid" viewBox="0 0 256 256">
              <path fill="#FF6C37" d="M254.953 144.253c8.959-70.131-40.569-134.248-110.572-143.206C74.378-7.912 10.005 41.616 1.047 111.619c-8.959 70.003 40.569 134.248 110.572 143.334 70.131 8.959 134.248-40.569 143.334-110.7Z" />
              <path fill="#FFF" d="m174.2 82.184-54.007 54.007-15.229-15.23c53.11-53.11 58.358-48.503 69.236-38.777Z" />
              <path fill="#FF6C37" d="M120.193 137.47c-.384 0-.64-.128-.895-.384l-15.358-15.229a1.237 1.237 0 0 1 0-1.792c54.007-54.006 59.638-48.887 71.028-38.649.255.256.383.512.383.896s-.128.64-.383.896l-54.007 53.878c-.128.256-.512.384-.768.384Zm-13.437-16.509 13.437 13.438 52.087-52.087c-9.47-8.446-15.87-11.006-65.524 38.65Z" />
              <path fill="#FFF" d="m135.679 151.676-14.718-14.718 54.007-54.006c14.46 14.59-7.167 38.265-39.29 68.724Z" />
              <path fill="#FF6C37" d="M135.679 152.956c-.384 0-.64-.128-.896-.384l-14.718-14.718c-.256-.256-.256-.512-.256-.896s.128-.64.384-.895L174.2 82.056a1.237 1.237 0 0 1 1.791 0 15.58 15.58 0 0 1 4.991 11.902c-.256 14.206-16.38 32.25-44.28 58.614-.383.256-.767.384-1.023.384Zm-12.926-15.998c8.19 8.319 11.646 11.646 12.926 12.926 21.5-20.476 42.36-41.464 42.488-55.926.128-3.327-1.152-6.655-3.327-9.214l-52.087 52.214Z" />
              <path fill="#FFF" d="m105.22 121.345 10.878 10.878c.256.256.256.512 0 .768-.128.128-.128.128-.256.128l-22.524 4.863c-1.152.128-2.175-.64-2.431-1.791-.128-.64.128-1.28.512-1.664l13.053-13.054c.256-.256.64-.384.768-.128Z" />
              <path fill="#FF6C37" d="M92.934 139.262c-1.92 0-3.327-1.536-3.327-3.455 0-.896.384-1.792 1.024-2.432l13.053-13.054c.768-.64 1.792-.64 2.56 0l10.878 10.878c.768.64.768 1.792 0 2.56-.256.256-.512.384-.896.512l-22.524 4.863c-.256 0-.512.128-.768.128Zm11.902-16.51-12.542 12.543c-.256.256-.383.64-.128 1.024.128.383.512.511.896.383l21.116-4.607-9.342-9.342Z" />
              <path fill="#FFF" d="M202.739 52.238c-8.191-7.935-21.373-7.679-29.307.64-7.935 8.318-7.679 21.372.64 29.306A20.678 20.678 0 0 0 199.155 85l-14.59-14.59 18.174-18.172Z" />
              <path fill="#FF6C37" d="M188.405 89.223c-12.158 0-22.012-9.854-22.012-22.012 0-12.158 9.854-22.012 22.012-22.012 5.631 0 11.134 2.176 15.23 6.143.255.256.383.512.383.896s-.128.64-.384.895L186.357 70.41l13.566 13.566c.512.512.512 1.28 0 1.792l-.256.256c-3.327 2.047-7.295 3.199-11.262 3.199Zm0-41.337c-10.75 0-19.452 8.703-19.324 19.453 0 10.75 8.702 19.452 19.452 19.324 2.944 0 5.887-.64 8.575-2.047l-13.438-13.31c-.256-.256-.384-.512-.384-.896s.128-.64.384-.895l17.149-17.15c-3.456-2.943-7.807-4.479-12.414-4.479Z" />
              <path fill="#FFF" d="m203.122 52.622-.255-.256-18.301 18.044 14.461 14.462c1.408-.896 2.816-1.92 3.967-3.072a20.51 20.51 0 0 0 .128-29.178Z" />
              <path fill="#FF6C37" d="M199.155 86.28c-.384 0-.64-.128-.896-.384l-14.589-14.59c-.256-.256-.384-.512-.384-.896s.128-.64.384-.895l18.173-18.173a1.237 1.237 0 0 1 1.791 0l.384.256c8.575 8.574 8.575 22.396.128 31.098-1.28 1.28-2.687 2.432-4.223 3.328-.384.128-.64.256-.768.256Zm-12.798-15.87 12.926 12.926c1.024-.64 2.048-1.536 2.816-2.304 7.294-7.294 7.678-19.196.64-26.875L186.357 70.41Z" />
              <path fill="#FFF" d="M176.375 84.488a7.879 7.879 0 0 0-11.134 0l-48.247 48.247 8.063 8.063 51.062-44.792c3.328-2.816 3.584-7.807.768-11.134-.256-.128-.384-.256-.512-.384Z" />
              <path fill="#FF6C37" d="M124.929 142.077c-.384 0-.64-.128-.896-.383l-8.063-8.063a1.237 1.237 0 0 1 0-1.792l48.247-48.247a9.115 9.115 0 0 1 12.926 0 9.115 9.115 0 0 1 0 12.926l-.384.384-51.063 44.792c-.128.255-.384.383-.767.383Zm-6.143-9.342 6.27 6.271 50.167-44.024c2.816-2.304 3.072-6.527.768-9.342-2.303-2.816-6.526-3.072-9.342-.768-.128.128-.256.256-.512.384l-47.351 47.48Z" />
              <path fill="#FFF" d="M80.009 187.637c-.512.256-.768.768-.64 1.28l2.175 9.214c.512 1.28-.256 2.816-1.663 3.2-1.024.384-2.176 0-2.816-.768l-14.077-13.95 45.943-45.943 15.87.256 10.75 10.75c-2.56 2.175-18.045 17.149-55.542 35.961Z" />
              <path fill="#FF6C37" d="M78.985 202.61c-1.024 0-2.048-.383-2.688-1.151l-13.95-13.95c-.255-.256-.383-.512-.383-.896 0-.383.128-.64.384-.895l45.944-45.944c.256-.256.64-.384.895-.384l15.87.256c.383 0 .64.128.895.384l10.75 10.75c.256.256.384.64.384 1.024s-.128.64-.512.896l-.895.767c-13.566 11.902-31.995 23.804-54.902 35.194l2.175 9.086c.384 1.664-.384 3.456-1.92 4.352-.767.384-1.407.512-2.047.512Zm-14.078-15.997 13.182 13.054c.384.64 1.152.896 1.792.512.64-.384.896-1.152.512-1.792l-2.176-9.214c-.256-1.152.256-2.176 1.28-2.688 22.652-11.39 40.952-23.163 54.39-34.81l-9.47-9.47-14.718-.256-44.792 44.664Z" />
              <path fill="#FFF" d="m52.11 197.62 11.006-11.007 16.38 16.381-26.107-1.791c-1.151-.128-1.92-1.152-1.791-2.304 0-.512.128-1.024.512-1.28Z" />
              <path fill="#FF6C37" d="m79.497 204.146-26.236-1.791c-1.92-.128-3.199-1.792-3.071-3.712.128-.768.384-1.535 1.024-2.047L62.22 185.59a1.237 1.237 0 0 1 1.792 0l16.38 16.38c.385.385.512.897.257 1.408-.256.512-.64.768-1.152.768Zm-16.381-15.74-10.11 10.11c-.384.255-.384.895 0 1.151.127.128.255.256.511.256l22.652 1.536-13.053-13.054ZM104.452 146.557c-.768 0-1.28-.64-1.28-1.28 0-.384.128-.64.384-.896l12.414-12.414a1.237 1.237 0 0 1 1.792 0l8.062 8.063c.384.384.512.768.384 1.28-.128.384-.512.767-1.023.895l-20.477 4.352h-.256Zm12.414-11.902-8.446 8.446 13.821-2.943-5.375-5.503Z" />
              <path fill="#FFF" d="m124.8 140.926-14.077 3.071c-1.024.256-2.048-.384-2.303-1.408-.128-.64 0-1.28.511-1.791l7.807-7.807 8.063 7.935Z" />
              <path fill="#FF6C37" d="M110.467 145.277a3.168 3.168 0 0 1-3.2-3.2c0-.895.385-1.663.897-2.303l7.806-7.807a1.237 1.237 0 0 1 1.792 0l8.062 8.063c.384.384.512.768.384 1.28-.128.384-.512.767-1.023.895l-14.078 3.072h-.64Zm6.399-10.622-6.91 6.91c-.257.257-.257.512-.129.768s.384.384.768.384l11.774-2.56-5.503-5.502ZM203.25 64.907c-.256-.767-1.151-1.151-1.92-.895-.767.255-1.151 1.151-.895 1.92 0 .127.128.255.128.383.768 1.536.512 3.455-.512 4.863-.512.64-.384 1.536.128 2.048.64.512 1.536.384 2.048-.256 1.92-2.432 2.303-5.503 1.023-8.063Z" />
            </svg>} />
    </div>;
};

export const ScopesList = ({scopes = [], description = "This API requires one of the following scopes:"}) => {
  if (!scopes || scopes.length === 0) {
    return null;
  }
  const sortedScopes = scopes.sort((a, b) => a.localeCompare(b));
  return <div>
      <div className="text-sm mb-2">{description}</div>
      <div>
        {sortedScopes.map((scope, index) => <div key={index}>
            <code>
              <span className="text-xs">{scope}</span>
            </code>
          </div>)}
      </div>
    </div>;
};

<PostmanCard collectionId="26126890-0bfba224-c033-4888-b160-f8c9815bb9aa" />

<Accordion title="Scope requirements">
  <ScopesList
    scopes={[
  'crm.objects.companies.highly_sensitive.read.v2',
  'crm.objects.companies.highly_sensitive.write.v2',
  'crm.objects.companies.read',
  'crm.objects.companies.sensitive.read.v2',
  'crm.objects.companies.sensitive.write.v2',
  'crm.objects.companies.write',
  'crm.objects.contacts.highly_sensitive.read.v2',
  'crm.objects.contacts.highly_sensitive.write.v2',
  'crm.objects.contacts.read',
  'crm.objects.contacts.sensitive.read.v2',
  'crm.objects.contacts.sensitive.write.v2',
  'crm.objects.contacts.write',
  'crm.objects.deals.highly_sensitive.read.v2',
  'crm.objects.deals.highly_sensitive.write.v2',
  'crm.objects.deals.read',
  'crm.objects.deals.sensitive.read.v2',
  'crm.objects.deals.sensitive.write.v2',
  'crm.objects.deals.write',
  'crm.schemas.companies.read',
  'crm.schemas.companies.write',
  'crm.schemas.contacts.read',
  'crm.schemas.contacts.write',
  'crm.schemas.deals.read',
  'crm.schemas.deals.write',
  'tickets',
  'tickets.highly_sensitive.v2',
  'tickets.sensitive.v2',
  'timeline'
]}
  />
</Accordion>

If you're a [technology partner](https://www.hubspot.com/partners/technology/join) with existing `v3` timeline events defined in a public app, you can use this API to send data from external systems into HubSpot for display in the activity timeline of contact, company, deal, and ticket records. If you'd prefer your data to be editable by users but none of the default CRM objects fit your needs, consider using [custom objects](/api-reference/legacy/crm/objects/custom-objects/guide).

<Warning>
  **Please note:** the `v1` and `v3` timeline events APIs are only available for app partners with existing `v1`/`v3` timeline events defined in their public app.

  * If your app doesn't include any timeline events yet, get started on [latest version of the developer platform](/apps/developer-platform/overview). Note that you'll need to request approval before you can define app events for your app. Learn more in the [app events overview](/apps/developer-platform/add-features/app-events/overview).
  * If your app includes a `v1`/`v3` timeline event, learn how to [migrate it to the developer platform](/apps/developer-platform/add-features/app-events/create-and-manage-event-types#migrate-an-existing-timeline-event-type). You don't need to request approval before migrating existing event types.

  If you're not an app partner, you can send custom event data to HubSpot using the [custom events API](/api-reference/legacy/events/define-events/guide).
</Warning>

<Frame>
  <img src="https://www.hubspot.com/hubfs/timeline_api/event_expanded-2.png" alt="event_expanded-2" />
</Frame>

For example, you want to better segment your contacts based on their interactions with your company and content. To do this, you need more information about them. Your app can create custom events (contacts who registered but did not attend a recent webinar, which variant of a sign-up flow a contact completed, etc.) that give you more context about the interactions contacts have with your company.

## Create an event template

Before you can start creating events, you must create an event template. Event templates describe actions your app will add to the timeline of a contact, company, deal, or ticket record in HubSpot. Examples of these actions include viewing a video, registering for a webinar, or filling out a survey. A single app can create up to 750 event templates.

Event templates are created for contacts by default, but they can be created for companies, deals, or tickets using the `objectType` field. See creating a timeline event template for more details.

Each event template has its own set of tokens and templates. You can use events created for contacts as criteria when creating new contact lists or workflows, such as: 'Create a list of all contacts with a Video Like where the video name contains XYZ,' where your event template is named "Video Like" and has an event token named "video name."

### Create event templates through the API

For this example, we'll create a new 'Example Webinar Registration' event template. For authentication, use the developer API key found in your app developer account.

```shell theme={null}
curl -X POST
-H "Content-Type: application/json" -d '
{
  "name": "Example Webinar Registration",
  "objectType": "contacts"
}' \
'https://api.hubapi.com/crm/v3/timeline/<<appId>>/event-templates?hapikey=<<developerAPIkey>>''
```

Be sure to replace `<appId>` with your own App ID, which can be found on both the *My Apps* and app details pages in your developer account. You'll also need to replace `<developerHapikey>` with your own developer API key, which you can find by navigating to **Apps** > **Get HubSpot API key**.

The properties `headerTemplate` and `detailTemplate` could also be provided here. For more information, see *Define header and detail templates* below.

This `POST` request will return the full, saved event template definition. Be sure to note the `id` property in this response. This is the event template ID, which you'll need to make any updates to this event template or tokens in the future.

You can see all event templates defined for an app via this GET command, which will also return the event template IDs:

```shell theme={null}
curl -X GET 'https://api.hubapi.com/crm/v3/timeline/<<appId>>/event-templates?hapikey=<<developerAPIkey>>'
```

### Create event templates in HubSpot

In addition to using the API to create and manage timeline event templates, you can also manage event templates in your HubSpot developer account.

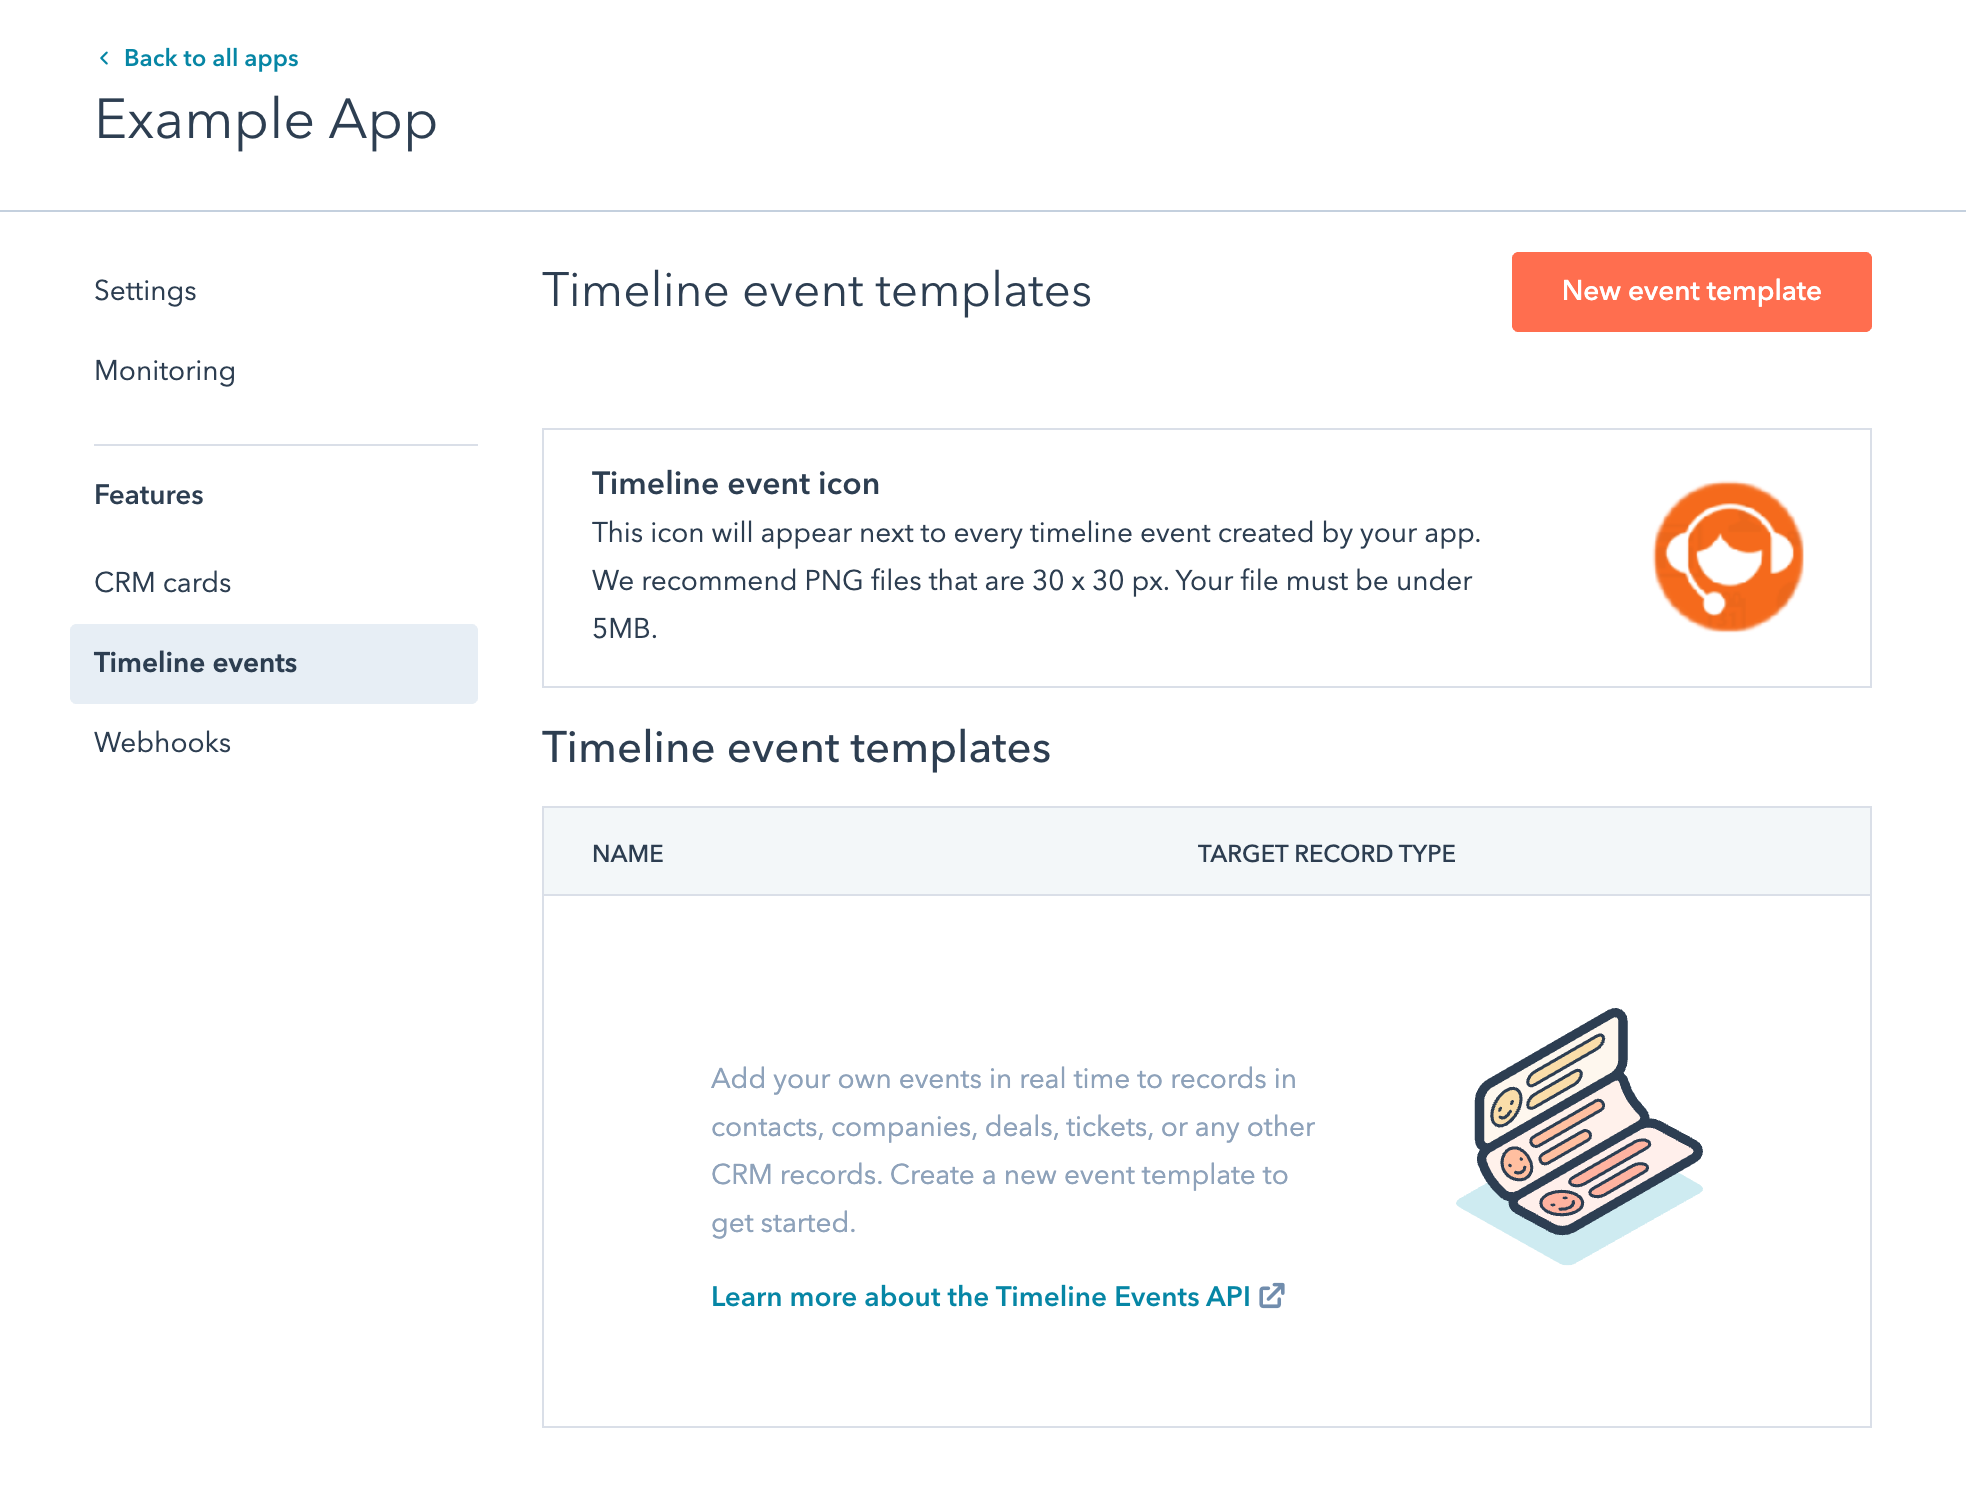
In your app settings, navigate to **Timeline events**, then click **Create event type** to create a new event template for this app. If you've created any event templates before, you'll see them here as well.

<Frame>
  <img src="https://www.hubspot.com/hubfs/timeline-event-example-app.png" alt="example-app" />
</Frame>

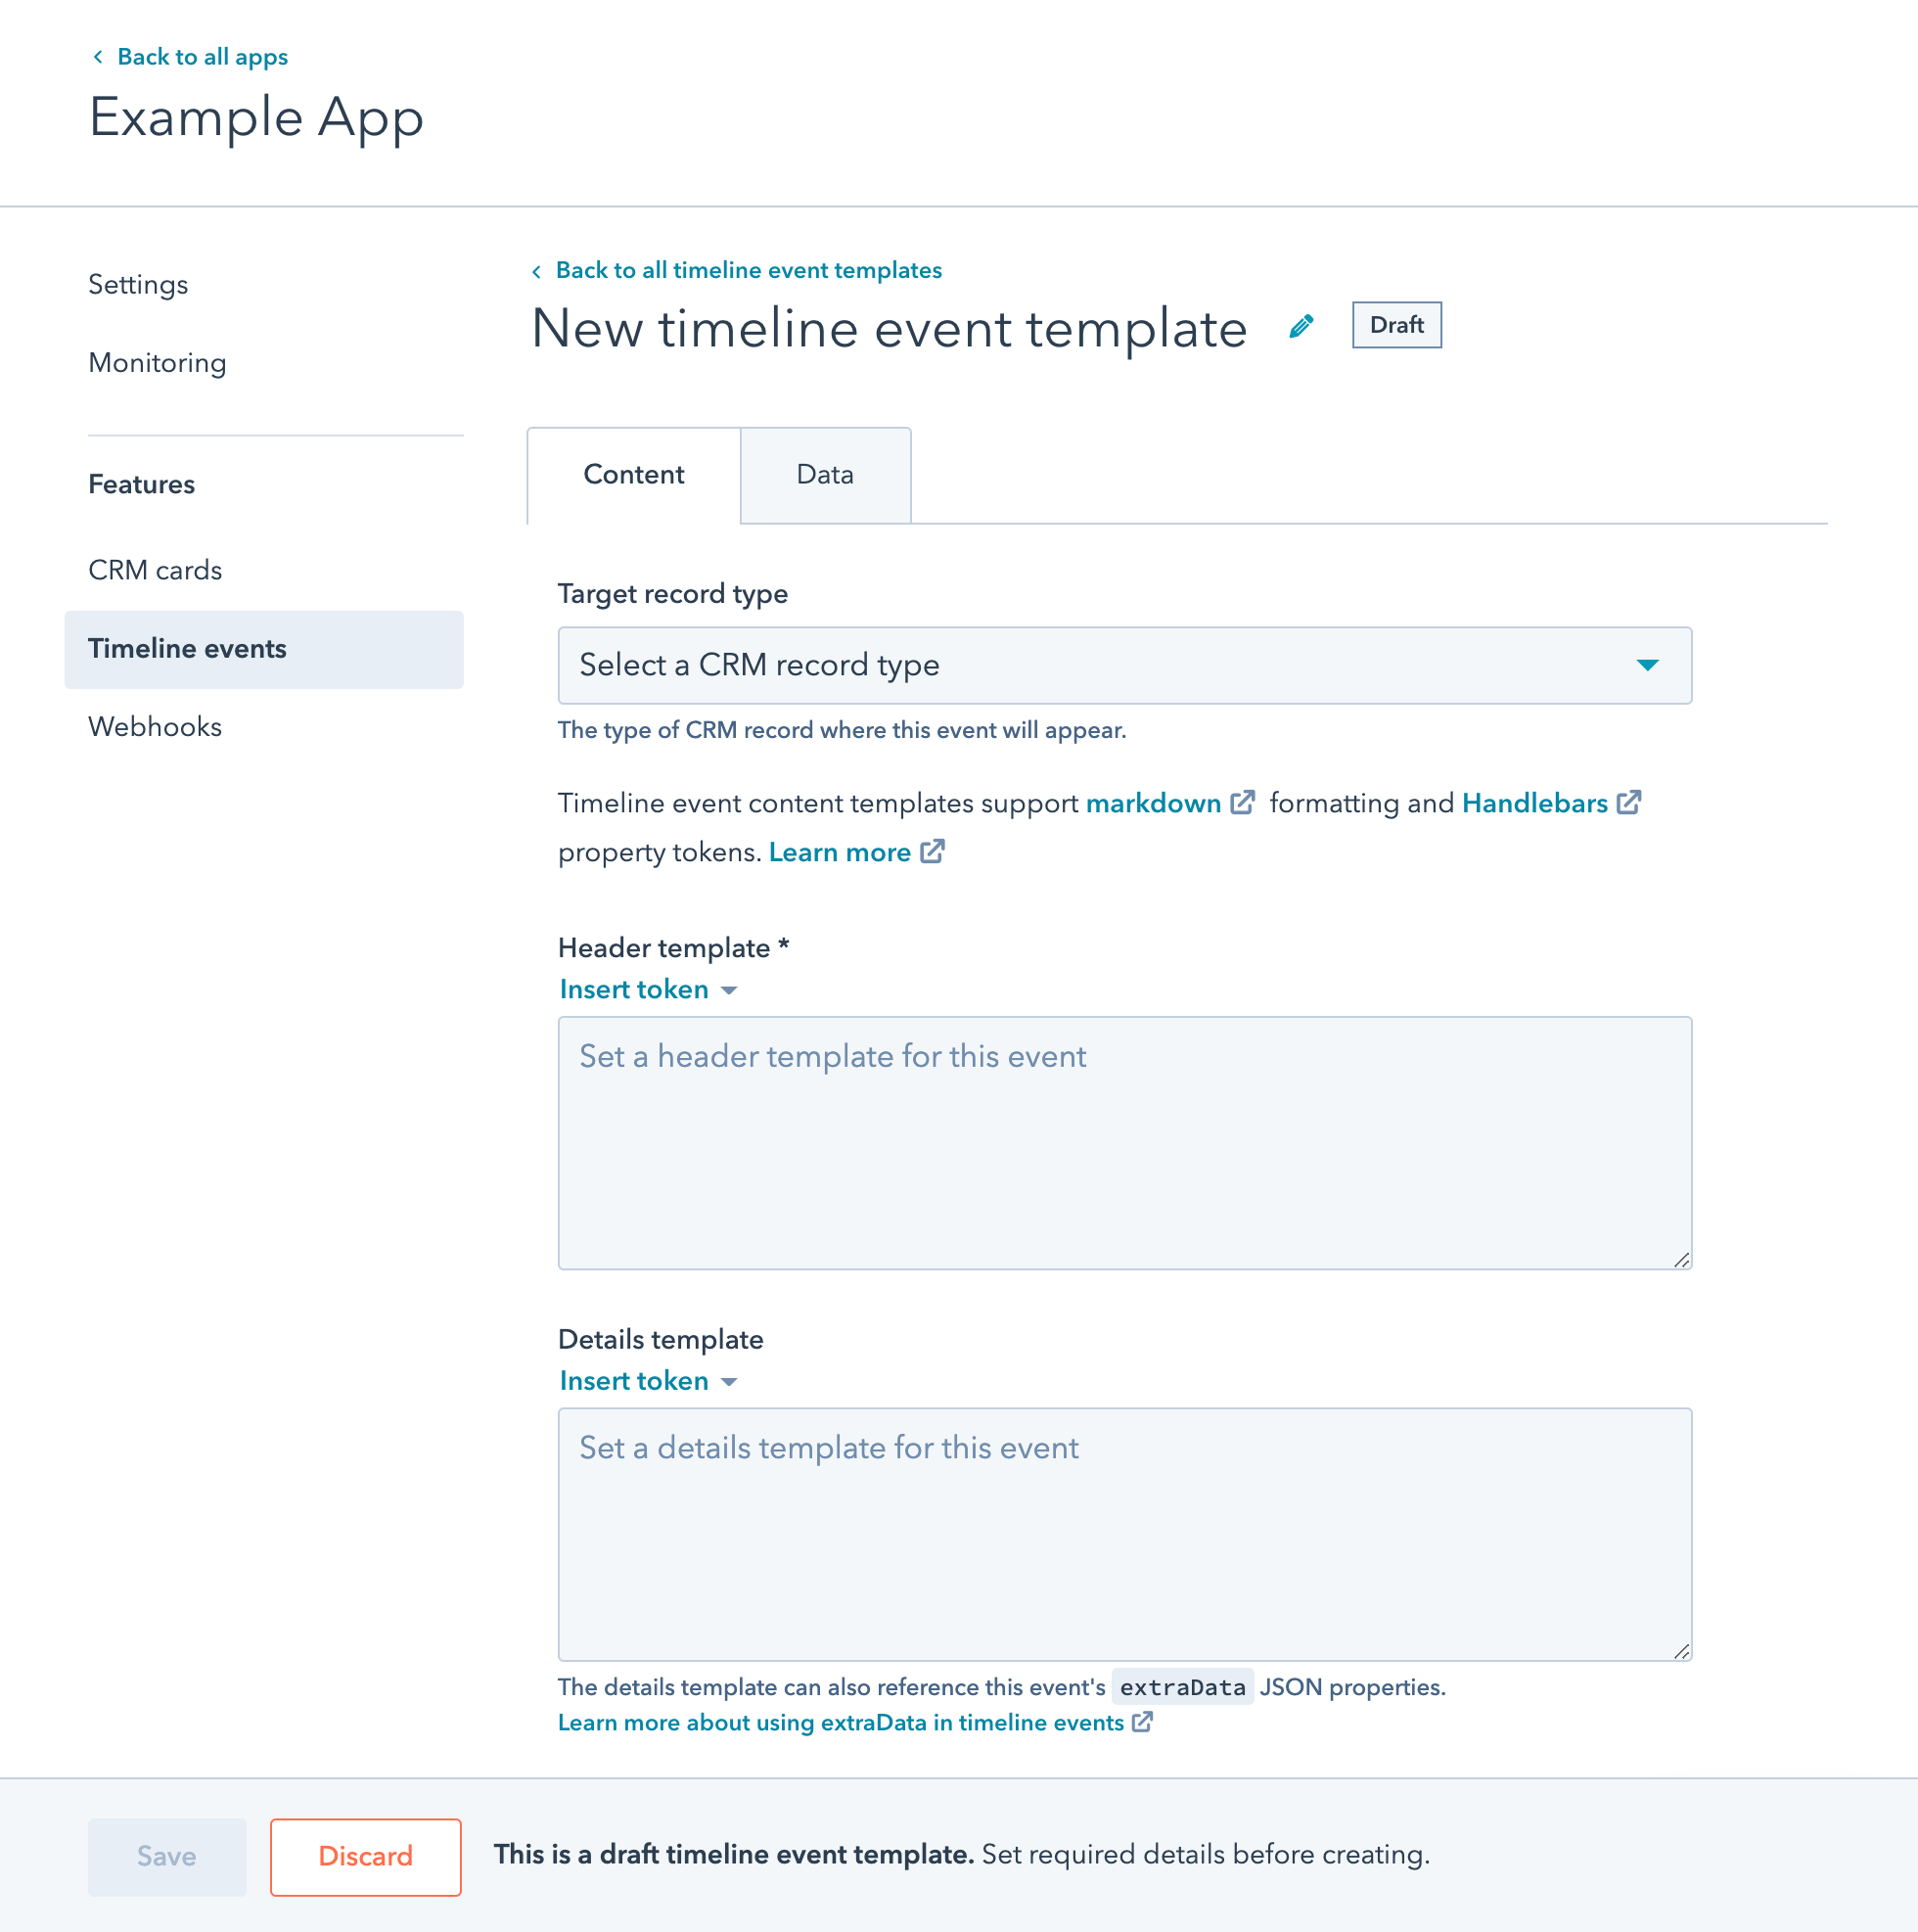
You'll start with a draft of your new event template. Once you've set the object type and the detail and header templates for the event, click **Create**.
<Frame>
  <img src="https://www.hubspot.com/hubfs/new-timeline-event-template.png" alt="new-timeline-event-template" />
</Frame>

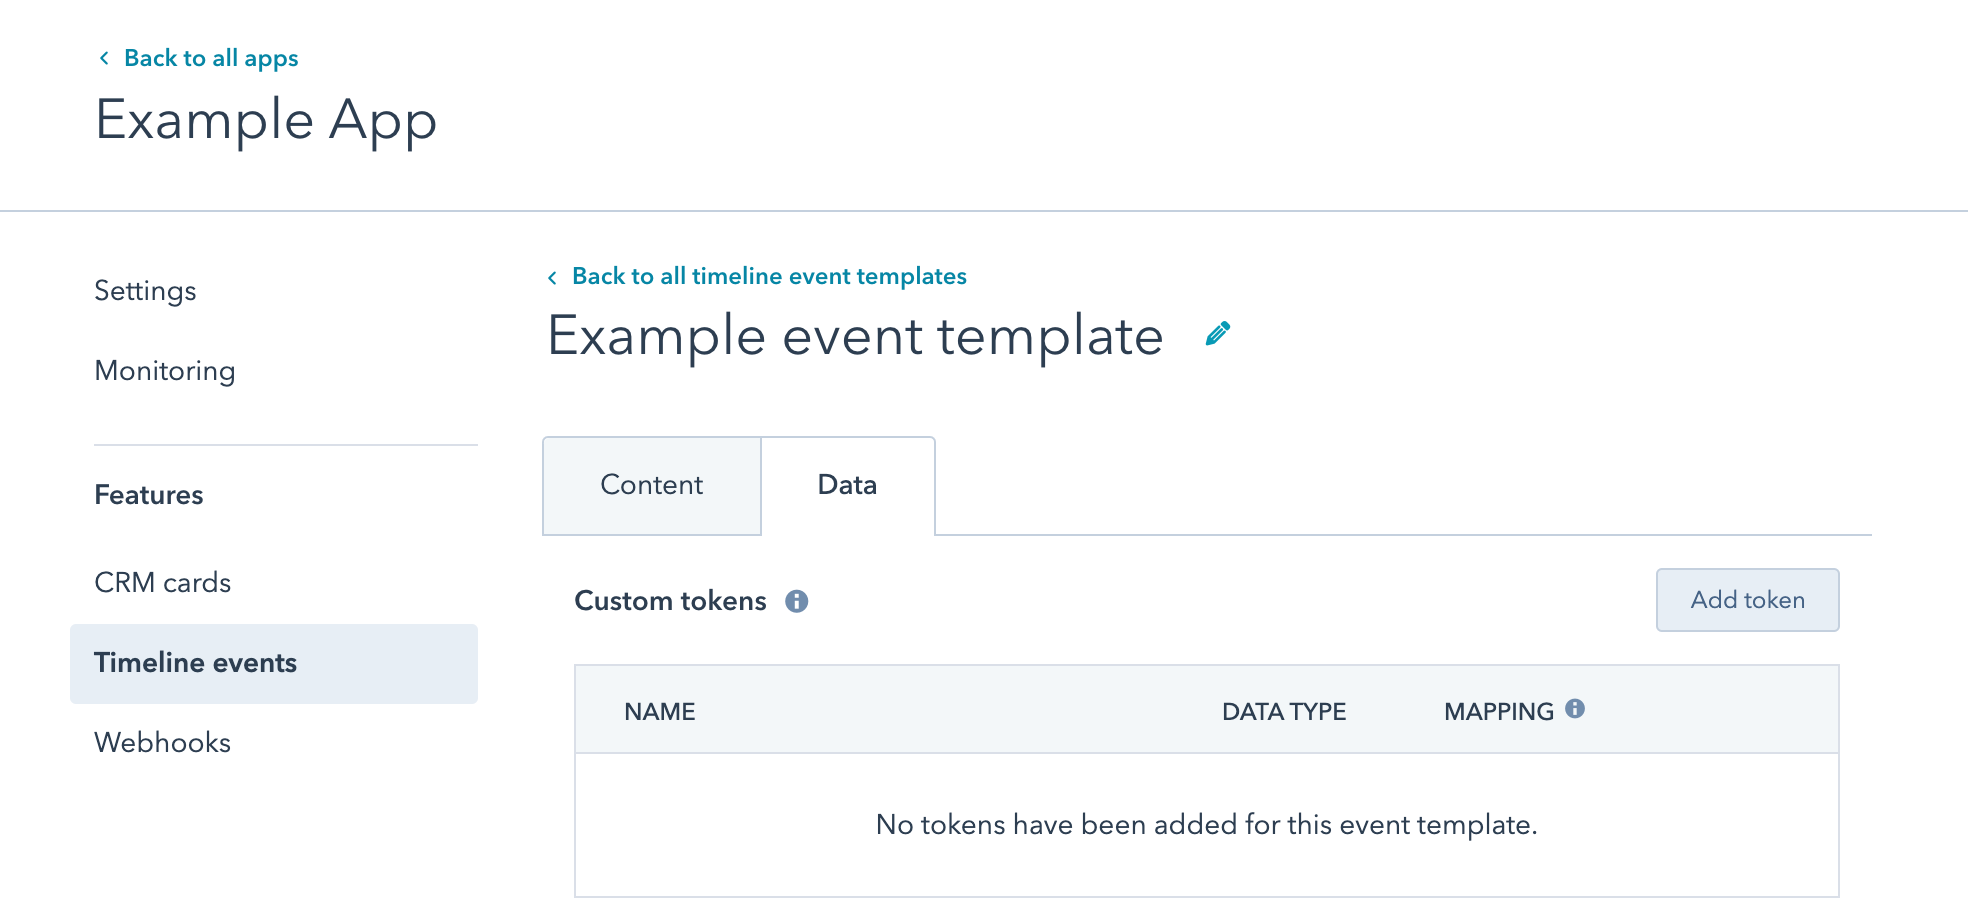
When creating or editing your event template, set any tokens you want to use with it in the *Data* tab.
<Frame>
  <img src="https://f.hubspotusercontent00.net/hubfs/53/data-tab-1.png" alt="data-tab-1" />
</Frame>

<Warning>
  **Please note:**

  If you delete a template, once it's deleted, existing events using that template will be permanently removed from accounts with your app connected. You'll no longer be able to create new events of this type, but you'll still see legacy event data in lists and reports. It may take several hours to see these changes reflected in HubSpot.
</Warning>

### Define event tokens

Once you've defined an event template, you'll likely want to define its tokens as well. Event template tokens allow you to attach custom data to events that can be displayed in the timeline and used for automation in workflows. For contacts, they can also be used for list segmentation. You can create up to 500 tokens per timeline event template.

#### Create event tokens through the API

Using the event template ID created in Step 1, we'll add some tokens to identify the webinar our contacts registered for.

```shell theme={null}
curl -X POST -H "Content-Type: application/json" -d '
{
  "name": "webinarName",
  "label": "Webinar Name",
  "type": "string"
}' \
'https://api.hubapi.com/crm/v3/timeline/<<appId>>/event-templates/<<eventTemplateId>>/tokens?hapikey=<<developerHapikey>>'

curl -X POST -H "Content-Type: application/json" -d '
{
  "name": "webinarId",
  "label": "Webinar Id",
  "type": "string"
}' \
'https://api.hubapi.com/crm/v3/timeline/<<appId>>/event-templates/<<eventTemplateId>>/tokens?hapikey=<<developerHapikey>>'

curl -X POST -H "Content-Type: application/json" -d '
{
  "name": "webinarType",
  "label": "Webinar Type",
  "type": "enumeration",
  "options": [
    {
      "value": "regular",
      "label": "Regular"
    },
    {
      "value": "ama",
      "label": "Ask me anything"
    }
  ]
}' \
'https://api.hubapi.com/crm/v3/timeline/<<appId>>/event-templates/<<eventTemplateId>>/tokens?hapikey=<<developerHapikey>>'
```

Similarly, a `GET` will return all tokens defined on an event template:

```shell theme={null}
curl -X GET -H "Content-Type: application/json" 'https://api.hubapi.com/crm/v3/timeline/<<appId>>/event-templates/<<eventTemplateId>>?hapikey=<<developerHapikey>>'
```

The supported token types include:

* `string`
* `number`
* `enumeration` — One of a set of options. See the webinarType example above.
* `date` — All dates must be in milliseconds in Unix time.

***Note**: Event tokens cannot be named log or lookup. These tokens are reserved as helpers by Handlebars.js, the library used to render in-app events. For more information, check out the Handlebars.js docs [here.](http://handlebarsjs.com/builtin_helpers.html)*

***

### Define header and detail templates

Header and detail templates define how to display a timeline event. You can specify [Markdown](http://daringfireball.net/projects/markdown/syntax) documents with [Handlebars](http://handlebarsjs.com/) templates. The header template should be a one-line description of the event; and the details template is the drill-down view of the event (examples below).

The event tokens are passed as data to the templates. Using our example, you can reference the `webinarName` token in the template by using `{{webinarName}}`

The `extraData` of an event (discussed below in "Understanding extraData") can only be referenced in the details template.

#### Define header and detail templates through the API

Header and detail templates can be defined on the event template via the event template endpoints. For example, we can add templates to our 'Example Webinar Registration' by modifying that with a `PUT`:

```shell theme={null}
curl -X PUT -H "Content-Type: application/json" -d '
{
  "id": "<<eventTemplateId>>",
  "name": "Example Name Change",
  "headerTemplate": "Registered for [{{webinarName}}](https://mywebinarsystem/webinar/{{webinarId}})",
  "detailTemplate": "Registration occurred at {{#formatDate timestamp}}{{/formatDate}}"
}' \
'https://api.hubapi.com/crm/v3/timeline/<<appId>>/event-templates/<<eventTemplateId>>?hapikey=<<developerHapikey>>'
```

Note the use of the `#formatDate` directive—it's something we've defined to allow for user-friendly date formatting.

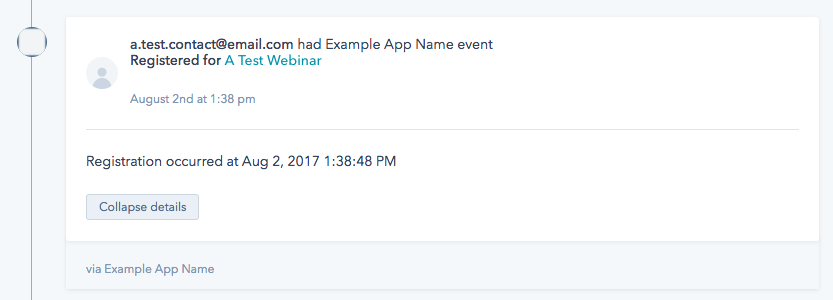
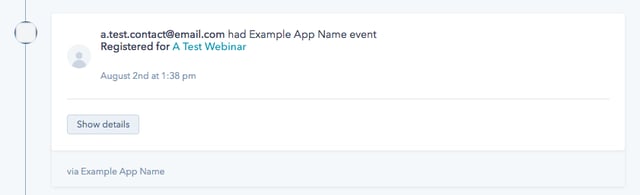
Once an event is created for a contact using this (see "[Creating an event](#creating-an-event)" below), here's what will show up in that contact's timeline:

<Frame>
  <img src="https://developers.hubspot.com/hs-fs/hubfs/timeline_api/event_collapsed.png?width=640&name=event_collapsed.png" alt="event_collapsed.png" />
</Frame>

Clicking on "Show details" renders the details template:
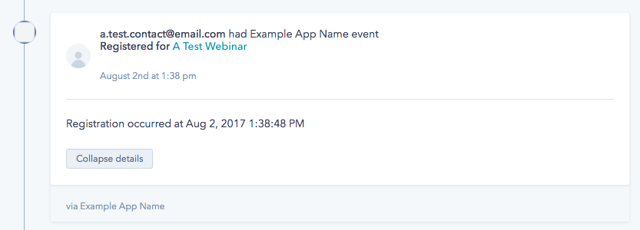
<Frame>
  <img src="https://developers.hubspot.com/hs-fs/hubfs/timeline_api/event_expanded.png?width=640&name=event_expanded.png" alt="event_expanded.png" />
</Frame>

To set the icon that is displayed next to the events, see "[Setting up a custom icon"](/api-reference/legacy/crm/extensions/timeline/guide#customicon) below.

The 'Example App Name' text above is the name of the app. In the CRM timeline, events can be filtered by app.

### Define all aspects of an event template in a single call

Now that you’ve seen each aspect of an event template is progressively defined, you can define it all in one `POST` call.

```shell theme={null}
curl -X POST -H "Content-Type: application/json" -d '
{
  "name": "Another Webinar Registration",
  "objectType": "contacts",
  "headerTemplate": "Registered for [{{webinarName}}](https://mywebinarsystem/webinar/{{webinarId}})",
  "detailTemplate": "Registration occurred at {{#formatDate timestamp}}{{/formatDate}}",
  "tokens": [
    {
      "name": "webinarName",
      "label": "Webinar Name",
      "type": "string"
    },
    {
      "name": "webinarId",
      "label": "Webinar Id",
      "type": "string"
    },
    {
      "name": "webinarType",
      "label": "Webinar Type",
      "type": "enumeration",
      "options": [
        {
          "value": "regular",
          "label": "Regular"
        },
        {
          "value": "ama",
          "label": "Ask me anything"
        }
      ]
    }
  ]
}' \
'https://api.hubapi.com/crm/v3/timeline/<<appId>>/event-templates?hapikey=<<developerAPIkey>>'
```

## Create an event

Now that an event template is set up with tokens and templates, we're ready to create events for our customers' contacts, companies, deals, and tickets. The examples below assume we're working with the `contacts` event template created above. If the event template above is not set up to have the tokens `webinarName` and `webinarId`, then you will get an error when trying to create the event. Here's an example `POST` for creating an event:

<Warning>
  **Please note:**

  Developer API keys and private app access tokens <u>cannot</u> be used as authentication when creating events. To create an event, the associated HubSpot account needs to grant access to your app via [OAuth](/apps/legacy-apps/authentication/working-with-oauth). Once you receive an [OAuth access token,](/api-reference/legacy/authentication/manage-oauth-tokens) you can use it to add events to the account.
</Warning>

```shell theme={null}
curl -X POST -H "Content-Type: application/json" \
-H "Authorization: Bearer <<OAuth2AccessToken>>" \
-d '
{
  "eventTemplateId": "<<eventTemplateId>>",
  "email": "a.test.contact@email.com",
  "tokens": {
    "webinarName": "A Test Webinar",
    "webinarId": "001001",
    "webinarType": "regular"
  }
}' \
'https://api.hubapi.com/crm/v3/timeline/events'
```

This generates an event on `a.test.contact@email.com`'s timeline (assuming the templates in 'Defining Templates' above):

<Frame>
  <img src="https://developers.hubspot.com/hs-fs/hubfs/timeline_api/event_collapsed.png?width=640&name=event_collapsed.png" alt="event_collapsed.png" />
</Frame>

### Set the event timestamp

The timestamp of the event determines where the event will appear in the record's timeline. By default, the event timestamp is when the POST command is sent. You can customize the event time by providing it in the request body in a timestamp property:

```shell theme={null}
curl -X POST -H "Content-Type: application/json" \
-H "Authorization: Bearer <<OAuth2AccessToken>>" \
-d '
{
  "eventTemplateId": "<<eventTemplateId>>",
  "email": "a.test.contact@email.com",
  "timestamp": "2020-03-18T15:30:32Z",
  "tokens": {
    "webinarName": "A Test Webinar",
    "webinarId": "001001",
    "webinarType": "regular"
  }
}' \
'https://api.hubapi.com/crm/v3/timeline/events'
```

This is preferred if you know the exact time an action occurred. In this example, if we have the timestamp for this webinar registration, we should provide it in this POST.

Timestamps can be in milliseconds epoch time or in [ISO 8601](https://en.wikipedia.org/wiki/ISO_8601) format.

### Associate an event with a CRM record

In order to create an event, you must be able to associate the event with a contact, company, deal, or ticket in the customer's account.

In the examples above, the `objectType` was set to contact, and we used email to associate the event with a contact. Email addresses must be unique for contacts in HubSpot, so if there's an existing contact with the provided `email`, that contact will be updated. If there isn't an existing contact, a new contact will be created. By default, this new contact will only have the `email` contact property provided. Learn more about [stamping event data onto contact properties](#stamp-event-data-onto-crm-object-properties) to add additional data to contact properties.

```json theme={null}
{
  "eventTemplateId": "<<eventTemplateId>>",
  "email": "a.test.contact@email.com",
  "tokens": {
    "webinarName": "A Test Webinar",
    "webinarId": "001001",
    "webinarType": "regular"
  }
}
```

If you are working with known contacts, you can also use the contact `vid` to associate the event. In those cases, you would use `objectId` in the request JSON. You must include the vid of an existing contact, as you will not be able to create new contacts using `objectId`. This example uses the `objectId` instead of email:

```json theme={null}
{
  "eventTemplateId": "<<eventTemplateId>>",
  "objectId": "29851",
  "tokens": {
    "webinarName": "A Test Webinar",
    "webinarId": "001001",
    "webinarType": "regular"
  }
}
```

You can also associate an event with a contact by usertoken, or `utk`. The usertoken is used by the HubSpot tracking code to track visitors, and is stored in the `hubspotutk` cookie. Use the `utk` parameter to associate an event with a contact by usertoken. Note: It is not possible to associate events with anonymous visitors using the usertoken, so if the event is associated using only the `utk`, and the provided usertoken is not already associated with a contact, no new contact would be created and the event would not be visible in HubSpot. However, the event would appear in the timeline if a new contact was associated with the usertoken through another means (usually through a [form submission including the hutk](/api-reference/legacy/marketing/forms/v2/forms/get-forms-v2-forms#submit-data-to-a-form-supporting-authentication), or through the [identify method of the Tracking Code API](/api-reference/latest/account/settings/tracking-code/overview)). For this reason, we recommend including the `email` in addition to the `utk` to make sure that the event gets associated with a new or existing contact.

If you're working with an event template for contacts, it's possible to include multiple identification parameters with the event, so any combination of the `email`, `objectId`, and `utk` parameters may be included. If multiple parameters are included, the `objectId` (vid) will have the highest priority when determining which contact to associate with the event, followed by `utk`, with `email` being the lowest priority. This means that you can update the email address of an existing object by including a new email address in the `email` parameter with the `vid` of a known record in `objectId`. This example uses the email address and usertoken together:

```json theme={null}
{
  "eventTemplateId": "<<eventTemplateId>>",
  "email": "a.test.contact@email.com",
  "utk": "89b5afb740d41f4cd6651ac5237edf09"
  "tokens": {
    "webinarName": "A Test Webinar",
    "webinarId": "001001",
    "webinarType": "regular"
  }
}
```

In addition to working with contacts, it's also possible to create event templates for companies, deals, and tickets. For those event templates, you must use `objectId` to associate the event with the company or deal. For companies, deals, and tickets, the `objectId` must be set to the `id` of the company, deal, or ticket you want to associate with the event.

In the example below, assuming the event template was set to the `COMPANY` `objectType`, this event would be associated with the company record with `companyId` 528253914:

```json theme={null}
{
  "eventTemplateId": "<<eventTemplateId>>",
  "objectId": "3001",
  "tokens": {
    "dealProperty": "Custom property for deal"
  }
}
```

### Timeline extensions

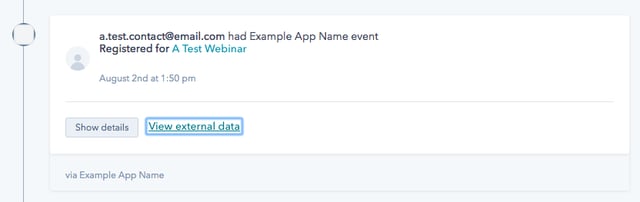
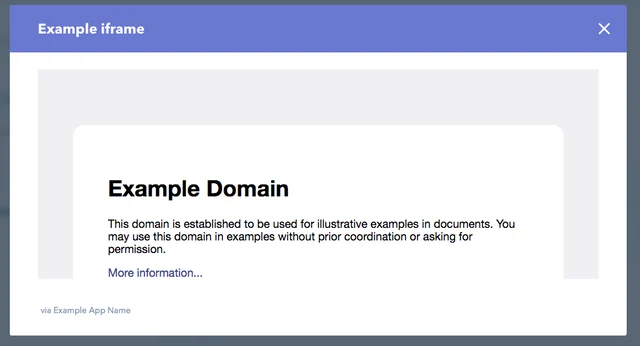
The timeline extensions feature can be used to display data from an external system using an iFrame. When included, the event will display a link that will open a modal window displaying the iFrame contents when clicked. The details for the iFrame are set in the timelineIFrame field, which is an object containing the following fields:

* `linkLabel` - The text used to display the link that will display the IFrame.
* `headerLabel` - The label of the modal window that displays the IFrame contents.
* `url` - The URI of the IFrame contents.
* `width` - The width of the modal window.
* `height` - The height of the modal window.

For example, using this data for an event:

```json theme={null}
{
  "eventTemplateId": "<<eventTemplateId>>",
  "email": "a.test.contact@email.com",
  "tokens": {
    "webinarName": "A Test Webinar",
    "webinarId": "001001",
    "webinarType": "regular"
  },
  "timelineIFrame": {
    "linkLabel":"View external data",
    "headerLabel":"Example iframe",
    "url":"https://www.example.com",
    "width":800,
    "height":300
  }
}
```

Would create this event, including the "View external data" link:

<Frame>
  <img src="https://developers.hubspot.com/hs-fs/hubfs/timeline_api/external_data_link.png?width=640&name=external_data_link.png" alt="external_data_link.png" />
</Frame>

Clicking that link would open a modal window displaying the page set in the `url`:
<Frame>
  <img src="https://developers.hubspot.com/hs-fs/hubfs/timeline_api/iframe_modal.png?width=640&name=iframe_modal.png" alt="iframe_modal.png" />
</Frame>

### Stamp event data onto CRM object properties

In many cases, you'll want to modify the properties for the contacts, companies, deals, or tickets to which you're adding events. This often happens in cases where adding the event will actually create a contact—you'll likely want to update the first and last name properties on the contact so that you don't just create a contact with only an email address and an event.

You can stamp data onto the associated record from an event by mapping your custom event tokens to contact, company, deal, or ticket properties.

Consider this `PUT` command for updating a custom event template, note the `objectPropertyName` field:

```shell theme={null}
curl -X PUT -H "Content-Type: application/json" -d '
{
  "label" : "Updated Webinar Name",
  "objectPropertyName": "zz_webinar_name"
}' \
'https://api.hubapi.com/crm/v3/timeline/<<appId>>/event-templates/<<eventTemplateId>>/tokens/<<tokenName>>?hapikey=<<developerHapikey>>'
```

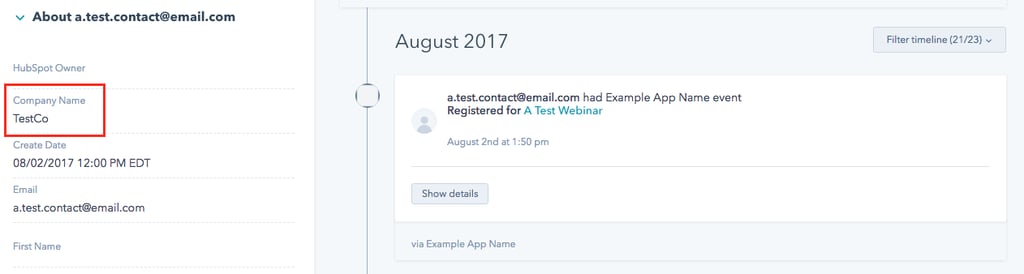
This uses `objectPropertyName` to map this custom event token to the `contact` Object `zz_webinar_name` property. This means that when we create a new event that specifies a `webinarName` token, the `zz_webinar_name` property of the associated `contact` will also be set. You can set these to custom or predefined HubSpot properties.

For example, let's say we already created a `companyName` token referencing a `zz_company_name` custom property on the contact. Then creating an event like this causes the `zz_company_name` and `zz_webinar_name` properties to be set on the contact with the email address [a.test.contact@email.com](mailto:a.test.contact@email.com):

```shell theme={null}
curl -X POST -H "Content-Type: application/json" \
-H "Authorization: Bearer <<OAuth2AccessToken>>" \
-d '
{
  "eventTemplateId": "<<eventTemplateId>>",
  "email": "a.test.contact@email.com",
  "tokens": {
    "webinarName": "Test Webinar will update contact property",
    "companyName": "TestCo",
    "webinarId": "001001",
    "webinarType": "regular"
  }
}' \
'https://api.hubapi.com/crm/v3/timeline/events'
```

<Frame>
  <img src="https://developers.hubspot.com/hs-fs/hubfs/timeline_api/set_property.png?width=1024&name=set_property.png" alt="set_property.png" />
</Frame>

Note: If an event token is stamped to a custom property, and that custom property is not present for a HubSpot account, then the value will still be set for the event, but it will be ignored for the corresponding record.

### Understand `extraData`

You may need to add detailed data to an event that doesn't fit the simple token-value structure used by the event template tokens. You may need to add a list or some hierarchical breakdown to an integration event. This is where `extraData` comes in.

You can add an `extraData` attribute to an event’s JSON body. The value of this `extraData` can be any valid JSON. For example:

```shell theme={null}
curl -X POST -H "Content-Type: application/json" \
-H "Authorization: Bearer <<OAuth2AccessToken>>" \
-d '
{
  "eventTemplateId": "<<eventTemplateId>>",
  "email": "a.test.contact@email.com",
  "tokens": {
    "webinarName": "Test Webinar will update contact property",
    "companyName": "TestCo",
    "webinarId": "001001",
    "webinarType": "regular"
  },
  "extraData": {
    "pollData": [
      {
        "question": "How excited are you for this webinar?",
        "answer":"Quite!"
      },
      {
        "question": "How frequently do you use our product?",
        "answer":"Daily"
      }
    ],
    "coWorkers": [
      {
        "name": "Joe Coworker",
        "email":"joe.coworker@testco.com"
      },
      {
        "name": "Jane Coworker",
        "email":"jane.coworker@testco.com"
      }
    ]
  }
}' \
'https://api.hubapi.com/crm/v3/timeline/events'
```

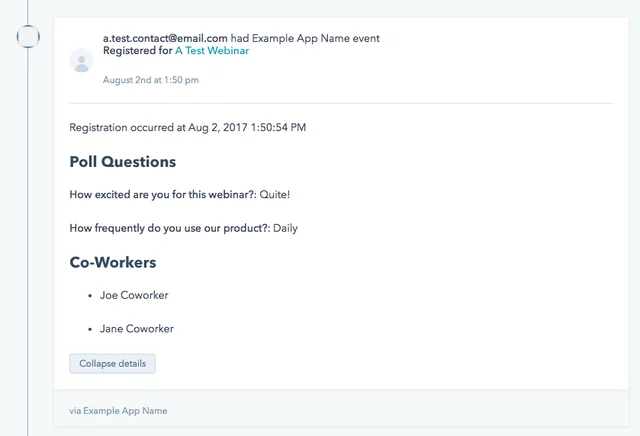
An example of using `extraData` in a details template:

```shell theme={null}
//
Registration occurred at {{#formatDate timestamp}}{{/formatDate}}

#### Poll Questions
{{#each extraData.pollData}}
  **{{question}}**: {{answer}}
{{/each}}

#### Co-Workers
{{#each extraData.coWorkers}}
  * {{name}}
{{/each}}
```

Which will result in a timeline event that looks like this:

<Frame>
  <img src="https://developers.hubspot.com/hs-fs/hubfs/timeline_api/extra_data.png?width=640&name=extra_data.png" alt="extra_data.png" />
</Frame>

Note: The `extraData` attribute can only be referenced in the details template for an event. It can't be used in either the header template or in list segmentation.

### Set up a custom icon

To add visual appeal to your timeline items, you'll want to add a custom icon.

This image file for this icon should:

* Have roughly square dimensions
* Have a transparent background
* Have the content in the center of the icon
* Be able to size down to 30x30 pixels
* Have a file size of 5MB or less

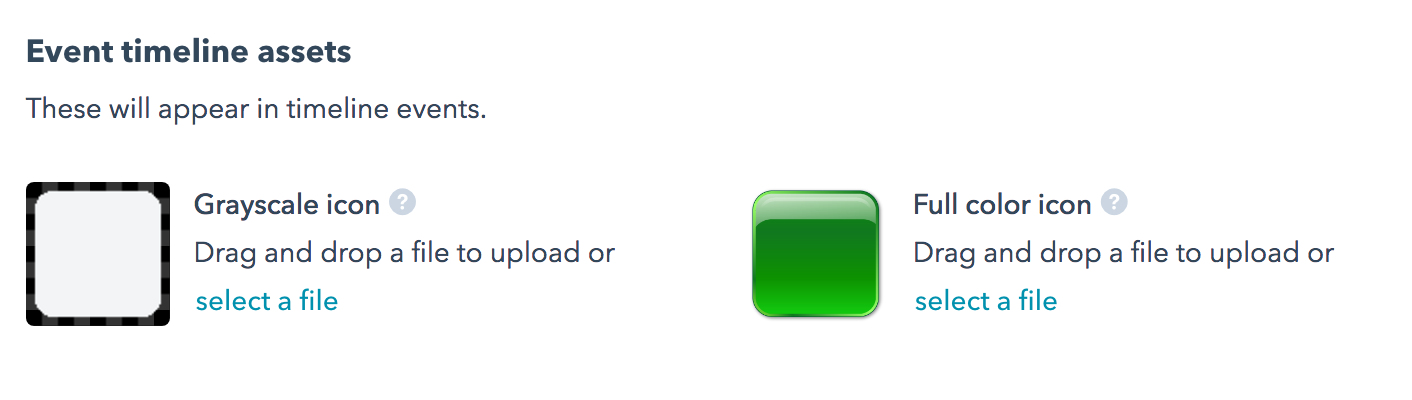
To set the icon used for timeline events, navigate to Timeline events. Click on the placeholder image or the existing icon to set or update it.
<Frame>
  <img src="https://www.hubspot.com/hubfs/timeline_assets.png" alt="timeline_assets" />
</Frame>

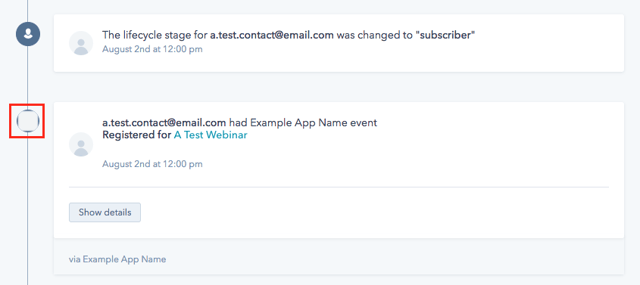
Once you set the icon(s), they will be shown next to all of the timeline events associated with this application:
<Frame>
  <img src="https://developers.hubspot.com/hs-fs/hubfs/timeline_api/timeline_icon.png?width=640&name=timeline_icon.png" alt="timeline_icon.png" />
</Frame>

## Limits

The following limits apply for the timeline events API.

### Event instance limits

When creating an event, each serialized event instance is subject to the following size limits of:

* 500 bytes for the event instance ID
* 510 KB per property/token
* 1 MB in total size for the event instance

### Limits for events in legacy public apps

Timeline events in a legacy public app are subject to the following limits:

* You can create up to 750 timeline event types per public app.
* You can create up to 500 properties per timeline event type.
* Event instance size limits are the same as described in the [Event instance limits](#event-instance-limits) section above.
