Create a settings page for your legacy public app to give users more control over how they use your app in their HubSpot account. Developers can create a settings page for their app using the settings builder so that users can access the settings from the Connected Apps page in HubSpot.
To create the app settings page:
- In your HubSpot account, navigate to Development.
- In the left sidebar menu, navigate to Legacy apps.
- Click the app you want to create a settings page for.
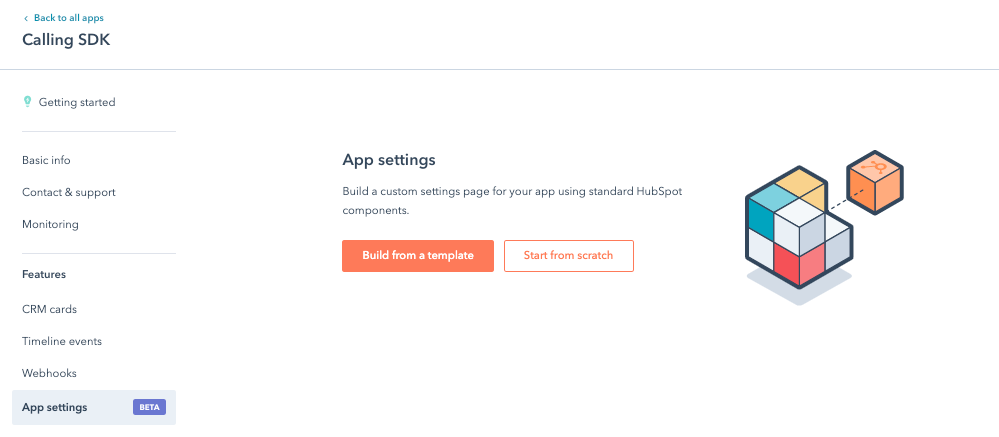
- In the left sidebar menu, click App settings.
- To create a settings page from a template, click Build from a template.
- To create a settings page from scratch, click Start from scratch. You’ll then be brought to the app settings page builder.
Please note:If you select the Build from a template option, ensure that all placeholder control component URLs are updated to your own API endpoints.
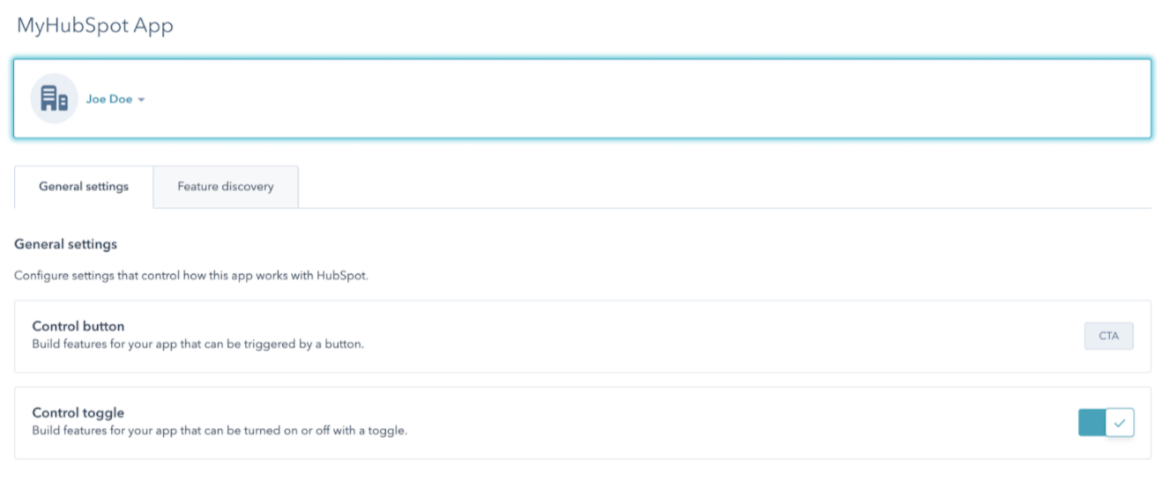
- On the General settings tab, users can interact with selected components such as buttons and toggles to configure their app settings.
- On the Feature discovery tab, add cards highlighting your app’s features, explain how the features work, and link to further documentation or resources.
The app settings builder is organized around three sections: accounts, controls, and feature cards.
Below, learn how to set up the following:
- An account component to enable users to configure user-specific settings.
- Control components to enable users to configure settings with buttons, dropdown menus, and more.
- Feature cards to provide context to users as they configure their settings.
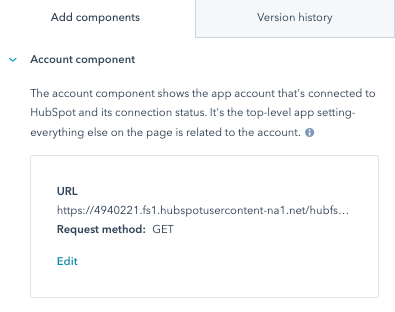
Set up the account component
App settings can be uniquely configured for each user. The account component is a dropdown menu of all users in the connected HubSpot account. When viewing the settings page, a user can select any user in the account to view and set user-specific settings for the app.
Please note:The account component is required and only one component can be added per app.
- That account component must have a URL for fetching account data.
- The account data fetched from the URL must include a list of connected users for the integration.
- The
accountID returned to HubSpot is what’s passed on to the control and feature card components so you’ll know which account HubSpot is interacting with.
The account URL is required to populate a list of user accounts on the customer’s app setting page. Users can then pick any of the accounts listed. Whichever account is selected will be sent on future action calls for toggles, buttons, and other action types. This allows the use of multiple account configurations in a single account that installs your app. You should use all the parameters HubSpot sends to determine which account you are making future changes for.
HubSpot will send a X-HubSpot-Signature header to verify that the request came from HubSpot. Read more about request signatures for details.
To add an account component:
- Create an endpoint that’s configured to handle either a
GET or POST request from HubSpot. This will be called to populate a list of user accounts on the customer’s app settings page.
- If you select
GET as the HTTP method for your endpoint, the fields will be included as query params. For example:
- If you select
POST as the HTTP method, the fields will be included in the request body as a JSON object. For example:
- In the request handler for your app’s endpoint, you should return a JSON object to HubSpot that includes a response field, which contains the
accountId, accountName of the user, along with an optional accountLogoUrl.
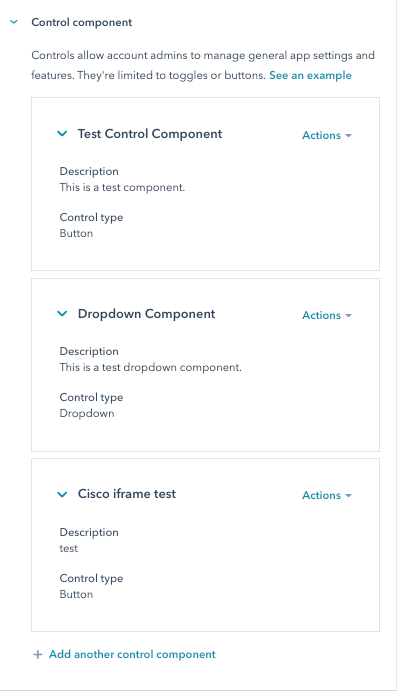
Set up the control component
You can set up controls for users such as buttons, toggles, or a dropdown menu to manage general app settings and functions in the control component. Controls are optional. If you choose to add a control, each control must contain a short header and description describing its purpose or function.
To add a component, populate the following fields:
- Header: what the control does.
- Description: a description of the control.
- Control type: select from three control types: button, toggle, or dropdown menu.
HubSpot will send a X-HubSpot-Signature header to verify that the request came from HubSpot. Read more about request signatures for details.
HubSpot will attempt to parse responses to actions as JSON and look for a message property. This message will be displayed to the user on either success or failure. Response status code of 2xx will show a success message and status codes of 4xx or 5xx will show an error message.
An example response may look similar to the following:
Use a button to initiate an action via a call to your API endpoint. You will supply the API endpoint and choose the request method (either PUT, POST or DELETE). While no data is returned, HubSpot will communicate the resulting success, failure, or timeout status of the action to the customer. You should use all parameters HubSpot sends to determine which account you are making changes for.
To add a button control type::
- Select a button control type.
- Click Configure button behavior.
- Select Hit an external endpoint.
- In the Button text field, enter text for the button. This should tell the customer what it does.
- Create an endpoint that’s configured to handle either a
PUT, POST or DELETE request from HubSpot. HubSpot will provide the associated identifying fields for the customer based on the HTTP method you select when configuring your button.
- The fields will be included in the request body as a JSON object. For example:
- In the request handler for your app’s endpoint, you should return a JSON object to HubSpot. This should include a response field along with an optional message to the user. For example:
You can also use a button to open a modal displaying an iframe. To do so:
-
Select a button control type.
-
Click Configure button behavior.
-
Select Open an external URL within an iframe.
-
In the Button text field, enter text for the button. This should tell the customer what it does.
-
Select the HTTP Method (
GET or POST).
-
Enter the Endpoint URL. Do not input the iframe URL.
-
If you select
GET as the HTTP method for your endpoint, the fields will be included as query parameters. For example:
- If you select
POST as the HTTP method, the fields will be included in the request body as a JSON object. For example:
- In the request handler for your app’s endpoint, you should return a JSON object to HubSpot. This should include a response field containing the
iframeURL:
All iframe modals will open from within your app’s settings page.
Add a toggle control type
The toggle control type provides users with a toggle option that they can turn on or off. HubSpot retrieves a toggle’s current state from the TOGGLE_FETCH URL. When a user clicks the toggle, HubSpot calls the TOGGLE_UPDATE URL to send the toggle’s new state. Other identifiers such as accountId and portalId are also passed – this allows you to identify the user triggering the toggle.
To add a toggle:
- Select a Toggle control type.
- Click Configure toggle behavior.
- In the Toggle settings pop-up, set up the toggle status and update toggle sections.
- If you’re fetching the toggle status:
- Create an endpoint that’s configured to handle either a
GET or POST request from HubSpot, which will be called to fetch the existing toggle state for a customer when they visit the settings page for your app.
- If you select
GET as the HTTP method for your endpoint, the fields will be included as query parameters. For example:
- If you select
POST as the HTTP method, the fields will be included in the request body as a JSON object. For example:
- In the request handler for your app’s endpoint, you should return a JSON object to HubSpot that includes a response field, which contains the current enabled state of the toggle as a boolean, along with an optional message to the user. For example:
- To configure the toggle when it’s turned on or off:
- Create an endpoint that’s configured to handle either a
POST or PUT request from HubSpot, which will be called when the toggle is turned on or off.
- The fields will be included in the request body as a JSON object. For example:
- In the request handler for your app’s endpoint, you should return a JSON object to HubSpot that includes a response field, which contains the current enabled state of the toggle as a boolean, along with an optional message to the user. For example:
Add a dropdown control type
The dropdown control type provides the customer with a list of options they can select from. HubSpot retrieves the list from the DROPDOWN_FETCH URL. Your API may also return a selectedOption field to display which option the user has selected, as well as a placeholder field signifying what text to display when no option is selected. By passing the accountId, portalId, and other identifiers, you can identify which user triggered the control.
When a user clicks on an option in the dropdown menu, HubSpot calls the DROPDOWN_UPDATE URL to send the same identifiers along with the selected option.
To add a dropdown menu:
-
Select the dropdown control type.
-
Click Configure dropdown behavior.
-
In the Dropdown settings pop-up box, configure the Dropdown fetch and Dropdown update sections.
-
To fetch the list of dropdown options:
-
Create an endpoint that’s configured to handle either a
GET or POST request from HubSpot, which will be called to fetch the list of dropdown options from the app settings page.
-
If you select
GET as the HTTP method for your endpoint, the fields will be included as query parameters. For example:
- If you select
POST as the HTTP method, the fields will be included in the request body as a JSON object. For example:
- In the request handler for your app’s endpoint, you should return a JSON object to HubSpot that includes a response field, which contains the current enabled state of the toggle as a boolean, along with an optional message to the user. For example:
- To configure what happens when an option is selected from the dropdown menu:
- Create an endpoint that’s configured to handle either a
POST or PUT request from HubSpot. The fields will be included in the body as a JSON object:
- In the request handler for your app’s endpoint, you should return a JSON object to HubSpot that includes a response field, which contains the current enabled state of the toggle as a boolean, along with an optional message to the user. For example:
Set up feature cards
Use feature cards to introduce, describe, and help users set up app features. You can add up to six feature cards per app.
To add a feature card:
-
Set up the following fields for the card
- Card header: enter a header – this is the title of a feature.
- Description: enter a description for the feature.
- CTA button text: enter text for the CTA button.
- CTA button URL: enter a URL. It is recommended to have the CTA direct users to where the feature appears in HubSpot.
- Illustration: select an illustration for the feature card.
- Add image or video: provide a preview carousel of the feature to your users.
- Upload an image or video file. You can upload up to six images or videos.
- Add a description of the image or video.
-
Once you’ve set up all the fields, click Add to settings.
Once you’ve added all the components to the settings page builder, click Deploy changes in the upper-right to deploy the settings page to all users.
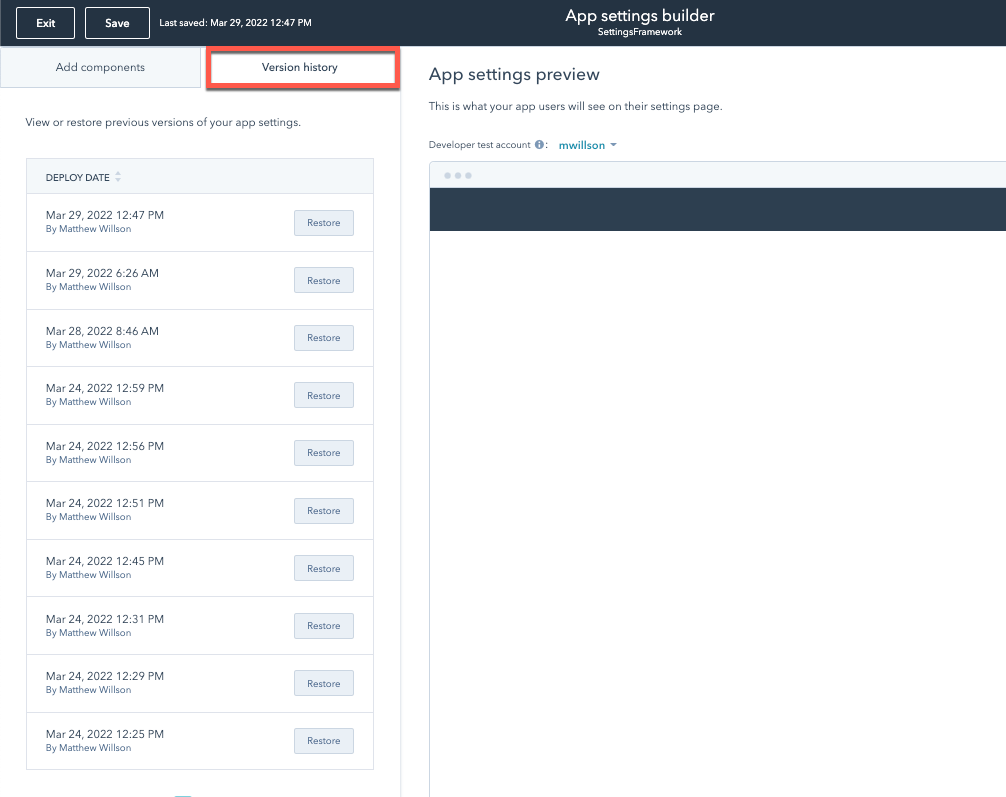
Restore a previous version of an app settings page
The app settings builder supports versioning and allows you to restore previously deployed settings pages. To do so:
- Click the Version history tab.
- Next to the version you want to deploy, click Restore. The selected version of the app settings page will load in the builder.
- From there, you can make new edits to the settings page and deploy it.
Test your app settings page
To test your app’s settings page, set up a test account from your developer account, then install the app on that test account. The app settings page will load on the test account’s connected app.
HubSpot also logs all requests made to URLs in the app settings page. To view this request log:
- In your developer account, click Apps.
- Click the app you want to create a settings page for.
- In the left sidebar menu, click Monitoring.
- Click the App settings tab.
Please note:Clicking buttons or toggles will make calls to the URLs you have configured, so ensure that you are using a true developer test account.