You can create, read, and update custom objects using API key authentication. If you’d like to integrate a custom object with your HubSpot app using OAuth, learn more about applying to request access for your public OAuth App .
Custom objects
Marketing Hub
- Enterprise
Sales Hub
- Enterprise
Service Hub
- Enterprise
CMS Hub
- Enterprise
HubSpot provides a set of standard CRM objects with each account, such as contacts, companies, and deals. However, you can also create your own custom objects to represent and organize your CRM data based on your business needs. Use the custom objects API to define custom objects, properties, and associations to other CRM objects.
For a video walkthrough of custom objects, check out Data in HubSpot: Custom Objects and Other Tools in HubSpot’s Academy.
Below, learn how to create and manage custom objects through the API, and see a walkthrough of creating an example custom object.
Create a custom object
Please note: custom objects are specific to each account, with a maximum of 10 custom objects per account.
To create a custom object, you'll first need to define the object schema. The schema includes the object name, properties, and associations to other CRM objects. You can find the full schema request details in the Object Definition tab at the top of this article. You can also view a sample request in the example walkthrough below.
To create the custom object schema, make a POST
request to crm/v3/schemas
. In the request body, include definitions for your object schema, including its name, properties, and associations.
When naming your custom object, keep the following in mind:
- Once you create an object, the object's name and label cannot be changed.
- The name can only contain letters, numbers, underscores, and hyphens.
- The first character of the name must be a letter.
- Long labels may be cut off in certain parts of the product.
Below, read about the required definitions for the object's properties and associations.
Properties
The properties you define in the request body will be used to store information on individual custom object records.
Please note: you can only have two unique ID properties for each custom object in your HubSpot account.
You'll use your defined properties to populate the following property-based fields:
- requiredProperties: the properties that are required when creating a new custom object record.
- searchableProperties: the properties that are indexed for searching in HubSpot.
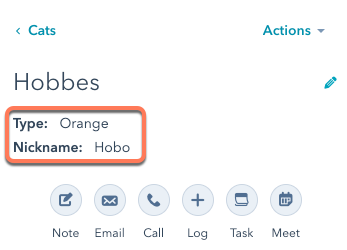
- primaryDisplayProperty: the property used for naming individual custom object records.
- secondaryDisplayProperties: the properties that appear on individual records under the primaryDisplayProperty.
- The first property listed in
secondaryDisplayProperties
will be also added as a fourth filter on the object index page if it’s one of the following property types:string
number
enumeration
boolean
datetime
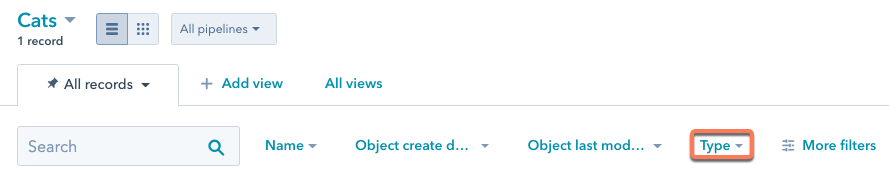
- To remove a display property from the UI, you'll need to first delete the property, then recreate it.
- The first property listed in
By default, when creating properties through the schema request, property type
is set to string
, and the fieldType
is set to text
. Below are the values you can use to create different types of properties.
type |
Description | Valid fieldType values |
---|---|---|
enumeration |
A string representing a set of options, separated by semicolons. | booleancheckbox , checkbox , radio , select |
date |
An ISO 8601 formatted value representing a specific day, month, and year. | date |
dateTime |
An ISO 8601 formatted value representing a specific day, month, year and time of day. The HubSpot app will not display the time of day. | date |
string |
A plain text strings, limited to 65,536 characters. | file , text , textarea |
number |
A number value containing numeric digits and at most one decimal. | number |
fieldType |
Description |
---|---|
booleancheckbox |
An input that will allow users to select one of either Yes or No. When used in a form, it will be displayed as a single checkbox. |
checkbox |
A list of checkboxes that will allow a user to select multiple options from a set of options allowed for the property. |
date |
A date value, displayed as a date picker. |
file |
Allows for a file to be uploaded to a form. Stored and displayed as a URL link to the file. |
number |
A string of numerals or numbers written in decimal or scientific notation. |
radio |
An input that will allow users to select one of a set of options allowed for the property. When used in a form, this will be displayed as a set of radio buttons. |
select |
A dropdown input that will allow users to select one of a set of options allowed for the property. |
text |
A plain text string, displayed in a single line text input. |
textarea |
A plain text string, displayed as a multi-line text input. |
Associations
HubSpot will automatically associate a custom object with the emails, meetings, notes, tasks, calls, and conversations objects. You can further associate your custom object with other standard HubSpot objects or other custom objects.
When creating associations through the create schema request, identify standard objects using their name and custom objects using their objectTypeId
value. For example:
Retrieve existing custom objects
To retrieve all custom objects, make a GET
request to /crm/v3/schemas
.
To retrieve a specific custom object, make a GET
request to one of the following endpoints:
/crm/v3/schemas/{objectTypeId}
/crm/v3/schemas/{fullyQualifiedName}
. You can find an object'sfullyQualifiedName
in its schema, which is derived fromp{portal_id}_{object_name}
.
For example, your request URL may look like the following:
https://api.hubapi.com/crm/v3/schemas/2-3465404
Update existing custom objects
To update an object's schema, make a PATCH
request to https://api.hubapi.com/crm/v3/schemas/{objectTypeId}
.
Once your custom object is defined, the name and labels (singular and plural) cannot be changed. However, you can update the requiredProperties
, searchableProperties
, primaryDisplayProperty
, and secondaryDisplayProperties
fields.
You can update an object's properties either in HubSpot or by using the properties API.
Update associations
To add other object associations to your custom object, make a POST
request to /crm/v3/schemas/{objectTypeId}/associations
.
You can only associate your custom object with standard HubSpot objects (e.g. contact, company, deal, or ticket) or other custom objects. In the toObjectTypeId
field, identify custom objects by their objectTypeId
value and standard objects by their name. For example:
Delete a custom object
You can only delete a custom object after all object instances of that type are deleted. To delete a custom object, make a DELETE
request to /crm/v3/schemas/{objectType}
.
If you need to create a new custom object with the same name as the deleted object, you must hard delete the schema by making a DELETE
request to /crm/v3/schemas/{objectType}?archived=true
. You can only delete a custom object type after all object instances of that type, associations, and custom object properties are deleted.
Custom Object Example
The following is a walkthrough of creating an example custom object. For full details of the requests shown, view the Object Definition tab at the top of the article.
This walkthrough covers:
- creating a custom object schema.
- creating a custom object record.
- associating a custom object record with a HubSpot contact.
- creating a new association definition between the custom object and HubSpot ticket.
- creating a new property definition.
- updating the object schema (i.e.
secondaryDisplayProperties
) with the new property.
Goal: a car dealership called CarSpot wants to store their inventory in HubSpot using a custom object. To track vehicle ownership and purchases, they'll associate cars with contact records. Along the way, they'll also track vehicle maintenance using HubSpot tickets and custom properties.
Creating the object schema
CarSpot needs to create an object schema that can represent the following attributes as properties:
- Condition (new or used): enumeration
- Date received at dealership: date
- Year: number
- Make: string
- Model: string
- VIN: string (unique value)
- Color: string
- Mileage: number
- Price: number
- Notes: string
They'll also define an association between their custom object and the standard contacts object so that they can connect cars to potential buyers.
With their data model finalized, they'll create the object schema by making a POST
request to /crm/v3/schemas
with the following request body:all
The response for this API call would look similar to:Copy all
After creating the object schema, CarSpot makes sure to note the new object's {objectTypeId}
field, as they'll use this for fetching and updating the object later. They can also use the {fullyQualifiedName}
value, if they prefer.
Creating a custom object record
With the custom object created, CarSpot can now create records on the object for each car in their inventory.
They'll create their first car by making a POST
request to /crm/v3/objects/2-3465404
with the following request body:
The response for this API call would look similar to:Copy all
With the record created, they can use the id
value to later associate the car with an existing contact.
If they wanted to later retrieve this record along with specific properties, they could make a GET
request to https://api.hubapi.com/crm/v3/objects/2-3465404/181308?portalId=1234567&properties=year&properties=make&properties=model
Associating the custom object record to a contact
Using the ID of the new car record (181308
) and a contact ID (51
), CarSpot can associate the car record with a contact. They'll create this association by making a PUT
request to /crm/v3/objects/{objectType}/{objectId}/associations/{toObjectType}/{toObjectId}/{associationType}
Using the above IDs, the request URL will be constructed as follows:
https://api.hubspot.com/crm/v3/objects/2-3465404/181308/associations/contacts/51/75
Defining a new association
CarSpot now wants to start tracking post-sale services for their cars. To do so, they'll use HubSpot tickets to log any maintenance performed.
To allow associations between cars and tickets, they'll create a new association by making a POST
request to /crm/v3/schemas/2-3465404/associations
with the following request body:
The response for this API call would look similar to:Copy all
When creating a new association between two custom objects, specify the custom objects by their objectTypeId in the toObjectTypeId field. For standard objects, you can identify them by name or use the following values:
- Contact: 0-1
- Company: 0-2
- Deal: 0-3
- Ticket: 0-5
Defining a new property
As they continue to track maintenance, CarSpot sees an opportunity to bundle maintenance services into packages. To track these maintenance packages on individual car records, they'll create a new enumeration property containing the available packages.
To define a new property, they'll make a POST
request to /crm/v3/properties/2-3465404
with the following request body:
The response for this API call would look similar to:Copy all
In addition, they want this property to appear in the sidebar of each car record so that the information is readily available to their sales reps and technicians. To do this, they'll add the property to secondaryDisplayProperties
by making a PATCH
request to /crm/v3/schemas/2-3465404
with the following request body:
The response for this API call would look similar to:Copy all
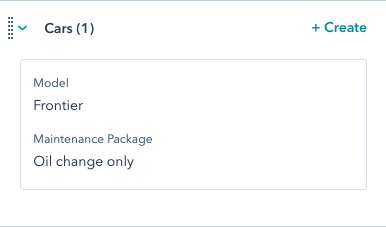
Now, when a technician opens a contact record that has an associated car, the property will be displayed in the custom object card in the sidebar:
As CarSpot continues to use HubSpot, they'll likely find ways to refine and expand this custom object and more using HubSpot's API. They might even decide to build dynamic pages using their custom object data.
Thank you for your feedback, it means a lot to us.