- The Calling Extensions SDK, a JavaScript SDK that enables communication between your app and HubSpot.
- The calling settings endpoints, which are used to set the calling settings for your app. Each HubSpot account that connects to your app will use these settings.
- The calling iframe, which is where your app appears to HubSpot users and is configured using the calling settings endpoints.
Run the demo calling app
You have the option to test the Calling Extensions SDK on two different demo apps:- The demo-minimal-js features a minimal implementation of the SDK using JavaScript, HTML, and CSS. View how the SDK is instantiated in index.js.
- The demo-react-ts features a real-life implementation of the SDK using React, TypeScript, and Styled Components to act as a blueprint for your app. View how the SDK is instantiated in useCti.ts.
Install the demo calling app
You can run the demo apps with or without installation. To install the demo on your local environment:- Install Node.js on your environment.
- Clone, fork, or download the ZIP of this repository.
- Open your terminal, and navigate to the root directory of the project.
- Run one of the following commands:
- For the
demo-minimal-js:
- For the
demo-react-ts:
Launch the demo calling app from HubSpot
- Navigate to your records:.
- Contacts: In your HubSpot account, navigate to Contacts > Contacts.
- Company: In your HubSpot account, navigate to Contacts > Companies.
- Open your browser’s developer console, and run the following command:
- If you’ve completed the installation steps, for the
demo-minimal-jsor thedemo-react-ts:
- If you’ve completed the installation steps, for the
- If you’ve skipped the installation steps:
- For the
demo-minimal-js:
- For the
- For the
demo-react-ts:
- Refresh the page, and click the Call icon in the left sidebar. Click the Call from dropdown menu, and select the name of the demo app from step 2 (e.g. Demo App Local, Demo App JS, Demo App React).
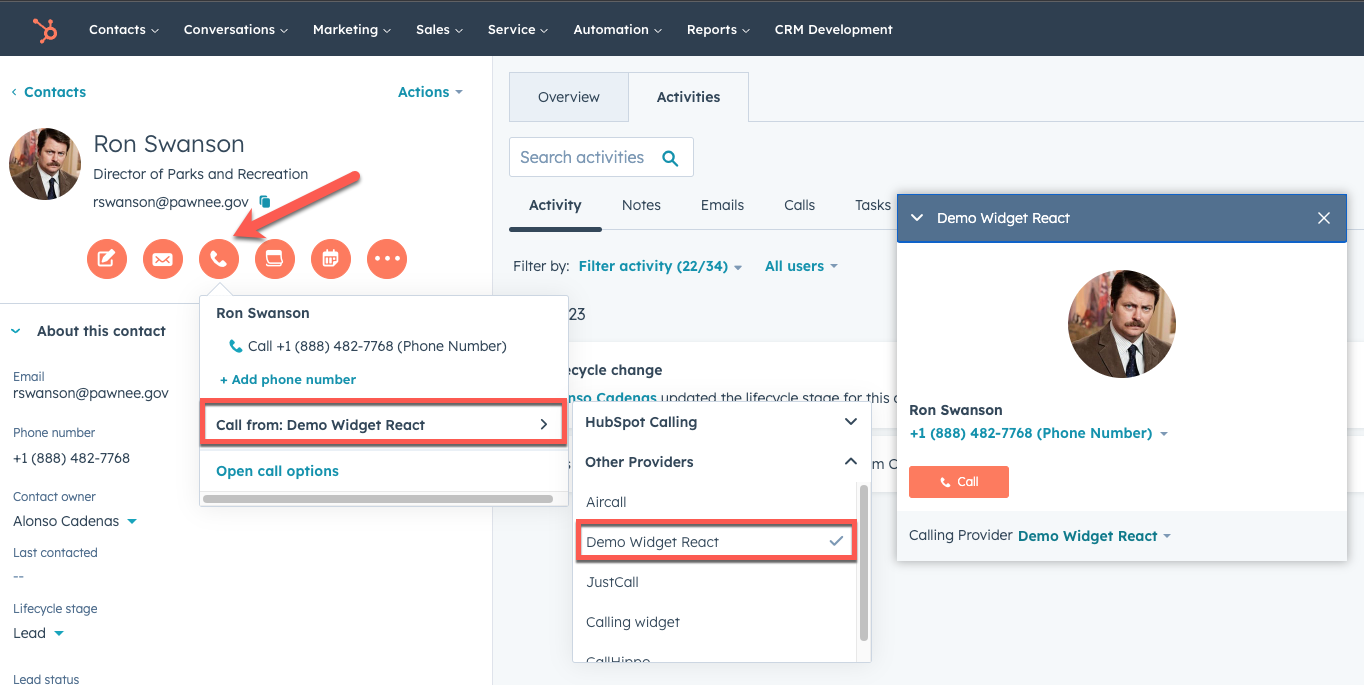
- Click Call to see how the demo app integrates with HubSpot via the Calling Extensions SDK. You can also see the events logged to your browser’s developer console.
Install the Calling Extensions SDK on your calling app
To add the Calling Extensions SDK as a Node.js dependency to your calling app:- For npm, run:
- For yarn, run:
Using the Calling Extensions SDK
The Calling Extensions SDK exposes a simple API for HubSpot and a calling app to exchange messages. The messages are sent through methods exposed by the SDK and received througheventHandlers. You can find a full list of the available events in the Events section.
The following is a description of the events:
- Dial number: HubSpot sends the dial number event.
- Outbound call started: App notifies HubSpot when the call is started.
- Create engagement: HubSpot creates a call engagement with minimal information if requested by the app.
- Engagement created: HubSpot created an engagement.
- EngagementId sent to App: HubSpot sends the
engagementIdto the app. - Call ended: App notifies when the call is ended.
- Call completed: App notifies when the user is done with the app user experience.
- Update engagement: App fetches the engagement by the
engagementId, then merges and updates the engagement with additional call details. Learn more about updating a call engagement via the APIor via the SDK.
CallingExtensions object. You can define the behavior of your extension by providing an option’s object when you create your extensions instance. This option’s object provides an eventHandlers field where you can specify the behavior of your extension. The following code block illustrates the available options and event handlers you can define:
Test your app
In order to launch the calling extensions iFrame for end users, HubSpot requires the following iFrame parameters.Using the calling settings endpoint
Using your API tool (e.g. Postman), send the following payload to HubSpot’s settings API. Ensure you get the APP_ID of your calling app and your app DEVELOPER_ACCOUNT_API_KEY.Override your extension settings using localStorage
You can override any of your extension settings for testing purposes. Open your browser developer console from a HubSpot tab, edit the settings below, and run the command:Get your app ready for production
Once you have set your app settings using the calling settings endpoint, use the PATCH endpoint to changeisReady to true.
Publish your calling app to the HubSpot marketplace
Once your app is set up, users can install it into their account using the app’s install URL. If you want to list it publicly for other HubSpot users to find, you can also choose to list it on the HubSpot Marketplace. This is not necessary if the app is for internal use only.Events
Available calling events:- Send messages to HubSpot:
-
Receive messages from HubSpot:
onReadyonDialNumberonEngagementCreatedonCreateEngagementSucceededonCreateEngagementFailedonNavigateToRecordFailedonPublishToChannelSucceededonPublishToChannelFailedonFinalizeEngagementSucceededonFinalizeEngagementFailedonCallerIdMatchFailedonCallerIdMatchSucceededonVisibilityChangeddefaultEventHandler
Sending messages to HubSpot
Theextensions object provides the following event handlers that you can invoke to send messages to HubSpot or to specify other associated behavior. See examples below.
initialized: Required
Send a message indicating that the soft phone is ready for interaction.userAvailable
Sends a message indicating that the user is available.userUnavailable
Sends a message indicating that the user is unavailable.userLoggedIn
Sends a message indicating that the user has logged in.Both
userLoggedIn and userAvailable must be called before HubSpot will route incoming call events to the extension. If either one is not called, the extension will not receive incoming call events even if it has been correctly initialized.userLoggedOut
Sends a message indicating that the user has logged out.incomingCall
Sends a message to notify HubSpot that an incoming call has started. A Call Started event will then be available in the journey analytics and workflows tools.outgoingCall
Sends a message to notify HubSpot that an outgoing call has started.dialingContext is not included in the OnOutgoingCall TypeScript type definition. To avoid a type error, assign your call data to a variable before passing it to outgoingCall instead of using an inline object literal. You can also use a type assertion (as OnOutgoingCall).onDialNumber payload and pass it as dialingContext:
callAnswered
Sends a message to notify HubSpot that an outgoing call is being answered.callTransferred
Notify HubSpot that a call has been transferred to another user or agent.callEnded
Sends a message to notify HubSpot that the call has ended, and a Call Ended event will then be available in the journey analytics and workflows tools. If omitted, HubSpot may still publish a Call ended event eventually, but the end time will be inaccurate.callCompleted
Sends a message to notify HubSpot that the call has completed. Engagement properties are owned by HubSpot, and no longer need to be created or updated manually (see highlighted).publishToChannel
Publishes the call to a connected channel. This isn’t needed for HubSpot-owned engagements.finalizeEngagement
Maps a third-party engagement (created outside of the calling SDK) to a CRM object within HubSpot. If you use the calling SDK to create the engagement, this mapping is handled automatically and this event is not required. This event replaces the deprecatedpublishToChannel event. While both events perform the same function, finalizeEngagement more accurately reflects its broader purpose beyond channel publishing.
You should use this event if any of the following criteria applies:
- You are creating your own engagements manually (not using the calling SDK’s engagement creation).
- You want call-related events to be published to HubSpot (e.g., for use in the journey analytics or workflows tools).
- The
incomingCallandcallEndedSDK events must also be sent to generatee_call_startedande_call_endedevents, respectively. - This event is backward-compatible with the
publishToChannelevent, but any new integrations should use thefinalizeEngagementevent going forward.
navigateToRecord
This event is called when navigating to a record.sendError
Sends a message to notify HubSpot that the calling app has encountered an error.resizeWidget
Sends a message to notify HubSpot that the calling app needs to be resized.Receive messages from HubSpot
Theextensions object provides the following event handlers that you can invoke when receiving messages in HubSpot or to specify other associated behavior. See examples below.
onReady
Message indicating that HubSpot is ready to receive messages.onDialNumber
This event will trigger when a user in HubSpot triggers an outbound call. TheonDialNumber event will provide a payload that includes all the pertinent fields associated with the call. These fields are detailed in the table below:
onEngagementCreated
Deprecated. Use onCreateEngagementSucceeded instead.onCreateEngagementSucceeded
HubSpot sends a message to notify the calling technology partner that the engagement update succeeds.onCreateEngagementFailed
HubSpot sends a message to notify the calling technology partner that the engagement creation failed.onNavigateToRecordFailed
This event is called when navigating to a record fails.onPublishToChannelSucceeded
This event is called when publishing to a channel succeeds.onPublishToChannelFailed
This event is called when publishing to a channel fails.onFinalizeEngagementSucceeded
This event is called when finalizing engagement successes.onFinalizeEngagementFailed
This event is called when finalizing engagement failures.onCallerIdMatchSucceeded
This event fires when HubSpot successfully matches the caller’s phone number to a contact or company record in the CRM. The event payload includes the matched record’s details, such as name and contact type.This event will only fire if the phone number passed to
incomingCall is in E.164 format. A misformatted number will silently prevent this event from firing.onCallerIdMatchFailed
This event is called when the caller ID match fails.onVisibilityChanged
Message indicating if the user has minimized or hidden the calling app.While a call is active, the HubSpot widget will reopen itself if the user attempts to close it. This is intentional behavior to prevent losing call state.
defaultEventHandler
Default handler for events.Calling SDK | Frequently Asked Questions
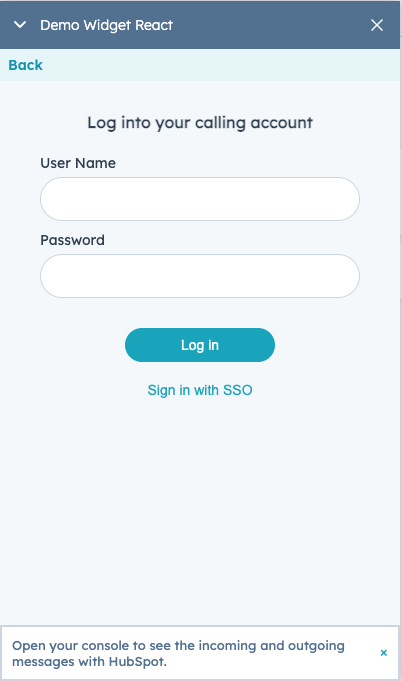
How is user authentication handled?
The calling app should handle authentication.Is Calling Extensions hosted on a CDN?
Yes. You can install the Calling Extensions SDK via jsDeliver. For example, to install calling-extensions-sdk@0.2.2, you can use https://cdn.jsdelivr.net/npm/@hubspot/calling-extensions-sdk@0.2.2/dist/main.js.When should an engagement be created versus updated?
A user can initiate a call from inside the HubSpot UI and outside the HubSpot UI (e.g. mobile app, redirected number, etc.) If a call is initiated from within HubSpot UI, HubSpot will create a call engagement and send the engagement to the calling app. Once the call finishes, the call app can update this engagement with additional call details. If a call is initiated outside of HubSpot UI, the app should create the call engagement.What scopes are required as a part of the integration?
Add contacts and timeline scopes are required. These scopes ensure your application has access to contacts and the ability to create and update call engagements in the CRM.Can this functionality be added to an already existing application in the marketplace or do I create a new app?
If you already have an existing app that serves the calling use case then you can directly add this functionality to your existing app. All customers who already have your app installed will get access to this new functionality without having to install the app again.Can I integrate my existing soft phone application in the SDK?
Yes, integrating your existing soft phone application should be very easy. Just follow the steps in the documentation above to have your application up and running.Can users use multiple integrations at the same time?
Yes, users can use multiple third-party calling integrations at the same time. They can use the provider switcher presented after clicking on the call button to seamlessly switch between providers.Can free users install app integrations?
Yes, all users can install the app.If a user already has my app installed, does the integration automatically show up?
Yes, if a user already has installed your app, and you are updating the same app with the calling extensions, the integration will automatically show up. Currently, there is no way for the developer to enable the calling app only to a subset of customers.Can any user install or uninstall an app?
No, only users who have necessary permissions can install and uninstall an app. Learn more about how to review a user’s permissions.Can I create a custom calling property?
Yes, you can create a custom calling property using the properties API.Can I place a call from a custom object?
Yes, calling integrations can place calls from custom objects as long as they only use the SDK to create the call. Each integration will need to verify that they only use the Calling SDK to create calls and to notify HubSpot in theoutgoingCall event.
First, verify that the integration is using the Calling SDK to create engagements in the outgoingCall event:
createEngagement is true, learn how to update your app information here.
Here is the example for the entire outgoingCall event: