Create and submit an app listing
Please note:Before submitting an app listing, review the App listing requirements page to understand how to fill your listing.
- In your HubSpot account, navigate to Development.
- In the left sidebar menu, click App Listings.
- In the upper right, click Create listing. If this button is grayed out, listings have already been created for all your existing apps.
- Select the app you want to create a listing for and click Next. Apps that are already listed on HubSpot Marketplace will not appear here.
- Click the Select the primary listing language for [app name] dropdown menu and select the default language users will see when browsing HubSpot Marketplace.
- Click Next.
Listing info
On the Listing info tab:- In the App information section, add your Public app name, Company name, Tagline, and Install Button URL.
- Click the Install Button URL dropdown menu and select a URL. These URLs are populated from the redirect URLs set in your app settings.
- In the Sign-in configuration section, select whether the app will require a separate partner sign-in. Learn more about the app install flow with and without partner sign in.
-
In the App icon section, upload an 800px by 800px icon for your app. This will appear in HubSpot Marketplace and connected users’ accounts. When creating your icon:
- Do: use a JPG, JPEG, or PNG file, fill the entire space (800px by 800px) - your image should touch at least two edges, and use a high-resolution, non-pixelated image.
- Do not: include text in your icon, use a wordmark, or leave extra whitespace around your icon.
- In the Categorize your app section, you can select up to two categories for your app. Learn more about the different categories available.
- You can also review and set a URL path and add any search terms that can be used to find your app in HubSpot Marketplace.
App details
On the App details tab:- In the Demo video section, upload a video to show how your app works. Refer to the How to Make a Great App Demo Video page for best practices and examples of how to create a demo video.
- In the Screenshots section, add images and alt text showing how your app works. You can add up to eight images.
- In the App Overview section, enter an overview for your app. Your overview should include information on what your app does, the key business problems your app solves, and why users should install your app.
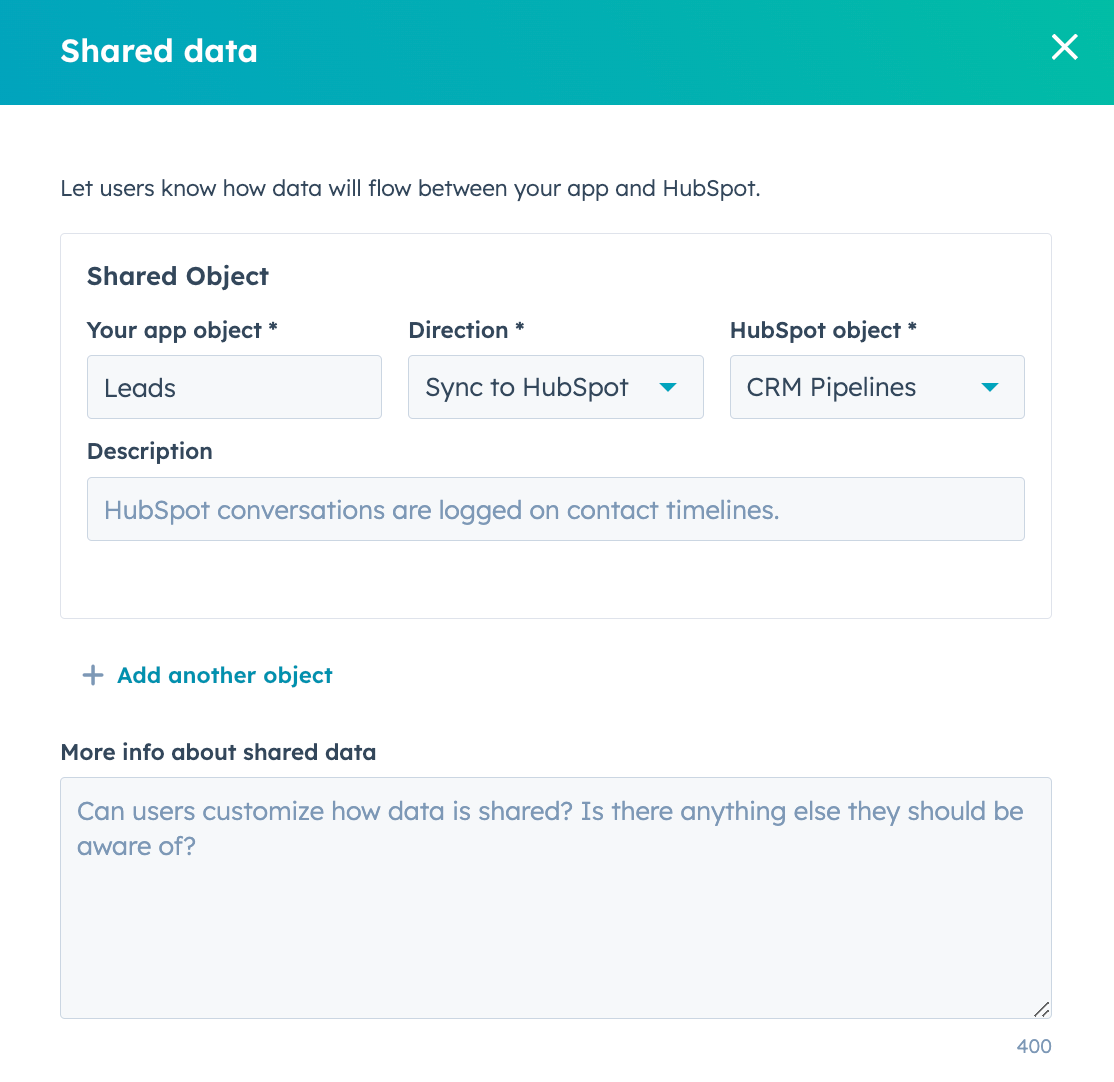
- Click Add shared data. In the Shared data section, let users know how data will flow between your app and HubSpot.
- In the right panel, select which app object syncs with which HubSpot object, and the direction of the sync. In the App Overview section, give a brief description of how your app can help users carry out their goals.
- To add another object sync, click Add another object.
- Click the HubSpot features your app works with dropdown menu and select the checkboxes next to the HubSpot features. You can add up to 10 HubSpot tools and features.
- Click the Other tools your software integrates with dropdown menu and select the checkboxes next to any external tools or apps that your app integrated with. You can select up to 6 other tools or apps.
- Click the Languages your app is available in dropdown menu select all languages available for your app. You can only create additional HubSpot Marketplace listings in these languages.
Pricing
On the Pricing tab:- Click the currency dropdown menu and select the checkboxes next to the currencies you want to list the app in. You can select from over 100 currencies.
-
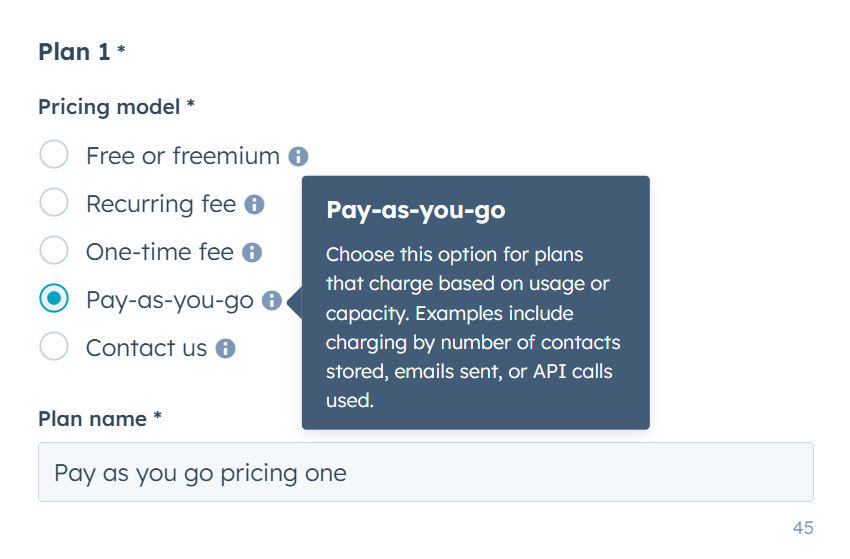
You can also set up pricing plans for your app by adding the pricing model, plan name, tagline, pricing detail, and features list.
- Depending on the pricing model selected, you may need to add more information, such as the frequency of payment, one-time fees, or monthly prices. Hover over the information icon to learn more about each pricing model.
- To add another pricing plans, click Add another plan. You can add up to 5 pricing plans.
- In the Link to your software’s pricing plan section, enter the URL where users can find more information on your pricing plans.
- In the Agency pricing plans section, enter the URL where users can learn more about pricing for partner or consulting services.
App features
On the App features tab, add features and guide customers on how to use them. There is no limit on the number of app features that can be created for your app.- In the top right, click Add a feature.
-
On the Feature details page, configure your app features:
- Feature name: enter your feature name. This should describe your what your feature does.
- Scopes: select all scope groups a customer’s account will need to have this feature. Scope groups are used to determine whether the customer’s HubSpot account is compatible with the app features.
- Description: enter a detailed description for your feature, and how it can solve a customer’s business problems.
- Image: add an image for your feature. After adding your image, click to toggle the On your app’s marketplace listing or As a feature discovery card switches on to configure where your images should display.
-
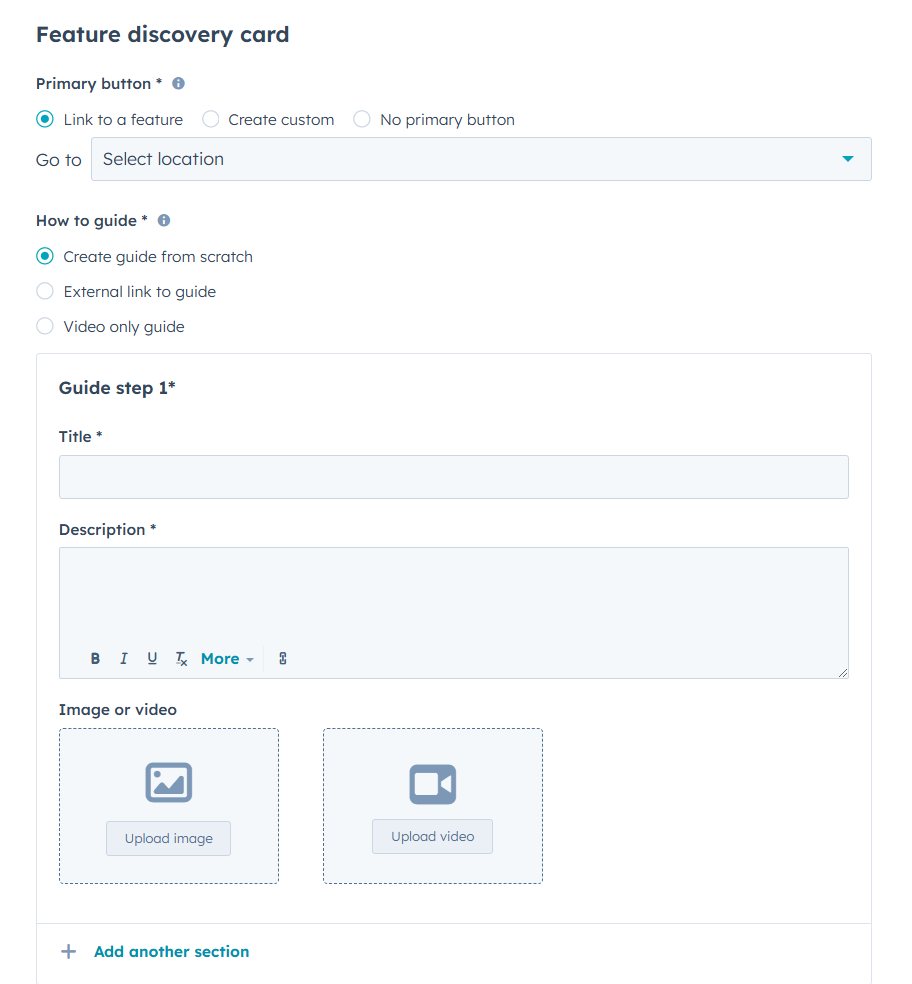
If you’ve chosen select to display the feature as a feature discovery card:
- Select an option for your primary button:
- Link to a feature: select which HubSpot feature the button should link to.
- Create custom: enter Button text and the Button URL.
- No primary button: no button will be displayed on your feature discovery card.
- Select a how-to guide to onboard your customers:
- Create a guide from scratch: enter a title, description, and image or video.
- External link to guide: enter a Guide URL.
- Video only guide: upload a video.
- To add another guide, click Add another section.
- Select an option for your primary button:
Support info
On the Support info tab:- In the Contact info section, add a support contact method for users who have questions while using your app. It is required add a support email and languages that customer support is offered in. You can also include links to your company website, live chat, Facebook page, and a phone number.
- In the Support resources section, include links to your app’s setup documentation.
- In the Terms of Service and Privacy Policy section, add links to your privacy documentation.
Testing info
On the Testing info tab:- In the App review instructions field, enter steps for HubSpot’s developers to test the app as part of the review process. Learn how to providing testing details and credentials for your app.
- In the Technology Partner Program points of contact section, add details for members of your team to receive listing, technical and program information about your app listing.
- These individuals receive key updates, resources, and opportunities designed to help your business grow and succeed as a HubSpot Technology Partner. Keeping these contacts accurate and up-to-date is critical, and will ensure the right people in your business receive timely and tailored communication from HubSpot.
- HubSpot will consider the team member you provide for Contact 1 as the main point of contact.
- You must include at least a Technology Partner Program main point of contact
- Business Development / Partner Manager: the person who focuses on maintaining and expanding the business relationship between your company and HubSpot.
- Developer: the primary contact for all technical communication for your app’s integration with HubSpot. They will manage the build process, maintenance, and performance of your app to provide a smooth user experience.
- Executive: the executive sponsor of the partnership. This should be a senior leader on your team who provides strategic oversight of your company’s relationship with HubSpot and may make decisions about partnership direction or future investments.
- Founder/Co-founder: the original creator or co-creator of your business.
- Marketing manager: a team member who manages app promotion and helps drive adoption within the HubSpot ecosystem. They likely orchestrate go-to-market resources and analyze app performance to improve visibility and user engagement.
- Product manager: the owner who oversees your app’s feature development and aligns your integration with HubSpot’s product standards.
- To add another person as a point of contact, at the bottom, click Add another point of contact.
- Main
- BD / Partner manager
- Developer
- Executive
- Marketing
- Product manager
Best for: program owner, partnership lead, or a team member responsible for managing your HubSpot partnership.Communications received:
- Technical updates and breaking change announcements
- Program news, events, and opportunities
- Exclusive partner resources and best practices
- Guidance on building, marketing, and scaling success in the HubSpot ecosystem
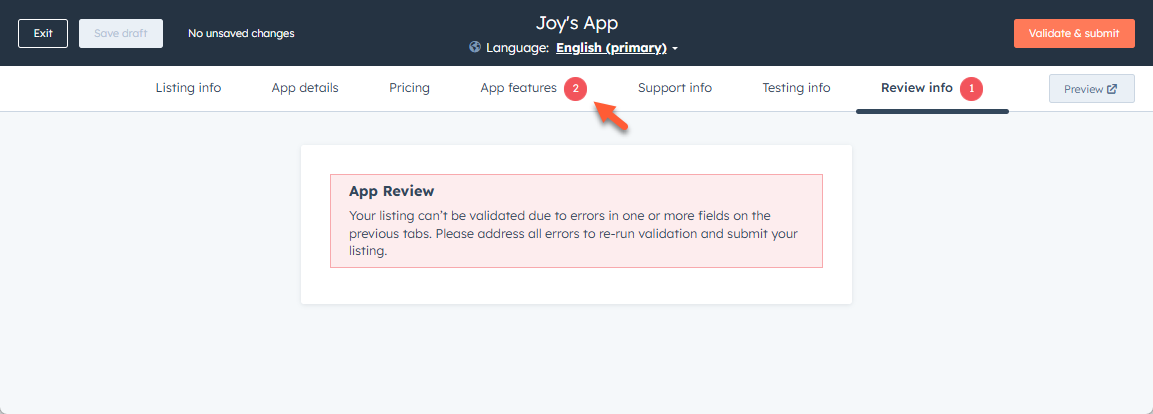
Review info
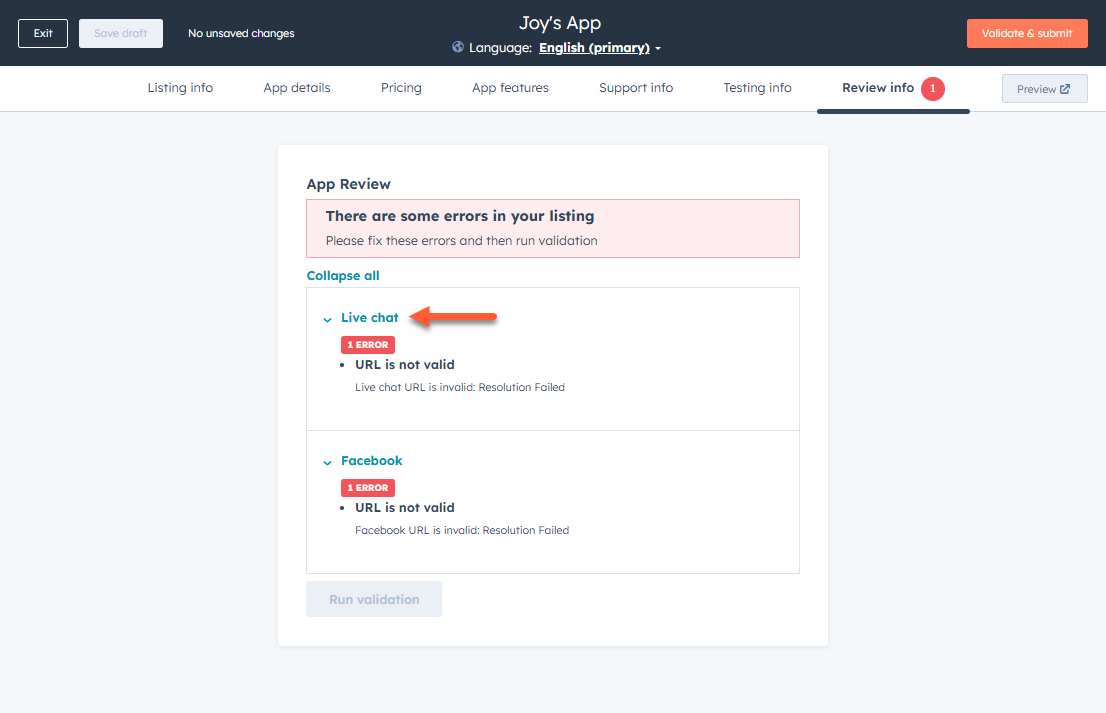
On the Review info tab: In the App review section, a list of all listing errors will appear:- To review details for all listing errors, at the top, click Expand all.
- To hide the details for all listing errors, at the top, click Collapse all.
- To resolve an error, click the error name. This will direct you to the relevant tab and section to resolve the error.
- If the Validate & submit button is grayed out, check that you’ve filled out all the required fields and have Super admin permissions.
- If you’ve missed any required fields, you will see a number in the tab heading indicating the number of missed fields. Click each tab and enter the missing information, then return to the Review info tab.
- At the bottom, click Run validation.
Submit app
Once you’ve resolved any validation errors, you can submit your app for approval.- Click Submit for review in the top right.
- In the dialog box, read through the terms and conditions, then select the checkboxes.
- By default, localized listings will be automatically translated into all supported languages. To customize which languages are automatically translated:
- Click to expand the Languages selected for auto-translation section.
- Clear the checkbox next to each language you don’t want translated. It is recommended to translate app listings into all available languages, but you may wish to omit languages with a manually created translation.
- Click Agree & submit.
Create and update a localized listing for an existing app listing
You will need to set a primary language on your existing app listing and have your primary listing already published in the HubSpot Marketplace in order to manually create listings in other languages. Automatically translated listings can be created when resubmitting your app.- In your HubSpot app developer account, click Marketplace > App Listings.
- If you already have an app listed in the Marketplace, you’ll see a yellow banner above the listed app asking you to set your primary listing language. Click Set it now. You will need to set the primary listing language for the app listing before you’re able to create new language listings.
- In the dialog box, click the Select the languages your app is available in dropdown menu and select the languages your app software is available in.
- Click the Select the primary listing language for [app name] dropdown menu and select the default language users will see when browsing HubSpot Marketplace.
- Click Save.
- Hover over the app listing and click More > Create listing in another language.
- Click the Language for this listing dropdown menu and select the language you want to create this listing in.
- When a user has set the language in their account, then they will automatically see the listing in that same language. For example, if you’ve create a listing in Spanish, and a user has set Spanish as their account’s default language, the listing will appear to the user in Spanish.
- Click Create, then follow the steps to create and submit a listing in the selected language.
Edit a live app listing
- In your developer account, navigate to Marketplace > App Listings.
- Hover over the listing you’d like to edit and click More. Then, select Edit.
- Make any changes, then click Submit for review in the top right and resubmit your app.
Unpublish a live app listing
- In your developer account, navigate to Marketplace > App Listings.
- Hover over the listing you want to unpublish and click More. Then, select Unpublish live listing.
- In the dialog box, enter the reason for unpublishing the app, the click Submit unpublish request.