Scope requirements
Scope requirements
In this article
- Scope requirements
- Differences between internal ID and external ID endpoints
- Event management endpoints
- Event attendance endpoints
- Participant state endpoints
- List association endpoints
- Configure app settings
Scope requirements
To make an API request to one of the marketing event endpoints, the following scopes are required:crm.objects.marketing_events.read: grants permission to retrieve marketing event and attendance data.crm.objects.marketing_events.write: grants permission to create, delete, or make changes to marketing event information.
Differences between internal ID and external ID endpoints
Many endpoints below provide two different ways to identify an event you want to fetch or update. Though the end result for similar endpoints might be the same, they differ mainly in the associated IDs you provide:- Endpoints using external IDs: endpoints that require
externalEventIdandexternalAccountIdparameters will only work in the same app that originally created the event. For example, if you created two public apps, called App A and App B, and you created a marketing event via the authentication and IDs associated with App A, only App A can read, update, or add new participants to the event. If you attempt to access the same event with App B using the same externalEventId and externalAccountId, a 404 error will result. - Endpoints using an objectId: endpoints that require an
objectIdcan be used to access an event by any app with the associated scopes listed in the section above, regardless of the app that originally created the event. If App A created a marketing event, App B can still read, update, or add participants throughobjectId-based endpoints.
Event management endpoints
The following sections provide context on common event properties, and detail how to use the various event management endpoints to create, read, update, and archive events.Event properties
The following properties are available to fetch and update when using the event management endpoints:Create an event
To create a marketing event you can make aPOST request to /marketing/v3/marketing-events/events and provide the eventName, externalEventId, externalAccountId, and eventOrganizer in the body of your request. You can optionally provide any additional properties listed in the table above in your request.
For example, if the externalAccountId of your app is "12345", and the externalEventId of your event in your app is "67890", you could create a new event called "Winter webinar" with a request that would resemble the following:
Update event properties using external IDs
You can update marketing events by making aPOST request to /marketing/v3/marketing-events/events/upsert endpoint. You can include any customProperties along with any other details of your event (including its name, start time, and description).
If a marketing event already exists with the specified ID in your request, it will be updated. Otherwise, a new event will be created.
For example, the following request would create an event with an ID of 4 named “Virtual cooking class”:
Update event properties using its objectId
Once an event is created, you can update its properties by making aPATCH request to /marketing/v3/marketing-events/{objectId}.
- To get the
objectIdfor a specific marketing event, follow the instructions in this knowledge base article to view the details for an event in your HubSpot account, then locate the ID under the Record ID field. TheobjectIdwill also be returned in the response when you successfully create an event. - You can also make a
GETrequest to the/marketing/v3/marketing-eventsendpoint described in the next section. - If you have the
externalEventIdof an event, you can include it as a path when making aGETrequest to/marketing/v3/marketing-events/{externalEventId}/identifiers. The response will include all marketing events along with the relevant identifiers for each event (i.e., the event’sobjectId, itsappInfo, themarketingEventName, and theexternalAccountId).
Get event details
To get a list of all marketing events along with their properties, make aGET request to /marketing/v3/marketing-events.
If you need to retrieve the details for a specific marketing event by its Record ID in HubSpot, you can provide the ID as the objectId in a GET request to /marketing/v3/marketing-events/{objectId}.
Delete an event
To delete a marketing event, make aDELETE request to /marketing/v3/marketing-events/{objectId} with the event’s associated objectId.
If successful, you’ll receive a 204 No Content response.
Update multiple events in bulk
To update multiple marketing events in bulk, you can make aPOST request to /marketing-events/v3/marketing-events/batch/update and provide the properties you want to update for each event within the inputs array of the request body.
For example, if you wanted to update several properties of two marketing events with object IDs of 58237132332 and 54073507364 in a single request, the body of your request would resemble the following:
Event attendance endpoints
The event attendance state endpoints allow you to record registration activities for a contact, such as whether they registered, attended, or cancelled their registration for your event. For example, you can use this endpoint to record that a HubSpot contact has registered for a marketing event.Update attendance using the event objectId
If you want to use theobjectId of a marketing event, you can either use the contact ID of the contact you want to record participation state for, or you can use their email address.
- To use a contact’s ID, make a POST request to
/marketing/v3/marketing-events/{objectId}/attendance/{subscribeState}/createthen provide the ID of the contact using thevidfield within theinputsarray of your request body. For example, the request body below provides an example of updating the attendance data for a contact with an ID of47733471576and specifying when the attendee joined and left the event via thejoinedAtandleftAtproperties:
- To use a contact’s email, make a POST request to
/marketing/v3/marketing-events/{objectId}/attendance/{subscribeState}/email-createthen provide the email of the contact using theemailfield within theinputsarray of your request body.- If you’re creating a new contact, you can include the
contactPropertiesfield within theinputsarray of your request body to set any associated properties on the newly created contact. Otherwise, if the contact already exists,contactPropertiesprovided in the request will not be updated. - For example, the request body below provides an example of updating the attendance data for a contact with an email address of
john@example.comand specifying when the attendee joined and left the event via thejoinedAtandleftAtfields within thepropertiesobject of yourinputsarray:
- If you’re creating a new contact, you can include the
objectId: the Record ID of the marketing event in your HubSpot account. Check out the section above for more details on using the objectId of an event versus using its external IDs.subscriberState: an enumeration that matches the new attendance status of the contact:REGISTERED: indicates that the HubSpot contact has registered for the event.ATTENDED: indicates that the HubSpot contact has attended the event. If you’re updating a contact’s status to ATTENDED, you can also include thejoinedAtandleftAttimestamps as parameters in the request body, specified in the ISO8601 Instant format.CANCELLED: indicates that the HubSpot contact, who had previously registered for the event, has cancelled their registration.
Update attendance using the external IDs of the event
If you do use the endpoints that require theexternalEventId from your app, you can either use the contact IDs or email address of existing contacts:
- If you want to use the contact IDs of existing contacts:
- Make a
POSTrequest to/marketing/v3/marketing-events/attendance/{externalEventId}/{subscriberState}/create, using the ID of the event from your external application as theexternalEventId. - In the request body, provide an
inputsobject that includes the following fields:interactionDateTime: the date and time at which the contact subscribed to the event.vid: the contact ID of an existing contact.
- Make a
- If you want to use the email address of one of the event’s attendees:
- Make a
POSTrequest to/marketing/v3/marketing-events/attendance/{externalEventId}/{subscriberState}/email-create. - In the request body, provide an
inputsobject that includes the following fields:interactionDateTime: the date and time at which the contact subscribed to the event.email: the email address of the attendee as the value of the email field within an inputs
- If the email address you include don’t match the address of an existing contact, a new contact will be created.
- Make a
externalEventId: the ID of the marketing event. Check out the section above for more details on using the objectId of an event versus using its external IDs.subscriberState: an enumeration that matches the new attendance status of the contact:REGISTERED: indicates that the HubSpot contact has registered for the event.ATTENDED: indicates that the HubSpot contact has attended the event. If you’re updating a contact’s status to ATTENDED, you can also include thejoinedAtandleftAttimestamps as parameters in the request body, specified in the ISO8601 Instant format.CANCELLED: indicates that the HubSpot contact, who had previously registered for the event, has cancelled their registration.
Participant state endpoints
You can use the participation endpoints to retrieve event participant data for your marketing events. You can query data such as aggregate metrics for a specific event, as well as participant data for a specific contact or event.Read participation data for a specific contact
To get event participation data for a specific contact, make aGET request to /marketing/v3/marketing-events/participations/contacts/{contactIdentifier}/breakdown, using’s the contact’s ID or email address as the contactIdentifier path parameter.
The response will include a summary of the contact’s event participation in the properties field:
Read participation breakdown data
To get a breakdown of participation data for a specific event, use yourexternalAccountId and the externalEventId of your event to make a GET request to /marketing/v3/marketing-events/participations/{externalAccountId}/{externalEventId}/breakdown.
Read participation counters
To get an aggregate participation summary for an event, use yourexternalAccountId and the externalEventId of your event to make a GET request to /marketing/v3/marketing-events/participations/{externalAccountId}/{externalEventId}.
The response will include the total attendance counts:
Filtering participation breakdown data
When fetching breakdown data or event participation data for a specific contact, you can filter the resulting data using the contactIdentifier, state, limit, or after fields as query parameters in your request.List association endpoints
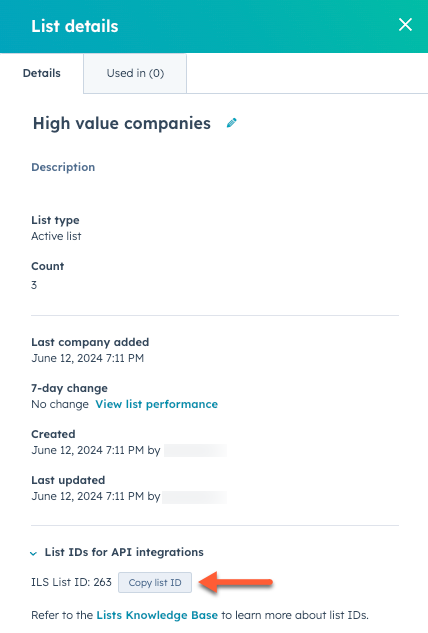
You can use the endpoints described in the sections below to manage associations between lists and your marketing events. Many of these endpoints require alistId as a path parameter, which you can find on the list details page in your HubSpot account:
- In your HubSpot account, navigate to CRM > Lists.
- Click the name of a list.
- In the top right, click Details.
- In the right panel, the list ID will appear under List IDs for API integrations. You can click Copy list ID to copy the ID to the clipboard.
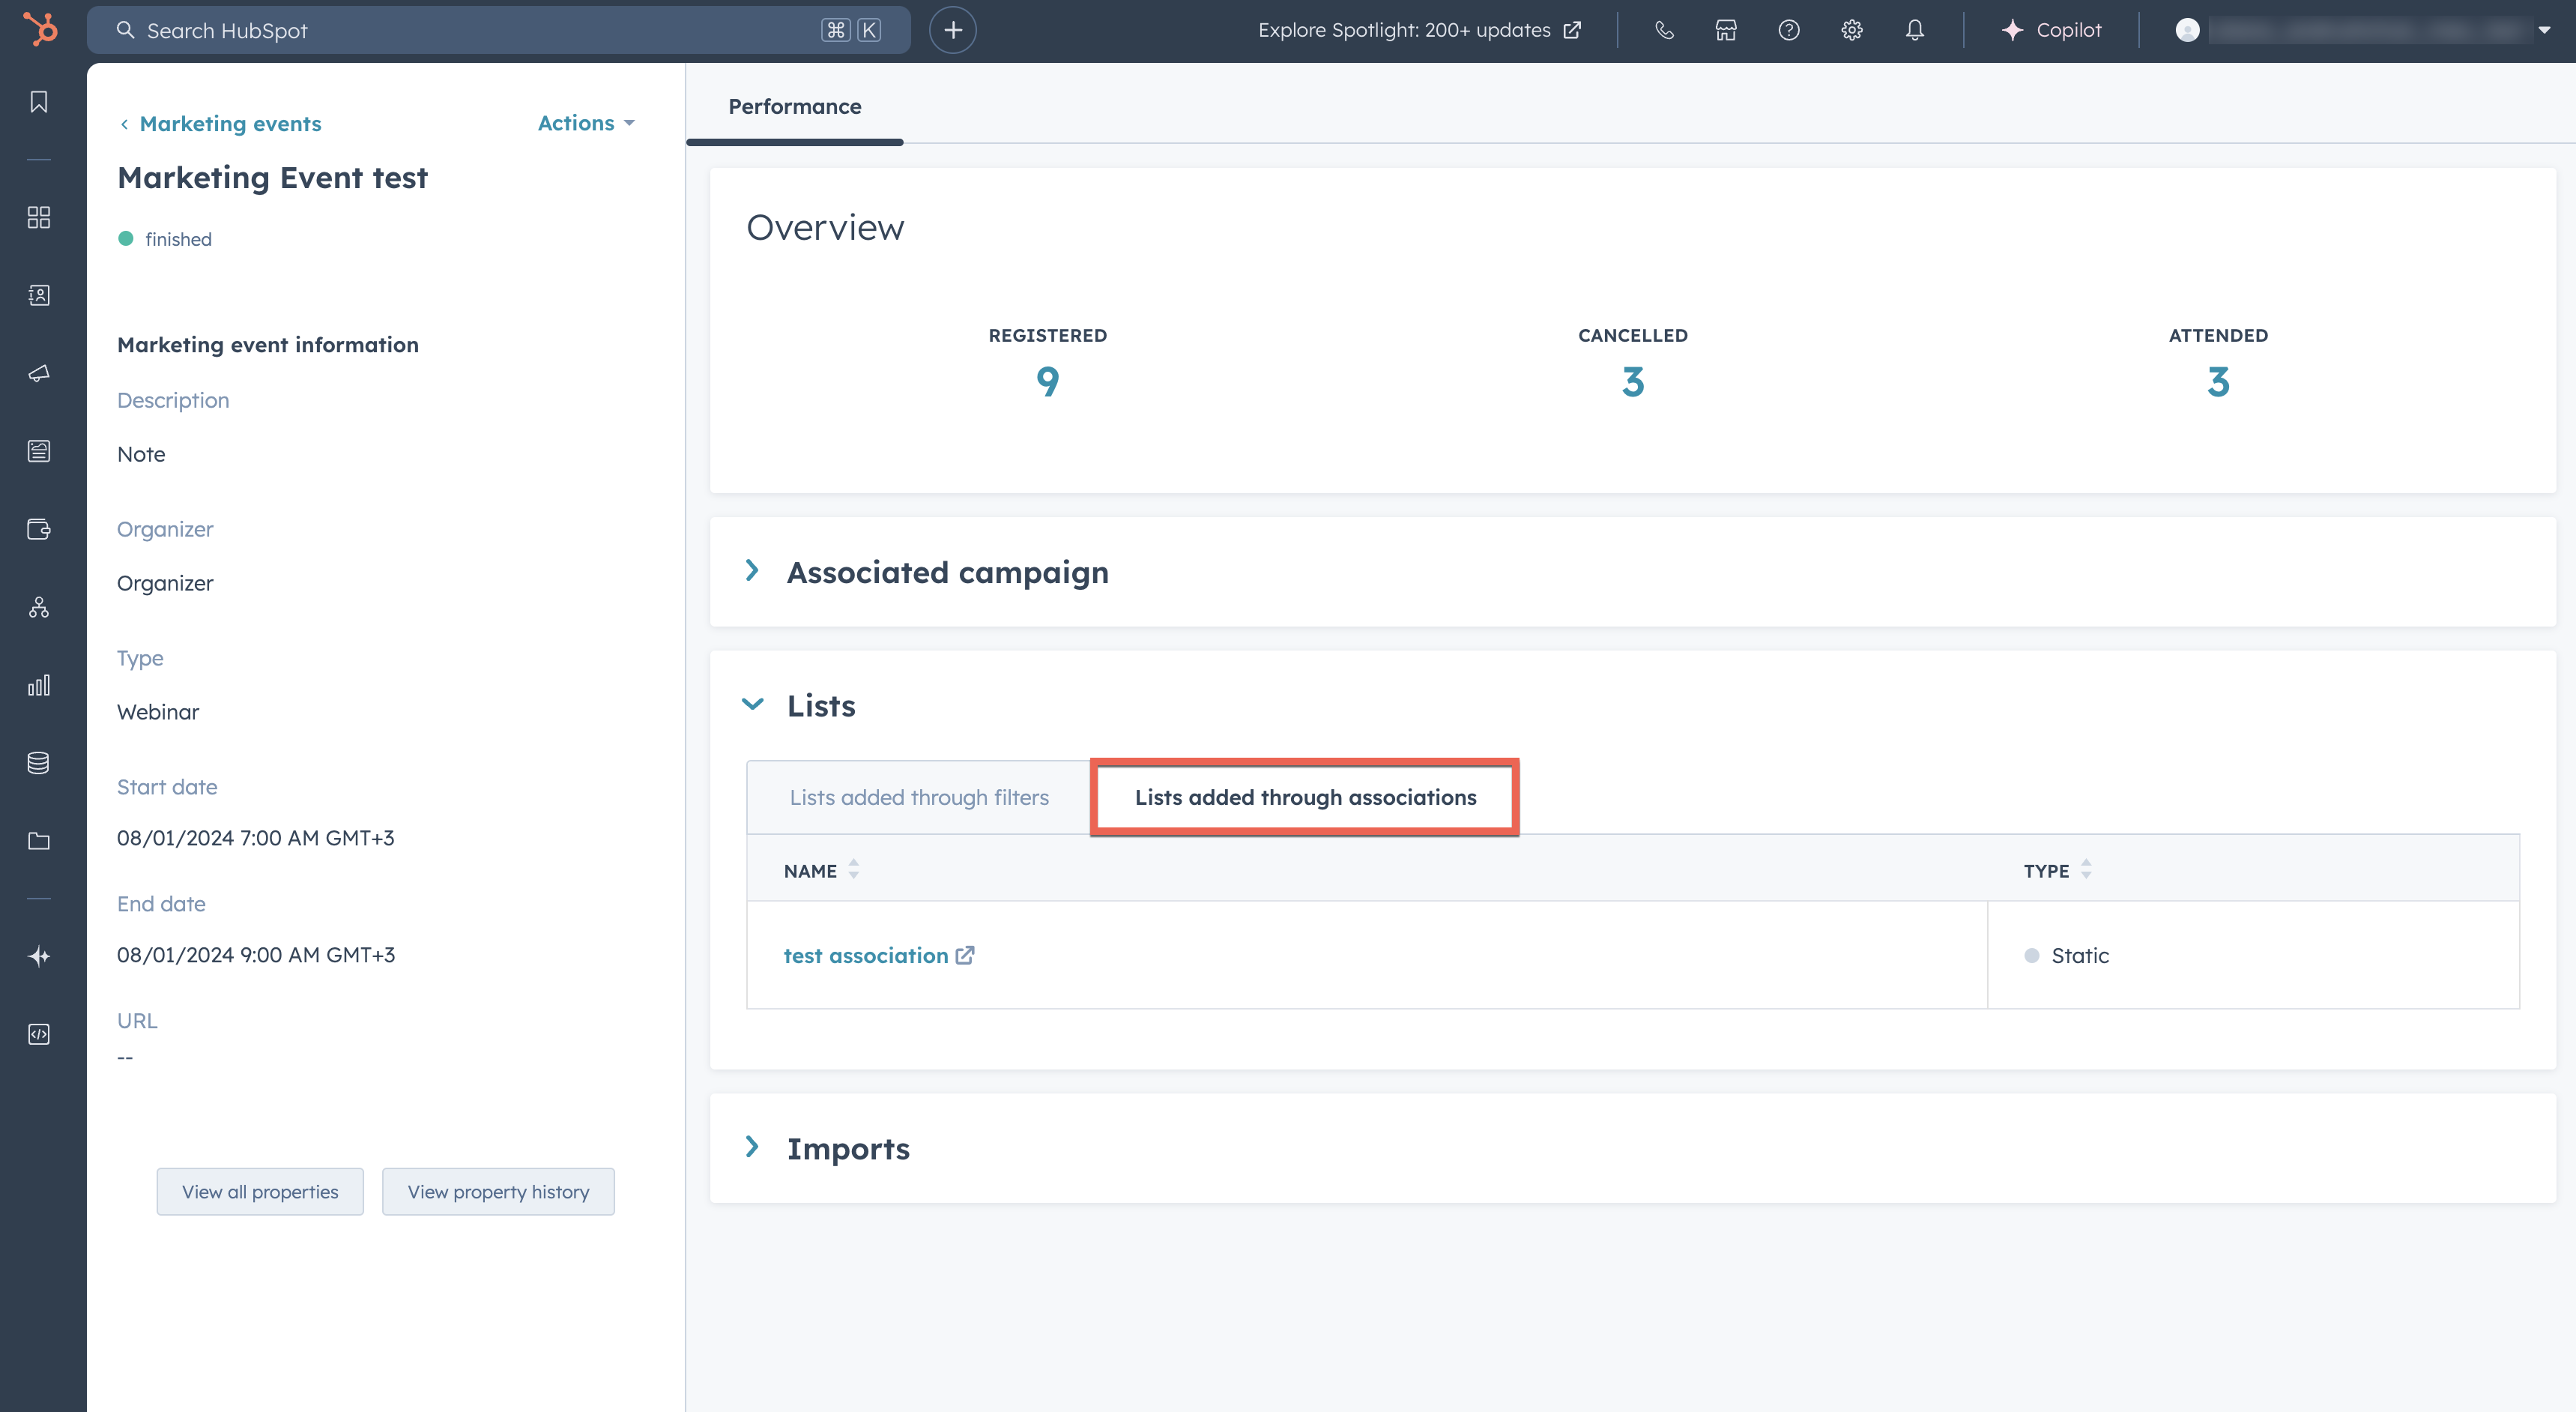
 As you associate lists with your marketing events, they’ll appear on the details page for a marketing event in your HubSpot account:
- In your HubSpot account, navigate to CRM > Contacts.
- In the upper left, click Contacts and in the dropdown menu, select Marketing events.
- Click the name of a marketing event.
- On the Performance tab, click Lists to expand the section, then click the Lists added through associations tab.
Create list association with a marketing event ID
To create a new association between a marketing event and an existing list, make aPUT request to /marketing/v3/marketing-events/associations/{marketingEventId}/lists/{listId}.
If successful, you’ll receive a 204 No content response.
Create list association with external event and account IDs
To create a new association between a marketing event and an existing list using the external account ID and the external event ID, make aPUT request to /marketing/v3/marketing-events/associations/{externalAccountId}/{externalEventId}/lists/{listId}.
If successful, you’ll receive a 204 No content response.
Get lists associated with a marketing event using a marketing event ID
To get all lists associated with a marketing event, make aGET request to /marketing/v3/marketing-events/associations/{marketingEventId}/lists.
The response will resemble the following:
Get lists associated with a event using external event and account IDs
You can also get lists associated with a marketing event using an external account ID and the external event ID, make aGET request to /marketing/v3/marketing-events/associations/{externalAccountId}/{externalEventId}/lists.
Delete list association using a marketing event ID
To delete a list association for a marketing event using a marketing event ID, make aDELETE request to /marketing/v3/marketing-events/associations/{marketingEventId}/lists/{listId}.
If successful, you’ll receive a 204 No content response.
Delete list association using external event and account IDs
To delete a list association for a marketing event using the external account ID and an external event ID, make aDELETE request to /marketing/v3/marketing-events/associations/{externalAccountId}/{externalEventId}/lists/{listId}.
If successful, you’ll receive a 204 No content response.
Configure app settings
There’s some setup required to allow marketing events to sync properly with HubSpot. If you send HubSpot an attendance state change (e.g., a registration or cancellation), HubSpot will first check to see if a Marketing Event exists for the specified event ID. If it doesn’t, HubSpot will call the configured endpoint for your app to retrieve the details of the marketing event, then create the event in HubSpot and then publish the attendance state change. This is provided for convenience; however, it’s still recommended that you create the Marketing Events yourself via the CRUD methods provided in the reference documentation (e.g., thisPOST endpoint reference), and don’t rely on this functionality to create your marketing events in HubSpot.
Step 1: Create an API in your app
In order to support this, HubSpot requires each app that uses Marketing Events to define an API to fetch information about a specific marketing event. Requirements:- Accepts:
externalAccountId: a query parameter that specifies the accountId of the customer in the external app.appId: a query parameter that specifies the ID of the HubSpot application that is requesting the event details. This will be the ID of your app.externalEventId: a path parameter in the URL of the request that specifies the ID of the event in the external app that HubSpot requires details about.
- Returns:
- A JSON object that provides details for the marketing event, that includes the following fields detailed in the table below:
HubSpot will also send a
X-HubSpot-Signature-v3 header that you can use to verify that the request came from HubSpot. Read more about request signatures for additional details on the signature and how to validate it.
Step 2: Provide HubSpot with the URL path to your API
Now that you’ve created the API in your app that will return an object that provides the details of a specific marketing event, you will need to provide HubSpot with the URL path to your API by making aPOST request to /marketing/v3/marketing-events/{appId}/settings. This will allow HubSpot to determine how to make requests to your app to get the details of a marketing event.
In the body of your POST request, specify your URL using the eventDetailsURL field. The eventDetailsURL must adhere to the following two requirements:
- Contain a
%scharacter sequence, which HubSpot will use to substitute in the ID of the event (externalEventId) as a path parameter. - It must be the full path to the API resource, including the
https://prefix and the domain name (e.g.,my.event.app).
eventDetailsURL of https://my.event.app/events/%s, and you need to make a request to fetch details of an event with id 1234-event-XYZ, for the HubSpot app with id app-101 and account with id ABC-account-789, HubSpot will make a GET request to:
https://my.event.app/events/1234-event-XYZ?appId=app-101&externalAccountId=ABC-account-789