Use your installed app to share HubSpot reports to channels and users

Learn how to set up the Share With feature to allow your public app to share HubSpot reports and recurring updates to specific channels and users. This means you'll be able to share your HubSpot reports and dashboards with the installed app. This feature is only available for public apps.

Set up the Share With feature

Before you set up your app to use the Share With feature, you'll need to create and host four API endpoints that will accept POST requests from HubSpot when a customer who has installed your app shares their HubSpot reports and dashboards. 

You'll need to set up the following endpoints to handle the four webhook event triggers:

  • CHECK_PERMISSIONS
  • FETCH_RECIPIENTS
  • FETCH_RECIPIENT
  • SHARE_OBJECT
Requests are sent with the HubSpot Signature. To ensure that the requests that are received are from HubSpot, they can be validated using the signature: https://developers.hubspot.com/docs/api/webhooks/validating-requests

Check permissions endpoint

The URL of the endpoint that returns account data should be structured like https://BASE_PATH_OF_YOUR_SERVICE/feature/SHARE_VIA/event/CHECK_PERMISSIONS.

HubSpot will provide the following fields in the body of the request: 

{ "portalId": 10, "appId": 20, "requiredPermissions": ["upload-file"] }

The response you return when HubSpot makes a POST request to the endpoint should be a JSON-formatted object with the following fields:

{ "portalId": 10, "appId": 20, "integrationComponentIdentifier": "SHARE_VIA", "eventType": "CHECK_PERMISSIONS", "payload": { "hasAllRequiredPermissions": true } }

Fetch recipients endpoint

The URL of the endpoint that returns account data should be structured like https://BASE_PATH_OF_YOUR_SERVICE/feature/SHARE_VIA/event/FETCH_RECIPIENTS.

HubSpot will provide the following fields in the body of the request: 

{ "portalId": 10, "appId": 20, "payload": { "recipientsFilter": { "type": 1, // integer: 0 for Channel or 1 for User "name": "Recipient" // substring which denotes filtering by name }, "limit": 5, "nextPageAfter": "hashkey" //string hashkey to denote the next page } }

The response you return when HubSpot makes a POST request to the endpoint should be a JSON-formatted object with the following fields:

{ "portalId": 10, "appId": 20, "integrationComponentIdentifier": "SHARE_VIA", "eventType": "FETCH_RECIPIENTS", "payload": { "recipients": { "total": 2, "results": [ { "id": "R2", "name": "Recipient Two", "type": 1 }, { "id": "R4", "name": "Recipient Four", "type": 1 } ] } } }

Fetch recipient endpoint

The URL of the endpoint that returns account data should be structured like https://BASE_PATH_OF_YOUR_SERVICE/feature/SHARE_VIA/event/FETCH_RECIPIENT.

HubSpot will provide the following fields in the body of the request: 

{ "portalId": 10, "appId": 20, "payload": { "id": "R3", "type": 0 } }

The response you return when HubSpot makes a POST request to the endpoint should be a JSON-formatted object with the following fields:

{ "portalId": 0, "appId": 0, "integrationComponentIdentifier": "SHARE_VIA", "eventType": "FETCH_RECIPIENT", "payload": { "recipient": { "id": "R3", "name": "Recipient Three", "type": 0 } } }

Share object endpoint

The URL of the endpoint that returns account data should be structured like https://BASE_PATH_OF_YOUR_SERVICE/feature/SHARE_VIA/event/SHARE_OBJECT.

HubSpot will provide the following fields in the body of the request: 

{ "portalId": 10, "appId": 20, "payload": { "sender": { "id": 2387654 // HubSpot Id of sender }, "recipient": { "id": "R3", "name": "Recipient Three", "type": 0 }, "message": "New report for this week", "objectMetadata": { "id": 2334567, "type": 2, // integer denotes Type of Object: 2 for Report "name": "Chat Conversations", "screenshotUrl": "https://api-na1.hubspotqa.com/filemanager/api/signed-url-redirect?portalId=10" } } }

The response you return when HubSpot makes a POST request to the endpoint should be a JSON-formatted object with the following fields:

{ "portalId": 10, "appId": 20, "integrationComponentIdentifier": "SHARE_VIA", "eventType": "SHARE_OBJECT", "payload": { "recipientUrl": "https://example.com" //optional redirect URL } }
Once you've set up your four endpoints, you can configure your app settings. 
  • In your app developer account, navigate to apps in the main navigation bar.
  • Select the app
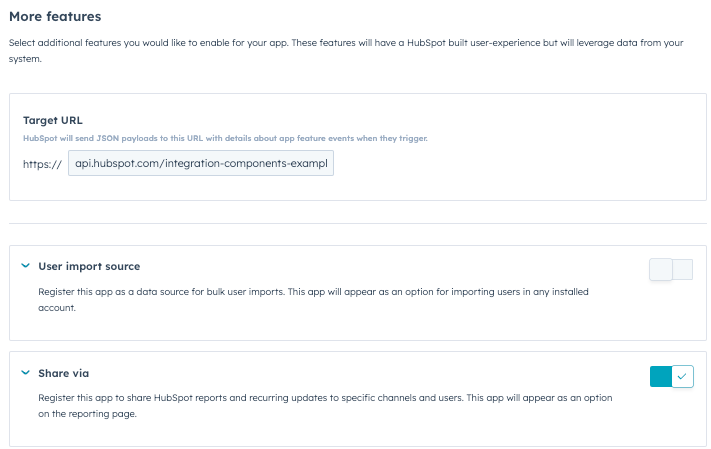
  • In the left sidebar, click More features
  • In the Target URL section, enter the URL that HubSpot will make a POST request to when events trigger. Or, use this testing URL: https://api.hubspot.com/integration-components-example/v1/sample-app-webhooks/beta-app
  • Click to toggle the Share via switch on. 
  • Click Save
app-features-share-via

Test the functionality

After setting up your four endpoints and configuring your app settings, you can test this feature: 

  • Install your app.
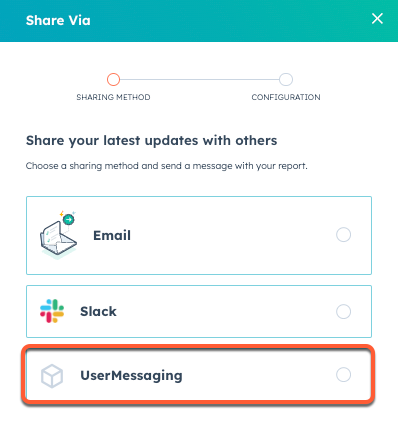
  • In your HubSpot account, navigate to Reporting & DataReports
  • Hover over a report and click the Actions dropdown menu. Then, click Share Via
  • In the right panel, select the connected app and click Next
  • Select the frequency of the message and which channel or user you're sending the report to.
  • Enter an optional message.
  • Click Send now.
share-via-reports

Was this article helpful?
This form is used for documentation feedback only. Learn how to get help with HubSpot.