> ## Documentation Index
> Fetch the complete documentation index at: https://developers.hubspot.com/docs/llms.txt
> Use this file to discover all available pages before exploring further.
---
id: f1990caf-35de-412b-9327-1743df836436
---
# Set up SCIM for your app
> Learn how to set up SCIM to sync identity information between a third-party provider and HubSpot.
Provisioning users through SCIM (the System for Cross-domain Identity Management) provides a secure and automated way to create and manage HubSpot users through your Identity Provider.
By setting up SCIM in your app, you can provision and de-provision users in your HubSpot account from your Identity Provider (IdP). This helps ensure that your users stay in sync while meeting your company's IT admin and compliance requirements.
This feature requires a HubSpot *Professional* or *Enterprise* account.
**Please note:** this guide is intended for HubSpot customers who use an Identity Provider (IdP) other than Google or Okta. To set up SCIM through Google or Okta, check out the Knowledge Base articles below:
* [Provision HubSpot users with SCIM through Google](https://knowledge.hubspot.com/account-security/provision-hubspot-users-with-scim-through-google)
* [Provision HubSpot users with SCIM through Okta](https://knowledge.hubspot.com/user-management/provision-hubspot-users-with-scim-through-okta)
## Prerequisites
Keep the following requirements and caveats in mind when setting up SCIM:
* [Single sign-on (SSO)](https://knowledge.hubspot.com/account-security/set-up-single-sign-on-sso) must be enabled in your HubSpot account.
* It's recommended to set up [user permission sets](https://knowledge.hubspot.com/user-management/create-permission-sets) in HubSpot based on your team's IdP Roles before setting up SCIM. Your IdP can then assign permissions to a user if their roles in the IdP matches the name of the HubSpot permission set.
* To verify your domain, you will need to update your DNS records. Ensure you have the login details for your DNS provider and have access to the TXT records.
* Assigning seats will vary depending on whether or not you're on the seats-based pricing model:
* **If you are not on a seats-based pricing model:** to assign paid seats for users set up with SCIM, [purchase the seats in HubSpot](https://knowledge.hubspot.com/account-management/manage-seats#assign-add-or-remove-sales-hub-or-service-hub-seats) and create a permission set with a paid seat. Navigate back to your IdP and set the user's Roles to be the same as the permission set.
* **If you are using the seats-based pricing model:** you cannot assign seats such as core seats, Sales or Service Hub seats, or view-only seats, based on permission sets assigned in your IdP. Before assigning permissions through your IdP, you will need to [update a user's seat in HubSpot](https://knowledge.hubspot.com/account-management/manage-seats).
**Please note:** if you're setting up SCIM with Microsoft Entra, you should disable group sync in the [provisioning settings](https://learn.microsoft.com/en-us/entra/identity/app-provisioning/configure-automatic-user-provisioning-portal) of your Entra account. Otherwise, the Entra ID service will enter a quarantine state after you finish configuring SCIM in your HubSpot account.
## Limitations and user syncing
For users created through SCIM in your HubSpot account:
* Only user permissions can be edited in HubSpot, and only if permission set management is not configured. All other user information, including name and email address, can only be updated through your identity provider.
* To sync identity provider roles with HubSpot permission sets, turn on permission set management in HubSpot. The permission set name in HubSpot must match the exact role name in your identity provider, including any space characters and capital letters.
* Your identity provider can't automatically assign users to teams, but after the user is added, you can [update their team manually](https://knowledge.hubspot.com/user-management/create-and-manage-teams) in HubSpot.
* Deleting a user in HubSpot will not delete the user in your identity provider. However, if you remove a user's access to HubSpot from your identity provider, or deactivate the user in your identity provider, the user will be deactivated in HubSpot as well.
* Adding a user to HubSpot will not add the user to your identity provider.
After setting up SCIM through your identity provider, any existing HubSpot users who match users in your identity provider wil automatically be converted to SCIM users. HubSpot will attempt to assign the user a permission set based on the corresponding roles in your identify provider. If the user doesn't have roles in your identity provider that match a permission set in HubSpot, the user will only have minimal permissions in HubSpot.
## Set up SCIM with a new app
To create a new app to set up SCIM in your account:
* If you haven't already authenticated your account using the HubSpot CLI, run [`hs init`](/developer-tooling/local-development/hubspot-cli/reference#hs-init-command). Learn more about [installing the HubSpot CLI](/developer-tooling/local-development/hubspot-cli/install-the-cli).
* Run the following command to create a project with configured with a boilerplate SCIM configuration file and set up the required project directory structure:
```shell theme={null}
hs project create --name scim-app --dest scim-app --project-base app --distribution private --auth static --features scim
```
A new project will be created in the working directory with the required [app configuration](/apps/developer-platform/build-apps/app-configuration) files and directories. The [next section](#manage-your-scim-configuration-in-your-project) provides details on how to update these project files with the required information before you upload the project to your account.
## Manage your SCIM configuration in your project
Your app's top-level configuration is specified using the `app-hsmeta.json` configuration file in the `src/app/` directory. The SCIM feature is configured via a `scim/` directory in your project's `src/app/` directory, which includes a `scim-hsmeta.json` configuration file within it.
```shell theme={null}
└── src/
└── app/
└── app-hsmeta.json
└── scim/
└── scim-hsmeta.json
```
First, open your app configuration file located at `src/app/app-hsmeta.json`, then replace the boilerplate content with the following:
```json theme={null}
{
"uid": "scim-app",
"type": "app",
"config": {
"description": "A private app for integrating an IdP with SCIM.",
"name": "scim app",
"distribution": "private",
"auth": {
"type": "static",
"requiredScopes": [
"crm.objects.users.read",
"crm.objects.users.write",
"settings.users.read",
"settings.users.write"
],
"optionalScopes": [],
"conditionallyRequiredScopes": []
},
"permittedUrls": {
"fetch": [],
"iframe": [],
"img": []
}
}
}
```
Note that you can update the `uid`, `description`, and `name` if needed, but all other fields should not be changed. The `uid` serves to uniquely identify this app from others in your account, so make sure to provide a distinct name from any existing apps you may have.
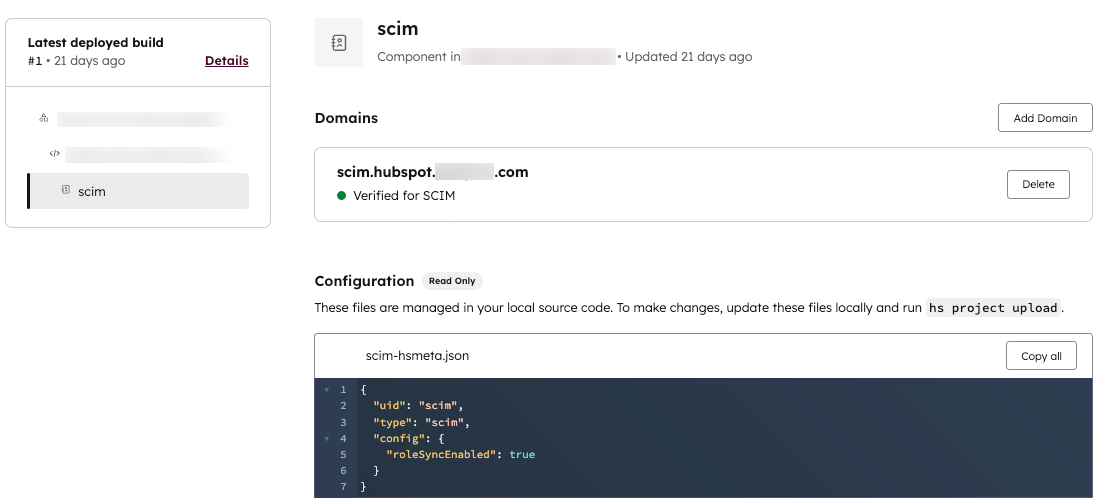
Next, within the `src/app/scim/` directory, edit the `scim-hsmeta.json` file and review the `uid`, `type`, and `config` properties. The `config` property has a single subproperty, `roleSyncEnabled`, which determines whether to sync user role data (if supported by your provider).
```json theme={null}
{
"uid": "scim",
"type": "scim",
"config": {
"roleSyncEnabled": false
}
}
```
| Field | Type | Description |
| -------- | ------ | ---------------------------------------------------------------------------------------------------------------------------------------------------------------------------------------------------------------------------------------------------------------------------------------------------------------------------------------------------------------------------------------------------------------------------------------------------------------------------------------------------------------------------- |
| `uid` | String | A unique identifier for your SCIM configuration. This can be set to any value, but it will appear in your project settings in your account, so it should be different from other `uid` values of other app components. |
| `type` | String | The type of component, which should be `scim` in this case. |
| `config` | Object | An object containing a single SCIM configuration field, `roleSyncEnabled`, which is used to control whether or not you want roles from your identity provider synced to permission sets in HubSpot. `roleSyncEnabled` is set to `false` by default, but you can set it to `true` at any time then upload the changes by running `hs project upload`. Note that for syncing to work properly, the role name in your identifier provider must exactly match the permission set in HubSpot, including letter-casing and spaces. |
Once you've updated the project's top-level `app-hsmeta.json` file and reviewed your `scim-hsmeta.json` configuration, run the following command to upload the project to your account:
```shell theme={null}
hs project upload
```
To open a browser window and navigate directly to your project details page in HubSpot you can run the `hs project open` command, or consult the [section below](#install-and-manage-scim-in-your-hubspot-account) to learn how to navigate to your app details page from within your HubSpot account.
**Please note:** there's a limit of one SCIM app in your HubSpot account. Attempting to upload a second project with SCIM configured will fail.
## Install and manage SCIM in your HubSpot account
Once uploaded, you can manage your SCIM configuration on the app details page:
* In your HubSpot account, navigate to **Development**.
* On the **Projects** page, click the **name** of your project.
* On the *Overview* tab of the project details page, under *Project Components*, click the top-level app name as defined in the `name` field in your app's [top-level schema file](/apps/developer-platform/build-apps/app-configuration#app-schema).
* Under *App Features* click the **scim** component, as defined by the `uid` field of your `scim-hsmeta.json` file.
### Add a verified domain
To verify a domain:
* On the SCIM component details page, click **Add domain**.
* In the right panel, enter the **domain**, then click **Next**.
* In the DNS settings of your domain provider, you'll need to set up a TXT record with the provided *Host (name)* and *Value* fields with the values provided. Once configured in your domain provider, click **Next**.
* The verification process usually completes within an hour, but you may need to wait up to 48 hours for the new DNS information to propagate. Once verified, you'll see the domain appear with a success state on the SCIM component details page.
 **Please note:** if you notice the error *This domain couldn't be verified*, ensure you entered your domain correctly with no spelling mistakes. You should also confirm that you copied the exact value for the TXT record from the domain setup in HubSpot into your DNS provider.
### Install the app in your account
To install the SCIM app you created in your HubSpot account:
* Click the *Distribution* tab on the SCIM component details page.
* Under the *Manage distribution* section, click **Install now** next to your account.
**Please note:** if you notice the error *This domain couldn't be verified*, ensure you entered your domain correctly with no spelling mistakes. You should also confirm that you copied the exact value for the TXT record from the domain setup in HubSpot into your DNS provider.
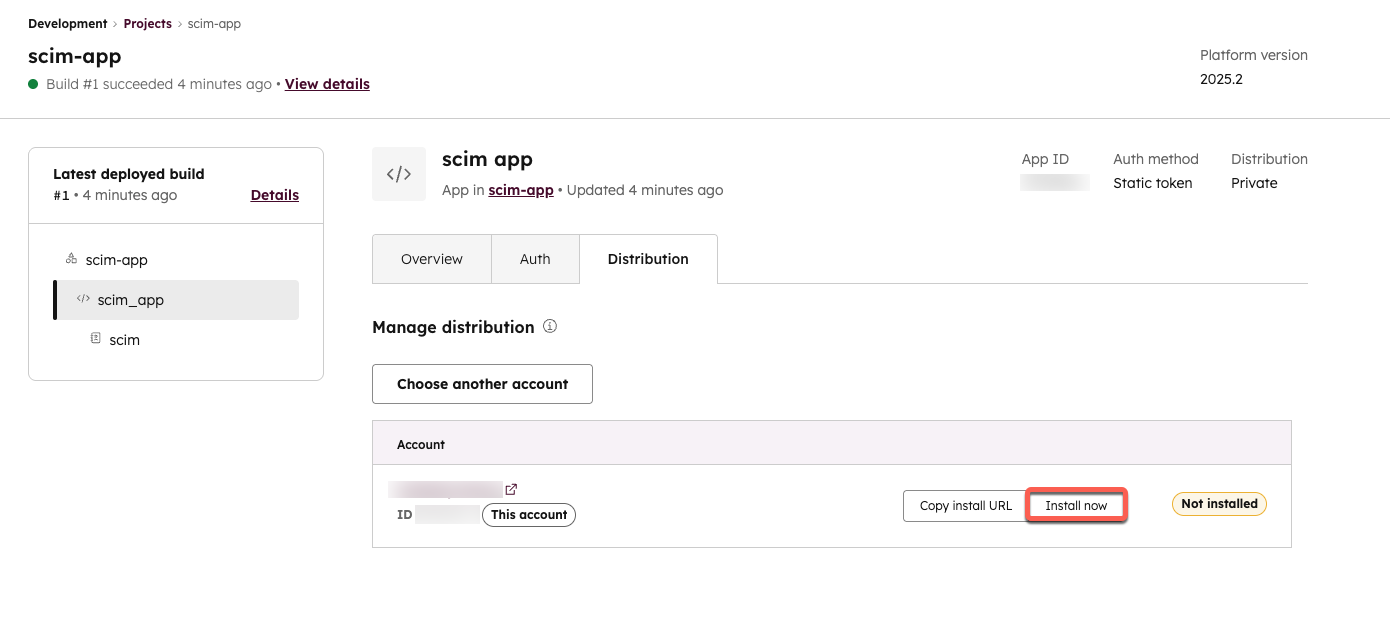
### Install the app in your account
To install the SCIM app you created in your HubSpot account:
* Click the *Distribution* tab on the SCIM component details page.
* Under the *Manage distribution* section, click **Install now** next to your account.
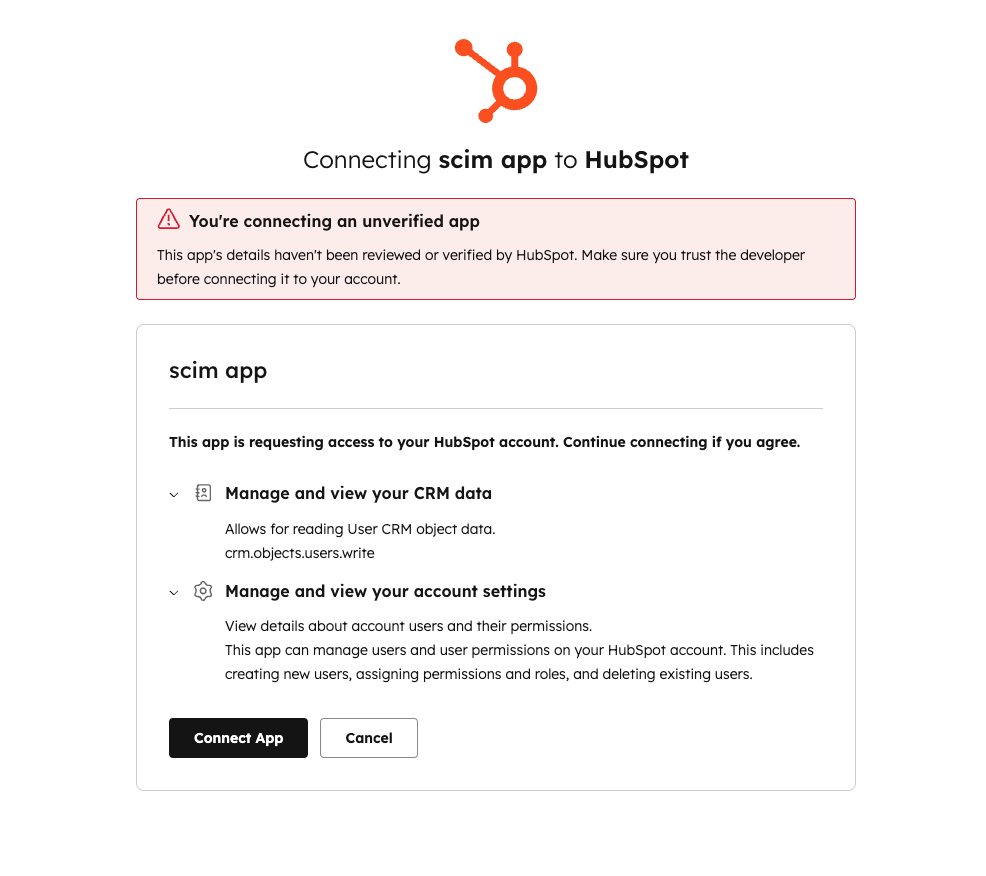
 * You'll be prompted to confirm that you're allowing an unverified app to connect to your account. Review your app permissions then click **Connect app**.
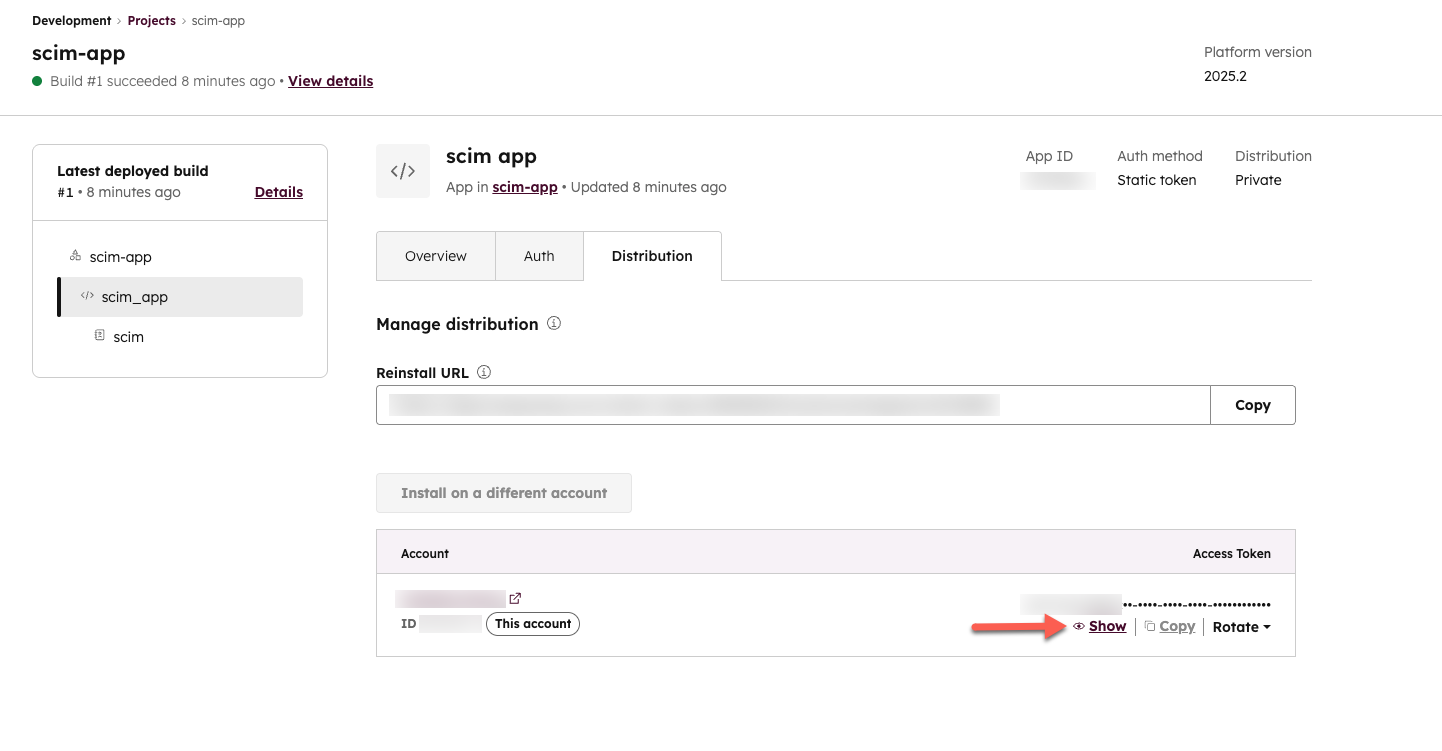
 * Back on the *Distribution* tab in your account, a new access token will appear next to your account. Click **Show** to view the token and **Copy** to copy the token to the clipboard. You can use this token, along with the *Tenant URL* of `https://api.hubspot.com/scim/v2` in your identity provider settings to connect your new SCIM app.