> ## Documentation Index
> Fetch the complete documentation index at: https://developers.hubspot.com/docs/llms.txt
> Use this file to discover all available pages before exploring further.

---
id: 0c112280-a132-4e18-934d-65a7f95e8558
---

# Create and execute serverless functions in app cards

> Learn how to use serverless functions in an app card on version 2026.03 of the developer platform.

export const SupportedProducts = ({marketing, sales, service, cms, data, commerce, marketingLevel, salesLevel, serviceLevel, cmsLevel, dataLevel, commerceLevel}) => {
  const translations = {
    description: "Requires one of the following products or higher.",
    productNames: {
      marketing: "Marketing Hub",
      sales: "Sales Hub",
      service: "Service Hub",
      cms: "Content Hub",
      data: "Data Hub",
      commerce: "Commerce Hub"
    },
    tiers: {
      free: "Free",
      starter: "Starter",
      professional: "Professional",
      enterprise: "Enterprise"
    }
  };
  const translateTier = tier => {
    if (!tier) return '';
    const lowerTier = tier.toLowerCase();
    return translations.tiers[lowerTier] || tier;
  };
  const products = [{
    name: marketing ? translations.productNames.marketing : '',
    level: translateTier(marketingLevel),
    icon: "https://mintlify-assets.b-cdn.net/Icons/marketing-bolt.svg",
    alt: "Marketing Hub"
  }, {
    name: sales ? translations.productNames.sales : '',
    level: translateTier(salesLevel),
    icon: "https://mintlify-assets.b-cdn.net/Icons/sales-star.svg",
    alt: "Sales Hub"
  }, {
    name: service ? translations.productNames.service : '',
    level: translateTier(serviceLevel),
    icon: "https://mintlify-assets.b-cdn.net/Icons/service-heart.svg",
    alt: "Service Hub"
  }, {
    name: cms ? translations.productNames.cms : '',
    level: translateTier(cmsLevel),
    icon: "https://mintlify-assets.b-cdn.net/Icons/content-play.svg",
    alt: "Content Hub"
  }, {
    name: data ? translations.productNames.data : '',
    level: translateTier(dataLevel),
    icon: "https://developers.hubspot.com/hubfs/Knowledge_Base_2023-24-25/subscription_key_icons/operations_icon.svg",
    alt: "Data Hub"
  }, {
    name: commerce ? translations.productNames.commerce : '',
    level: translateTier(commerceLevel),
    icon: "https://developers.hubspot.com/hubfs/Knowledge_Base/subscription_key_icons/commerce_icon.svg",
    alt: "Commerce Hub"
  }].filter(product => product.name && product.level);
  if (products.length === 0) return null;
  return <div>
      <div className="text-sm mb-2">{translations.description}</div>
      <div className={`grid ${products.length === 1 ? 'grid-cols-1' : 'grid-cols-2'} gap-1.5`}>
        {products.map((product, index) => <div key={index} style={{
    display: 'flex',
    alignItems: 'center'
  }}>
            <img src={product.icon} alt={product.alt} className="w-3.5 h-3.5 mr-1.5 mt-2.5 mb-2.5 flex-shrink-0 align-middle" />
            <span className="font-medium mr-1 text-sm">{product.name} -</span>
            <span className="text-sm">{product.level}</span>
          </div>)}
      </div>
    </div>;
};

<Accordion title="Supported products" defaultOpen="true" icon="cubes">
  <SupportedProducts marketing={true} sales={true} service={true} cms={true} data={true} marketingLevel="enterprise" salesLevel="enterprise" serviceLevel="enterprise" cmsLevel="enterprise" dataLevel="enterprise" />
</Accordion>

If you're building UI extensions, such as app cards, an app home, or app settings page, you can leverage serverless functions to retrieve or write data when an end-user triggers an action from your UI extension. When the serverless function executes, HubSpot runs the function server-side using JavaScript, and mitigates the need to manage your own server.

This guide will walk you through how to add an app card with a serverless function that creates a contact when the user clicks a button within your app card.

## Prerequisites

Review the following prerequisites before proceeding with the steps below:

* Confirm that you're on the latest version of the [HubSpot CLI](/developer-tooling/local-development/hubspot-cli/install-the-cli#install-the-latest-version-of-the-hubspot-cli). Version `8.4.0` or above is recommended.
* An ***Enterprise*** subscription is required to install an app with serverless functions. While developing your app, you can use a [developer test account](/getting-started/account-types#developer-test-accounts) to test your app's functionality without the need for an ***Enterprise*** subscription.

## Create a new app with a serverless function

To get started, run the command below to create a new project with scaffolding for an app card and support for serverless functions.

```shell wrap theme={null}
hs project create --project-base app --features app-function card --auth static --distribution private
```

<Tip>
  The command above configures a project with [static auth](/apps/developer-platform/build-apps/authentication/overview#static-auth). 2026.03 apps with serverless functions do <u>not</u> currently support using [OAuth authentication](/apps/developer-platform/build-apps/authentication/overview#oauth).
</Tip>

Follow the prompts to provide a **name** and **location** for your new project.

Your new project will have the following structure:

```shell theme={null}
my-project-folder/
└── hsproject.json
└── src
    └── app/
        └── app-hsmeta.json/
        └── cards/
            └── MyCard.jsx
            └── card-hsmeta.json
            └── package.json
        └── functions/
            └── NewFunction.js
            └── private-function-hsmeta.json
            └── package.json
```

## Wire up your app card and serverless function

Next, edit the following files to include the contents of the respective code blocks below:

```shell highlight={7,11,12} theme={null}
my-project-folder/
└── hsproject.json
└── src
    └── app/
        └── app-hsmeta.json/
        └── cards/
            └── MyCard.jsx
            └── card-hsmeta.json
            └── package.json
        └── functions/
            └── NewFunction.js
            └── private-function-hsmeta.json
            └── package.json
```

<Tabs>
  <Tab title="MyCard.jsx">
    ```jsx theme={null}
    import React, { useState } from 'react';
    import { Button, Input, hubspot } from '@hubspot/ui-extensions';

    // Define the extension to be run within HubSpot
    hubspot.extend(({ context, actions }) => (
      <CreateContactForm
        context={context}
        addAlert={actions.addAlert}
      />
    ));

    const CreateContactForm = ({ context, addAlert }) => {
      const [email, setEmail] = useState('');
      const [firstname, setFirstname] = useState('');
      const [lastname, setLastname] = useState('');
      const [loading, setLoading] = useState(false);

      const handleSubmit = async () => {
        setLoading(true);

        try {
          const result = await hubspot.serverless('app_function_private', {
            parameters: { email, firstname, lastname }
          });

          if (result.body.success) {
            addAlert({
              title: "Contact successfully created",
              message: `New contact ID: ${result.body.contactId}`,
              type: "success"
            });
          } else {
            addAlert({
              title: "Error creating contact",
              message: result.body.error,
              type: "danger"
            });
          }
        } catch (error) {
          addAlert({
            title: "Error creating contact",
            message: error.message,
            type: "danger"
          });
        } finally {
          setLoading(false);
        }
      };

      return (
        <>
          <Input value={email} onChange={setEmail} placeholder="Email" />
          <Input value={firstname} onChange={setFirstname} placeholder="First Name" />
          <Input value={lastname} onChange={setLastname} placeholder="Last Name" />
          <Button onClick={handleSubmit} disabled={loading}>
            {loading ? 'Creating...' : 'Create Contact'}
          </Button>
        </>
      );
    };
    ```
  </Tab>

  <Tab title="NewFunction.js">
    ```js theme={null}
    const axios = require('axios');

    exports.main = async (context) => {
      const { parameters, crm } = context;
      const { email, firstname, lastname } = parameters;

      // Validate input
      if (!email || !firstname || !lastname) {
        return {
          statusCode: 400,
          body: {
            success: false,
            error: 'Missing required parameters: email, firstname, lastname'
          }
        };
      }

      try {
        // Get token to make API requests on behalf of your app
        const accessToken = process.env.PRIVATE_APP_ACCESS_TOKEN;

        // Create contact in HubSpot
        const response = await axios.post(
            'https://api.hubapi.com/crm/v3/objects/contacts',
            {
              properties: {
                email,
                firstname,
                lastname
              }
            },
            {
              headers: {
                'Authorization': `Bearer ${accessToken}`,
                'Content-Type': 'application/json'
              }
            }
        );

        console.log('Contact created:', response.data.id);

        return {
          statusCode: 200,
          body: {
            success: true,
            contactId: response.data.id,
            message: 'Contact created successfully'
        }
      };
      } catch (error) {
        console.error('Error creating contact.');

        const { response } = error;
        return {
          statusCode: (response && response.status) ? response.status : 500,
          body: {
            success: false,
            error: (response && response.data) ? response.data.message : 'Unknown error occurred'
          }
        };
      }
    };
    ```
  </Tab>

  <Tab title="private-function-hsmeta.json">
    ```json theme={null}
      {
        "uid": "app_function_private",
        "type": "app-function",
        "config": {
          "entrypoint": "/app/functions/NewFunction.js",
          "secretKeys": []
        }
      }
    ```

    <Tip>
      Note that a reserved secret named `PRIVATE_APP_ACCESS_TOKEN` is accessible by default in every private serverless function. If needed, you can manage additional secrets by following the instructions [here](/apps/developer-platform/add-features/serverless-functions/reference#managing-and-referencing-secrets).
    </Tip>
  </Tab>
</Tabs>

After updating the files above, save your changes. Since the example code in `NewFunction.js` uses the third-party `axios` dependency, you'll also need to install the package locally by navigating to the `functions/` directory, then running `npm install axios`. For example, in the terminal, if you're already in the root directory of your project, you'd run the following two commands:

```shell theme={null}
cd src/app/functions
npm install axios
```

After `axios` is installed, run the following command to upload your project to your HubSpot account:

```shell theme={null}
hs project upload
```

## Install your app and locate your access token

With your project uploaded, you can install your app in either your standard HubSpot account, or a developer test account:

<Tabs>
  <Tab title="Install in a standard account">
    If you have the [required user permissions](/apps/developer-platform/build-apps/manage-apps-in-hubspot#permission-requirements), you can install your app directly in your [standard account](/getting-started/account-types#standard-hubspot-accounts):

    * In your HubSpot account, navigate to **Development**.
    * In the left sidebar menu, navigate to **Projects**, click the **name** of your new project, then click the **UID** of your app in the component list.
    * On the *Distribution* tab, under *Standard install*, click **Install now**.

    <Frame>
      <img src="https://www.hubspot.com/hubfs/Knowledge_Base_2023-24-25/developer/install-new-app-in-standard-hubspot-account.png" alt="Screenshot showing where to initiate installation for a standard HubSpot account" />
    </Frame>

    After initiating the install, you'll be prompted to review the app permissions.

    * Select the **checkbox** to authorize installing an unverified app, then click **Connect app**.
    * Once successful, click **View installed app details** to navigate to the *Connected Apps* page of the account where you installed your app.
    * Navigate back to **Development**.
    * In the left sidebar menu, navigate to **Projects**, click the **name** of your new project, then click the **UID** of your app in the component list.
    * If you need to use your app's access token, you can click the *Distribution* tab, then click **Show** under *Standard install* to reveal your static auth access token. Note that your serverless function will already be able to access a built-in secret called `PRIVATE_APP_ACCESS_TOKEN` by default, and you don't need to add it manually as a secret.
  </Tab>

  <Tab title="Install in a developer test account">
    * Navigate to **Test accounts** in the *Development* navigation menu, then click **Create developer test account**. Follow the prompts to create your new test account.
    * In the left sidebar menu, navigate to **Projects**, click the **name** of your new project, then click the **UID** of your app in the component list.
    * Click the *Distribution* tab, under *Test installs*, click **Add test installs**.

    <Frame>
      <img src="https://www.hubspot.com/hubfs/Knowledge_Base_2023-24-25/developer/install-new-app-in-test-account.png" alt="Screenshot showing where to initiate installation for a test account" />
    </Frame>

    * In the right panel, click **Install** next to the test account you created.
    * Review the app permissions, select the **checkbox** to authorize installing an unverified app, then click **Connect app**.
    * Navigate back to your standard HubSpot account where you originally uploaded your project, then navigate to **Development**.
    * In the left sidebar menu, navigate to **Projects**, click the **name** of your new project, then click the **UID** of your app in the component list.
    * If you need to use your app's access token, you can click the *Distribution* tab, under *Test installs*, click **Show** next to the test account you installed your app in to reveal your static auth access token. Note that your serverless function will already be able to access a built-in secret called `PRIVATE_APP_ACCESS_TOKEN` by default, and you don't need to add it manually as a secret.
  </Tab>
</Tabs>

## Test out your app card

You can now test out the serverless function on a contact record.

First, you'll need to add the app card to the default contact record view:

* In your HubSpot account, navigate to **CRM** > **Contacts**.
* Click the **name** of an existing contact.
* In the middle column of the record, to the right of the existing tabs, click **Customize**.

<Frame>
  <img src="https://www.hubspot.com/hubfs/Knowledge_Base_2023-24-25/developer/customize-contact-record-to-add-app-card.png" alt="Location of customize link on contact record" />
</Frame>

* On the *Record Customization* tab, in the view table, click **Default view**.
* In the middle column, under the default tabs, hover over where you want your app card to appear, then click **Add card**.

<Frame>
  <img src="https://www.hubspot.com/hubfs/Knowledge_Base_2023-24-25/developer/add-card-prompt-when-customizing-record-view.png" alt="Add new card to middle column of contact record" />
</Frame>

* In the right panel, click the **Card library** tab.
* Search for the name of your app card by the `uid` specified in your project's `/src/app/cards/card-hsmeta.json` file. You can also click the **All card types** dropdown menu and select **Apps** to filter by app cards.
* Locate your app card then click **Add card**.

<Frame>
  <img src="https://www.hubspot.com/hubfs/Knowledge_Base_2023-24-25/developer/add-middle-column-app-card-with-serverless-function.png" alt="Locate and add app card to contact record" />
</Frame>

* Click the **X** in the top right to close the right panel.
* In the top right, click **Save and exit**.

You'll be taken back to the contact record, where your app card will now appear in the location you chose.

To test out your card, enter a test **email address**, **first name**, and **last name**, then click **Create Contact**. After a short delay, you should see a success notification appear at the top of the page.

<Frame>
  <img src="https://www.hubspot.com/hubfs/Knowledge_Base_2023-24-25/developer/example-of-2026-03-serverless-function-in-app-card-1.gif" alt="Testing out 2026.03 serverless function in app card" />
</Frame>

## Local development

As you continue to develop and test your serverless function and app card, you can run `hs project dev` to help you preview changes and debug errors directly in your terminal. You'll be prompted to select the account to test on, which you should choose based on where you installed your app in the [step above](#install-your-app-and-locate-your-access-token)

Once your deployed build and dependencies are validated, a new browser tab or window will open to a *Local dev panel* where you can review the status of each of your app's components.

<Frame>
  <img src="https://www.hubspot.com/hubfs/Knowledge_Base_2023-24-25/developer/local-development-server-dev-panel-with-serverless-function.png" alt="Local dev panel with 2026.03 serverless function" />
</Frame>

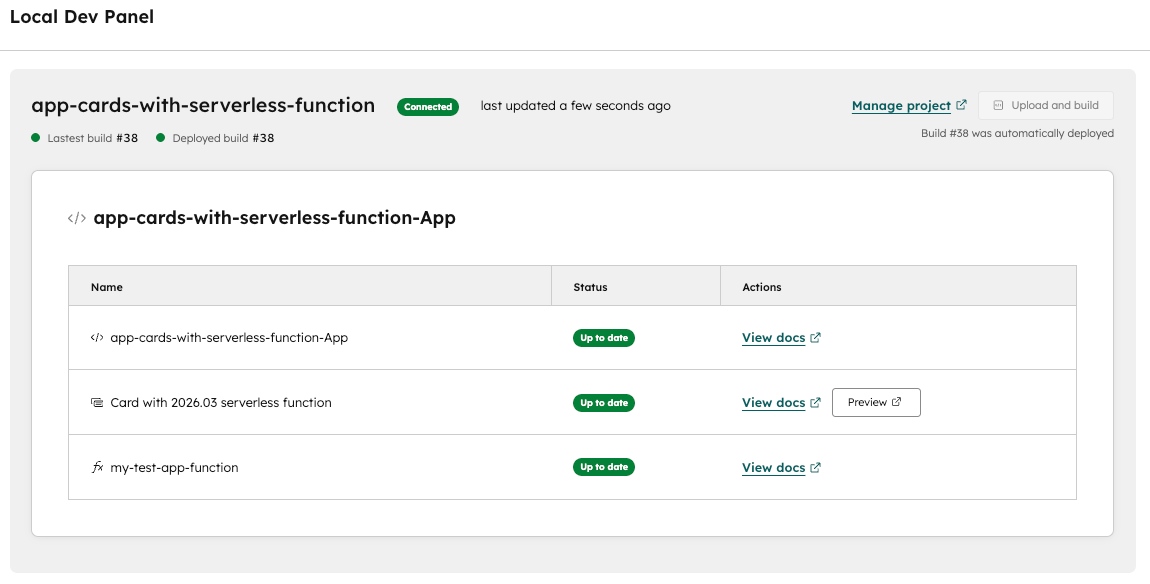
* In the *Actions* column, you can click **Preview** next to your app card component to navigate to the contacts index page.
* You can then navigate to a specific contact and test out your app card, and any `console` logging statements (e.g., `console.log()` or `console.error()`) will be logged to your terminal to help you debug.

If you edit and save any changes to your frontend app card code (e.g., a change to `/src/app/cards/MyCard.tsx`) while running `hs project dev`, the changes should automatically be detected and reflected when previewing the changes.

<Info>
  Note that changes to your serverless functions in `/src/app/functions` will <u>not</u> automatically update your app and you'll need to run `hs project upload` to ensure your changes are deployed to the account where you installed your app.
</Info>

## Next steps

Check out the following resources as you develop your app:

* [Serverless function reference](/apps/developer-platform/add-features/serverless-functions/reference)
* [App card reference](/apps/developer-platform/add-features/ui-extensions/extension-points/app-cards/reference)
* [UI components overview](/apps/developer-platform/add-features/ui-extensions/ui-components/overview)
* [UI extensions SDK](/apps/developer-platform/add-features/ui-extensions/ui-extensions-sdk)
