> ## Documentation Index
> Fetch the complete documentation index at: https://developers.hubspot.com/docs/llms.txt
> Use this file to discover all available pages before exploring further.
---
id: 36d2e050-b25d-4a7f-9ca5-33d148c71d06
---
# Manage apps in HubSpot
> Learn how to manage authentication, installation, and other settings for your app on the new developer platform
After you upload your app to HubSpot using the [app creation guide](/apps/developer-platform/build-apps/create-an-app), migrating it from a legacy app, or manually running the command `hs project upload`, you can manage your app on the projects index page in your HubSpot account. On the details page for your app, you can view its build and deploy history, confirm active app features, and manage authentication.
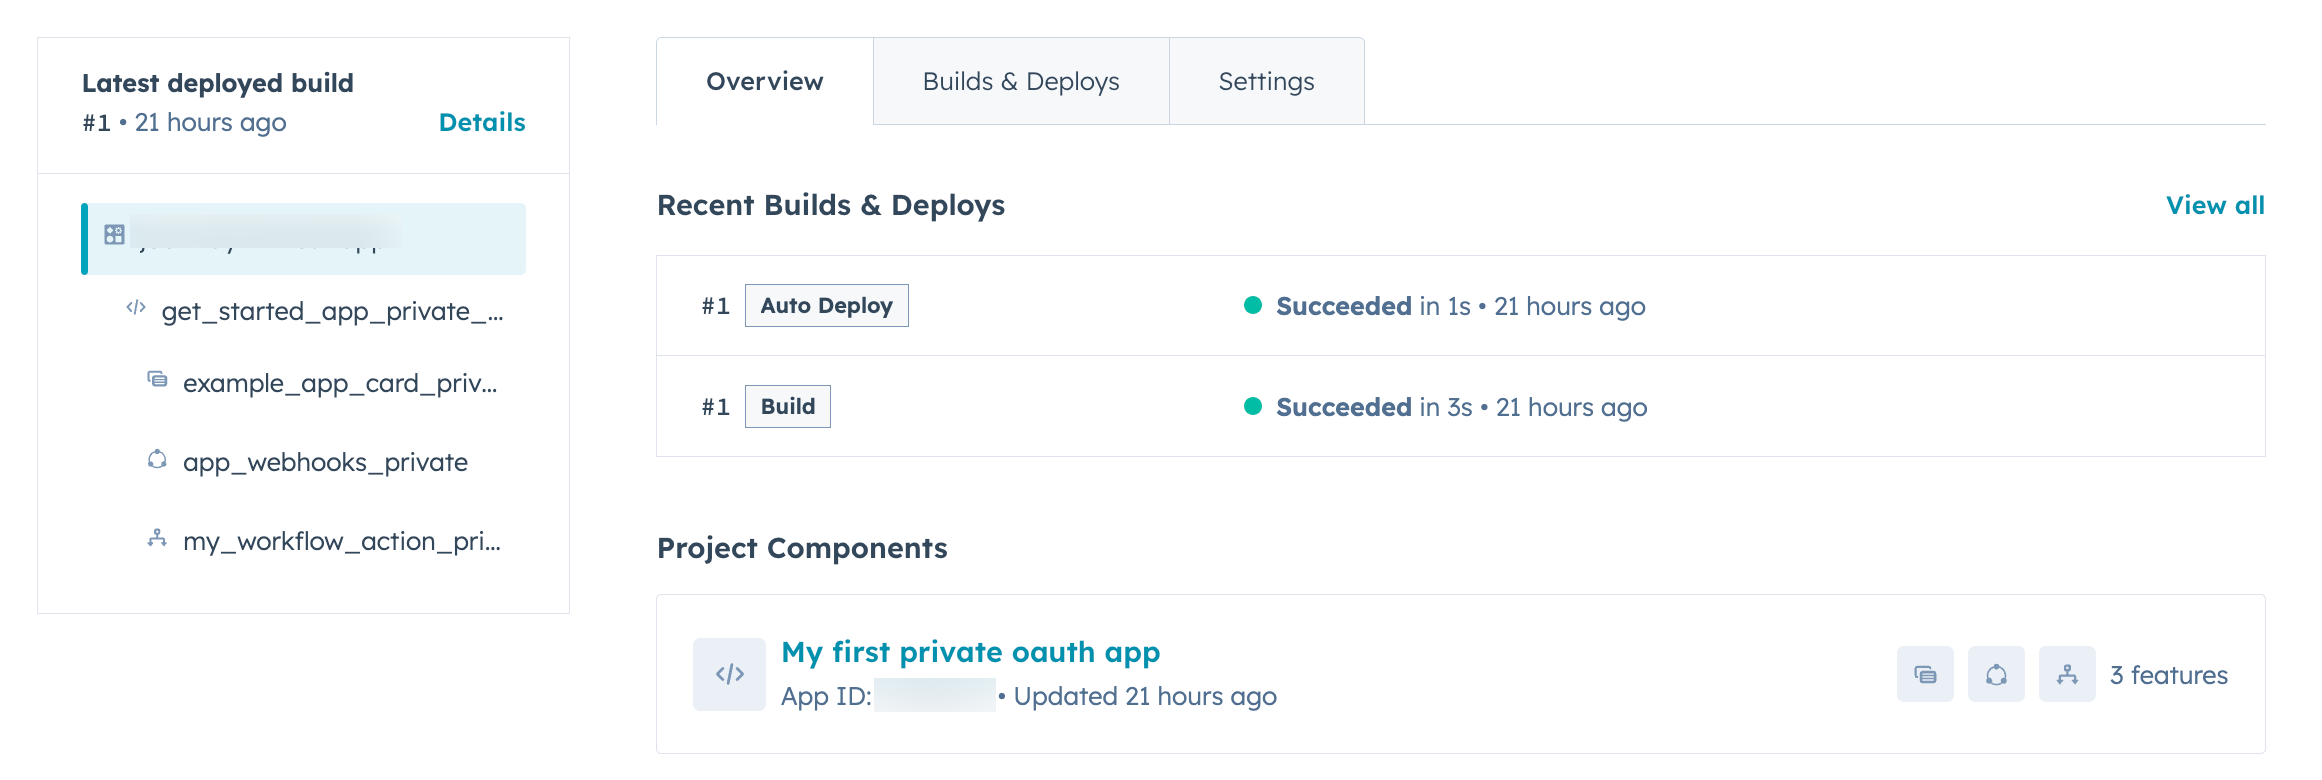
## View your app on the project details page
To review your app details:
* In your HubSpot account, navigate to **Development**.
* On the **Projects** page, click the **name** of your project. On the project details page, review and manage your app:
* In the left sidebar menu, you can click **Details** to jump straight to recent build and deploy history, or click an app feature to check the configuration as detailed in its associated `*-hsmeta.json` file.
* Click the **Settings** tab to toggle your auto-deploy settings, or if you need to delete your app.
* Under *Project Components*, click your app's \`name (as specified in your app's [top-level schema](/apps/developer-platform/build-apps/app-configuration#app-schema)) to review the most recently deployed app schema, the currently configured app features, and manage authentication settings.
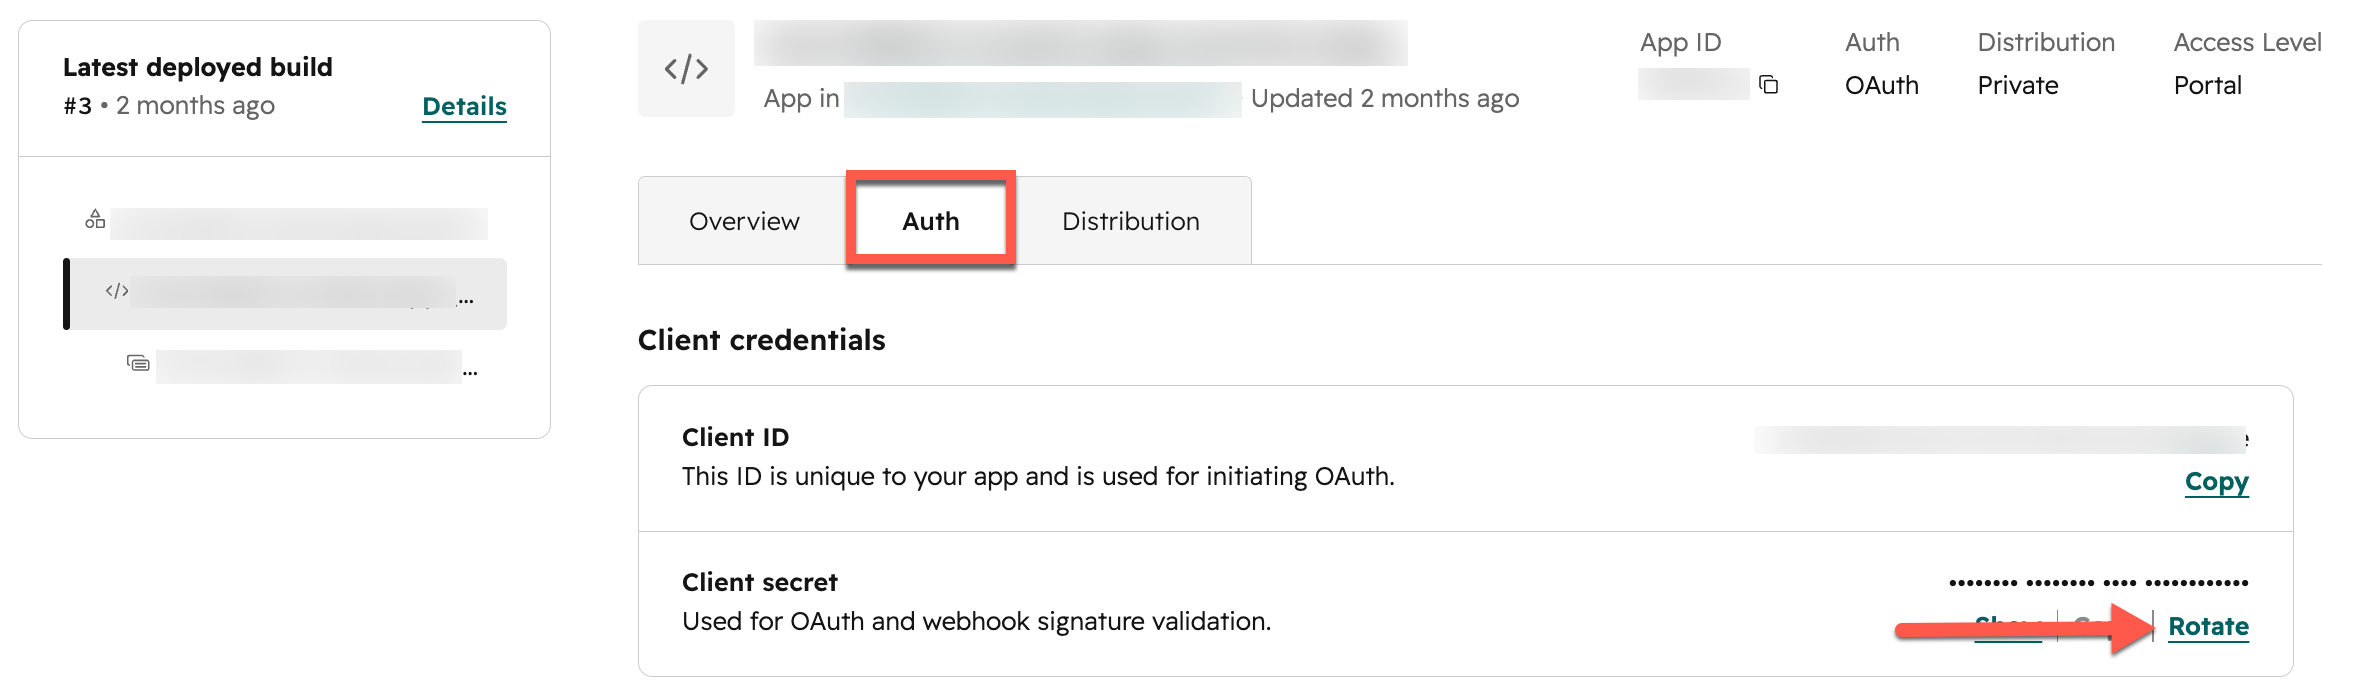
 ## Locate your app's client credentials and redirect URLs
If you're setting up [OAuth authentication](/apps/developer-platform/build-apps/authentication/oauth/working-with-oauth) or [request validation](/apps/developer-platform/build-apps/authentication/request-validation) for your app, you can find the required credentials such as your app's client ID, client secret, and redirect URLs within the authentication details page:
* On the *Overview* tab of the project details page, under *Project Components*, click the top-level app name as defined in the `name` field in your app's [top-level schema file](/apps/developer-platform/build-apps/app-configuration#app-schema).
* Click the **Auth** tab.
* Your app's *Client ID* and *Client secret* will appear in the *Client credentials* section.
## Locate your app's client credentials and redirect URLs
If you're setting up [OAuth authentication](/apps/developer-platform/build-apps/authentication/oauth/working-with-oauth) or [request validation](/apps/developer-platform/build-apps/authentication/request-validation) for your app, you can find the required credentials such as your app's client ID, client secret, and redirect URLs within the authentication details page:
* On the *Overview* tab of the project details page, under *Project Components*, click the top-level app name as defined in the `name` field in your app's [top-level schema file](/apps/developer-platform/build-apps/app-configuration#app-schema).
* Click the **Auth** tab.
* Your app's *Client ID* and *Client secret* will appear in the *Client credentials* section.
 * Scroll down to the bottom of the page to locate your app's currently configured *Redirect URL*, used in the initial [authorization](/apps/developer-platform/build-apps/authentication/oauth/working-with-oauth#set-up-oauth-authentication) step when a user installs your app via OAuth. You can update these URLs by updating the `redirectUrls` field in your app's top-level `app-hsmeta.json` [file](/apps/developer-platform/build-apps/app-configuration#app-schema), then running `hs project upload`.
### Rotate client secret
Your app's client secret is a confidential value used for managing OAuth tokens, validating requests, and generating a client credentials token.
If this secret is compromised, you can rotate the secret to ensure the old one is invalidated and cannot be used.
To rotate your app's client secret:
* In your HubSpot account, navigate to **Development**.
* On the **Projects** page, click the **name** of your project.
* On the *Overview* tab of the project details page, under *Project Components*, click the top-level app name as defined in the `name` field in your app's [top-level schema file](/apps/developer-platform/build-apps/app-configuration#app-schema).
* Click the **Auth** tab.
* Next to your client secret, click **Rotate**.
* Scroll down to the bottom of the page to locate your app's currently configured *Redirect URL*, used in the initial [authorization](/apps/developer-platform/build-apps/authentication/oauth/working-with-oauth#set-up-oauth-authentication) step when a user installs your app via OAuth. You can update these URLs by updating the `redirectUrls` field in your app's top-level `app-hsmeta.json` [file](/apps/developer-platform/build-apps/app-configuration#app-schema), then running `hs project upload`.
### Rotate client secret
Your app's client secret is a confidential value used for managing OAuth tokens, validating requests, and generating a client credentials token.
If this secret is compromised, you can rotate the secret to ensure the old one is invalidated and cannot be used.
To rotate your app's client secret:
* In your HubSpot account, navigate to **Development**.
* On the **Projects** page, click the **name** of your project.
* On the *Overview* tab of the project details page, under *Project Components*, click the top-level app name as defined in the `name` field in your app's [top-level schema file](/apps/developer-platform/build-apps/app-configuration#app-schema).
* Click the **Auth** tab.
* Next to your client secret, click **Rotate**.
 * In the dialog box, confirm you're ready to rotate your secret, then enter the name of your app and click **Rotate secret**.
## Distribute your app
Based on the [authentication](/apps/developer-platform/build-apps/app-configuration#authentication) and [distribution](/apps/developer-platform/build-apps/app-configuration#distribution) you configure in your app's `app-hsmeta.json` file of your project, you can install your app in a single account, multiple allowlisted accounts, or prepare to [list the app](/apps/developer-platform/list-apps/listing-your-app/listing-your-app) on the HubSpot Marketplace.
### Installation limits
App installation is subject to the following limits based on your app's configuration:
* **Static token apps:** can only be installed in 1 [standard HubSpot account](/getting-started/account-types#standard-hubspot-accounts) at a time, and up to 10 [developer test accounts](/getting-started/account-types#developer-test-accounts).
* **Privately distributed OAuth apps:** can be installed in up to 10 allowlisted accounts (not including developer test accounts).
* **Marketplace OAuth app prior to listing:** can be installed in up to 25 accounts (not including developer test accounts).
* **Marketplace OAuth app after being listed:** can be installed in unlimited accounts.
### Permission requirements
The following users can install an app in a standard HubSpot account:
* [Super admins](https://knowledge.hubspot.com/user-management/hubspot-user-permissions-guide#super-admin)
* Users with the *HubSpot Marketplace access* [permission](https://knowledge.hubspot.com/user-management/hubspot-user-permissions-guide#settings-access) along with any scope groups requested by the app (e.g., if your app requires the `crm.import` scope, the user must have the *Import* permission in the account to install the app)
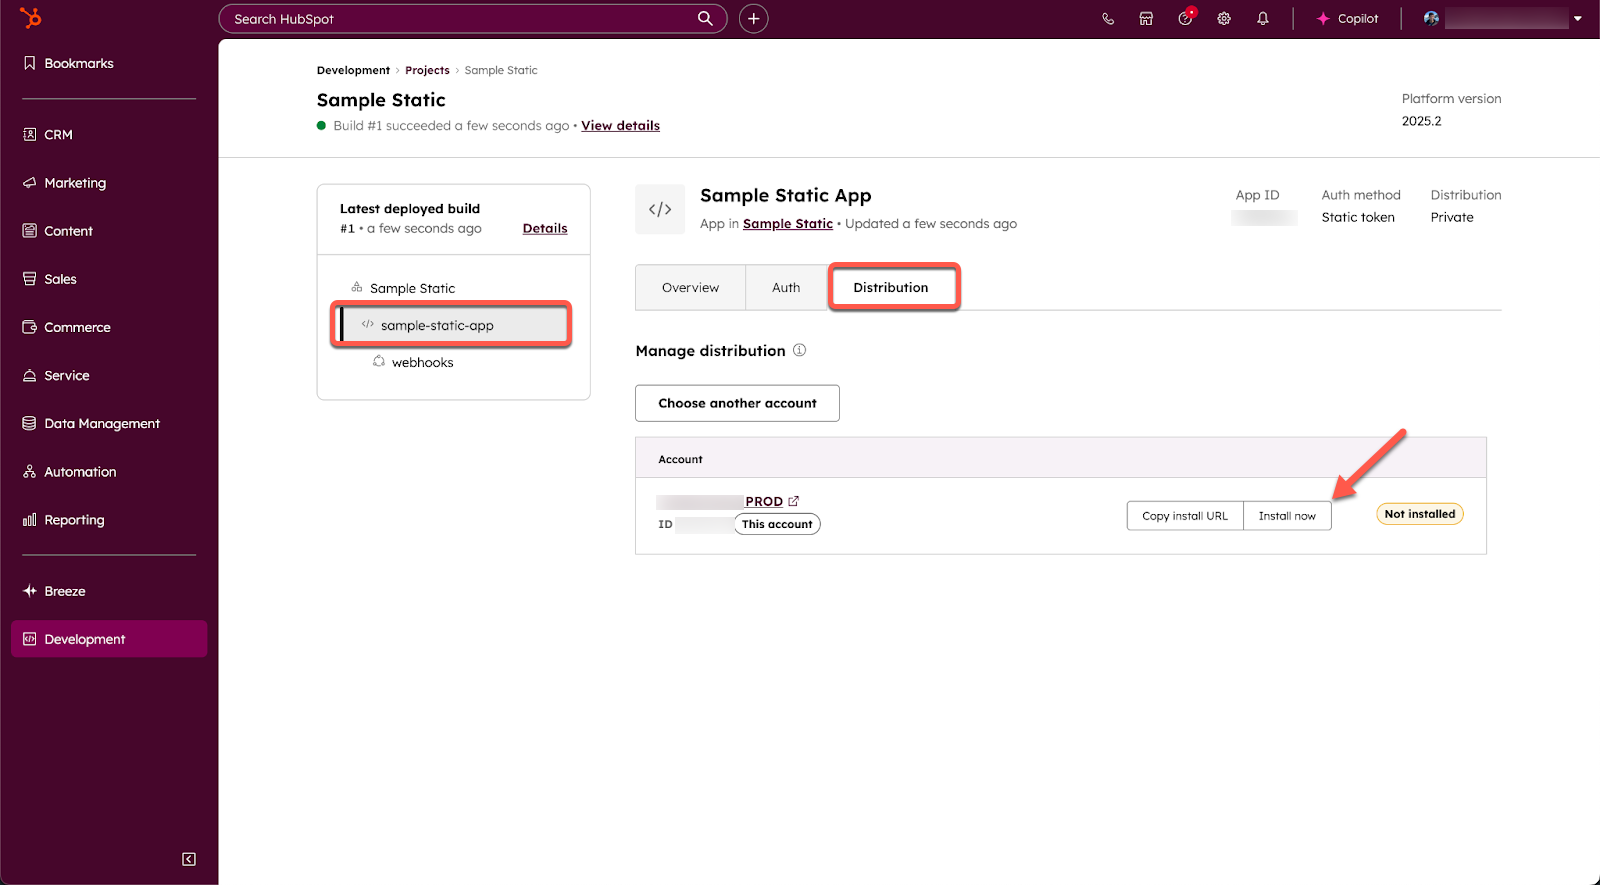
### Navigate to your app distribution settings
After you [upload your app's project](/developer-tooling/local-development/hubspot-cli/project-commands#upload-to-hubspot) or [deploy a new build](/developer-tooling/local-development/hubspot-cli/project-commands#deploy-to-hubspot) to HubSpot, navigate to the distribution settings of your app.
* In your HubSpot account, navigate to **Development**.
* In the left sidebar menu, click **Projects**, then click the *name* of the project associated with your app.
* On the *Overview* tab of the project details page, under *Project Components*, click the top-level app name as defined in the `name` field in your app's [top-level schema file](/apps/developer-platform/build-apps/app-configuration#app-schema).
* Click the **Distribution** tab.
Then, consult the corresponding section below to install your app based on your app's configuration.
### Install an app with a static token
Apps built with a static auth token can be installed in a single [standard account](/getting-started/account-types#standard-hubspot-accounts) at a time.
**Please note:** you can also use your static token to install your app in up to 10 [developer test accounts](/getting-started/account-types#developer-test-accounts).
To install an app with a static token:
* Under *Manage distribution* on the *Distribution* tab, your current HubSpot account will appear. Click **Install now**.
* In the dialog box, confirm you're ready to rotate your secret, then enter the name of your app and click **Rotate secret**.
## Distribute your app
Based on the [authentication](/apps/developer-platform/build-apps/app-configuration#authentication) and [distribution](/apps/developer-platform/build-apps/app-configuration#distribution) you configure in your app's `app-hsmeta.json` file of your project, you can install your app in a single account, multiple allowlisted accounts, or prepare to [list the app](/apps/developer-platform/list-apps/listing-your-app/listing-your-app) on the HubSpot Marketplace.
### Installation limits
App installation is subject to the following limits based on your app's configuration:
* **Static token apps:** can only be installed in 1 [standard HubSpot account](/getting-started/account-types#standard-hubspot-accounts) at a time, and up to 10 [developer test accounts](/getting-started/account-types#developer-test-accounts).
* **Privately distributed OAuth apps:** can be installed in up to 10 allowlisted accounts (not including developer test accounts).
* **Marketplace OAuth app prior to listing:** can be installed in up to 25 accounts (not including developer test accounts).
* **Marketplace OAuth app after being listed:** can be installed in unlimited accounts.
### Permission requirements
The following users can install an app in a standard HubSpot account:
* [Super admins](https://knowledge.hubspot.com/user-management/hubspot-user-permissions-guide#super-admin)
* Users with the *HubSpot Marketplace access* [permission](https://knowledge.hubspot.com/user-management/hubspot-user-permissions-guide#settings-access) along with any scope groups requested by the app (e.g., if your app requires the `crm.import` scope, the user must have the *Import* permission in the account to install the app)
### Navigate to your app distribution settings
After you [upload your app's project](/developer-tooling/local-development/hubspot-cli/project-commands#upload-to-hubspot) or [deploy a new build](/developer-tooling/local-development/hubspot-cli/project-commands#deploy-to-hubspot) to HubSpot, navigate to the distribution settings of your app.
* In your HubSpot account, navigate to **Development**.
* In the left sidebar menu, click **Projects**, then click the *name* of the project associated with your app.
* On the *Overview* tab of the project details page, under *Project Components*, click the top-level app name as defined in the `name` field in your app's [top-level schema file](/apps/developer-platform/build-apps/app-configuration#app-schema).
* Click the **Distribution** tab.
Then, consult the corresponding section below to install your app based on your app's configuration.
### Install an app with a static token
Apps built with a static auth token can be installed in a single [standard account](/getting-started/account-types#standard-hubspot-accounts) at a time.
**Please note:** you can also use your static token to install your app in up to 10 [developer test accounts](/getting-started/account-types#developer-test-accounts).
To install an app with a static token:
* Under *Manage distribution* on the *Distribution* tab, your current HubSpot account will appear. Click **Install now**.
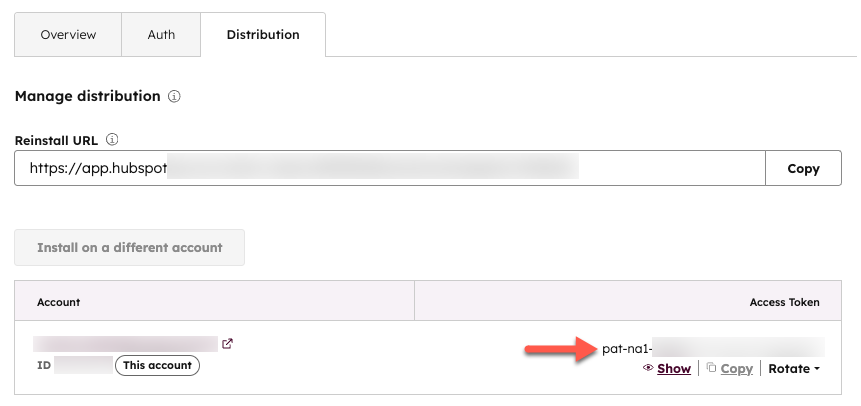
 * You'll be prompted to confirm the installation. Review the data that the app is requesting access to, which should align with the scopes you configured. Then click **Connect app**.
* If installation is successful, the app's *Distribution* tab within your project will display an access token. Click **Show** to reveal the full token, which you can then copy and use to authenticate your app's API requests to HubSpot.
* You'll be prompted to confirm the installation. Review the data that the app is requesting access to, which should align with the scopes you configured. Then click **Connect app**.
* If installation is successful, the app's *Distribution* tab within your project will display an access token. Click **Show** to reveal the full token, which you can then copy and use to authenticate your app's API requests to HubSpot.
 **Please note:**
* To view or rotate your access token, you must be a super admin or have a developer seat for the associated account.
* It's recommended you rotate your token every 6 months for security purposes.
* If you need to install the app on a different account, the app must first be uninstalled from the first account.
* If you update the scopes for your app, you'll need to reinstall the static token app using the *Reinstall URL* on the *Distribution tab* to apply the changes.
### Install a privately distributed OAuth app
To install an OAuth app in a set of allowlisted accounts, make sure your OAuth server is fully set up, then proceed to the following steps:
* On the *Distribution* tab of your app settings, a summary of currently installed accounts will appear at the top of the page. For apps with a `private` distribution, you can install your app in a maximum of 10 HubSpot accounts.
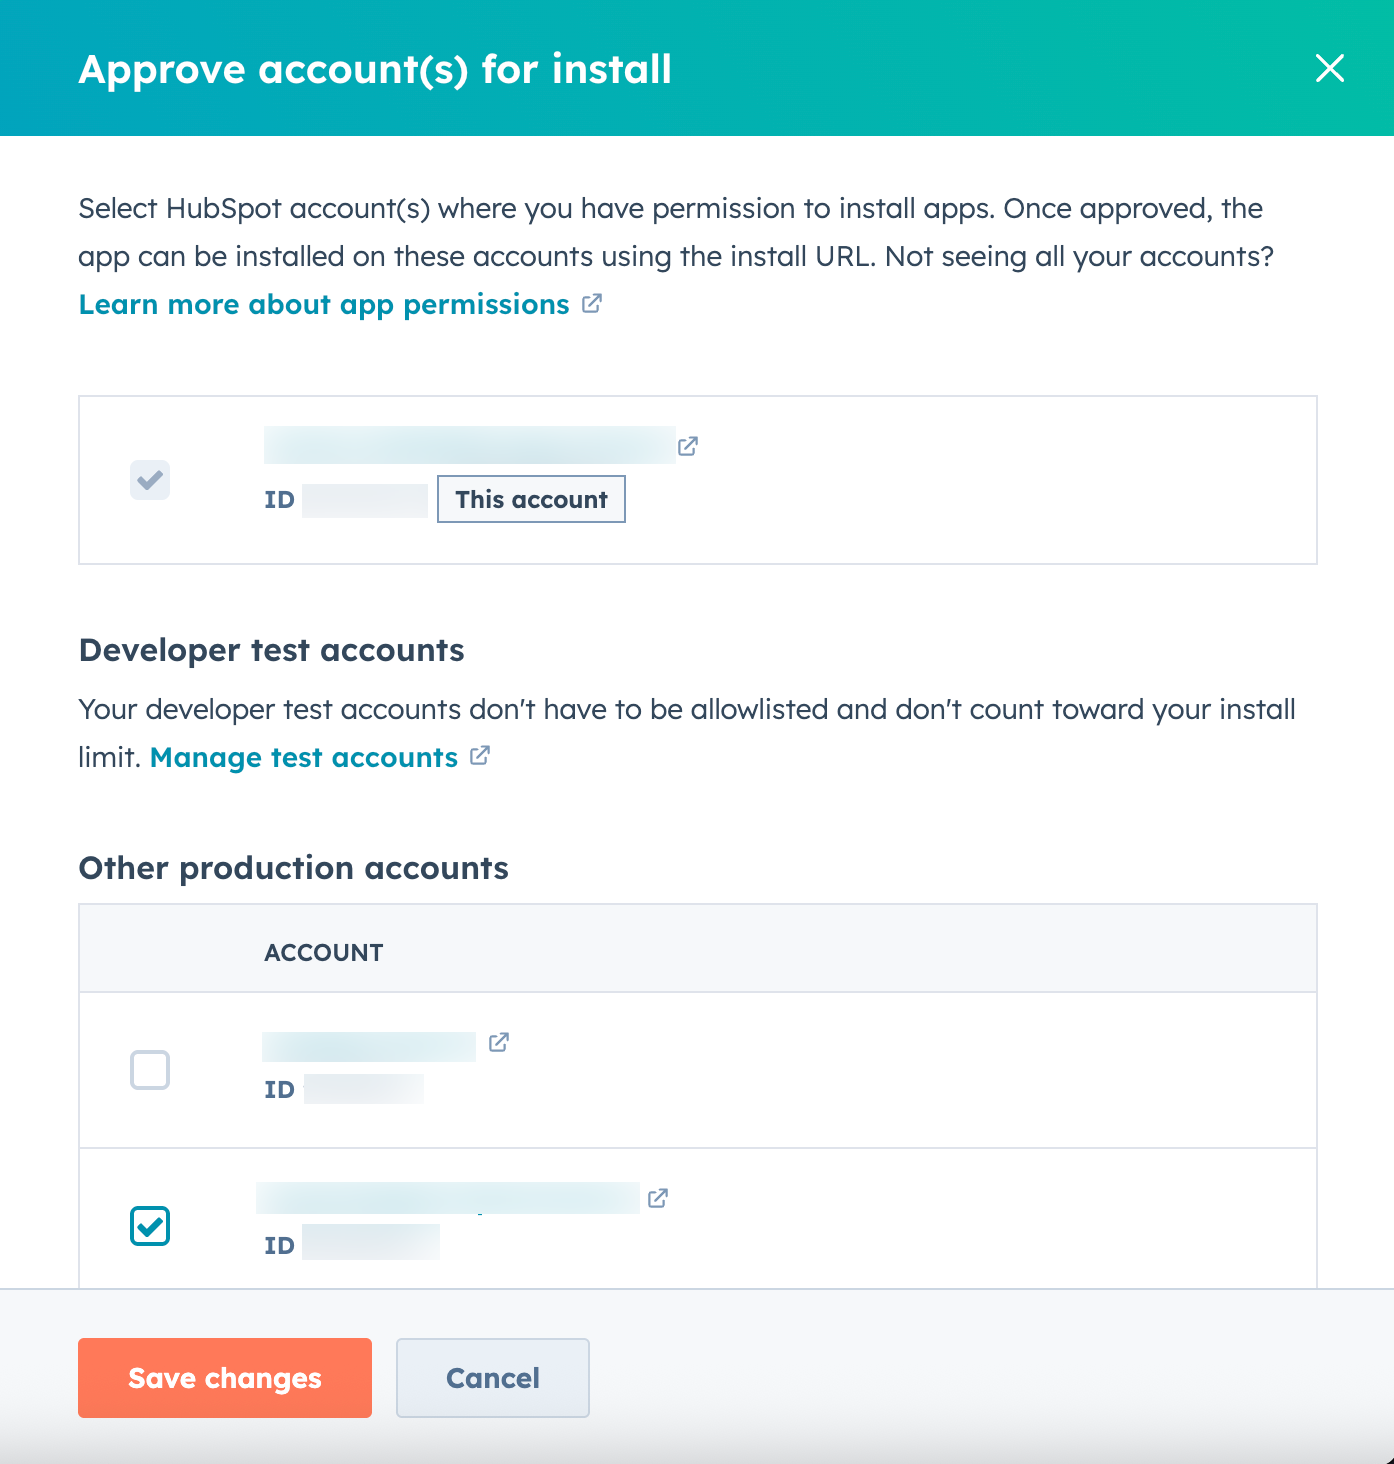
* To add allowlisted accounts, click **Add approved account(s)**.
* In the right panel, under *Other production accounts*, review the list of production accounts that your HubSpot user currently has access to.
* Select the **checkbox** next to any account you want to add to the allowlisted accounts that can install your app.
* When you're done, click **Save changes**.
**Please note:**
* To view or rotate your access token, you must be a super admin or have a developer seat for the associated account.
* It's recommended you rotate your token every 6 months for security purposes.
* If you need to install the app on a different account, the app must first be uninstalled from the first account.
* If you update the scopes for your app, you'll need to reinstall the static token app using the *Reinstall URL* on the *Distribution tab* to apply the changes.
### Install a privately distributed OAuth app
To install an OAuth app in a set of allowlisted accounts, make sure your OAuth server is fully set up, then proceed to the following steps:
* On the *Distribution* tab of your app settings, a summary of currently installed accounts will appear at the top of the page. For apps with a `private` distribution, you can install your app in a maximum of 10 HubSpot accounts.
* To add allowlisted accounts, click **Add approved account(s)**.
* In the right panel, under *Other production accounts*, review the list of production accounts that your HubSpot user currently has access to.
* Select the **checkbox** next to any account you want to add to the allowlisted accounts that can install your app.
* When you're done, click **Save changes**.
 * In the list of approved accounts, you can hover over an account to copy its install link, or remove it from the list of allowlisted accounts.
* To install the app, copy the allowlisted account's install URL, then paste into the URL bar of a new browser window.
* You'll be prompted to confirm the installation. Review the data that the app is requesting access to, which should align with the scopes you configured. Then click **Connect app**.
* In the list of approved accounts, you can hover over an account to copy its install link, or remove it from the list of allowlisted accounts.
* To install the app, copy the allowlisted account's install URL, then paste into the URL bar of a new browser window.
* You'll be prompted to confirm the installation. Review the data that the app is requesting access to, which should align with the scopes you configured. Then click **Connect app**.
 ### Install an OAuth marketplace app
To install an OAuth marketplace app, make sure your OAuth server is fully set up, then proceed to the following steps:
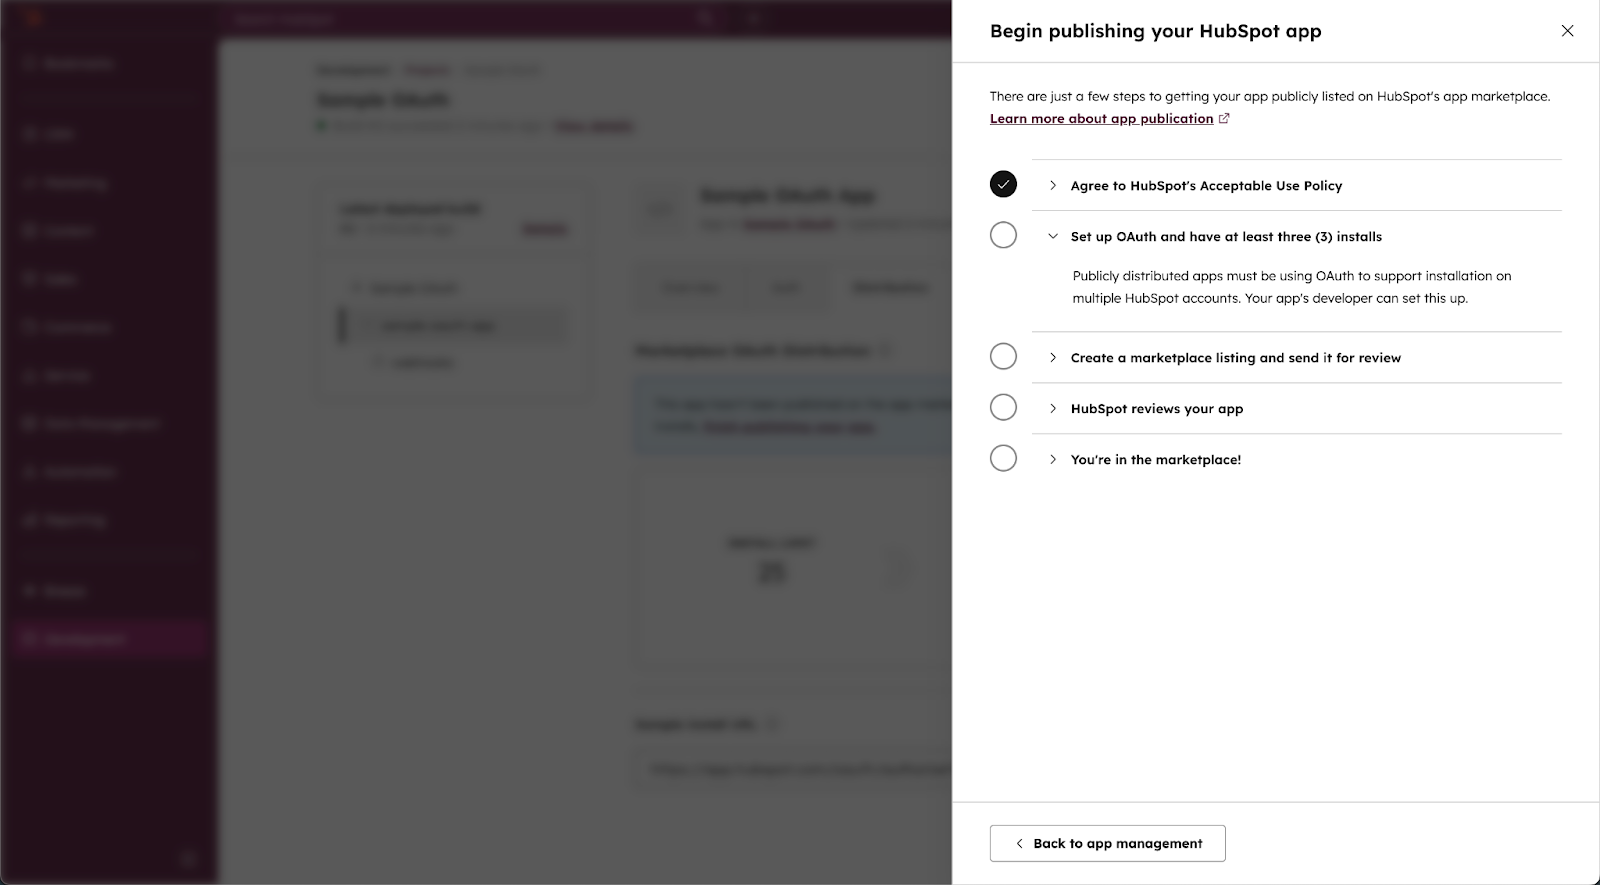
* On the *Distribution* tab of your app settings, click **Begin publishing**.
* Review and sign the Acceptable Use Policy (AUP). Until the AUP is signed, you won't be able to install your app in accounts other than developer test accounts.
* If you're not ready to create a marketplace listing for your app, you can close the right panel to return to the app management page. You can return to the panel at any time by clicking **Continue publishing**.
### Install an OAuth marketplace app
To install an OAuth marketplace app, make sure your OAuth server is fully set up, then proceed to the following steps:
* On the *Distribution* tab of your app settings, click **Begin publishing**.
* Review and sign the Acceptable Use Policy (AUP). Until the AUP is signed, you won't be able to install your app in accounts other than developer test accounts.
* If you're not ready to create a marketplace listing for your app, you can close the right panel to return to the app management page. You can return to the panel at any time by clicking **Continue publishing**.
 * You can use the sample install URL to install your app in any account. OAuth marketplace apps do not use an allowlist to manage installed accounts.
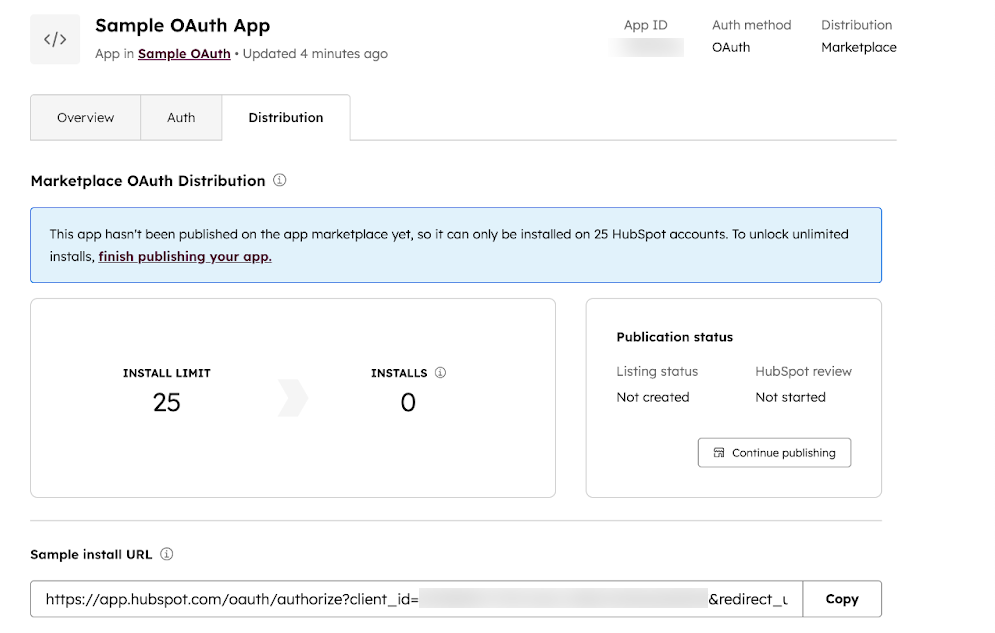 Until your app is reviewed by the HubSpot Ecosystem Quality team and listed on the Marketplace, you'll be limited to 25 installs. Once your app is published, you can install your app in an unlimited number of accounts.
To install your app in an account, navigate to the install URL in a browser window:
* Select the **account** where you want to install your app.
Until your app is reviewed by the HubSpot Ecosystem Quality team and listed on the Marketplace, you'll be limited to 25 installs. Once your app is published, you can install your app in an unlimited number of accounts.
To install your app in an account, navigate to the install URL in a browser window:
* Select the **account** where you want to install your app.
 * After choosing an account, you'll be presented with a list of scopes to authorize based on what you specified in the top-level [app configuration](/apps/developer-platform/build-apps/app-configuration#scopes) file.
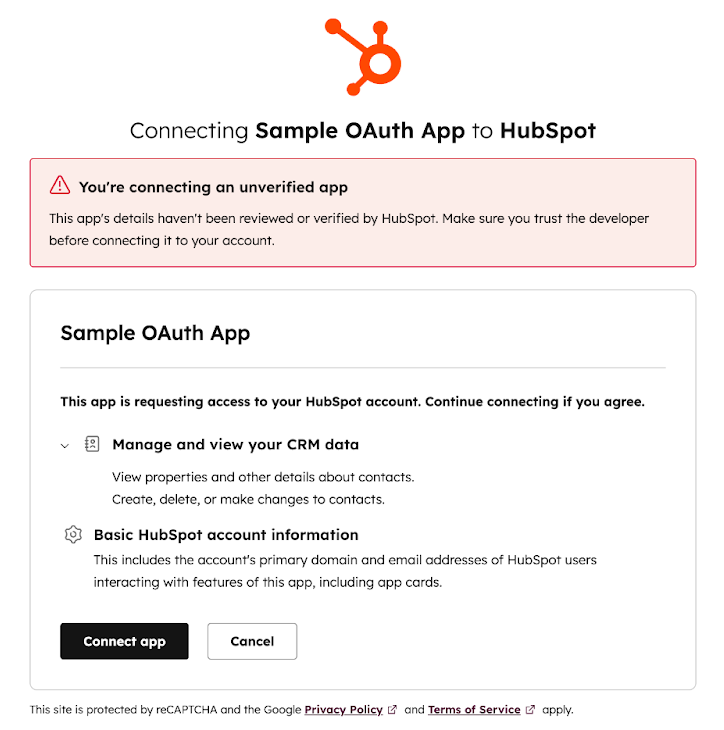
* If your app has not yet been verified by the HubSpot Ecosystem Quality team, a warning banner will appear to alert the user that the app is unverified:
* Carefully review all scopes being requested by the app to confirm they match what you expect.
* Click **Connect app**.
* In the dialog box, double-check all details of the app to confirm that the unverified app matches what you expect. Then type **I accept the risk**, and click **Connect** to authorize the app.
* After choosing an account, you'll be presented with a list of scopes to authorize based on what you specified in the top-level [app configuration](/apps/developer-platform/build-apps/app-configuration#scopes) file.
* If your app has not yet been verified by the HubSpot Ecosystem Quality team, a warning banner will appear to alert the user that the app is unverified:
* Carefully review all scopes being requested by the app to confirm they match what you expect.
* Click **Connect app**.
* In the dialog box, double-check all details of the app to confirm that the unverified app matches what you expect. Then type **I accept the risk**, and click **Connect** to authorize the app.
 Learn more about [listing your app](/apps/developer-platform/list-apps/listing-your-app/listing-your-app) on the HubSpot Marketplace.
## Manage keys
Beyond the authentication methods available for your app (e.g., OAuth or static auth access tokens), two other keys are available in the developer overview of your account: a developer API key and a personal access key.
To review your keys or create a new key in your developer account:
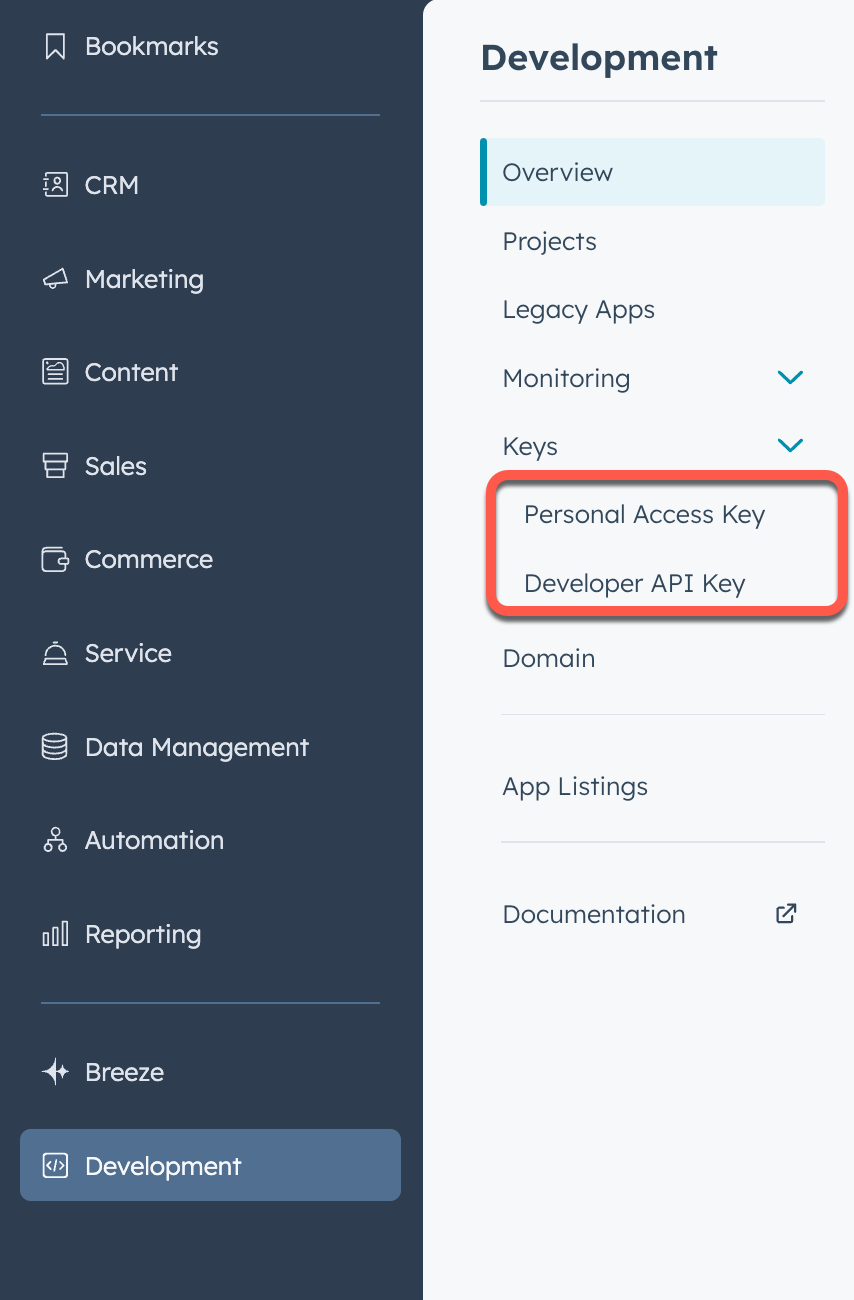
* In your HubSpot account, navigate to **Development**.
* In the left sidebar menu, click **Keys**, then click **Personal access key** or **Developer API key**.
Learn more about [listing your app](/apps/developer-platform/list-apps/listing-your-app/listing-your-app) on the HubSpot Marketplace.
## Manage keys
Beyond the authentication methods available for your app (e.g., OAuth or static auth access tokens), two other keys are available in the developer overview of your account: a developer API key and a personal access key.
To review your keys or create a new key in your developer account:
* In your HubSpot account, navigate to **Development**.
* In the left sidebar menu, click **Keys**, then click **Personal access key** or **Developer API key**.
 ### Personal access keys
Personal access keys provide a form of authentication that's specific to one HubSpot user and one HubSpot account, based on permissions selected when the key is first generated. Once generated, the key is used to authenticate when developing locally using the HubSpot CLI, such as when you run `hs init` or `hs account auth` commands.
Learn more about using auth-related CLI commands in the [CLI reference documentation](/developer-tooling/local-development/hubspot-cli/reference#authentication).
### Developer API keys
Some APIs and features, such as the [custom channels API](/api-reference/legacy/conversations/guide), require a developer API key to authenticate the request. Each key is specific to a HubSpot account, not an individual user, and only one key is allowed at a time. You can deactivate your API key and generate a new one at any time.
For the applicable APIs, this key is provided as the `hapikey` query parameter in your request, often accompanied by the associated `appId` query parameter that corresponds to the app you want to make changes for. For example, the `cURL` snippet below provides an example of using the [custom channel registration](/api-reference/legacy/conversations/guide) endpoint:
```shell theme={null}
curl --request POST \
--url "https://api.hubapi.com/conversations/v3/custom-channels?hapikey={YOUR_DEVELOPER_API_KEY}&appId={appId}
```
## Verified domains
When a HubSpot user installs an app, they consent to grant the app developer access to their account data, subject to [scopes](/apps/developer-platform/build-apps/authentication/scopes) that the app requests, such as retrieving or updating contacts in their CRM. The developer's identity and reputation each play an important role in a user's decision to proceed to install the app in their account.
### Verification status during app installation
To ensure full user consent when installing an app, HubSpot will display a message on the app installation page based on the app's level of verification and if the app is listed on the [HubSpot Marketplace](https://ecosystem.hubspot.com/marketplace/apps):
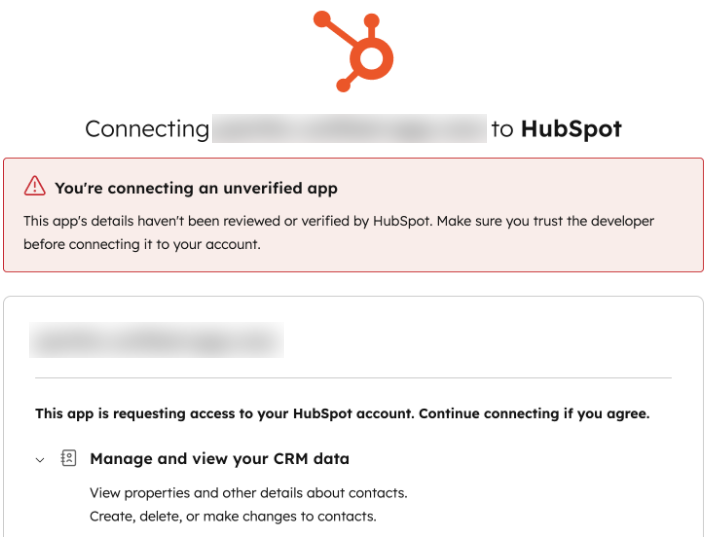
* When an app doesn't have a verified domain, a banner will appear that indicates the app hasn't been verified.
### Personal access keys
Personal access keys provide a form of authentication that's specific to one HubSpot user and one HubSpot account, based on permissions selected when the key is first generated. Once generated, the key is used to authenticate when developing locally using the HubSpot CLI, such as when you run `hs init` or `hs account auth` commands.
Learn more about using auth-related CLI commands in the [CLI reference documentation](/developer-tooling/local-development/hubspot-cli/reference#authentication).
### Developer API keys
Some APIs and features, such as the [custom channels API](/api-reference/legacy/conversations/guide), require a developer API key to authenticate the request. Each key is specific to a HubSpot account, not an individual user, and only one key is allowed at a time. You can deactivate your API key and generate a new one at any time.
For the applicable APIs, this key is provided as the `hapikey` query parameter in your request, often accompanied by the associated `appId` query parameter that corresponds to the app you want to make changes for. For example, the `cURL` snippet below provides an example of using the [custom channel registration](/api-reference/legacy/conversations/guide) endpoint:
```shell theme={null}
curl --request POST \
--url "https://api.hubapi.com/conversations/v3/custom-channels?hapikey={YOUR_DEVELOPER_API_KEY}&appId={appId}
```
## Verified domains
When a HubSpot user installs an app, they consent to grant the app developer access to their account data, subject to [scopes](/apps/developer-platform/build-apps/authentication/scopes) that the app requests, such as retrieving or updating contacts in their CRM. The developer's identity and reputation each play an important role in a user's decision to proceed to install the app in their account.
### Verification status during app installation
To ensure full user consent when installing an app, HubSpot will display a message on the app installation page based on the app's level of verification and if the app is listed on the [HubSpot Marketplace](https://ecosystem.hubspot.com/marketplace/apps):
* When an app doesn't have a verified domain, a banner will appear that indicates the app hasn't been verified.
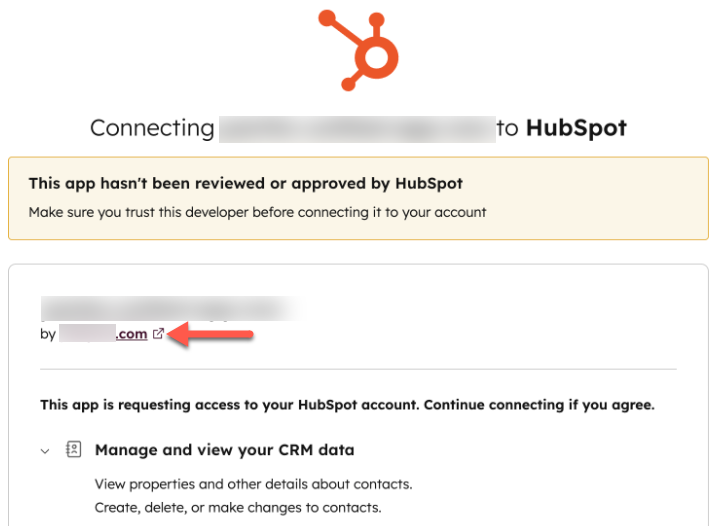
 * When an app does have a verified domain but isn't officially listed on the HubSpot Marketplace, HubSpot will display the verified domain, along with a banner to indicate that the app hasn't been reviewed or explicitly approved by HubSpot.
 * When an app has been submitted for certification and officially passes HubSpot's app review process, HubSpot will not display any warning banner. You are not required to verify the domain if your app has been listed on the HubSpot Marketplace, since the app has been fully vetted by the HubSpot Ecosystem Quality team.
### Add a verified domain
To add a verified domain for your apps, add the domain within the developer overview page of your account, then set up a TXT record in your domain provider's DNS settings:
* In your HubSpot account, navigate to **Development**.
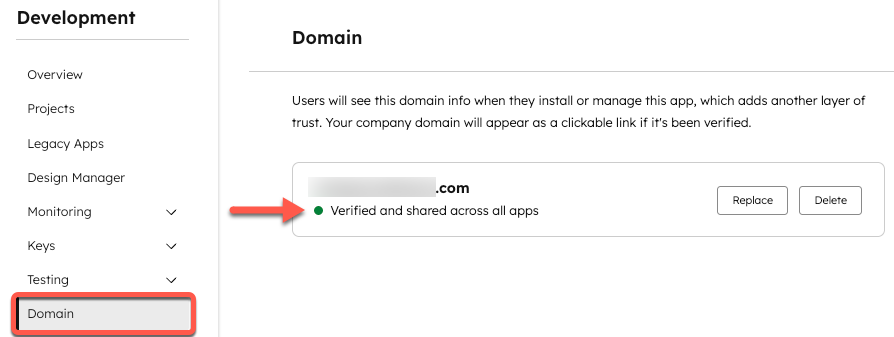
* In the left sidebar menu, click **Domain**.
* Click **Verify a domain**.
* In the right panel, enter your **domain**, then click **Next**.
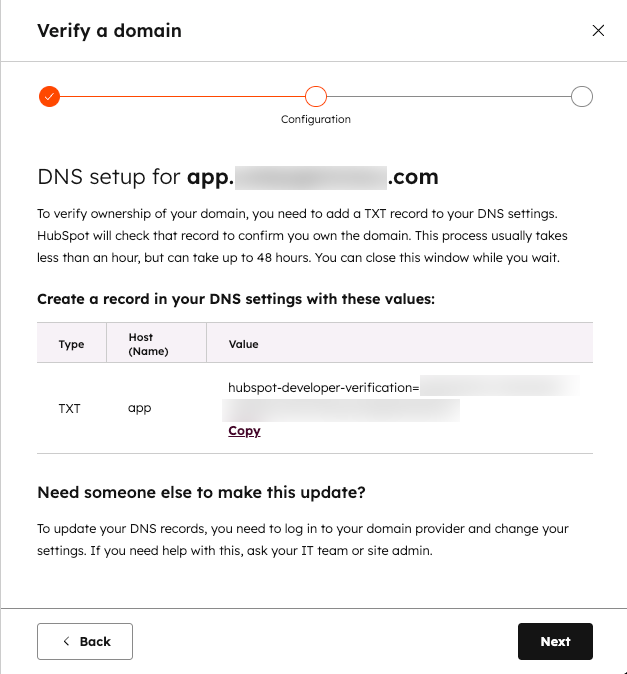
* In the DNS settings of your domain provider, you'll need to set up a TXT record with the provided *Host (name)* and *Value* fields with the values provided. Once configured in your domain provider, click **Next**.
* When an app has been submitted for certification and officially passes HubSpot's app review process, HubSpot will not display any warning banner. You are not required to verify the domain if your app has been listed on the HubSpot Marketplace, since the app has been fully vetted by the HubSpot Ecosystem Quality team.
### Add a verified domain
To add a verified domain for your apps, add the domain within the developer overview page of your account, then set up a TXT record in your domain provider's DNS settings:
* In your HubSpot account, navigate to **Development**.
* In the left sidebar menu, click **Domain**.
* Click **Verify a domain**.
* In the right panel, enter your **domain**, then click **Next**.
* In the DNS settings of your domain provider, you'll need to set up a TXT record with the provided *Host (name)* and *Value* fields with the values provided. Once configured in your domain provider, click **Next**.
 * The verification process usually completes within an hour, but you may need to wait up to 48 hours for the new DNS information to propagate. Once verified, you'll see the domain appear with a success state on the *Domain* details page in the developer overview.
 ### Additional notes
Keep the following caveats regarding domain verification in mind:
* To ensure continued ownership of the domain, HubSpot will continue to verify that the TXT record is present on a regular basis. The install warning will return if the TXT record is removed or modified.
* You can only have one verified domain per developer account. All apps in an account share the verified domain. The domain on the install page will link to your root domain.
* If you delete your verified domain, any user who installs your app will be prompted with the [verification warning noted above](#verification-status-during-app-installation). You can verify another domain, but the process will take a couple hours.
### Additional notes
Keep the following caveats regarding domain verification in mind:
* To ensure continued ownership of the domain, HubSpot will continue to verify that the TXT record is present on a regular basis. The install warning will return if the TXT record is removed or modified.
* You can only have one verified domain per developer account. All apps in an account share the verified domain. The domain on the install page will link to your root domain.
* If you delete your verified domain, any user who installs your app will be prompted with the [verification warning noted above](#verification-status-during-app-installation). You can verify another domain, but the process will take a couple hours.