
Module files
When building a module for pages, blogs, and quotes, the module will contain three frontend-related files that control the content, styling, and functionality of the module:
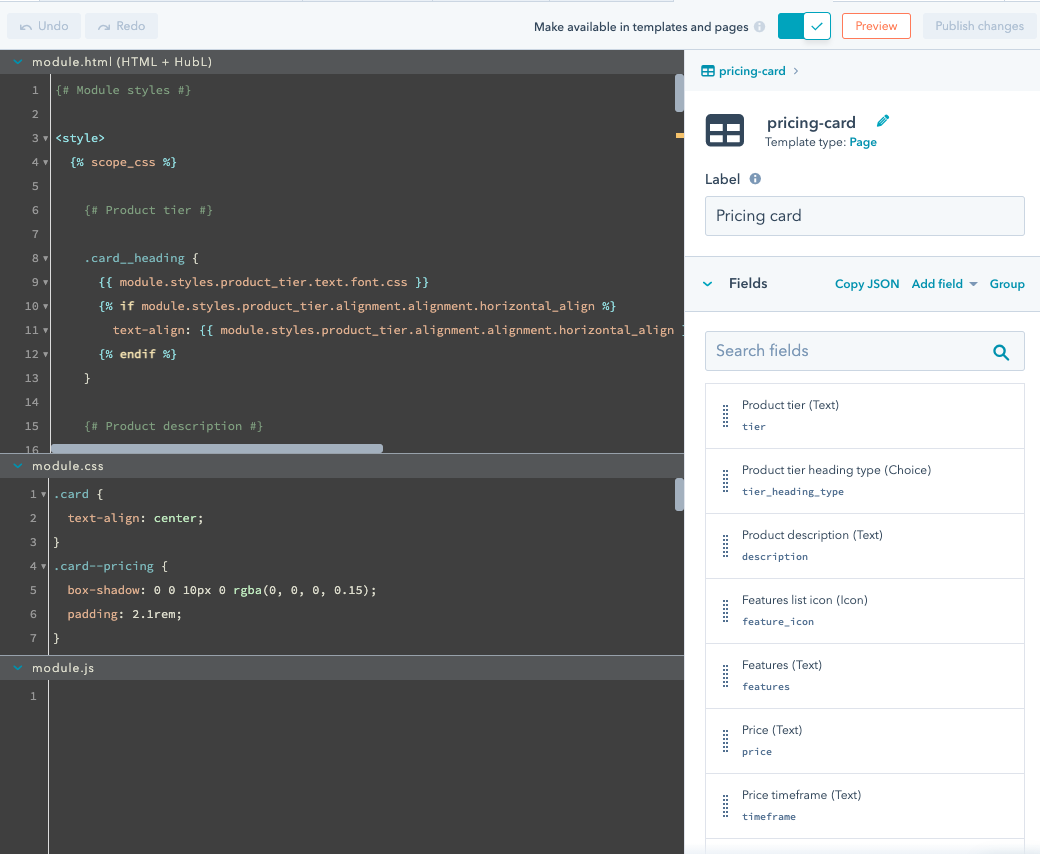
module.htmlmodule.cssmodule.js
Each module also has two backend-related files that control the module's configuration and fields:
meta.jsonfields.json
As an example, check out the menu module in HubSpot's CMS boilerplate. In each section below, learn more about each file along with some example code from this menu module.
Email modules don't support module.css and module.js. This is because email clients don't support JavaScript and support for linked CSS files is limited.
These files will always be rendered to the page when an instance of the module is on the page.
When a page includes multiple instances of the same module, HubSpot will only load module.css and module.js from that module once. By default, module.css and module.js do not load asynchronously, but you can change this by including css_render_options and js_render_options in the module’s meta.json.
Modules can be built within the design manager or locally using the HubSpot CLI. In the design manager, module files are displayed in a multi-pane editor.
 When viewing a module locally, the files are contained within
 module-name.module folders.
 Whether you use the design manager or CLI to create and manage modules is based on your team’s preferences. See creating an efficient developer workflow for recommendations.
The module.html file is intended for HTML and HubL. In general, wherever a module is placed in the page editor or template file determines where the contents of the module.html file are rendered.
This file acts like a HubL include in the page wherever the module is placed. The module.html file can access the module's field values through HubL.
When building a module, you can add default content to your fields as a placeholder so that content creators have an idea of what the content will look like once populated. Aside from default content, you can also add an editor_placeholder HubL tag into a custom module. This tag renders the module's icon and name as empty placeholders in the editor.

Use the module.css file to add CSS to a module.
In general, module.css supports a very limited subset of HubL. However, you can use module_asset_url("my-image.png") for images added as module linked assets. This enables linking assets such as images, packaged with the module itself. For example:
Below, learn how to set up a module's CSS to change dynamically based on the module's fields.
There are a few ways you can influence the styling of your module based on the module’s fields. Choose the way that works best for your specific use case.
To set up predefined styling for the module with the option for editors to select from those options, you can add a module field to set classes in your module.html file which correspond to CSS classes in your module.css file.
For example, you may have an image and text module. You want content creators to be able to position the image to the right or left of the text based on a choice field. To do this, you could set your module.html and module.css files as follows:
When you need to give content creators direct control over specific properties and when classes are not ideal, style tags with require_css blocks are the best option.
To give content creators direct control over specific properties without using classes, you can instead add styling to the module.html file within require_css tags. For example:
Because module.html can render HubL, you can use module field values as CSS variables. When a content creator updates the field in the page editor, the CSS will update to match. These block move the <style> tags into the <head> of your page within the standard_header_includes statement.
You can also set the CSS to be scoped to only the module instance by wrapping the CSS with scope_css tags. For example, you could update the above module code as follows:
When you need to give content creators granular control over only a few properties and when classes are not ideal, you can directly add the values to a style attribute in the HTML.
If you have many properties and the code becomes hard to read, consider switching to the require_css block method.
require_css is a HubL function that you can add to module.html which tells HubSpot that a particular module or template requires a particular CSS file to display. A link tag pointing to the css file is added to the page's <head> inside of the standard_header_includes.
The require_css function will only load that CSS file once, regardless of how many times that same file is required by modules and templates on a particular page. This makes it great for situations where styles may be shared across multiple modules, but where adding the CSS directly to the main stylesheets used on every page for your site may not make sense.
require_css and linked CSS files fill the same purpose, but require_css can be used conditionally based on field values. This prevents loading unnecessary code.
Use the module.js file to add JavaScript to a module.
Like the module.css file, the module.js file does not support HubL.
There are a few ways you can build modules, where the JavaScript acts differently based on field values. Understanding which method to use and when can mean performance benefits on every page the module is used.
For example, you have a custom image module, you want to give content creators the ability to make it so the image can open in a lightbox. Content creators only want that for specific images, and not all instances of the module.
Data attributes are HTML 5 standard custom attributes that developers add to elements. Just as all elements support class="yourClassName", all elements support data-your-attribute="yourValue".
You can use data attributes to pass the field values of your module instances to be handled by your module.js file.
To use the values in your module.js file, you will need to loop through all of the instances of your module. Adding a module-specific class name to the outermost wrapper element of your module will give you a target to use, so that you can loop through each of your module instances.
The data attributes will allow you to retrieve the field values for each module instance in your module.js.
In advanced situations, perhaps when using a JavaScript templating library or a reactive framework like Vue.js or React.js, you may prefer outputting just the data, while the framework handles rendering.
In this case, use a script tag surrounded by a require_js block to provide variables you can access from your templating script.
This technique can be useful for supplying advanced applications with an initial set of data from which to render. This eliminates an initial JavaScript call to retrieve data.
require_js is a HubL function that tells HubSpot that a particular module or template requires a particular JavaScript file to load properly. The function takes two parameters: the path to the file and the location the file is to be added to ("head" or "footer").
In a module require_js can only be added to the module.html. The JavaScript file referred to in the require_js statement will only be loaded once per page, regardless of how many times it is required by modules and templates within the page. This reduces the number of HTTP requests and prevents duplicate code.
Some situations where this becomes handy:
- If you have multiple modules or templates that require the same JavaScript, you can use
require_jsto share that script across modules. - If you're working with a JavaScript bundler like webpack, it can be easier to output your js files to one specific location. Using
require_js, you can associate the JavaScript with your module.
require_js and linked javascript files serve the same purpose, but require_js can be done conditionally based on field values. This prevents unnecessary code from being loaded. You also have the additional option of loading JavaScript in the head, should you need that.
Since JavaScript is render-blocking , the default location require_js places JavaScript is the "footer". Learn more about optimizing for performance.
Thank you for your feedback, it means a lot to us.