- Content Hub Professional or Enterprise
- Some prior knowledge of HTML and CSS
You can learn more about building data-based CMS pages in HubSpot Academy’s CMS Data-Driven Content course.
1
Create a HubDB table
To create a new HubDB table: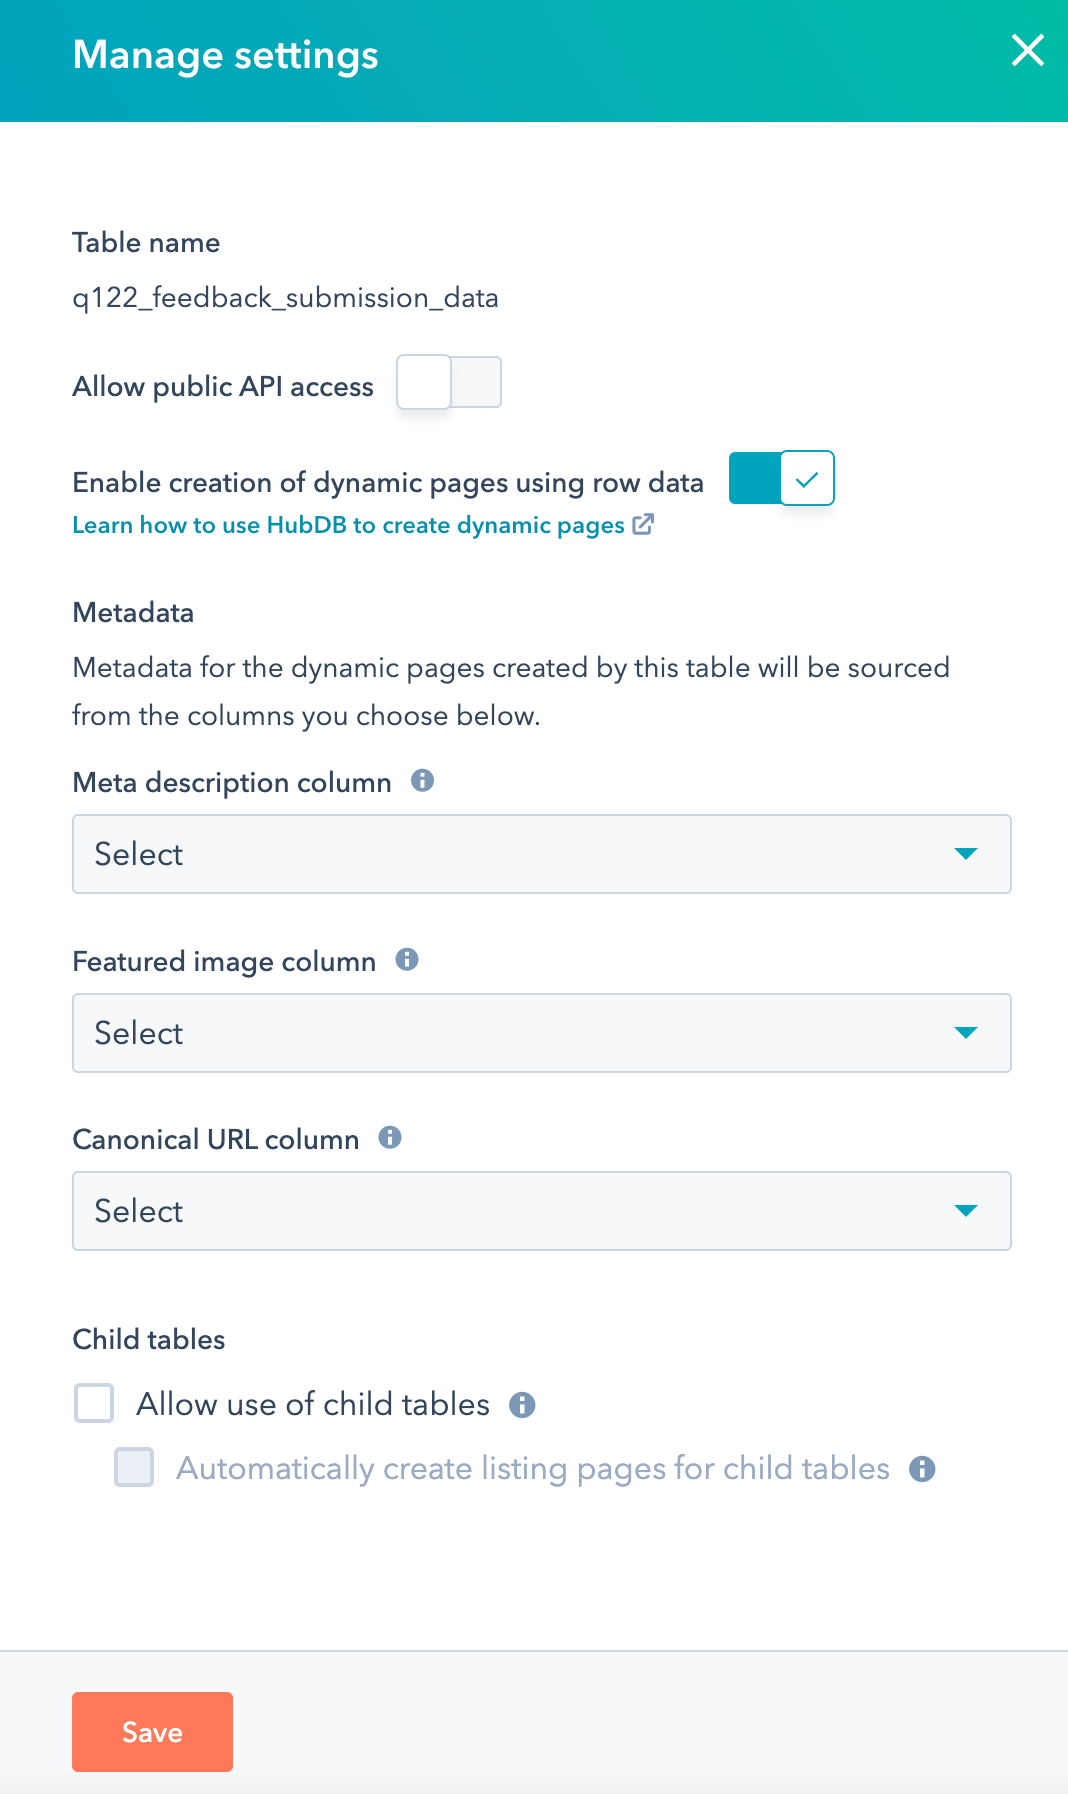 After you update the table settings, the Page title and Page path columns will be added to the table.
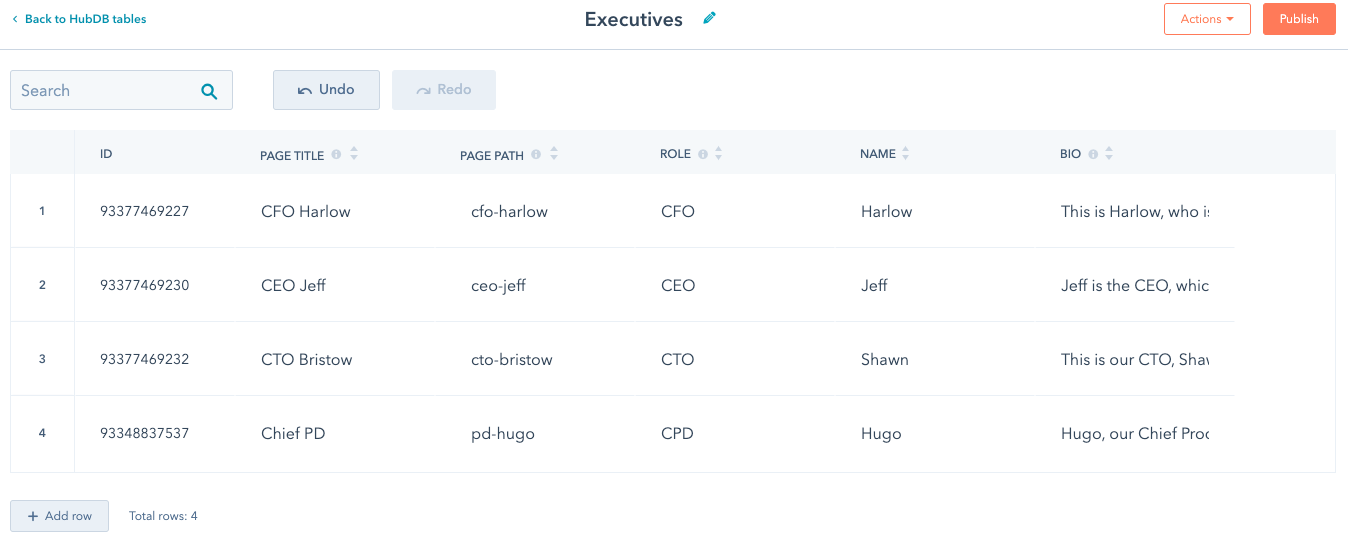 When you’re ready to use the data from your table to build out your pages, click Publish in the top right.
- In your HubSpot account, navigate to Content > HubDB.
- In the upper right, click Create table.
- In the dialog box, enter the table label and name, then click Create.
- In the upper right, click Actions, then select Manage settings.
- In the right panel, click to toggle the Enable creation of dynamic pages using row data switch on.
- You can optionally select the meta description, featured image, and canonical URL of the individual dynamic pages. If you leave these values empty, each page will inherit the respective values from its parent page.
- Click Save to save your changes.
- Page title: the name of this page as seen in the HTML title tag.
- Page path: the last segment of the URL for the dynamic page created by each row in the table.
cfo-harlow, ceo-jeff, cto-bristow, and pd-hugo.Please note:Though you have to enter page paths as lowercase, the resulting URLs are case insensitive. In the example above, when someone navigates to
/CEO-Jeff they will see the same page as /ceo-jeff instead of a 404 error.2
Create a template
Next, you’ll create one template for both the listing page and the individual detail pages for each row, similar to how blog templates can be used for both listing and post detail pages. To create the page template: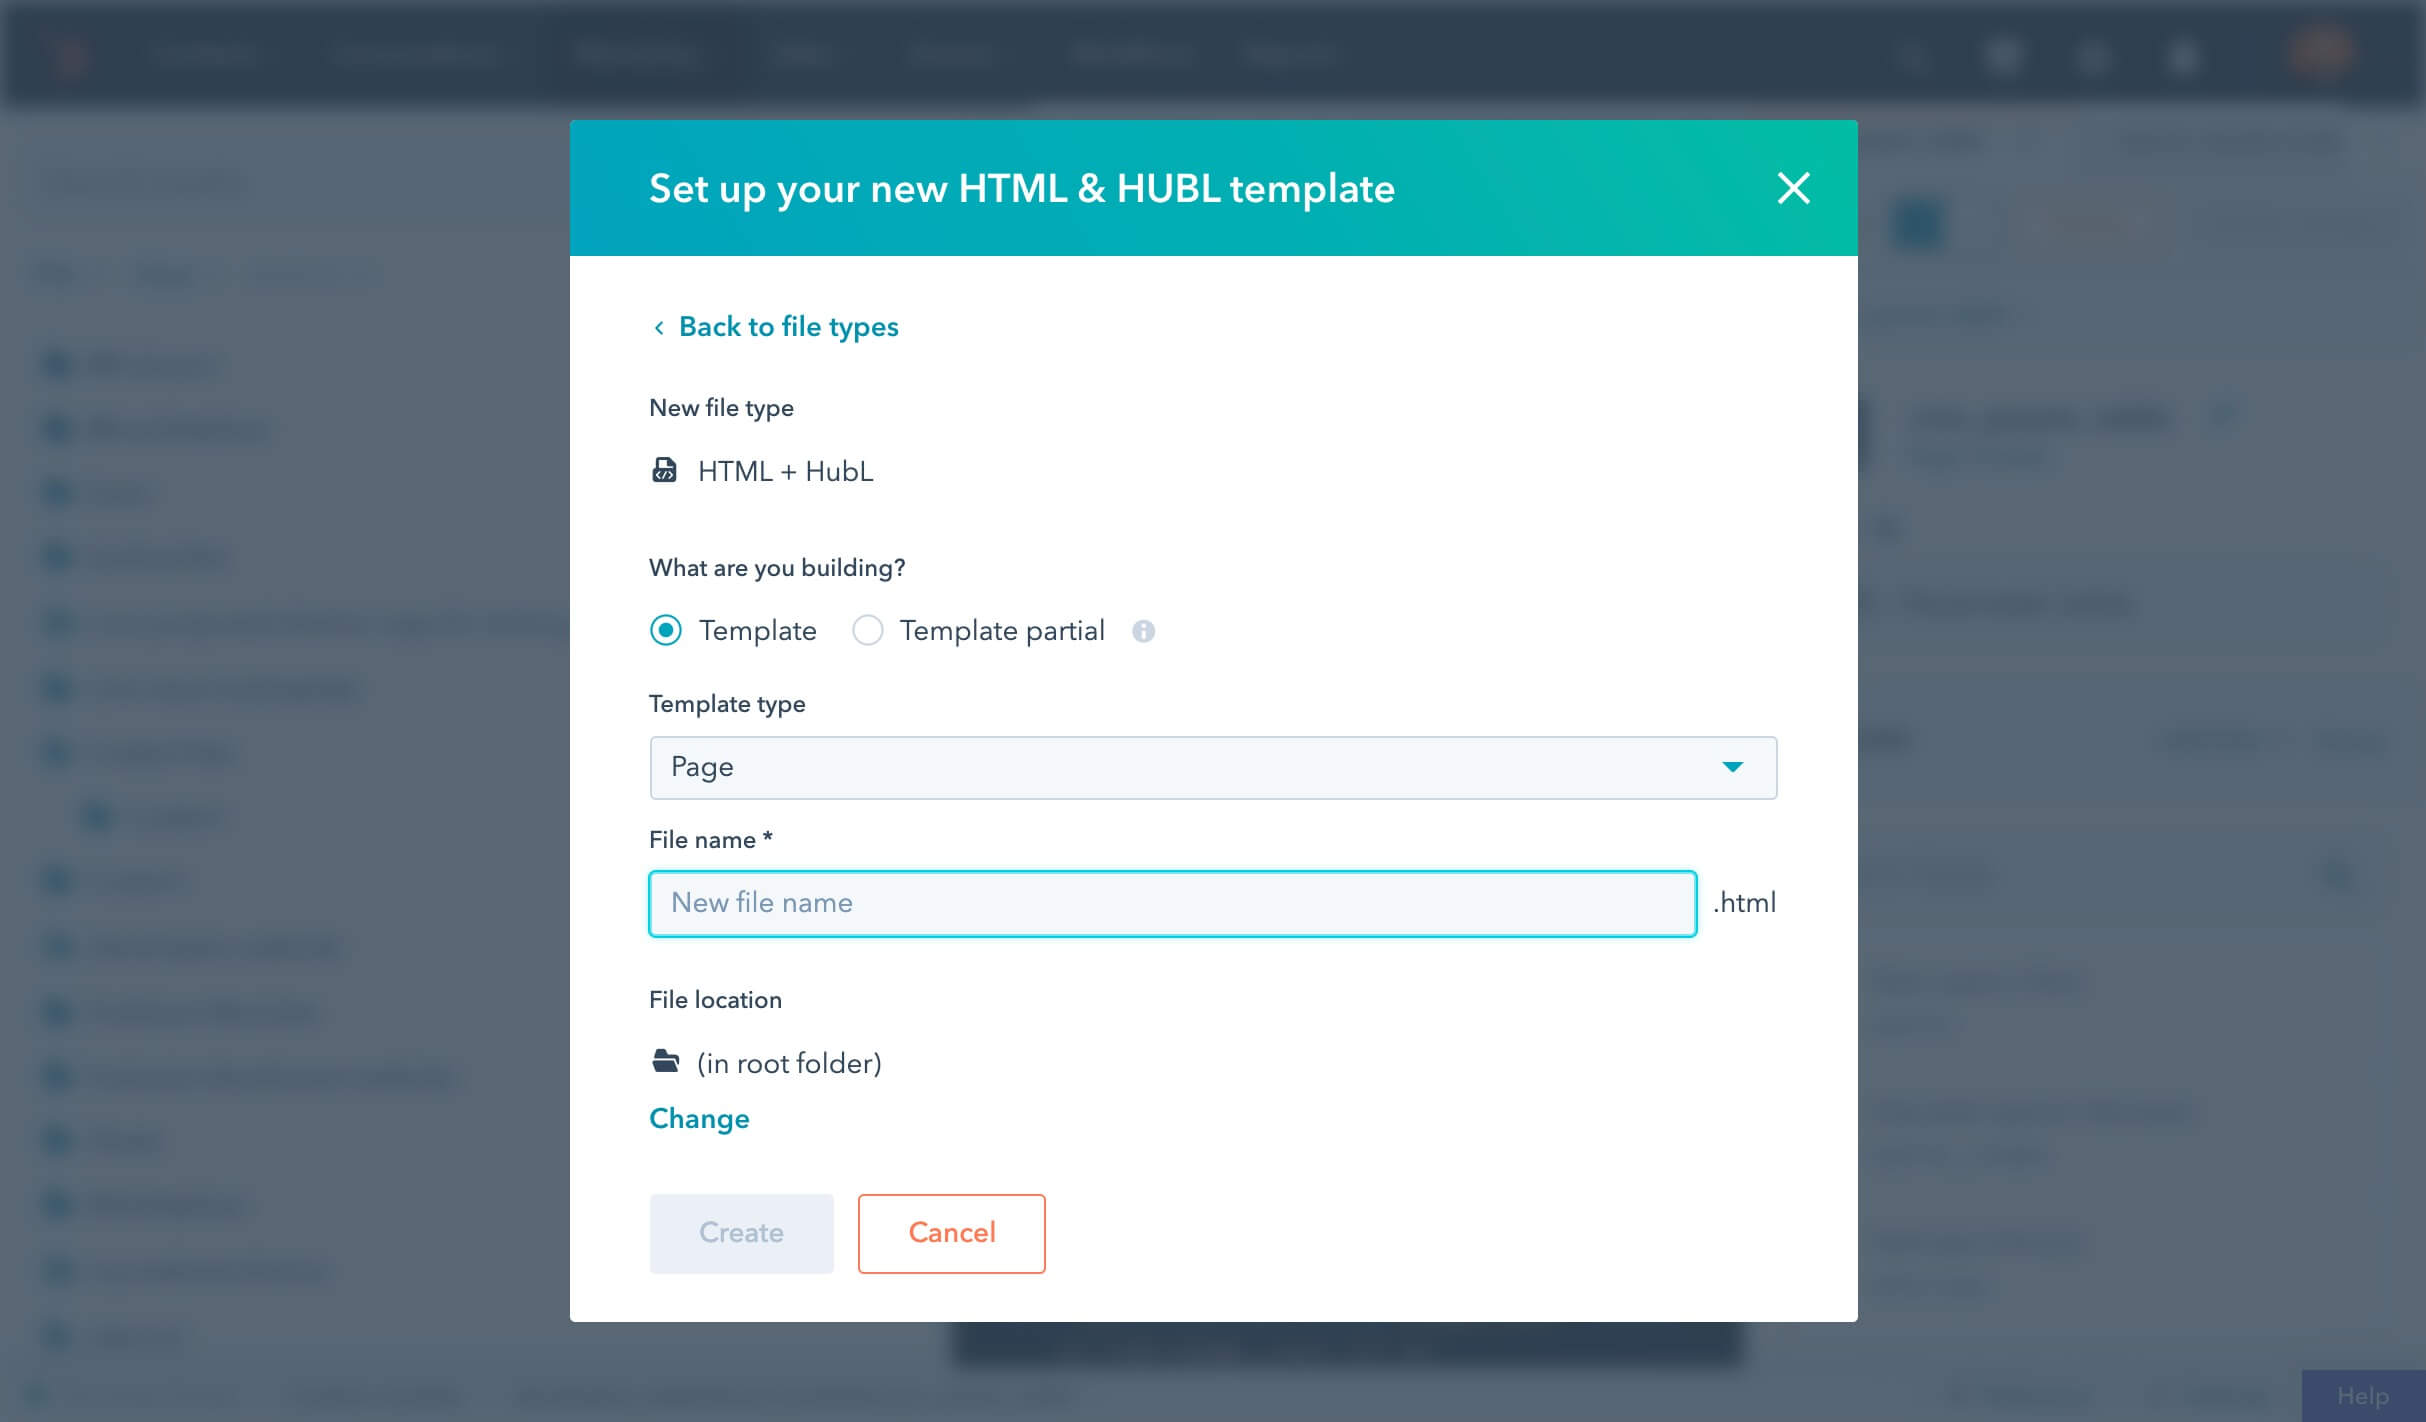 Next, you can add handling for the case in which someone loads your dynamic page without any additional paths from your table. Usually, this is used as a listing page, for listing links to the pages for the rows in your HubDB table. Replace your code with:The code inside the
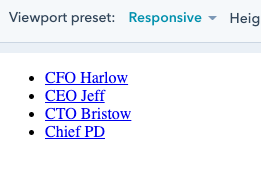
- In your HubSpot account, navigate to Content > Design Manager.
- In the left sidebar menu, navigate to the folder that you want to create the template in. To create a new folder, in the upper left click File, then select New folder. Then, click File, and select New file.
- In the dialog box, use the dropdown menu to select HTML + HubL as the file type.
- Click Next.
- In the File name field, enter the name of the template.
- Under File location, you can change where the template is located in your design manager by clicking Change*.*
- Click Create to create the template.
dynamic_page_hubdb_row and dynamic_page_hubdb_table_id variables in the template. For example, for building an executive profile page, the code below demonstrates how you can use fields from dynamic_page_hubdb_row to display an executive’s info:hs_name: the associated Page title for the HubDB row.name: the executive’s name.role: the executive’s role.
elif block iterates over all the rows in the executive’s table and displays each entry in a list, with a link to their unique path.- In the design manager, click Preview to preview the template. The preview will be blank, because it relies on the context of the page to set the
dynamic_page_hubdb_rowordynamic_page_hubdb_table_idvariables. - To test your code at the template level, add the following temporary code to the top of your template, ensuring that you remove it before publishing:
{% set dynamic_page_hubdb_table_id = <YOUR_HUBDB_TABLE_ID> %}- After adding the above code, your template should now render a list of hyperlinks, pulling data from the HubDB table you built.
- After previewing the template, remove the temporary code above. Then, click Publish in the top right to make it available for creating pages.
3
Create the dynamic page
To create a dynamic page from your template: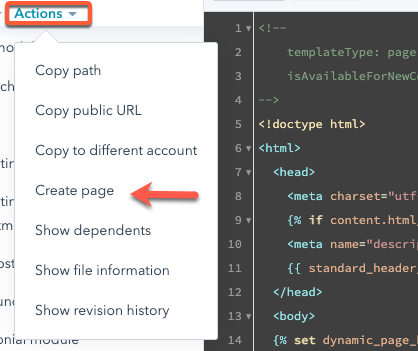

- With your new template open in the design manager, click the Actions dropdown menu at the top of the finder, then select Create page.
- In the dialog box, select Website page, then enter a page name.
- Click Create page.
- At the top of the page editor, click the Settings tab.
- In the Page title field, enter a page name, which you can use later to look up traffic analytics.
- In the URL field, enter a URL of
/executives. The URL will be the base URL for your dynamic page. - Click Advanced Options to expand additional settings.
- Scroll down to the Dynamic pages section, then click the Data sources dropdown menu. Select the HubDB table you created.
- When you’re finished, click Publish in the upper right. Your pages are now ready to view.
4
View live pages
Now you can visit your new dynamic page and all of its paths, as defined by your HubDB table..gif)
- Navigate to the dynamic listing page at the URL you set in the page editor. This tutorial uses
/executivesfor its dynamic page URL, so in that case you would navigate to:https://www.yourdomain.com/executives. - From the listing page, click the names in the bulleted list to view the details page for that executive.
5
Add a new table row
With your dynamic page loading HubDB data, navigate back to the table and add a new row. After publishing the table, you’ll then see your live page dynamically update with the new HubDB data.
- In your HubSpot account, navigate to Marketing > Files and Templates > HubDB.
- Click the name of the table that you create.
- Click Add row, then fill out each column. Below is a sample set of data.
- In the upper right, click Publish.
- In another tab, navigate back to the listing page (
/executivesin this example). You should now see the new executive appear on the listing page, and clicking their name will reveal their details page.
6
View dynamic page data
Once there are visits to your dynamic page, you can measure individual page performance or view all page data in the traffic analytics tool. Even though the individual executive pages are built from the same dynamic page, traffic data, such as page views, will be attributed to each page.To view your page visit data in HubSpot: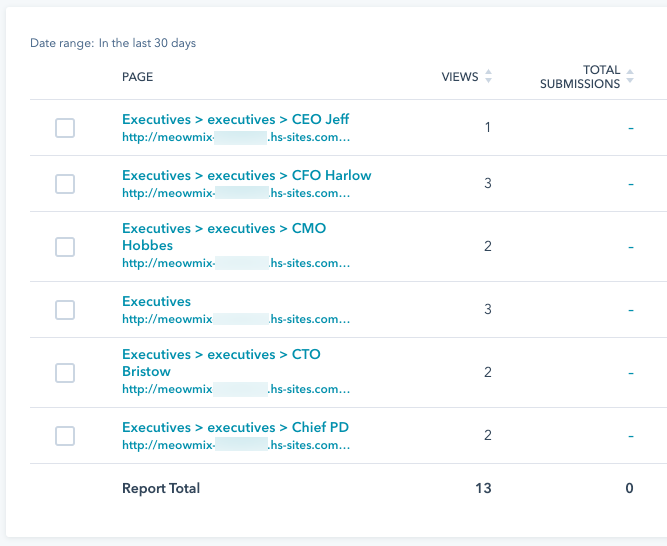 Keep in mind the following if you’re not seeing the traffic data you expect:
- In your HubSpot account, navigate to Reporting > Marketing Analytics.
- In the left sidebar, navigate to Web traffic analysis > Pages.
- View the table to see traffic data for the individual parent and child pages. Child pages will be denoted with > arrow icons to show their relation to parent pages.
- If you’ve excluded your IP addresses in the account’s report settings, ensure that you’re accessing your pages from outside your network for your page views to register.
- It can take up to 40 minutes for new page data to appear in HubSpot.