Set up continuous integration with a GitHub repository using GitHub Actions

Last updated:

As a part of your development workflow, you might prefer to keep your production codebase source of truth in version control. This would be especially helpful if you work as a part of a development team so that you can track changes and quickly roll them back if needed.

Using GitHub Actions, you can set up a continuous integration with a GitHub repository. This guide walks through the integration process, and assumes that you're familiar with:

Below, learn how to set up the integration using the HubSpot CMS Deploy GitHub Action (recommended) or manually.

Send local files to GitHub

Before you can integrate with GitHub, you'll first need to gather your files locally.

  • If you have an existing CMS asset that lives in HubSpot, such as a theme or set of templates, you can fetch it by running the fetch command as follows: hs fetch <HubSpot_src> <local_dest>. Alternatively, you can download all files in the account's developer file system by running hs fetch /.
  • To create a new local project, it's recommended to start with the CMS theme boilerplate. If you haven't worked with the CMS theme boilerplate before, check out the quickstart guide. If you've already installed the HubSpot CLI and configured your local environment, you can create a new local theme from the boilerplate by running hs create website-theme <new-theme-name>. You'll then need to upload your files to HubSpot with the hs upload command.

With your code available locally, you'll then add it to a GitHub repository. After adding your files to GitHub, proceed to the next step to either install HubSpot's pre-made GitHub Action (recommended) or configure the Action manually.

To streamline the process, HubSpot created a GitHub Action that you can install to your GitHub project to handle automatically deploying changes from a branch to your production HubSpot account.

Install GitHub Action

After installing, skip ahead to complete the process.

Manually configure the Action

It's recommended to use the HubSpot CMS Deploy GitHub Action above, as it handles a lot of the setup and configuration for you. However, if you want to manually configure your Action or are using a service other than GitHub, follow the instructions below.

Add dependencies to your package.json file

If you don't already have one, create a package.json file at your project root. In the file, add the @hubspot/cli and js-yaml as devDependencies as shown below.

// package.json { "name": "my-website-theme", "version": "0.0.1", "devDependencies": { "@hubspot/cli": "^3.0.9", "js-yaml": "^3.13.1", } }

Write your files to be run on deploy

At your project's root, create a bin directory that contains two files:

  • deploy.sh: a shell command which will run the deploy script. This file should contain the following:
#!/bin/bash npx hs upload src cms-theme-boilerplate

Note that line two is the upload command. Replace src with the local location of your source files to be uploaded to HubSpot, and cms-theme-boilerplate with the destination name of your project in your HubSpot account.

  • generate-config.js: a node script that generates an authentication file to deploy to your production HubSpot account. This file should contain the following:
#!/usr/bin/env node const path = require('path'); const fs = require('fs'); const yaml = require('js-yaml'); const portalId = process.env.HUBSPOT_PORTAL_ID; const HubSpotPersonalAccessKey = process.env.HUBSPOT_PERSONAL_ACCESS_KEY; const portalConfig = { name: 'PROD', portalId, authType: 'personalaccesskey', HubSpotPersonalAccessKey }; const config = { defaultPortal: 'PROD', portals: [portalConfig], }; fs.writeFileSync( path.join(process.cwd(), 'hubspot.config.yml'), yaml.safeDump(config) );

Make the scripts executable

To make these scripts executable, run the following command in the terminal from your project's root folder:

chmod +x bin/generate-config.js;chmod +x bin/deploy.sh

If you're using Windows, you can instead try the following command:

git update-index --chmod=+x path/to/file

Create your GitHub Action workflow

Since GitHub Actions allow you to run a workflow on any GitHub event, you'll now configure the deploy workflow.

  • In your project root, create a file at .github/workflows/deploy.yml.
  • Paste the following into the file, which configures the deploy workflow to occur on pushes to the master branch:
on: push: branches: - master jobs: deploy: runs-on: ubuntu-latest steps: - uses: actions/checkout@v1 - name: Use Node.js uses: actions/setup-node@v1 with: node-version: 10.x - name: Install NPM deps run: | npm install - name: Generate hubspot.config.yml and deploy env: HUBSPOT_PORTAL_ID: ${{ secrets.HubSpotPortalId }} HUBSPOT_PERSONAL_ACCESS_KEY: ${{ secrets.HubSpotPersonalAccessKey }} run: | bin/generate-config.js bin/deploy.sh

Note on lines 20-21 the HUBSPOT_PORTAL_ID and HUBSPOT_PERSONAL_ACCESS_KEY variables. In the next step, you'll create secrets to populate  ${{ secrets.HubSpotPersonalAccessKey }} and ${{ secrets.HubSpotPortalId }} to add your personal access key and HubSpot account ID as environmental variables. This allows you to store your sensitive information in source control without exposing it.

Refer to the GitHub Actions documentation to learn more about various events you can use to trigger workflows.

Create secrets for your personal access key and HubSpot account ID

Next, create secrets to ensure your personal access key and HubSpot account ID are not exposed, but rather passed into the deploy script as environment variables:

  • In your GitHub repository, navigate to SettingsSecrets. Then select Add a new secret.
  • Name the secret HubSpotPersonalAccessKey, then enter your HubSpot personal access key as the value. 
  • Click Add secret to save it.
  • Repeat the same steps to add another secret for your HubSpot account ID. For this secret, use the name HubSpotPortalId, as per the deploy.yml file.
Please note: if you choose to use different secret names, make sure that you use the same names within your deploy.yml file.
  • With your secrets created, commit the new .github/workflows/deploy.ymlbin/deploy.sh and bin/generate-config.js files to your main branch. 

Create and merge a pull request in main

  • With your secrets, workflows, and scripts in your GitHub repository, create a pull request and merge it into main. 
  • After merging the pull request, navigate to Actions. You should see your deploy Action run, which will then deploy your code to your HubSpot account.

Lock your asset in the design manager

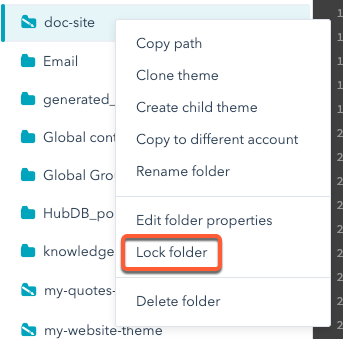
Now that your source of truth lives in GitHub, you should lock your asset in HubSpot to prevent edits from being made there. This ensures that changes only come through the deploy action.

To lock assets in the design manager:

  • In your HubSpot account, navigate to MarketingFiles and TemplatesDesign Tools.
  • Locate your asset's folder in the left sidebar, then right-click and select Lock folder.
design-manager-lock-folder

Was this article helpful?
This form is used for documentation feedback only. Learn how to get help with HubSpot.