> ## Documentation Index
> Fetch the complete documentation index at: https://developers.hubspot.com/docs/llms.txt
> Use this file to discover all available pages before exploring further.

---
id: f55731ae-0fd8-403d-9e21-77b572dad98f
---

# HubL Syntax

> HubL is the jinja inspired templating language used for building templates and modules on the HubSpot CMS. If statements, for loops, includes, etc.

HubSpot’s CMS uses the HubSpot Markup Language, referred to as HubL (pronounced “Hubble”). HubL is HubSpot’s extension of [Jinjava](https://github.com/HubSpot/jinjava), a templating engine based on [Jinja](https://jinja.palletsprojects.com/en/latest/). HubL uses a fair amount of markup that is unique to HubSpot and does not support all features of Jinja.

This article will take you through the basics of HubL's features and syntax.

## Types of delimiters

Similar to other commonly used templating languages such as PHP, HubL can be mixed into your HTML in coded templates files or HubL template modules. In order to differentiate, where your HubL starts and ends, you will need to learn a few key symbols that act as delimiters.

```jinja theme={null}
{% %} - statement delimiters
{{ }} - expression delimiters
{# #} - comment delimiters
```

### Statements

`{% statement %}`

HubL statements are used to create editable modules, define conditional template logic, set up for loops, define variables, and more. Statements are delimited by `{%`. They do not print anything to the page.

### Expressions

`{{ expression }}`

Expressions print values stored in the context of the template. Expressions are delimited by `{{`. For example, a variable must be defined as a statement, but then a HubL expression would be used to print the variable.

#### Do tag

`{% do %}`

The 'do' tag works like a statement, and can be used to modify lists and dictionaries.

<Note>
  * When adding values to arrays, use [`.append()`](/cms/reference/hubl/functions#append) instead.
  * When adding values to objects, use [`.update()`](/cms/reference/hubl/functions#update) instead.
</Note>

<Tabs sync={false}>
  <Tab title="HubL">
    ```jinja theme={null}
    <!-- Arrays -->
    {% set navigation = ["Home", "About"] %}
    {% do navigation.append("Contact Us") %}
    {{navigation}}
    <br />
    <!-- Objects -->
    {% set book = {"name" : "Rocking HubL", "author" : "John Smith" }%}
    {% do book.update({"ebook" : "yes"}) %}
    {{book}}
    ```
  </Tab>

  <Tab title="Output">
    ```html theme={null}
    [Home, About, Contact Us]
    {name=Rocking HubL, author=John Smith, ebook=yes}
    ```
  </Tab>
</Tabs>

### Comments

The final type of delimiter that you may encounter or decide to employ while developing with HubL, is a HubL comment. Comments are delimited by `{#`/ `#}`.

<Tip>
  Be mindful of nesting comments in your code, as it can result in the trailing comment tag to render as text.
</Tip>

## Modules

[Modules](/cms/start-building/building-blocks/modules/hide-modules-and-sections) are dynamic areas of a template that can be customized by the end user in the content editor. For example, if you were coding a template file from scratch, you would add modules to templates with HubL tags, to give your content creators the ability to edit areas of the page.

Module tags are made up of the following components:

* **Type of module:** specifies which module to render. Please refer to the [HubL Supported Tags](/cms/reference/hubl/tags/standard-tags) page for a listing of the different types of modules available.
* **A unique name for that module:** gives the module a unique identity in the context of the template.
* **Path:** depending on the tag, defines the location of where the module is in the design manager. The path for HubSpot default modules should always start with @hubspot/ followed by the type of module. See the example below and the [using modules in templates page](/cms/reference/modules/using-modules-in-templates) for more.
* **Parameters:** optionally specify additional module information.

The example below is a text module with the label and value parameters defined. The label defines the help text in the editor and value sets the default text for that module. See the sample gif below for how this looks inside of the editor.

<Tabs sync={false}>
  <Tab title="HubL">
    ```jinja theme={null}
    {% module "unique_module_name",
      path="@hubspot/text",
      label="Single Text Line",
      value="This is a single text line"
    %}
    ```
  </Tab>

  <Tab title="Output">
    ```html theme={null}
    <div
      class="hs_cos_wrapper hs_cos_wrapper_widget hs_cos_wrapper_type_module widget-type-text widget-type-text"
      data-hs-cos-general-type="widget"
      data-hs-cos-type="module"
      id="hs_cos_wrapper_text"
      style=""
    >
      <span
      class="hs_cos_wrapper hs_cos_wrapper_widget hs_cos_wrapper_type_text"
      data-hs-cos-general-type="widget"
      data-hs-cos-type="text"
      id="hs_cos_wrapper_text_"
      style=""
      >
        This is a single text line
      </span>
    </div>
    ```
  </Tab>
</Tabs>

<Frame>
  <img src="https://cdn2.hubspot.net/hubfs/53/module-label-value-min.gif" alt="module-label-value-min" />
</Frame>

You can [learn more about using modules in templates](/cms/reference/modules/using-modules-in-templates).

## Variables and macros

HubL includes many [predefined HubSpot variables](/cms/reference/hubl/variables) that print their helpful values from the app. In addition, you can [define your own variables in a template](/cms/reference/hubl/variables-macros-syntax). In the following example, a variable named `primaryColor` is defined in a statement and then printed with a HubL expression. This example mixes the HubL variable with CSS.

<Tabs sync={false}>
  <Tab title="HubL">
    ```jinja theme={null}
    {% set primaryColor = '#F7761F' %} {# defines variable and assigns HEX color #}

    a {
    color: {{ primaryColor }}; {# prints variable HEX value #}
    }
    ```
  </Tab>

  <Tab title="Output">
    ```css theme={null}
    a {
    color: #f7761f;
    }
    ```
  </Tab>
</Tabs>

HubL macros allow you to print multiple statements with a dynamic value. This technique proves useful when you find yourself writing the same basic code blocks over and over, but only need to change certain values. In the following example, a macro is used to print a CSS3 transition property that includes all the vendor prefixes. You can [learn more about macros, here](/cms/reference/hubl/variables-macros-syntax#macros).

<Tabs sync={false}>
  <Tab title="HubL">
    ```css theme={null}
    {% macro trans(value) %}
    -webkit-transition: {{value}};
    -moz-transition: {{value}};
    -o-transition: {{value}};
    -ms-transition: {{value}};
    transition: {{value}};
    {% endmacro %}

    a {
    {{ trans("all .2s ease-in-out") }}
    }
    ```
  </Tab>

  <Tab title="Output">
    ```css theme={null}
    a {
    -webkit-transition: all 0.2s ease-in-out;
    -moz-transition: all 0.2s ease-in-out;
    -o-transition: all 0.2s ease-in-out;
    -ms-transition: all 0.2s ease-in-out;
    transition: all 0.2s ease-in-out;
    }
    ```
  </Tab>
</Tabs>

## Filters and functions

You can alter and transform values of template variables using [HubL filters](/cms/reference/hubl/functions), which are specified using a `|` pipe character followed by the filter name. A simple example displayed below is formatting a date variable.

In the example below, assume a blog post was published on the 29th of April. The publish date of the post is formatted with a `datetimeformat` [filter](/cms/reference/hubl/filters).

<Tabs sync={false}>
  <Tab title="HubL">
    ```jinja theme={null}
    {{ content.publish_date_local_time|datetimeformat("%B %e, %Y") }}
    ```
  </Tab>

  <Tab title="Output">
    ```html theme={null}
    April 29, 2020
    ```
  </Tab>
</Tabs>

While filters affect how variables render, [HubL functions](/cms/reference/hubl/functions) process values and render that information. For example, you can use a function to get the total number of posts for a particular blog or to lighten/darken a color variable by a particular amount.

The example below would print the total number of blog posts from a blog, specified by a blog ID parameter.

<Tabs sync={false}>
  <Tab title="HubL">
    ```jinja theme={null}
    {{ blog_total_post_count(359485112) }}
    ```
  </Tab>

  <Tab title="Output">
    ```html theme={null}
    2
    ```
  </Tab>
</Tabs>

## If statements

[If statements](/cms/reference/hubl/if-statements) allow you to use conditional logic to dictate how your template will render conditional logic in HubL statements for `if`, `elif`, `else`, and `endif`. An if statement must begin with an `if` and end with an `endif`.

The example below defines a choice module that lets users in the content editor select a department from a dropdown menu. Depending on what the user selects in the editor, the template will generate a dynamic heading for a careers page. This example requires the use of the [`export_to_template_context`](/cms/reference/modules/export-to-template-context) parameter.

```jinja theme={null}
{% choice "department" label="Choose department", value="Marketing", choices="Marketing, Sales, Dev, Services" export_to_template_context=True %}

{% if widget_data.department.value == "Marketing" %}

<h3>Want to join our amazing Marketing team?</h3>
<h4>We have exciting career opportunities on the {{ widget_data.department.value }} team.</h4>

{% elif widget_data.department.value == "Sales" %}

<h3>Are you a Sales superstar?</h3>
<h4>We have exciting career opportunities on the {{ widget_data.department.value }} team.</h4>

{% elif widget_data.department.value == "Dev" %}

<h3>Do you love to ship code?</h3>
<h4>We have exciting career opportunities on the {{ widget_data.department.value }} team.</h4>

{% else %}

<h3>Want to work with our awesome customers?</h3>
<h4>We have exciting career opportunities on the {{ widget_data.department.value }} team.</h4>

{% endif %}
```

## For loops

[For loops](/cms/reference/hubl/loops) allow you to iterate over items stored in a sequence. They will most commonly be used with rendering blog content in a listing format. For loops begin with a `for` statement and end with an `endfor` statement.

In the example below, an array of types of bears is stored as a variable called `bears`. A for loop is then used to iterate through the different types of bears printing a list item for each type.

<Tabs sync={false}>
  <Tab title="HubL">
    ```jinja theme={null}
    {% set bears = ["panda bear", "polar bear", "black bear", "grizzly bear", "koala bear"] %}

    <h1>Types of bears</h1>
    <ul>
      {% for bear in bears %}
      <li>{{ bear }}</li>
      {% endfor %}
    </ul>
    ```
  </Tab>

  <Tab title="Output">
    ```html theme={null}
    <h1>Types of bears</h1>
    <ul>
      <li>panda bear</li>
      <li>polar bear</li>
      <li>black bear</li>
      <li>grizzly bear</li>
      <li>koala bear</li>
    </ul>
    ```
  </Tab>
</Tabs>

## Other HubL features

Below are a few other miscellaneous templating features that may be useful, as you develop with HubL.

### Escaping HubL delimiters

Many other languages share the same delimiters as HubL, which can create issues when working in coded files on the CMS. If you want to use a HubL delimiter for a different language, or otherwise prevent code from being rendered as HubL, you can wrap it with `{% raw %}`/ `{% endraw %}`.

```jinja theme={null}
{% raw %}
 {{"Code you want to escape"}}
{% endraw %}
```

### Including files in files

You can use the `{% include %}` tag to include other files in a file. For example, use it to include multiple `.html` files in one [HubL template](/cms/start-building/building-blocks/templates/html-hubl-templates), as shown below.

```hubl theme={null}
{% include "custom/page/web_page_basic/my_footer.html" %}
{% include "hubspot/styles/patches/recommended.css" %}
```

You can also use this tag to compile multiple CSS files into a single CSS file. When you publish the parent file, the child file will be compiled into a single minified CSS file with the parent's code.

### Blocks and extends

When creating complex templates, you can use create compartmentalized blocks that extend a parent template.

First, you'll create a main template that includes the required [`standard_header_includes`](/cms/reference/hubl/variables#required-page-template-variables) and [`standard_footer_includes`](/cms/reference/hubl/variables#required-page-template-variables) variables. Within that template, you need to define a unique block using the following syntax where `my_sidebar` is a unique name:

```hubl theme={null}
{% extends "custom/page/web_page_basic/my_template.html" %}
{% block my_sidebar %}
<h3>Sidebar title</h3>
<ul>
  <li>Bullet 1<li>
  <li>Bullet 2<li>
  <li>Bullet 3<li>
</ul>
{% endblock %}
```

Next, you can create a child HTML file that will populate that block. First, you must declare an [extends statement](/cms/start-building/building-blocks/templates/html-hubl-templates#blocks-and-extends) that references the path to the parent. This block of code would be rendered in the parent template but maintained in another smaller and more manageable file. This technique is not for everyone but can be useful to stay organized when coding complex email or page templates. When using this technique, you should choose the child template, when creating content.

### Copy section HubL

In the page editor, you can copy the HubL markup for a [drag and drop section](/cms/start-building/building-blocks/sections/sections) to reuse the code as needed. This can be helpful when wanting to recreate a drag and drop section in a coded file.

<Frame>
  <img src="https://www.hubspot.com/hubfs/Knowledge_Base_2021/Developer/copy-section-hubl-menu.png" alt="copy-section-hubl-menu" />
</Frame>

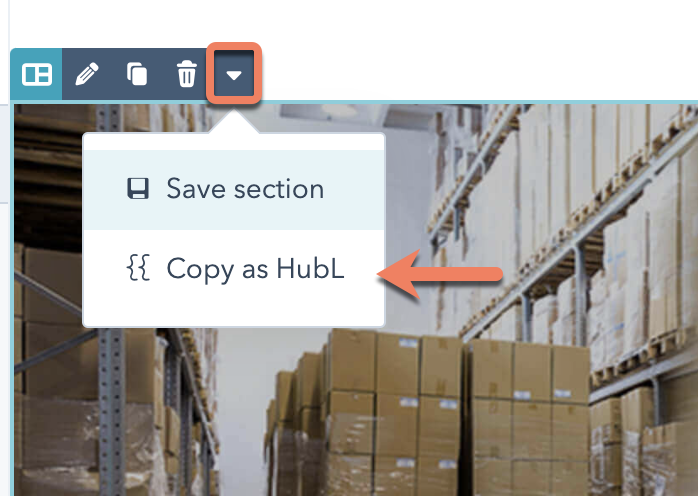
Learn more about [copying section HubL](/cms/start-building/building-blocks/sections/sections#copy-section-hubl).
