2026.03, provides serverless function support for apps with static auth, as well as all of the previous functionality released on version 2025.2. This includes apps managed via projects, which use a file-based build-and-deploy framework. This framework contains an app’s configuration, assets, and other source code.
This guide walks you through how to migrate an existing app to 2026.03.
Migrating a legacy non-project-based private app to
2026.03 is not currently supported.Prerequisites
- Before proceeding with the steps below, confirm that you’re on the latest version of the HubSpot CLI. Version
8.4.0or above is recommended. - Review the migration overview for more details on previous app versions, legacy apps, and other important context.
Determine your migration path
After you’ve installed the latest version of the CLI and reviewed the migration overview to check your existing app’s version follow one of the sections below based on the existing app you want to migrate:- If you’re on version
2025.2of the developer platform, follow the steps in the first section below. - If you’re on version
2023.1,2023.2, or2025.1, follow the steps in the second section below. This section also covers project-based apps that predate platform versioning. - If you’re migrating a legacy public app that’s not managed via an existing project, follow the steps in the third section below.
Migrate from 2025.2
If your app is already on version 2025.2 of the developer platform, you’ll first need to update theplatformVersion property in the top-level hsproject.json file of your project from 2025.2 to 2026.03:
platformVersion to 2026.03, run the following command to re-upload the project to your HubSpot account:
Migrate from an older project version
If your app is on version2023.1, 2023.2, 2025.1, you can automatically migrate to the latest version of the developer platform by running the following command in the working directory of your project:
2026.03.
Migrate a legacy public app (non-project-based)
If you have an existing legacy public app that’s not managed via a project, you can migrate it automatically by following the instructions below. This process will preserve the original authentication credentials, app features, and installs for the app. No changes are required in your app’s backend. To get started, open a terminal, navigate to the directory where you plan on managing your HubSpot projects, then run the following command:- You’ll be prompted to choose the app you want to migrate. This will create a new project in your local filesystem containing an app, along with its features that represent its currently configured state.
- After selecting the app, you’ll be prompted for confirmation of the components that will be migrated. Make sure you fully understand the migration process before confirming to the next step.
- Next, you’ll be prompted to provide a project name, a local path to the new project, and any required UIDs.
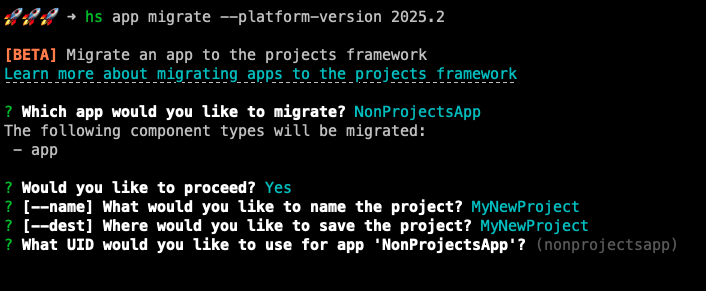
- Once you confirm the details for your project, the migration process will automatically perform the following actions as a single operation:
- Create a project for your app in your account’s Projects page, which includes an app component and any compatible features.
- Convert any existing features of the app to source code files, which you can update to revise their configuration in the future.
- Build and deploy the new project (which will be labeled as Build #1), which completes the association between the app and its project. This will preserve the original auth credentials, app features, and installs.
- Download the new project source files to the local directory you specified earlier when prompted in the terminal.
- If an existing project was migrated, move the files from the original
src/directory toarchive/and populate/src/with the new project source code.
Build #1 of the new project captures the app’s configuration state for all supported features as baseline you can return to. If needed, you can safely revert any future changes to this project (e.g., adding React-based app cards) by redeploying build #1.
Next steps
After you’ve successfully migrated your app, check out the resources below to start building on version2026.03:
- Review the supported features on the developer platform.
- Learn about using serverless functions.
- Review the app configuration reference.
- Create an app card, settings page, or app page using UI extensions.