When developing a theme, you can add custom fonts to enable content creators to use them in font fields and rich text fields when building website content. After adding a custom font to the theme, HubSpot will generate CSS to render the font styling.
At a high level, to add a custom font to a theme you’ll need to add the following to your theme files:
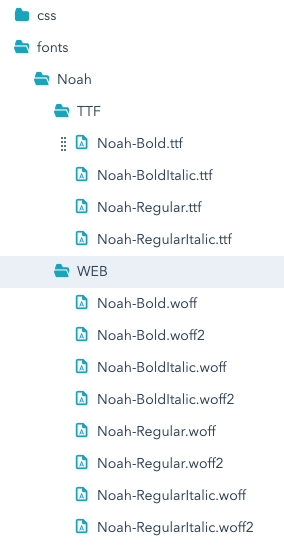
- A
fonts folder that contain the custom font files and font.json config file. This folder and its contents can be named and structured in any way.
- A
font.json file within the fonts folder that defines the font and its variations for use in the theme.
- In
theme.json, a custom_fonts array containing a list of paths to the font folders within the theme.
Below, learn more about adding fonts to your theme files.
Font files
In your theme folder, you’ll first add a fonts folder to store the needed font files if you’re hosting them locally. While there’s no set way to structure the fonts folder and its contents, it’s important to include several font formats to optimize browser compatibility and to provide content creators with various font weights.
You can include font variations by adding individual files for each variation, or by using a variable font where a single file contains all variations. The method you choose will depend on the font files available to you, and the font.json file will need to be configured to match.
Set up the font config (font.json)
In the fonts folder, include a font.json file that defines the font and its variations for use in the theme.
{
  "name": "Noah",
  "default": "Regular",
  "fallback": "arial, sans-serif",
  "variants": [
    {
      "name": "Regular",
      "files": [
        {
          "file": "./TTF/Noah-Regular.ttf",
          "format": "truetype"
        },
        {
          "file": "./WEB/Noah-Regular.woff",
          "format": "woff"
        },
        {
          "file": "./WEB/Noah-Regular.woff2",
          "format": "woff2"
        }
      ],
      "styles": {
        "font-weight": 400
      }
    },
    {
      "name": "Bold",
      "files": [
        {
          "file": "./TTF/Noah-Bold.ttf",
          "format": "truetype"
        },
        {
          "file": "./WEB/Noah-Bold.woff",
          "format": "woff"
        },
        {
          "file": "./WEB/Noah-Bold.woff2",
          "format": "woff2"
        }
      ],
      "styles": {
        "font-weight": "bold"
      }
    }
  ]
}
| Parameter | Type | Description |
|---|
name | String | The name of the font. |
default | String | The name of the font variant to use as the default, as specified in the variants array. If no default is specified, HubSpot will automatically designate the first variant in the variants array as the default. |
fallback | String | Comma-separated fallback fonts to be appended to the end of the custom font CSS. For example, "fallback:": 'Times New Roman', serif" will result in: font-family: 'Custom font', 'Times New Roman', serif. |
variants | Array | A list of font variants, including the default font. For each variant, include the following fields:name: the name of the variant.files: an array of file paths and formats. Paths can be relative or absolute. You can reference font files stored locally or by external URL, but you cannot reference stylesheets containing @font-face declarations.styles: an object that specifies which CSS styles should be applied to the variant. If not included, no additional CSS will be applied. This field overrides conflicting styles from the top-level styles object.
|
Variable fonts
If your custom font is a variable font, where the main font and its variations are contained in one file, you’ll define your font variants in the same way as a non-variable font where each variant is defined separately. Each variant will then reference the same file within the file property.
For example, if you had a single variable font file (myfont.ttf), which contained the bold and italic versions, you would format your font.json file as follows:
{
  "name": "My font",
  "default": "Regular",
  "fallback": "arial, sans-serif",
  "variants": [
    {
      "name": "Regular",
      "files": [
        {
          "file": "./TTF/myfont.ttf",
          "format": "truetype-variations"
        }
      ],
      "styles": {
        "font-weight": 400
      }
    },
    {
      "name": "Bold",
      "files": [
        {
          "file": "./TTF/myfont.ttf",
          "format": "truetype-variations"
        }
      ],
      "styles": {
        "font-weight": "bold"
      }
    },
    {
      "name": "Italics",
      "files": [
        {
          "file": "./TTF/myfont.ttf",
          "format": "truetype-variations"
        }
      ],
      "styles": {
        "font-style": "italic"
      }
    }
  ]
}
files array for that variant instead of styles.
{
  "name": "My font",
  "files": [
    {
      "file": "./myfont.ttf",
      "format": "truetype-variations"
    }
  ],
  "variants": [
    {
      "name": "Bold",
      "styles": { "font-weight": 700 }
    },
    {
      "name": "Italic",
      "styles": { "font-style": "italic" }
    },
    {
      "name": "My special variant",
      "files": [
        {
          "file": "./myfontvariant.ttf",
          "format": "truetype"
        }
      ]
    }
  ]
}
Add fonts to the theme config (theme.json)
After adding your font files and setting up your font.json file, you’ll add a custom_fonts array listing the paths to the font folder within the theme.
{
 "label" : "Atomic_Lite",
  …
 "custom_fonts": [ "./fonts/Noah"]
}
Limits
When using the rich text editor in the design manager, font options will not appear in the font selector dropdown menu. Last modified on February 10, 2026