
This article was authored by a member of the HubSpot developer community, Joshua Beatty.
As the Lead Developer at Pearagon Consulting, I have built complex processes and solutions for many clients, entirely within HubSpot, for over two years. Custom code workflow actions are some of my absolute favorite tools, and I am excited to talk about how you can use Node Package Manager (NPM) in your own custom code workflow actions—and how this benefits your work.
Custom code actions take the abilities of your workflows from 1 to 100, but you have to program them yourself for anything you want to do. If you have an idea for a workflow that uses some complex algorithm, or an interesting data analysis tool, you have to write it entirely from scratch—until now.
Using this tool, you can use any of the 1.3 million NPM packages directly within your custom code action. This uses the flexibility of custom code actions and speeds the process by reducing your workload, since you can use any existing package, like a phone number parsing/validating library or a fast implementation of the Levenshtein algorithm.
Build and test custom code action with NPM
I have put together a tutorial here demonstrating how to generate custom code using NPM packages that you can put directly into your workflows. You’ll use Git to download the example code I created, load your package with NPM, and then build the code with esbuild.
Requirements:
You’ll need to use Git, NPM, a terminal, and an editor. I recommend VS Code for the latter two, though any terminal and editor will work. And, if you need a refresher, review how to use custom code actions.
Git
Git is used to download the code I provided as a template. If you don't have Git installed, install Git first and then continue with this tutorial.
NPM
NPM is the source for the packages we will use for the custom code action. NPM also functions as a code compiler that includes an executable when initiating the run command. See downloading and installing Nodejs and NPM for more information.
Terminal
I recommend using a terminal to interface with Git and NPM. I use the built-in VS Code terminal, but you can use CMD, Git-bash, WSL, or whatever tool you are comfortable using.
Code Editor
This is just a text/code editor you will use to write your code, that will utilize your NPM package.
Step 1: Clone the repository
You can get all of the code used to build a custom code action that uses NPM packages from this repository:
https://gitlab.com/pearagon-public/Custom-Code-Template-Simple
To clone the repository, go to the above link and click the blue “Clone” button, then choose one of the options listed. See the git clone tutorial for more information.
After you clone the repository, run the following terminal command from the Custom-Code-Template-Simple directory:
This will install the necessary packages you need to build and use the tools provided by the repository you cloned. One of the tools NPM downloads is esbuild. Esbuild is an NPM package that allows us to bundle all of our code into a single file.
Step 2: Install the NPM package
For this example, we will use google-libphonenumber, but the steps work the same way for any NPM package. First, find the one you would like to use.
In your terminal, in the same directory, run the following command:
For example, your command might look like this:
Step 3: Use the NPM package
Now, it’s time to write your code that uses your NPM package.
Open the src/action.js file and modify it to use your NPM package. When you open this file, you will see the default HubSpot custom code action template code. Here, you can write your custom code action as you normally would, but you’ll use your package as if you were using a package that was included in a custom code action by default (like Axios or Lodash). This is the uncompiled code version that you will use in your custom code workflow action.
Here is an example of what your code may look like:
As you can see, we require google-libphonenumber like we usually do, and are using inputFields and outputFields like we would in a regular custom code action.
Step 4: Build your action and use it in HubSpot
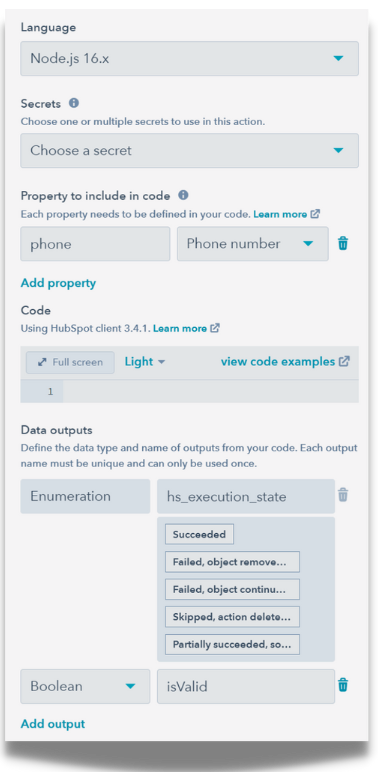
Once you have all your code written, you can set up your custom code action. Remember to include any needed secrets, input, and output fields at this step. You can do it later, but it will be more tedious once you have the code in there.
Now, you want to build the code. Inside the directory, run the following command:
The NPM run command will run an esbuild command, which you can see inside the package.json file.
The run command will also create a src/out.js file. Go ahead and open this file; depending on the included packages, it may be a huge file.
In my case, it was 14,327 lines!
Copy this entire file, paste it into the code in your custom code action, and then click ‘save.’
Note: This may cause quite a bit of lag, depending on your packages and your operating system or machine.
Step 5: Run
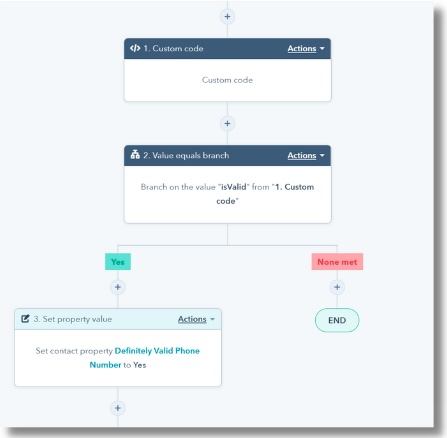
At this point, you should be able to use your custom code action as if it were any other. You can use the outputs in other parts of your workflow, like branching off of it or copying it to a property. This is what my workflow looks like in the end, but this is just one example of branching off—you can use your action however you’d like.
Tips and Tricks:
- To update your code, you can copy your new output from the
build/out.jsfile and paste it into the custom code action. I recommend opening the code action, clicking into the code text box, executingcontrol + A(this will take a few moments), followed bycontrol + Vto paste it in. - Remember to set up your input and output fields before you paste your code. If you need to modify them, I recommend deleting all of the code, making your changes, and then pasting the code back in.
Conclusion
NPM packages can take your code far beyond what any individual developer could do alone. If you want to take your testing capabilities to the next level, this repository contains tools to help you test your code locally. To learn more about testing locally, check out the testing.md file inside the repository.
