
This article was authored by a member of the HubSpot developer community, Tim Joyce.
If you're planning to create an app for HubSpot, chances are you want to get right to the fun stuff—like moving data in/out, syncing with other platforms, generating content, manipulating data, and so much more. But, in order to do that, you need to create a scalable foundation for your app that is versatile, while also setting up your HubSpot account authentication.
What languages, frameworks, and libraries you use are entirely up to you (we will be using Laravel and PHP throughout this post), but here's how you can architect your database for OAuth, as well as some real-world code examples.
What do you need to think about?
It's easy to say, "I just want users to authenticate their HubSpot account with my app," but that can lead to a one-to-one connection in which a user, identified by their email address, can authenticate only to a single HubSpot account.
But, if the same user is part of an agency, the agency may need to connect to many client HubSpot accounts. Now, you have to think about how to tie a single user to multiple accounts.
We can take the example even further. Let's say that the agency has multiple users who need to connect to multiple accounts. What would the database architecture look like, and how do we authenticate accounts to all of these users?
The answer is that you authenticate an account to an entity instead of an individual user. This allows you to start creating functionality in your app that means users can be added and removed from the entity without disrupting the account authentication that has already been put in place.
The entity can go by many labels: client, team, company, group, crew, etc. We are going to use "team" as the nomenclature here.
By authenticating your HubSpot accounts to a team entity, you aren't limiting your infrastructure to just agencies. You are covering all of the bases, including business owners, internal marketing teams, and consultants.
It's a very powerful approach!
The internal marketing team flow, for instance, might look something like this:
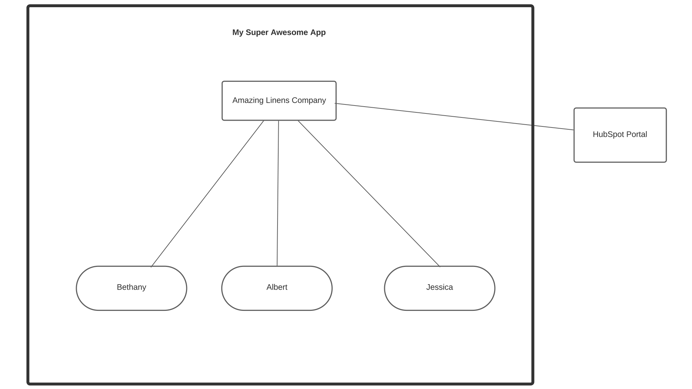
Here, you have many users who just need to authenticate to a single HubSpot account.
Meanwhile, the agency flow might look something like this:
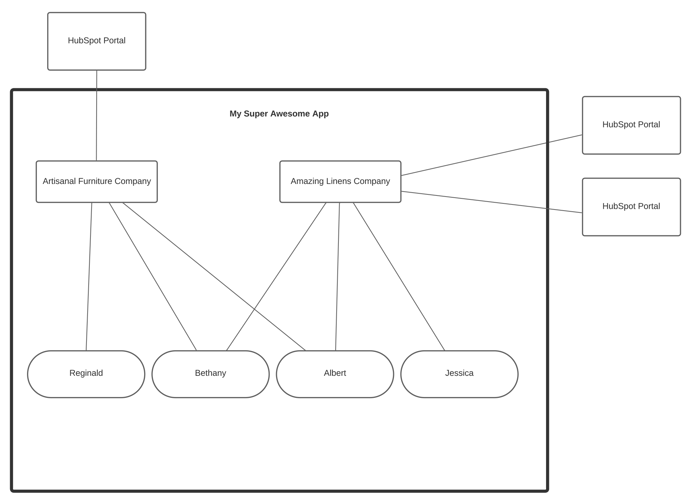
The agency marketing team follows the same rules as the internal marketing team’s flow—we've just expanded the diagram a bit to show more versatility. A user can belong to many teams, and each team can have many accounts.
The database architecture
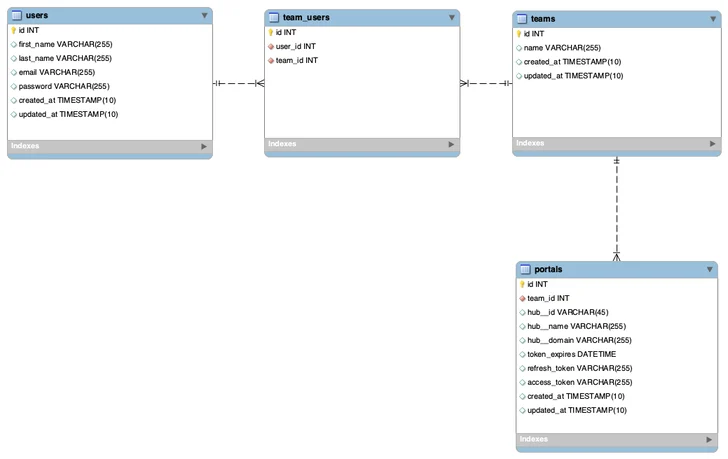
As you can see in the diagram above, HubSpot account authentication is attached to a team entity instead of a user. Then, a pivot table created between users and teams allows users to belong to multiple teams.
When you make your subsequent API requests to HubSpot from your app, you simply look up the authentication tokens for the team and pass them along.
Let's see some code!
As previously mentioned, for this example we will be using the Laravel framework on top of PHP, but you can use any framework you prefer. If you plan to use Laravel, there is a github repo that you may fork or download, called the Laravel HubSpot Starter Kit app, to get you up and running quickly. If you plan to use another language, I recommend checking out HubSpot's client libraries to see if there is one that fits with your codebase.
If you haven't done so already, please follow the steps to create your own HubSpot Public Application and get familiar with the HubSpot OAuth Documentation before proceeding to the next steps. In this example, we are only going to require a single scope crm.lists.read so we can fetch contact lists from a HubSpot account and display them in our dashboard.
(NEW UPDATE): (January 2026) HubSpot has released new OAuth v3 API endpoints with enhanced security features. The v1 OAuth API endpoints are now deprecated but remain operational. We recommend that all new integrations use v3. Learn more about those changes.
The first step is to trigger the authentication between your app's team entity and a HubSpot account.
Modify your .env file:
Define a route:
Create your function:
The next step is to wait for the Authentication response from HubSpot.
Define another route:
Create your function:
The functions above should successfully attach a HubSpot account to a team entity within your application.
When a user chooses a HubSpot account from within your application, you will need to set that account information into the user's session variables and any subsequent calls made to the HubSpot API by the user, will pass the OAuth access token of the intended HubSpot account.
Here's an example of how to fetch the contact lists from the account using the HubSpot API.
Create a route:
Create a function to refresh the access token:
Fetch the contact lists from the HubSpot API:
Of course, there's a lot more work to be done to get your application to production, but this should provide you with a solid foundation and a good starting point.
Happy coding!
