Supported products
Supported products
- Store feedback from an external mechanism to retrieve at a later time.
- Store structured data that you can use to build dynamic CMS pages (CMS Hub Professional and Enterprise only).
- Store data to use in a programmable email (Marketing Hub Enterprise only).

- Query the data externally via the HubDB API.
- Use HubSpot’s HubL markup tags to pull data into the CMS as structured content.
- Use the HubDB API with serverless functions to provide an interactive web app experience.
HubDB architecture
A HubDB table consists of rows, columns, and cells, similar to a spreadsheet.- Tables: a table is a 2-dimensional arrangement of rows and columns. When a table is created, it is assigned a globally unique ID which you can use when needing to specify a table in HubL or through the API.
- Rows: rows are horizontal slices of a table. In a spreadsheet application, rows are represented by numbers, starting with 1. Each table row is given a unique ID on creation. Each row in a table comes with a few columns by default:
- Columns: columns are vertical slices of a table. Each column has a type, which is used to store kinds of data. A table can include as many columns as you’d like, and each is assigned a globally unique ID on creation. Column ID start at a value of
1, but are not necessarily sequential, and cannot be reused. Column types include:- Text
- Rich text
- URL
- Image
- Select
- Multi-select
- Date
- Date and time
- Number
- Currency
- Checkbox
- Location (longitude, latitude)
- Foreign ID
- Video
- Cells: Cells store the values where a row and column intersect. Cells can be read or updated individually or as part of a row. Setting the value of a cell to
nullis equivalent to deleting the cell’s value.
HubDB technical limits
Note the following HubDB technical limits:-
Account limits:
- 1,000 HubDB tables per account.
- 1 million HubDB rows per account.
-
Table limits:
- 250 columns per table.
- 10,000 rows per HubDB table.
- 700 characters per table name.
- 700 characters per table label.
-
Column limits:
- 65,000 characters per rich text column.
- 10,000 characters in each text column.
- 700 characters per column name.
- 700 characters per label.
- 300 characters per column description.
- 700 characters per selectable option within a column.
-
Page limits:
- 10 calls to the
hubdb_table_rowsHubL function per CMS page. - 10 dynamic pages using the same HubDB table.
- HubDB’s with dynamic pages turned on must have lowercase paths so that URLs to these pages can be case insensitive.
- 10 calls to the
Create a HubDB table
You can create HubDB tables either through HubSpot’s UI or through the HubDB API. All new tables created are set with a status of draft. They cannot be used to output data via HubL or API until you publish the table. When creating a table, you can also manage its settings, such as allowing public API access and whether its data will be used to create dynamic pages.Join multiple HubDB tables
HubDB tables can be joined using the Foreign ID column type, which allows you to render the combined data from multiple tables. This can be helpful when some data might be shared across multiple data stores, allowing one centralized data table of this information, which can then be accessed across multiple other HubDB table data stores. Below, learn how to join multiple HubDB tables.1. Add a Foreign ID column to the main table
- In your HubSpot account, navigate to Marketing > Files and Templates > HubDB.
- Locate the table you want to add a table join to, click the Actions dropdown menu, then select Edit.
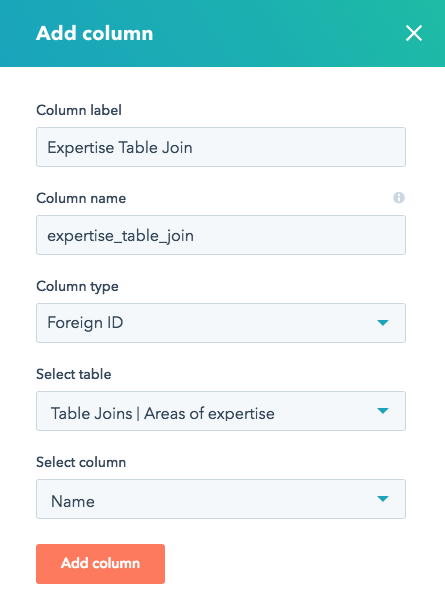
- In the top right, click Edit, then select Add column.
- Enter a label and name for the new column.
- Click the Column type dropdown menu and select Foreign ID.
- Click the Select table dropdown menu and select the table you want to join with your current table.
- Click the Select column dropdown menu, then select the column from the joining table you have selected to be visible in the Foreign ID field.
- Click Add column.
Please note:The value you chose as the Select column only dictates which column value you see in the Foreign ID field in the HubDB UI. All table columns are available when rendering the joined HubDB tables.
2. Add foreign table rows to your table’s rows
Now that you have a Foreign ID column, you will have a multi-select column field on every row in your HubDB table, which allows you to select a foreign table’s rows. The Select column field you chose will be used in this multi-select field to identify which row you are selecting from the foreign table. In the example below, the multi-select values for the Expertise table join field are the values available from Name column of the foreign HubDB table.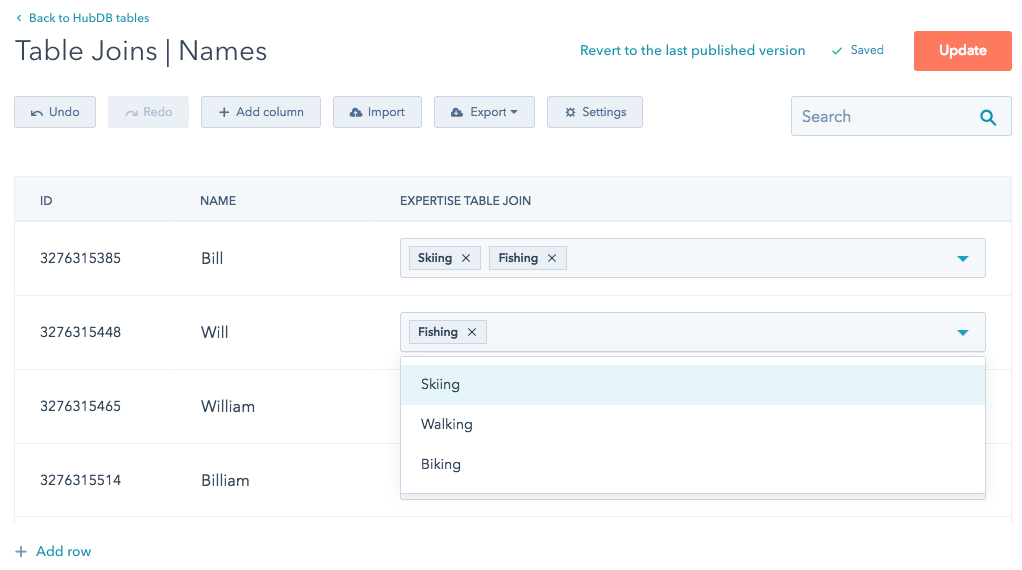
Please note:It’s safe to edit the Select column field of your Foreign ID column, and will simply update which column’s values will display in the HubDB UI.
3. Render your joined HubDB table data
All of a foreign table’s row data is accessible via HubL for rendering, not just the Select column field. HubDB foreign row data is accessible by using a nested for loop, looping through all of the foreign rows associated with an individual row.Access HubDB data using HubL
Using HubL, you can pull HubDB data as to use as structured content on website pages. Below, learn more about how to retrieve table, row, and column data using HubL.Getting rows
To list rows of a table, use the hubdb_table_rows() HubL function. You can either access a table by its ID or name. It is recommended to reference a HubDB table by name, as this can help with code portability across HubSpot accounts. The immutable table name is set when creating a new table and can be found at any time by selecting Actions > Manage Settings within the table editor. A table’s ID can be found in the address bar of the table editor or in the HubDB tables dashboard under theID column.

hubdb_table_rows() to fetch data.
<filterQuery> uses the same syntax as the HTTP API. For example, hubdb_table_rows(123, "employees__gt=10&orderBy=count") would return a list of rows where the “employees” column is greater than 10, ordered by the “count” column. A complete list of optional <filterQuery> parameters can be found here.
Instead of using multiple row queries with different <filterQuery> parameters, you should make one query and use the selectattr() or rejectattr() filters to filter your rows:
hubdb_table_row() HubL function.
HS_ID will work the same as hs_id.
Row attributes
Getting table metadata
To get a table’s metadata, including its name, columns, last updated, etc, use thehubdb_table() function.
Table attributes
Getting column metadata
hubdb_table_column() function
Column attributes
Column methods
Rich Text columns
Therichtext column type functions similar to the rich text field you see for modules.
The data is stored as HTML, and the HubDB UI provides a text editing interface. However, when editing a HubDB table through HubSpot’s UI, you cannot edit source code directly. This prevents situations where a non-technical user may input invalid HTML, preventing unintended issues with the appearance or functionality of your site. For situations where you need an embed code or more custom HTML you can use the embed feature in the rich text editor to place your custom code.