
Welcome back to our series, "A Developer's Guide to HubSpot CRM Objects". If you’re joining us with this series, make sure to look back at our other CRM object posts:
- HubSpot Standard Objects Overview
- HubSpot Contacts Object
- HubSpot Company Object
- HubSpot Deals Object
Today’s post will explore how to efficiently track and resolve customer issues by leveraging HubSpot's powerful solution – the ticket object. The ticket object is designed to streamline support and enhance customer satisfaction. This guide will explore the tickets object and how the tickets API functions. We will also explore common developer challenges and use cases when working with the tickets API.
Understanding the Ticket Object
From a developer's perspective, HubSpot's ticket object is versatile for tracking customer issues. It includes default properties like ticket ID, creation date, status, and priority. Developers can define custom properties to capture specific information relevant to their business processes. Tickets can also be associated with other CRM objects like contacts, companies, and deals, providing crucial context and a comprehensive view of customer interactions.
Leveraging the Tickets API
As a developer diving into HubSpot’s Tickets API, you'll find it a powerful tool for managing customer service requests directly within your CRM. The ticket object essentially represents a customer request for assistance, which can be tracked through various pipeline stages through resolution.
To effectively use the Tickets API, it’s crucial to understand some key concepts within HubSpot:
- HubSpot Objects: These are the core data structures, such as contacts, companies, deals, and tickets.
- Records: These are instances of HubSpot objects, each representing a specific piece of data.
- Properties: Attributes that store information about objects and records.
- Associations: Relationships between objects (e.g., linking a ticket to a contact).
When creating or updating a ticket, you must include essential properties. Critical properties include the ticket's subject (aka, a ticket’s name), hs_pipeline_stage, and hs_pipeline (if you have multiple pipelines). Ensuring these are correctly set will help maintain clarity and order within your support process.
Leveraging internal IDs for ticket status or pipeline management is vital to using the Tickets API. These numeric values are essential for making the API calls that allow you to retrieve and manage ticket information. You can find these IDs in your ticket pipeline settings, and using them accurately ensures smooth interaction with the API.
To start using the Tickets API, fork the recently published API from HubSpot's Public API workspace and make your first request!
Ticket Associations
HubSpot's ticket object enables various associations, allowing for a comprehensive and organized approach to customer support. Associations can link tickets with other CRM objects. These activities provide context, a complete view of customer interactions, and issue resolution processes that you can incorporate into your HubSpot account.
Support teams can efficiently track, manage, and resolve customer needs by leveraging associations with tickets.
Let’s explore a use case when associating tickets and how to ensure they deliver user value.
Associating Tickets and Conversations
Associating tickets with conversations ensures all customer interactions are linked to their respective support tickets, enhancing rep productivity and customer satisfaction.
Use Case: Ensure All Customer Inbox Interactions are Linked to Support Tickets
Step 1: Create a conversation with a workflow
From a programmatic perspective, you can create a new workflow, set an enrollment trigger to “Conversation properties,” and select the criteria “Conversation has been created.”
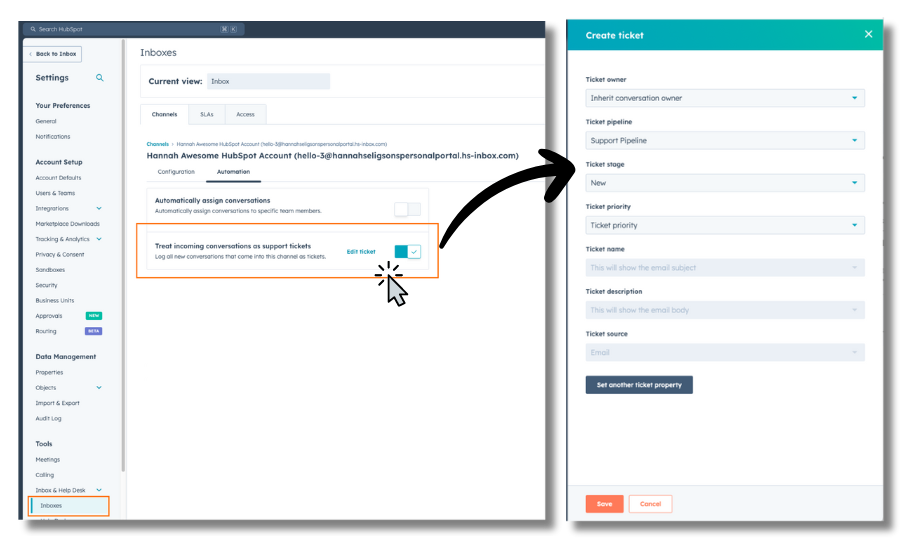
Note: You can skip the workflow and custom code action by automatically leveraging the Inbox settings within your HubSpot account to treat incoming conversations as support tickets.
See below for a UI example leveraging the HubSpot UI to enable incoming conversations as tickets automatically.
Step 2: Create a ticket
Next, use HubSpot’s custom code actions within the workflow to process the data and create the ticket.
In your workflow, add a custom code action. HubSpot allows you to write JS code that can interact with our APIs. Here’s an example of what the custom code action might look like:
This custom code action will create a ticket and then associate it with all threads of the specified conversation. The getThreadsResponse retrieves all threads of the conversation. Then, it’s associating each thread with the newly created ticket.
This approach ensures that the customer interactions in the conversation inbox are linked to support tickets, streamlining your customer support process. However, it’s important to note some crucial factors when working with the conversations and ticket associations we wanted to share with you below.
Essential Considerations When Associating Conversations with Tickets
- Limitations on Conversation Threads
While you can send messages from existing threads, starting new threads or sending messages directly to threads is not possible. Conversations usually stay within a single thread, even with complex interactions like CCing or removing email addresses.
- API Usage for Threads
Use the conversations/v3/conversations/threads endpoint of the Conversations API instead of the Associations API. This allows for better sorting and filtering, making thread management easier.
- Understanding Thread Actors
Threads can have different actors, including system actors like automated responses. Understanding these roles is crucial for effective conversation management.
- Attachments in Conversations and Tickets
Attachments can be handled in two main ways:
In Messages: Include attachments within a thread to keep related files easily accessible.In Tickets: Attach files directly to tickets to ensure all relevant documents are accessible, regardless of the conversation thread.
Consider using HubSpot's file field types to effectively organize and manage attachments.
By understanding thread limitations, effectively using the API, and managing attachments, you can optimize your support process and improve customer experience.
Example Usage of the Tickets API
As a developer, you must streamline customer support processes by associating existing tickets with other CRM records or activities (i.e., calls, emails, meetings, notes, etc.). As I’ve mentioned in previous posts, activities are also called engagements. This capability can be handy in several scenarios, such as enhancing a customer support workflow. Let’s learn more about this below.
Use case: Associate existing tickets to relevant product records and engagements
Let’s imagine a situation where a customer has an ongoing issue documented across multiple tickets related to a specific product or service. You can comprehensively view the customer's journey and support history by associating these tickets with the relevant product record and the associated engagements.
Retrieve the Ticket and Engagement IDs
First, you’ll need the IDs of the ticket and the engagements you want to associate.
- Get Tickets:
GET /crm/v3/objects/ticketsNote: If a ticket is already associated with a record, you can utilize the POST request for crm/v3/objects/tickets/batch/read. You can also use the option idProperty param to retrieve a ticket using a custom unique identifier property. The default ID value in the request will refer to the record ID, aka hs_object_id.
Make sure to reference our API documentation for more information.
- Get Engagements: You can retrieve the engagement IDs using the GET request for the specific engagement type you need to associate the tickets with.
Note: If you are utilizing a public app with OAuth, you can leverage a pin to pin one activity per record, and the activity must be associated with the ticket before pinning. You can pin an activity/engagement on a ticket record via the API by using the hs_pinned_engagement_id field in your API request via whatever engagement API you are using.
Make sure to reference our API documentation for more information.
- Retrieve the Association Type IDs
To identify the relevant associationTypeId, you can use the v4 Associations API using the GET request:
GET /crm/v4/associations/{fromObjectType}/{toObjectType}/labels
Replace the {fromObjectType} and {toObjectType} with the appropriate object types, such as tickets and calls.
- Associate Tickets with Engagements
Once you have the ticket IDs, engagement IDs, and association type ID, use the PUT request to associate tickets with the engagement:
PUT /crm/v3/objects/tickets/{ticketId}/associations/{toObjectType}/{toObjectId}/{associationTypeId}
Replace {ticketId}, {toObjectType}, {toObjectId}, and {associationTypeId}, with these actual values:
ticketId: The ID of the ticket you want to associate.toObjectType: The type of object you want to associate with (e.g., engagements like calls or emails).toObjectId: The engagement you want to associate with the ticket.associationTypeId: The ID for the association type between the ticket and the engagement type. This value can be obtained from the list of association types or by making a GET request to:
GET /crm/v4/associations/tickets/{engagement}/labels
Note: {engagement} can be replaced with any other type of engagement, like calls, emails, etc.
- Associate Tickets with Product Records
Create a line item from an existing product and associate it with the tickets by making a POST request to:
POST /crm/v3/objects/line_items
To create a line item based on an existing product (created through the products API or in HubSpot), include hs_product_id {aka, the productId you want to associate the
Example Request in Node.js
This example demonstrates how to associate multiple existing tickets with a relevant product record and existing calls and emails.
Conclusion
In this guide, we’ve explored the HubSpot tickets object and API, highlighting how it can streamline customer support processes. By automating ticket creation and associations with other CRM objects like contacts, emails, calls, and products, developers can create efficient and organized workflows. Stay tuned for more in our series, "A Developer's Guide to HubSpot CRM Objects," as we dive deeper into other objects and APIs of HubSpot's CRM and how you can leverage them to drive business success. In the meantime, make sure to check out the Tickets API spec and collection on HubSpot's Postman workspace!