Finding the right theme can be tricky. The HubSpot Template Marketplace offers plenty of themes ready for you to deploy on any HubSpot website. But it’s rare to find one that exactly suits your needs.
Fortunately, HubSpot offers native support for child themes.
Think of a child theme as a clone of an existing theme. It’s the exact duplicate of the parent theme, but we can modify it as we see fit.
We can edit a child theme as desired without changing the original parent theme. Whether we just want to tweak a few details or use an existing theme as a jumping-off point to craft something unique, we can do it all without any damage to the parent theme.
That means that we have free range to edit any of the theme’s code without overwriting the original files. As a result, our parent theme can continue to receive updates from the original creator, which are painlessly inherited by our child theme.
Rather than creating our own forked version of the theme, we are able to selectively modify relevant theme files while still relying on the parent theme. The result is a completely customized appearance backed by the benefits of a pre-packaged and professionally updated theme.
Let’s explore how to create a child theme and get our hands dirty editing some CSS to change its look.
Finding a Parent Theme
Let’s begin by searching for CMS themes on the HubSpot Template Marketplace. Log into any HubSpot account then visit the Marketplace here.
We can select any theme from the Marketplace to use as a parent theme. Typically, when choosing a parent theme, we want to look for one that’s already as close as possible to the design we envision for our page.
For this article, we use the Drop Theme by HIVE Digital Strategy.
Once you’ve selected your theme from the marketplace, click Get theme for free (or Buy theme if you’re purchasing a paid theme) to install the theme with one click to our HubSpot.
Now we’re ready to create a child theme.
Creating a Child Theme
We’ll use the HubSpot Command Line Interface (CLI) to create and upload our child theme.
First, create a new directory:
mkdir child-project
Now, initialize HubSpot:
hs init
Then, create another directory inside the child-project folder. This folder holds our theme files:
mkdir child-theme
cd child-theme
We’ll build our child theme using files from the parent theme. We don’t need to download the entire theme, as HubSpot will use the parent theme files for any files we don’t include in the child theme. However, we do need to download copies of the files we want to customize.
To signal to HubSpot that we’re creating a child theme, we need to edit a file from the original theme called theme.json.
Let’s retrieve a copy of that file. Since we’re using the Drop Theme for this tutorial, that’s the path we reference here. We need to change the path below to represent the path to our theme.
hs fetch “@marketplace/HIVE_Digital_Strategy/Drop Theme/theme.json”
Now, open theme.json in your editor.
We need to let HubSpot know that we’re not trying to create an entirely new theme from scratch. To do that, we’ll add an extends argument that references our parent theme.
Add the following to line six:
"extends": "@marketplace/HIVE_Digital_Strategy/Drop Theme",
Let’s also change the label field at the top to “Child Theme.” This will change the name of our theme as displayed on HubSpot.
For now, we don’t need to worry about the other details in theme.json. Many of the fields are for meta-data about the theme, such as author information and version number.
Here’s what our completed theme.json looks like:
{
"label" : "Child Theme",
"preview_path" : null,
"screenshot_path" : null,
"enable_domain_stylesheets" : false,
"extends": "@marketplace/HIVE_Digital_Strategy/Drop Theme",
"is_available_for_new_content" : true,
"author" : {
"name" : "",
"email" : ""
}
}
Next, fetch another file called fields.json:
hs fetch “@marketplace/HIVE_Digital_Strategy/Drop Theme/fields.json”
We don’t need to change fields.json for now. We just need to retrieve a copy prior to uploading our child theme.
Next, return to the child-project folder.
cd ..
Next, we upload our child theme:
hs upload child-theme child-theme
We’ve done it! We’ve created a child theme.
We can now select “Child Theme” when creating or customizing a page on HubSpot.
However, we haven’t done anything to change our theme. Right now, Child Theme is still identical to the original Drop Theme parent we selected.
So let’s make some changes.
Customizing Your Child Theme
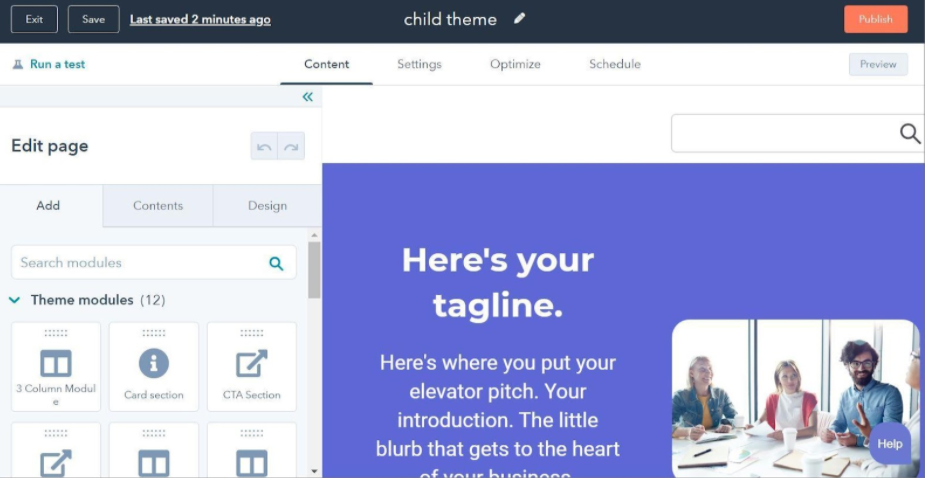
By default, the Home template within the Drop Theme looks like this: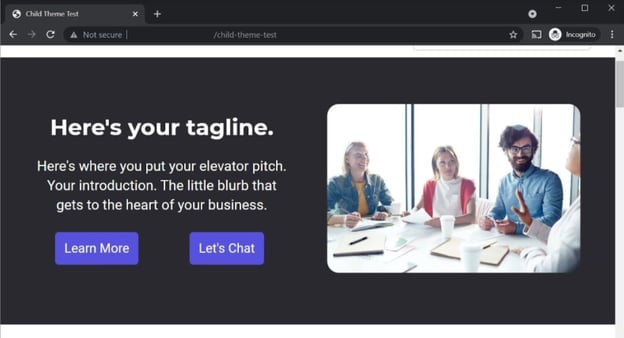
Let’s say this is almost what we want. We’re so close, but our imaginary client wants us to do a few things:
• Change the button color
• Make the buttons more circular
• Remove one button
• Change the tagline element’s background-color
So far in this tutorial, we’ve created a child theme but haven’t added anything to it. If we preview our child theme, it looks exactly like the parent. This is because any theme files HubSpot doesn’t find in the child theme folders automatically revert to parent theme files. Since we haven’t added any files yet, our child theme uses all the parent files.
To customize a theme element, we need to fetch the relevant file from the parent theme, edit it, and upload it to HubSpot in our child theme directory. In our case, for the Drop Theme, much of the action happens in a file we find at /css/theme-overrides.css.
We want to fetch this file, but we also want to reflect the parent theme’s directory structure. Create a directory called css within our child-theme folder and navigate to it:
mkdir css
cd css
Now, fetch the theme-overrides.css file:
hs fetch "@marketplace/HIVE_Digital_Strategy/Drop Theme/css/theme-overrides.css"
In order to modify our buttons, we need to dig into the CSS code from our parent theme.
We’ll be changing the background-color and border-color elements for the CSS class .button which controls the appearance of our buttons.
Within theme-overrides.css, we find the CSS code controlling the color and border-radius of our buttons on lines 191-203.
Change those lines to the following:
button,
.button {
background-color: #de52b3;
border-color: #de52b3;
border-radius: 33px;
}
button:hover,
button:focus,
.button:hover,
.button:focus {
background-color: #de52b3;
border-color: #de52b3;
color: ;
}
Let’s upload and view our test page:
cd YOURPATH/child-project/
hs upload child-theme child-theme
Deploying a Child Theme
After we’ve uploaded our child theme with the appropriate changes to the theme.json file, we should be able to select our child theme when creating a new website page using the HubSpot Design Manager.
To deploy our theme:
First, log in to Design Manager.
Then, go to Marketing > Website > Website Pages.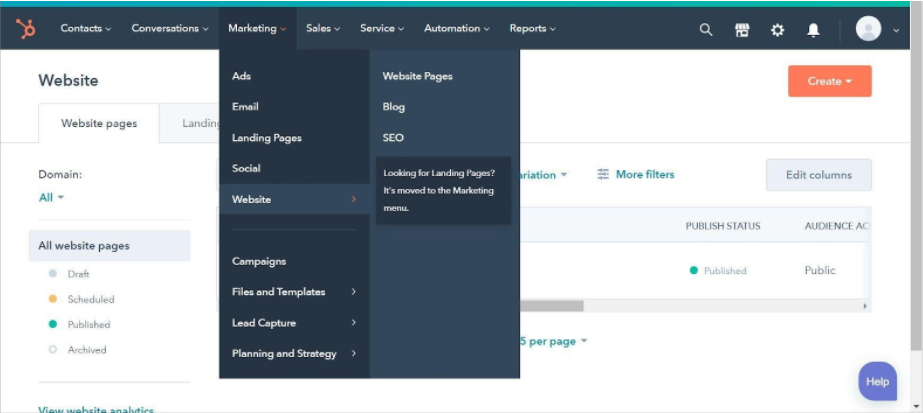
From there, click Create > Website Page.
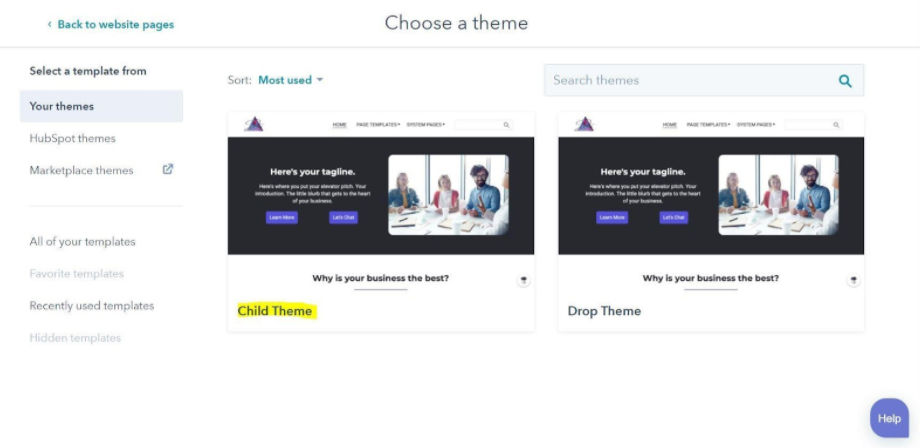
Select our child theme from the list of available themes. It will have the name we defined as “label” in the theme.json file. Recall that we named it Child Theme.
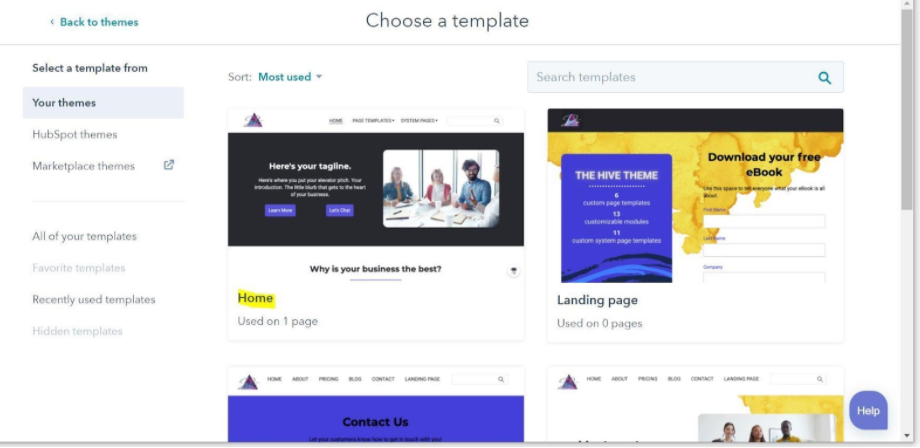
Then, we select the template we’d like to display for this page. Because we customized the Home template, select that one.
When prompted, we give our page a name for internal reference.
We can preview or publish the page by clicking the buttons on the right side of the screen.
If we now create a new website page in the HubSpot Design Manager and set the theme to Child Theme and the template to Home, we should see this:
As you can see, HubSpot automatically incorporates our changes by overriding the parent theme’s CSS file in favor of our new file. The rest of the theme remains intact.
However, we’re not done. Our client also wants us to remove one button and change the tagline’s background color.
To do that, we need to edit another file. In this case, we can accomplish both tasks by editing the Home template contained within our parent theme.
Let’s create a templates directory within our child-theme folder and fetch the parent theme’s home.html file:
mkdir templates
cd templates
hs fetch "@marketplace/HIVE_Digital_Strategy/Drop Theme/templates/home.html"
Within home.html we find the page elements written in HubSpot Markup Language, also known as HubL.
While HubL might look a little unfamiliar, it is easy to work with. Just like we’d change a CSS element, we’re going to find the background_color element for our tagline section and change its RGB values to customize our page.
Open home.html in your editor and go to line 14, which controls the tagline element. Change lines 14-24 to:
{% dnd_section
label='Tagline section'
vertical_alignment='MIDDLE',
background_color = {
'r': 93,
'g': 103,
'b': 213,
'a': 1
}
%}
This CSS changes our main element’s background color, but we’re not quite done. Our client also wants us to remove a button.
The buttons in our parent themes are drag and drop areas which can be used with HubSpot’s visual editor.
We can find the button code by looking for the dnd_module path pointing to ..modules/customizable-button within the drag and drop area that creates our buttons.
As expected, we find two drag and drop button modules within our parent theme.
We can control the first button’s width with the width argument we find on line 57. We’ll increase it to 10.
For the second button, we want to remove it entirely. Rather than deleting the code, we will comment it out using the “” syntax.
On line 68 the parent theme begins to create the drag and drop area for our second button. Comment out lines 68-79 to disable the button.
Change lines 55-79 of home.html to the following:
{% dnd_row %}
{% dnd_column
width=10,
offset=1
%}
{% dnd_row %}
{% dnd_module path='../modules/customizable-button',
button_text='Learn More',
horizontal_alignment='CENTER'
%}
{% end_dnd_module %}
{% end_dnd_row %}
{% end_dnd_column %}
{# {% dnd_column
width=6,
offset=6
%}
{% dnd_row %}
{% dnd_module path='../modules/customizable-button',
button_text="Let's Chat",
horizontal_alignment='CENTER'
%}
{% end_dnd_module %}
{% end_dnd_row %}
It’s time to upload and see what we’ve got:
cd YOURPATH/child-project/
hs upload child-theme child-theme
If all went well, our page should now look like this:

While it's true that we could have made these simple changes without creating a child theme, we now know how to go about modifying theme files to suit our purposes.
What’s more, we’ve made all of these changes to our child theme without compromising the parent theme’s code nor the child theme’s ability to receive updates.
You’re now prepared to make much more extensive changes to your child theme.
There are next to no limits when it comes to customizing a child theme. We can add subtle differences or create something that is a radical departure from the parent theme. It’s all up to you.
Conclusion
Child themes are a powerful way to make the most of available HubSpot themes. With a little bit of CSS, developers like us can tweak any existing HubSpot theme details to suit our needs perfectly.
To create a child theme, all we need to do is install a parent theme, write our theme.json file, and get down to business editing the theme files. Now that you’ve seen how easy it is, create a HubSpot developer account and try your hand at customizing a child theme of your own.