Section templates are one of the template types in HubSpot CMS. They allow you to pre-scaffold parts of a website so that users of your theme can add that section to pages using the page editor. In this tutorial, you will learn how to create a section template using HubSpot Developer tooling.
We’ll cover the following techniques to work with section templates in HubSpot CMS:
- Create a section template in the Design Manager.
- Teach you how to preview a section template by including it into a page template.
- Create a section template preview image using inspect capture node screenshot.
After you have completed this tutorial, you will have created a section template with an image module and a rich text module. Your section will also include a screenshot for your theme users to preview the section in the page editor. We also have a great lesson in the Academy for more information on creating section templates; check out this Academy lesson.
Section Template Prerequisites
- Basic HTML and CSS knowledge
- Creation of a HubSpot developer account
Creating A Section Template in the Design Manager
- In the navigation bar of your Hubspot account, click on Content, then click on Design Manager.
- On the left panel, click on File > New theme.
- Under Theme Starting Point, select Boilerplate.
- Name your new theme “Section Tutorial” and click Create.

- Click on the Section Tutorial folder within the directory.
- Navigate to the sections directory in your Section Tutorial theme.
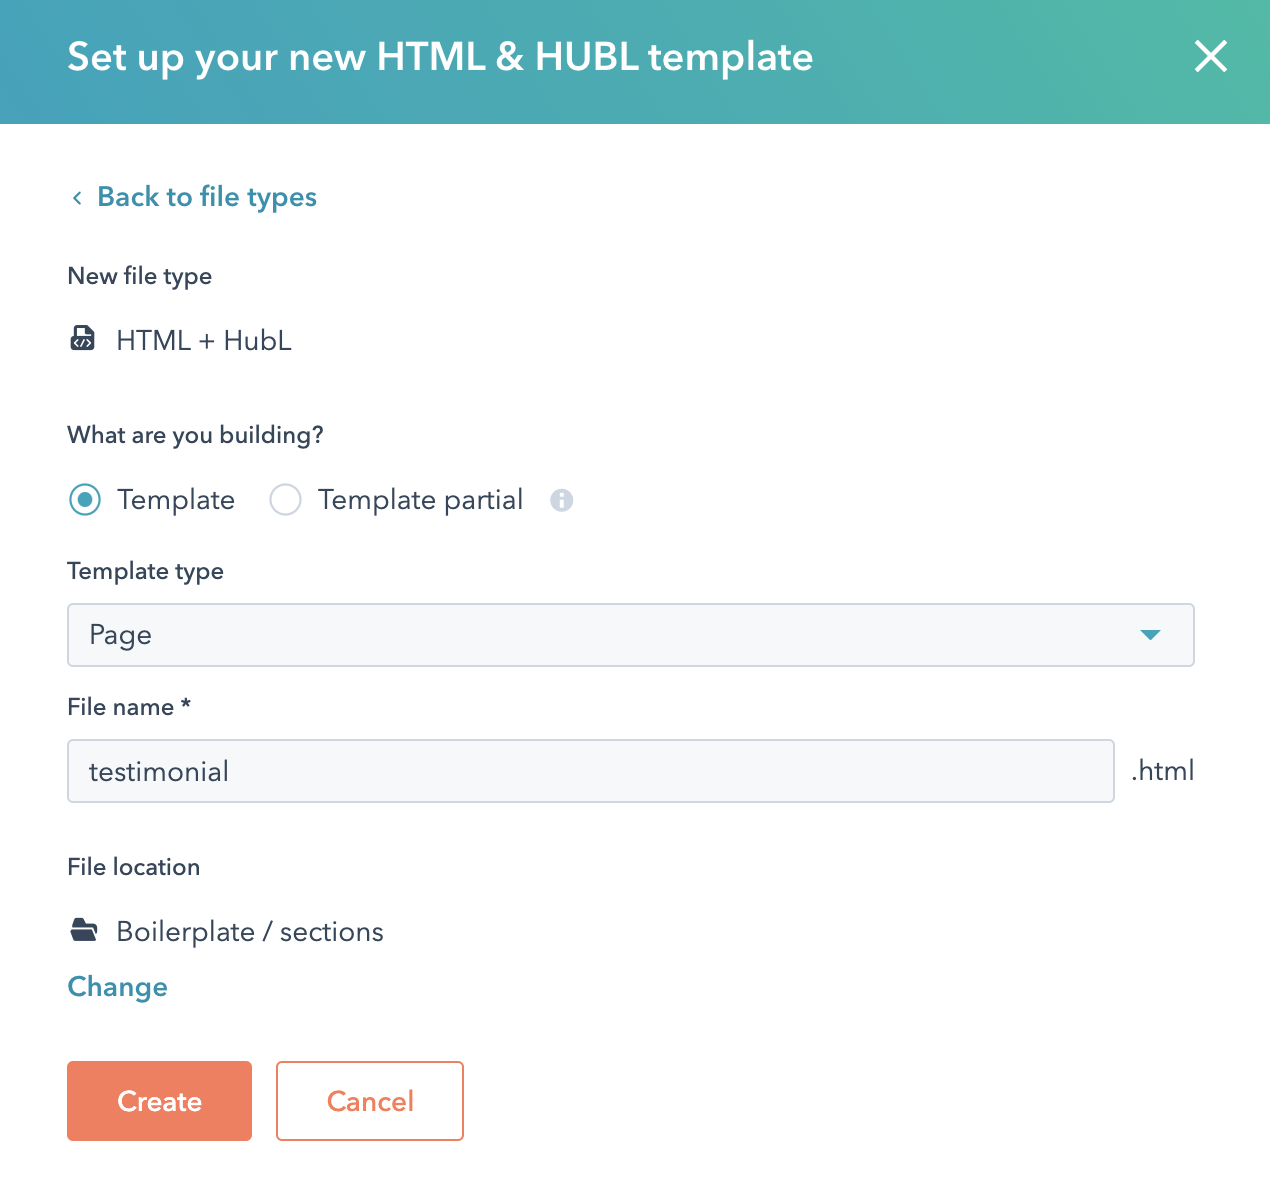
- Create a file by right-clicking on the sections directory. Select New file in “sections,” select HTML + HubL, and then click Next.
- Fill out the Set up your new HTML & HUBL template form as follows:
- What are you building?: Template
- Template type: Page
- File name: testimonial
Then click Create.
- Delete all the code in this file and add the template annotations below.
Note: When you paste the template annotations into the testimonial file, you will get an error until you add a dnd_section tag below the template annotations. Every section template must have one dnd_section tag and no more.
- Add the following code below the template annotations.
Your document will now look like this:
Note: At this point, you have technically already created a section template, but let's add some content.
- Add two columns by using the dnd_column tags inside your dnd_section tag.
- Add a
dnd_rowtag inside eachdnd_columntag.
- Add layout styles to your
dnd_columntags. Layout styles allow you to control the width of rows and columns in drag and drop areas. The HubSpot CMS Boilerplate sample project has some examples of layout styles you could implement.
Note: Drag and drop areas are based on a 12-column responsive grid. Drag and drop tags (like dnd_column and dnd_row) render markup with class names designating columns and rows.
You'll need to add a stylesheet to target those class names. The HubSpot CMS Boilerplate’s layout.css file has some examples of layout styles you could use. You’ll need to load this stylesheet into your templates in order for the grid to work. This is a part of the boilerplate by default.
Adding an offset pushes a column to the right. Width values are an integer between 1–12, which is the width based on a 12-column responsive grid.
We’ll give the first column a width of 6 and an offset of 0, and the second column a width of 6 and an offset of 6.
- In the first
dnd_row, add an image module.
Note: You can see in the src value above we have a relative path of "../images/team-image.jpg" This image is in your Section Tutorial theme > images directory > team-image.png. If you right-click on this file, you can copy the image's path.
- In the second
dnd_row, add a module for rich text:
The finished section template will look like this:
- Click Publish Changes to save your template.
Preview your section template
If you want to preview your section template changes while developing, you can use the HubSpot Design Manager. Add your section to a page template using an include_dnd_partial tag. Using this method, you can update your section and see your changes reflected in real-time. Be aware that when you add a section to a page using the page editor, that section will not be updated when the section template is updated.
- Navigate to your Section Tutorial theme directory.
- Navigate to the templates directory inside the Section Tutorial theme directory.
- Create a file by right-clicking on the templates directory. Choose New file in “templates,” select HTML + HubL, and click Next.
- Fill out the Set up your new HTML & HUBL template form as follows:
- What are you building?: Template
- Template type: Page
- File name: new-template.html
Then click Create.
-
Replace the head tag’s content with the code below to see your section’s layout styled with the Section Tutorial theme’s layout.css file. You can also find this file in HubSpot CMS Boilerplate’s layout.css.
The final result will look like this
Inside the body tag, add the code below.
- Within the
block_bodytag of new-template.html, add the testimonial section using aninclude_dnd_partialtag.
The final result of the new-template.html will look like the code below:
Note: This template will have a warning. It’s okay to dismiss this warning since this page template is only meant to preview the section and not to build pages.
- At the top right corner, click Preview.
So far, you have learned how to create a section template and included that section template inside a page template. Using section templates inside your theme will allow you to pre-scaffold parts of pages in order to make website-building faster and help with visual consistency.
These are the most basic steps you need to create a section template. If you want to make your section template more useful to content creators, however, you can attach a screenshot for them to preview before they add that section to a page using the page editor.
Create a Section Template Preview Image using Inspect Capture Node Screenshot
A powerful feature of section templates is the theme user’s ability to see a preview of a section in the page editor. In this section, we will walk through how to create a screenshot for your section and how to apply that image to your section template.
- Open Google Chrome.
- Navigate to your HubSpot developer account.
- In the navigation bar, click on Content, then click on Website Pages.
- In the upper right corner, click on the orange Create button.
- Click Website page.
- Name the page “Section Tutorial.”
- If this is your first time creating work in your CMS account, you will be prompted to choose a theme. To do this, find Section Tutorial and click Set as active theme. Then Select any of the theme templates in “Section Tutorial.” For example, find the About template and click on Select template.
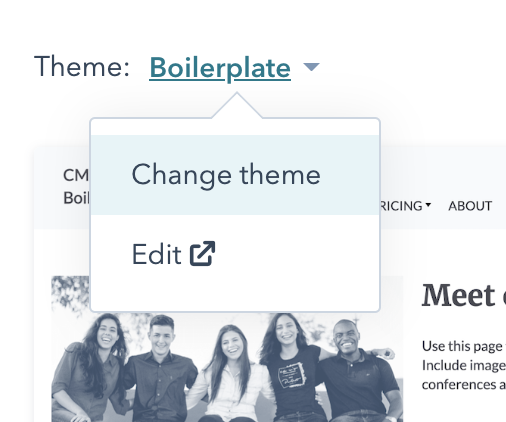
Note: If you have worked with this CMS account before, change the theme by clicking on the blue text that is next to the theme then click Change theme. Select “Section Tutorial.”
- Select any of the theme templates in “Section Tutorial.”
- For example, find the About template and click on Select template.
- Hover over an empty part of a page. You will know you can add a section because a blue circle with a white plus sign will appear.
- Click on the blue circle with a white plus sign.

- An Add section panel will appear on the right side of the page.
- Look under Theme sections
- Hover over Testimonial.
Note: The preview image will look wonky at this point

- Press Select
- At the top right of the page, press Preview
- Click Open in new window
- Hover over the Testimonial section
- Navigate to inspect element (Command + Option + C on MacOS, Control + Shift + C on Windows).
- Click on Elements tab
- Navigate to the html element that wraps your section

- Right-click on the parent div.
- Click on Capture node screenshot. You can now use this image in your theme as your section preview.
- Refer back to the Section Tutorial theme and add your image inside Section Tutorial theme > images directory > section-previews directory.
- Rename the image file by right-clicking the image and selecting Rename file.
- Name the file testimonial.png.
- Add the screenshotPath parameter in your section annotations.
- Set the value to the relative path of your testimonial.png file.\
The final result will look like this:
Take a look at the CMS boilerplate to see a few examples of section templates and how they are included in page templates. You will find that when you start using sections, you'll need to create fewer templates, making content creation a more seamless process for you and your team.
Resources