
The Custom Channels API was recently released for public beta because customers and developers alike needed an omnichannel solution to centralize their communication data and interactions.
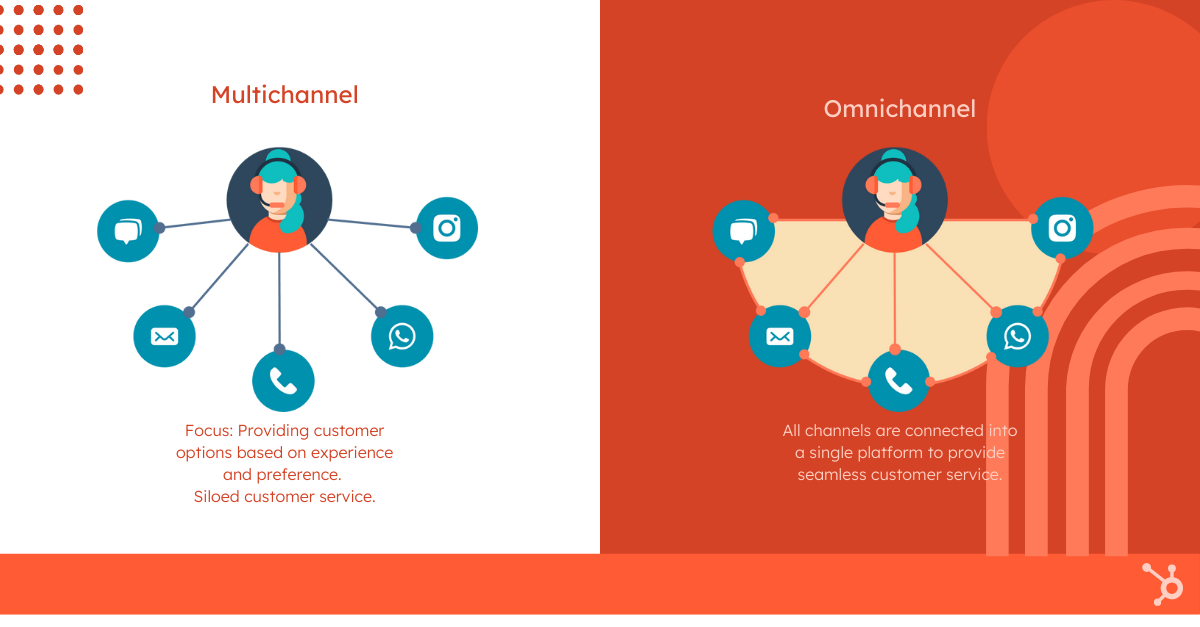
Before this beta release, HubSpot customers were leveraging multichannel engagement with services like email, phone, social media, etc., to serve their customers. Those services operated independently, resulting in fragmented experiences. Because of the fragmented services, tools to aid employees in handling/responding/triaging messages and requests from customers and prospects often were separate tools that didn't directly talk to each other. Forcing reps to look at multiple tools to have a full context of a customer's situation or ask the customer questions they've already answered previously. However, an omnichannel service that integrates all those different services into a single system allows for much more fluid and consistent customer service, regardless of the medium a customer chooses.
The Custom Channels API allows you to leverage the omnichannel customer experience, represented in the diagram below. This diagram emphasizes the difference between a multichannel and omnichannel customer experience.
If you have a Sales or Service Hub Professional or Enterprise account, you can now use this new tool to unify your messaging services into an easy-to-use customer platform. It’s designed to excel in powering two-way, real-time messaging for reactional customer support, allowing you to leverage HubSpot’s Help Desk workspace and Inbox, where customer support teams execute their support efforts. The new API lets you focus on getting messages in and out and use HubSpot’s native UI features for message editing, threading, contact associations, notifications, CRM object creation, and more.
This post will demonstrate creating a custom integration with multiple channels to enhance customer support. This will allow businesses to scale their support efforts and meet customers' expectations!
Custom Channel concepts
Before we get into the weeds and start building, it’ll be helpful to understand some important concepts of how the Custom Channel API sends and receives messages across different services and how users connect their accounts to their HubSpot portal.
Custom channel
Imagine a channel as an interpreter that helps HubSpot communicate with different messaging services like WhatsApp or Facebook Messenger. A custom channel is a special kind of interpreter that developers can create to connect HubSpot to messaging services that aren’t already supported by default. It’s a way to build a connection between HubSpot and a new or unique messaging service.
Channel accounts
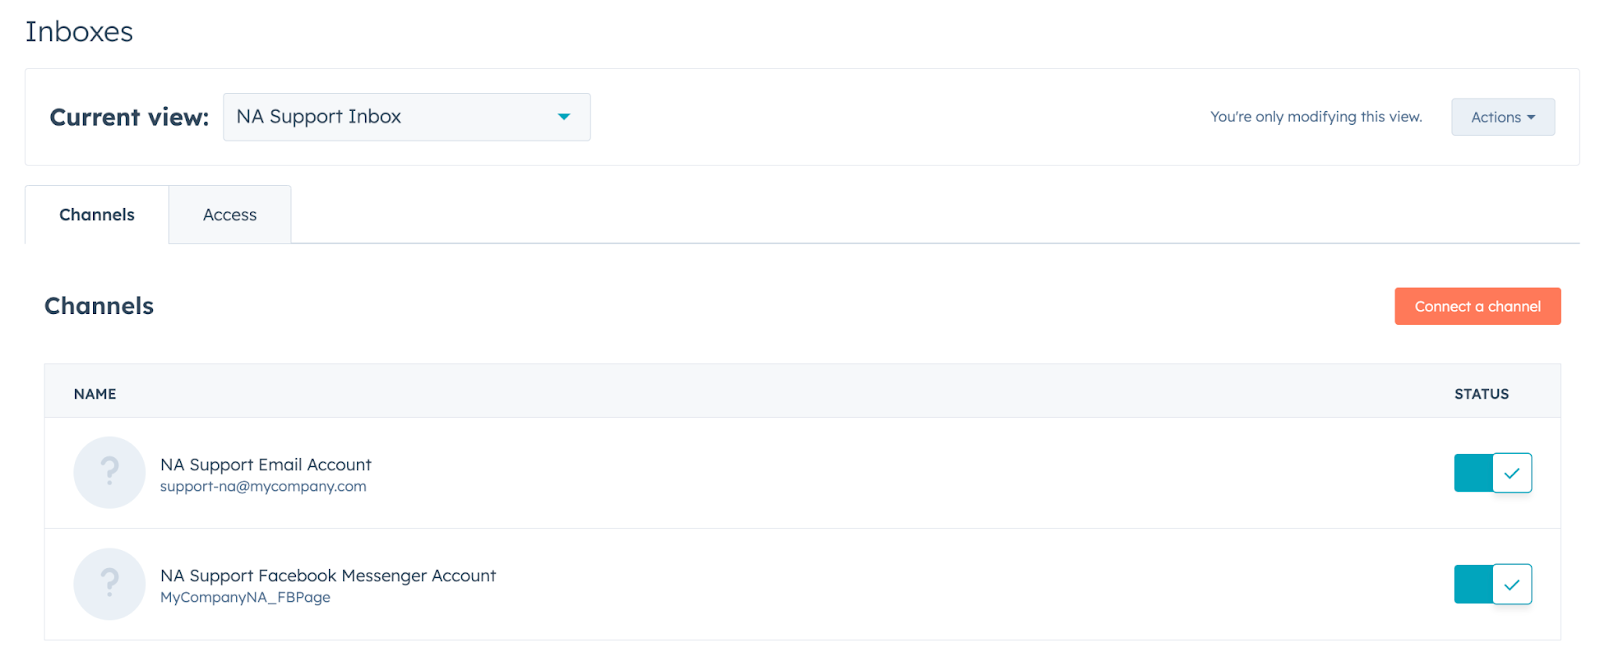
Channels refer to different messaging services, like email (your company email domain) or WhatsApp, but channel accounts are the specific accounts or inboxes you use for those services. For example, if you utilize Facebook Messenger and a company email, each of those messaging services is a Channel account. See the diagram below to understand this concept better.
 When HubSpot users set up their Conversations Inbox, they focus on connecting their accounts (such as WhatsApp or Messenger) to HubSpot, as exemplified above in the diagram. This allows them to manage all their messages in one place. One of the key advantages of Custom Channels is its integration with HubSpot’s Conversations platform and the ability to link multiple channel accounts to a single Inbox view. This enables teams to respond to incoming support requests across different accounts on various messaging services, all within a centralized view.
Note: It’s common for each HubSpot portal to have multiple Conversation Inboxes, each with a different set of connected channel accounts. This allows different teams to support different accounts.
Use case
For this use case, I will use a similar one introduced by the engineering team behind Custom Channels while building the new API to onboard internal and private beta participants. I believe it demonstrates how businesses would realistically use custom channels and accounts for their customer support efforts from a regional perspective.
So, imagine your company has three support teams covering North America, EMEA (Europe, Middle East, Africa), and Japan. Each of those support teams uses different messaging services to communicate with customers. Here’s an example of how the Custom Channels API can help us setup messaging for each team:
- North America: Uses a company email and Facebook Messenger.
- EMEA: Uses a company email, Facebook Messenger, and WhatsApp.
- Japan: Uses a company email, WhatsApp, and LINE.
To achieve this, we’ll create three custom channels (one for each region), each connecting to specific messaging services. Follow the example below to set up one of these custom channels.
Create a public app to register your custom channel
Before creating a custom channel, you must create a public app to handle incoming and outgoing messages to HubSpot’s Help Desk or Inbox.
Note: Currently, you cannot leverage a private app with the Custom Channels API.
Step 1: Create a public app
- Create an app developer account
From there, you can create a developer test account to test apps and integrations without impacting HubSpot data and leverage a Sales and Service Hub Professional or Enterprise account to authenticate your public app.
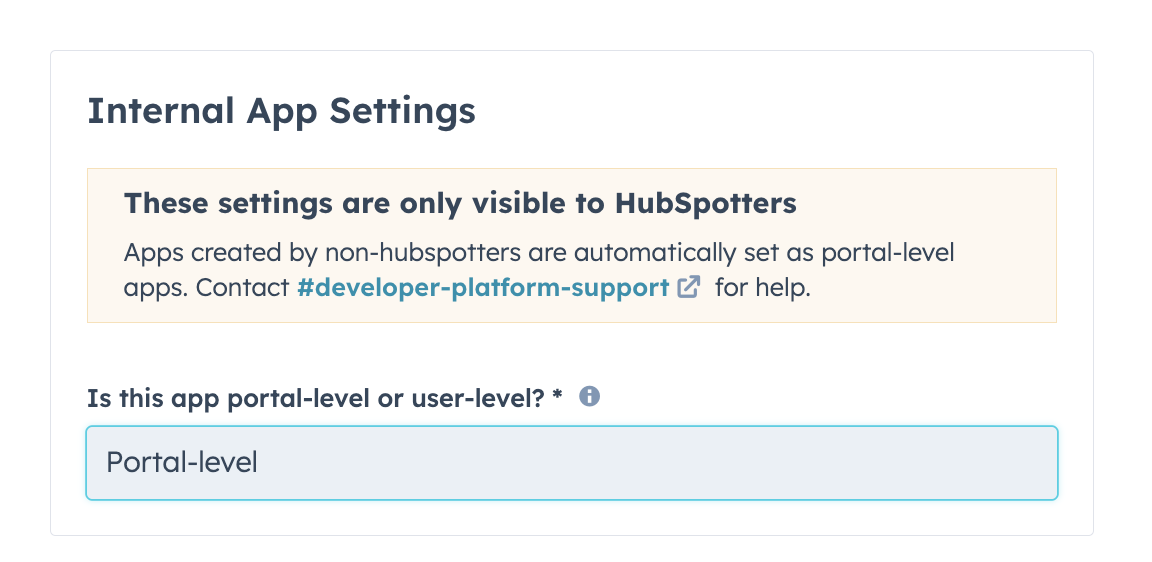
Note: When creating your app, assign the Internal App Settings to the portal level, not the user level.
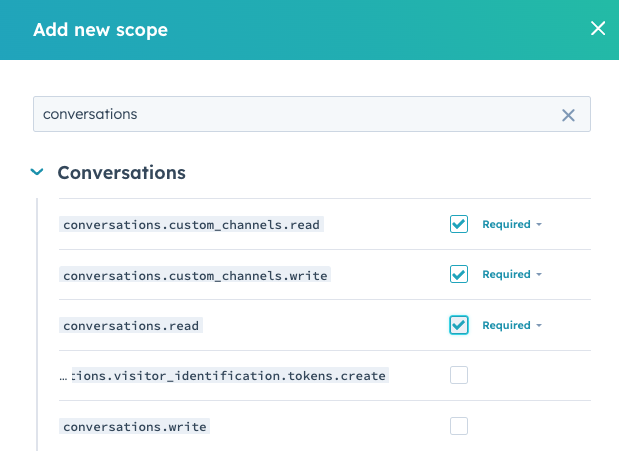
- Configure scopes for your app
Configure the scopes based on the data you need for your integration in the Auth tab. For example, for contact information, ensure you’re leveragingcrm.objects.contacts.readandcrm.objects.contacts.write. However, you must ensure the app requests the following scopes for Custom Channels API:conversations.custom_channels.read: this scope allows you to access and read messages and threads that your custom channel has already published to HubSpot.conversations.custom_channels.write: this scope allows you to publish messages to HubSpot.conversations.read: this scope allows you to retrieve a list of conversation inboxes in an account using the Conversations BETA API to connect channel accounts to specific inboxes.
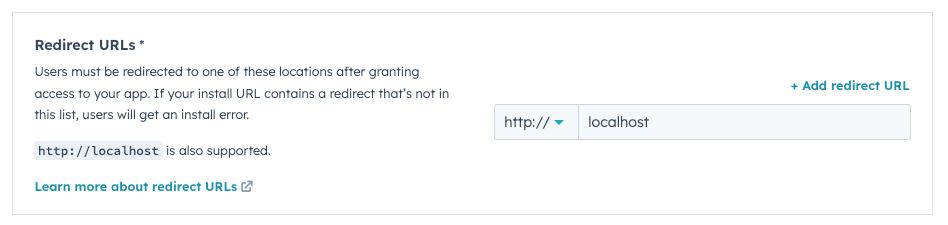
- Add a verified domain to the redirect URL field. You can only have one verified domain per developer account. However, you can use
http://localhost/to test your app locally while building it.
After you’ve created your app, keep the tab to your Auth settings open so you can easily refer to your app details when making API requests with the Custom Channels API.
- App ID
- Client ID
- Client Secret
Step 2: Create and register a custom channel
Now that you’ve created your app, you can create your custom channel in HubSpot. To begin, you’ll use the app ID you made a note of, and you’ll also need your HubSpot Developer API key. To access your API key, navigate to the left-hand navigation bar and click on Apps, then Get HubSpot API key, click Show key, and copy/paste the key value with your other app details.

If you ever need a new key, you can regenerate it for a new value by clicking the Regenerate key button.

POST request will look something like this:
Example request body to register the custom channel for North America (update the values to fit your custom channel):
Schema overview
name: Identifies the channel as the North America Support Channel. This name will be visible to the support team using the channel.webhookUrl: The URL where outgoing message notifications will be sent for this channel (for instance, when the support team sends a message).
Channel capabilities
capabilities: This object defines the channel's messaging capabilities:deliveryIdentifierTypes: We’re usingHS_EMAIL_ADDRESSsince the North American team will be handling emails.richText: This channel supports bold, italic, and hyperlinks in messages, which allows the support team to format messages.allowConversationStart: This is set to true, meaning the team can start conversations with customers rather than just receiving messages.allowMultipleRecipients: We allow messages to be sent to more than one recipient.allowInlineImages: The team can insert inline images in their messages.allowOutgoingMessages: This is true, enabling the team to send messages through the platform.outgoingAttachmentTypes: This channel supports file attachments, such as PNG and JPEG images.allowedFileAttachmentMimeTypes: We’re allowing the common image formats, image/png, and image/jpeg.maxFileAttachmentCount: A maximum of 3 files can be attached per message.maxFileAttachmentSizeBytes: Each file can be up to 2 MB.maxTotalFileAttachmentSizeBytes: The total size for all attachments combined in a single message is capped at 6 MB.
Note: Please check out the API documentation for more information on each parameter. Also, remove "Authentication" from your request headers (I made this mistake).
Here’s what the response will look like after you successfully create the channel:
If you need to review or update your channel's configuration, you can send a GET or PATCH request to the same endpoint using the same channel schema. PATCH requests also accept partial update requests.
Updating a custom channel
As your support teams evolve, you may need to update the capabilities of a custom channel. For instance, if the North American team starts using WhatsApp for messaging, you can update the custom channel using a PATCH request.
This update allows sending messages using WhatsApp by supporting phone numbers (HS_PHONE_NUMBER) while keeping email support intact.
Step 3: Connect channel accounts to HubSpot
After successfully creating the NA Support Channel, the next step is to connect the relevant Channel Accounts to HubSpot. For the North American support team, we want to link their company email and Facebook Messenger account from their company Facebook page so they can send and receive messages directly through HubSpot's Conversations Inbox.
- Obtain an OAuth token
When a HubSpot user installs the custom channel app for the NA Support Channel, they'll be redirected to your custom channel’s “redirect URL” with an authorization code.
Use this authorization code to request an OAuth token. This will grant you access to the HubSpot portal, where the custom channel will be connected. For specifics on how this works, refer to this documentation from HubSpot’s developer docs.
This process is necessary to authenticate your app's connection to the HubSpot portal.
- Send a
POSTrequest to register channel accounts
POST /conversations/v3/custom-channels/{your-channel-id}/channel-accounts
Replace {your-channel-id} with the ID of the NA Support Channel, you registered earlier.
Example request body for the "NA Support Channel"
Here's an example of the request body to connect two Channel Accounts—a company email account and a Facebook Messenger account to the NA Support Channel:
Repeat the request with the following body to connect to the Facebook Messenger account:
Schema overview
inboxId: This is the ID of the Conversations Inbox associated with the North American support team. This ensures that all messages are routed to the appropriate team inbox.deliveryIdentifier: Represents the unique address for each Channel Account:- For the company email account, we use
HS_EMAIL_ADDRESSas the delivery identifier type. - For the Facebook Messenger account, we use
CHANNEL_SPECIFIC_OPAQUE_IDto represent the account's identifier on that platform.
- For the company email account, we use
authorized: Setting this to true indicates that these Channel Accounts can send and receive messages through the custom channel.
When sending the request, use the following headers when making the request:
- Authorization Header: Bearer
<YOUR_OAUTH_ACCESS_TOKEN_GOES_HERE> - Content-Type Header:
application/json
Once these steps are complete, the NA Support Channel will fully connect to the email and Facebook Messenger accounts. The support team can now manage all communications from these accounts within their Conversations Inbox in HubSpot, providing a seamless experience for handling customer interactions across multiple platforms.
This process ensures that every message, whether sent via email or Facebook Messenger, appears in the HubSpot Conversations Inbox, allowing the support team to reply quickly and efficiently using the same interface.
Next, ensure that any messages received by the North American team's messaging accounts (like email or Facebook) are properly entered into HubSpot's system. We need to ensure the messages appear in the Conversations Inbox, CRM, and other areas within HubSpot.
Step 4: Publishing received messages
When a new message is received on the external messaging service (e.g., an email arrives at support-na@mycompany.com or a Facebook message is received), your service should trigger an event to handle this message.
- Send a
POSTrequest to HubSpot
You will send a POST request to the following endpoint to publish the message into HubSpot's system and replace {your-channel-id} with the ID of the NA Support Channel.
POST /conversations/v3/custom-channels/{your-channel-id}/messages
- Create the incoming message body
The message data should be formatted according to HubSpot's Incoming Message schema. Below is an example of a message body that you might use for a new email received by the North American support team:
- Publish the message to HubSpot
Make the POST request and include the message body above:
POST /conversations/v3/custom-channels/{your-channel-id}/messages
Make sure to use the OAuth token obtained earlier to authenticate the request and include it in the headers like this:
- Authorization Header: Bearer
<YOUR_OAUTH_ACCESS_TOKEN_GOES_HERE> - Content-Type Header:
application/json
This ensures that every message received via email or Facebook Messenger is automatically published into HubSpot. Customer communication will appear in the NA Support Inbox, allowing the North American support team to manage and respond to messages efficiently. Below is the process we’ve executed, minus the steps needed to deliver an outgoing message.
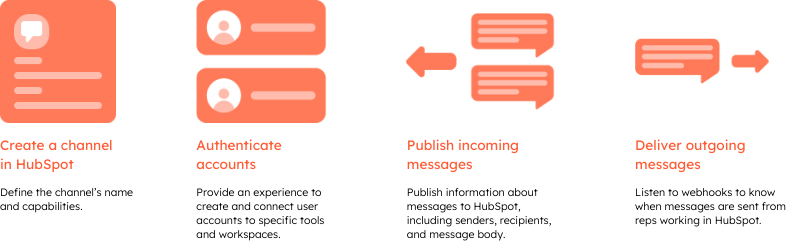
However, this current setup for the NA region provides a unified view of all customer interactions, making it easier for the support team to track conversations, manage responses, and maintain a high level of customer service across different messaging platforms, no matter the region.
Summary
Now, this is only a fraction of this new API's capabilities. We didn’t cover how to manage outgoing messages within this post (at the risk of this becoming a textbook), but to clarify, the API does allow you to use webhooks to notify your specified webhookUrl whenever a message is from HubSpot through the custom channel. It also allows you to respond to customers without leaving the platform.
Additionally, the API supports updates to channel accounts, with notifications sent to your webhookUrl when a channel account is updated or deleted, helping maintain synchronization between HubSpot and your external services. The API also allows updating the channel capabilities or webhookUrl via a simple PATCH request. Custom Channel capabilities define specific messaging features such as test formatting options, file attachment limits, and support for different messaging formats. This flexibility ensures that your custom channel can integrate seamlessly with various messaging services while adapting to unique user needs.
Check out the API documentation and Postman collection, and join the #custom-channels-api-beta channel on the HubSpot Developer Slack to connect with other developers and share how you’re leveraging the Custom Channels API!