
First things first: Cron jobs are scripts that get executed based on time. Understanding where this shorthand name comes from may help you remember this:
-
“Cron” refers to the Greek god of time, Chronos, so it should actually be “chron” job—but the Unix/Linux folks that came up with the term are also all about efficiency. If you don't pronounce the `h,` I guess don't spell it out, either?
-
"Job" as you can probably guess, is the "task to be done." Traditionally, it's a script of some kind.
Therefore, a cron job is a task to be done at a certain time.
Typically, cron jobs are created for automation tasks that need to be done on a recurring basis. This could be done to keep data fresh or take action on data that can be scheduled, as opposed to needing to be done immediately.
Some examples of cron jobs are:
-
Importing data from another system on a recurring basis
-
Making changes to properties in your CRM based on time and date (such as annually, monthly, or daily)
-
Making changes to data in another system based on the data in your CRM and the date and time
-
Transferring data from HubSpot to another system that needs it
-
Generating a file (like a CSV) from CRM data or another data source and uploading it to a file store
In HubSpot, we use workflows to execute tasks based on triggers. These triggers can be based on a date or a time, and they instigate custom code workflow actions, which are serverless functions.
Restating that in another way—you can create Node or Python-based scripts that execute based on time or date.
HubSpot workflows require you to pick an object type, which is used to trigger the workflow. The standard HubSpot object types you can base your workflow on are:
- Contact
- Company
- Deal
- Ticket
- Quote
- Conversation
- Feedback submission
After picking an object type, you can schedule a recurring date and time-based workflow with any of these HubSpot standard objects.
Keep in mind that your workflow can also be based on custom objects.
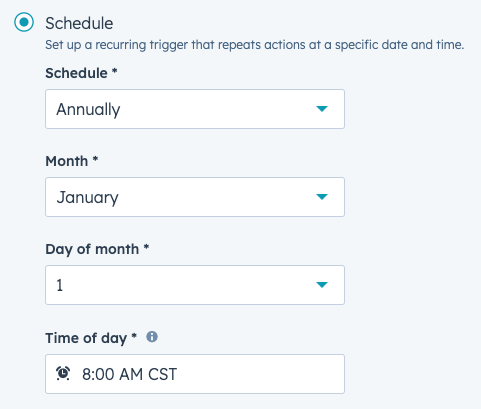
All of those objects support having your workflow trigger at a recurring date and time:
- Daily
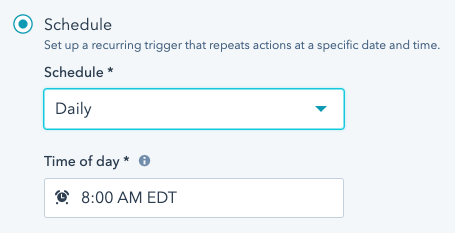
- Weekly
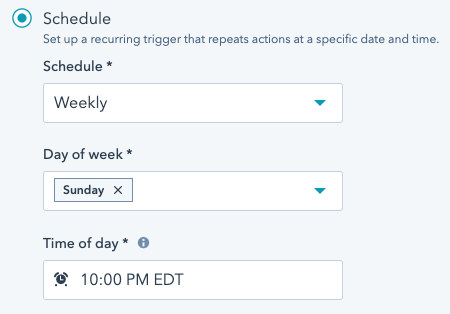
- Monthly
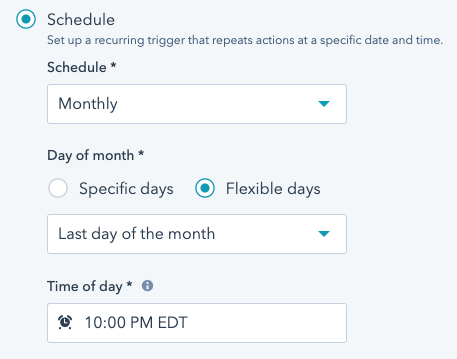
- Annually
Today, contacts have some special scheduling options beyond the recurring workflow.
- You can set a workflow to occur once, on a specific date, for the contact.
- You can schedule contact-based workflows to take effect based on a date property stored to the contact.
Let's create a workflow that adds a note to a contact's activity timeline denoting when that person has been subscribed for over a year. This will give our sales and service representatives context they might have a hard time identifying otherwise, and that may change how they want to work with the contact.
Create a Private App
Before we dive specifically into the workflow itself, we need to do a little bit of foundational work. We know we're going to use the HubSpot API to create the note, so we'll need a HubSpot Private App token. We're going to create a HubSpot Private App with the required scope and then copy the Private App token so we can use it in a custom code workflow action later.
- Go to Settings (gear icon).
- In the side navigation, go to Integrations > Private Apps.
- Click "Create a private app."
- Set a name. This can be anything you want; in this case, we'll name it, "workflow custom code."
- Provide a description, which gives others (and our future selves) context as to what this private app is used for. In this case, we’ll enter,"workflow custom code action uses this to create notes on contact records."
- Go to the "Scopes" tab.
- The endpoint we'll be using with this app is the "basic" create note endpoint. In the "endpoints" tab of the documentation, it says that to use the API, we need the "crm.objects.contacts.write" scope. In our tab, where we're creating the private app, search for "crm.objects.contacts." This should filter the scopes and show just the write and read scopes for contacts. Check the box for "write."
- Click "Create App."
- A modal will appear telling you that creating a private app generates an access token you use for API requests, and to treat that token like you would a password. Click "Continue creating."
- A new modal will appear that says, "Your private app was created." Click "Show token," then "Copy." This is the token you'll need later when creating your custom code workflow action. I recommend keeping this tab open to this screen while you work for easy reference.
Creating a workflow triggered by date or time
Now, we'll get into creating the actual workflow itself, setting up the trigger that will start the workflow.
- Open the workflows tool.
- Click "Create workflow.".
- Choose "From Scratch."
- Choose "Contact Date Property."
- Set date property field to "became a subscriber date."
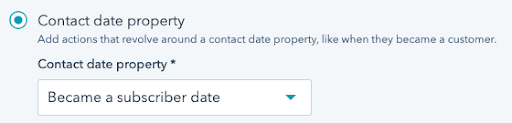
You now have a workflow that will start every time a contact's "became a subscriber date" gets set for the first time.
Click "Next."
Take action one year from the subscription date
We want to add this note one year from the subscription date, not immediately, so we're going to set a delay.
- Select the existing "Delay" action.
- Change the value of "When will the next action execute" to "After."
- Set days to "365."
- Click "Save."
Create Note and associate it to Contact
Here, we're going to use the HubSpot APIs to create a note and associate it to the contact. While our use-case here is creating a note, this is also where you would substitute any server side code you want to execute on a schedule. Some other use-case examples are:
- Syncing data from HubSpot to another tool
- Importing data from another tool to HubSpot
- Triggering an action to happen in another application
Create empty Custom Code action
- Click the plus icon to add a new action.
- Choose "Custom Code."
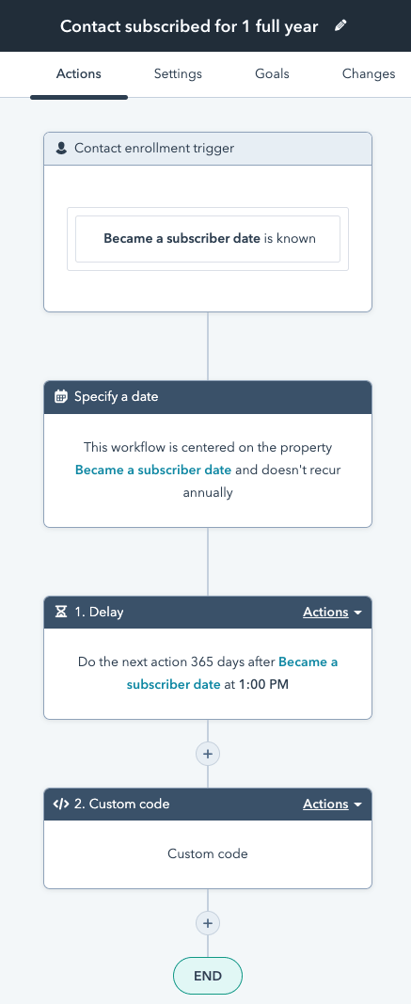
- We're going to use "Node.js 16.x" for this.
Add Secret to workflow
Now, we'll add the private app token as a secret so we can use it in our code.
- Click the "Secrets" field. Choose "Add secret."
- The "Secret value" is your private app token that you copied earlier. Paste it into the "Secret value" field.
- Your "Secret name" determines the variable name you'll use in your code. We'll name it "privateApp" to make it easy to understand what it is in our code.
- Click "Save."
Add properties we want to access in code
When we create a note, we have to associate it with a specific contact. Since we want it to be associated with the contact this workflow is for, we can use the "property to include in code" section to pass this information from the workflow into our code. We also want to know the date the contact first became a subscriber.
- Click the select field that says, "Select value," and in the search field enter, "Record Id." Choose the record Id option that appears below. The field to the left of the select field will say, "hs_object_id"—so, let's change this to something that’s easier to understand: Enter "contact_id" instead.
- Click "Add property." Click the select field that appears. Type in, "Became a subscriber." Choose the "Became a subscriber date" option. The field to the left of the select field will say,
hs_lifecyclestage_subscriber_date—and while that's a descriptive variable name, let's shorten it tosubscriber_dateto make our code more understandable later.
Write the code
Now, we're going to write the code that will actually create the note. Instead of using the default code example, we're going to simplify a bit and start with just what we need, as well as some comments to help us write the code.
Click into the code field. Select all of the code and delete it.
Copy the code below and paste it into the code field. You may want to use the Full Screen view and dark theme if it makes it easier for you to read the code.
Pass in private app token as secret
- Under the comment that says, "Pass in private app token as a secret."
- Write
const privateAppToken = process.env.privateApp;—thisprivateAppTokenvariable will be used later for an axios-based API request.
Pass properties from workflow to code
Under the comment that says, "Pass in properties to your custom coded action," write:
Note:
- The text strings inside
event.inputFields[]need to match the properties you defined above the code field. - The parseInt for subscriber date converts the
subscriber_datevalue from a string to an integer, making it easier to do math with the date.
Add one year to subscriber_date
Below the comment that says, "Add one year in epoch format to the subscriber date," we'll create a new variable that adds one year in epoch time format. Write:
Make the API request to create the note
Here, we're going to follow the developer documentation for Engagements > Notes. We need to identify what endpoint to which we’ll make the request and what information we need to send.
Set the endpoint URL as a variable
Below the "We use the ‘Basic’ create endpoint for notes" comment, add:
Send the required properties
Looking at the create Notes endpoint documentation, it shows we need to send a properties object. In that object, we want to set the timestamp (which will be one year from the subscriber date) and the note body (which will be the text we'll display in the note). For our purposes, we don't want to associate an owner to the note, since this is automated, so we'll leave the owner_id out of our code.
Let's define a properties object and pass in our subscriber_date_plus_one_year variable:
Associate the note to the current contact
In order for the note to appear in the contact, we'll now need to associate it to the contact. Instead of doing separate API calls, one to create the note and another to associate it to a contact, the "overview" tab of the documentation explains that you can pass an associations object in with your create request. So, let's create that object now:
Make the request
You're now ready to make the request. We're going to use axios, since it's included in the package for custom-coded actions. Since we're creating a note, we'll need to POST to that endpoint, pass in our properties and associations information, and include headers with our Private App token and the content type.
Under the comment "Make API call to create the note," add:
Click "save."
If you had any trouble following along, here's the full finished code.
Test your custom code action
Before you can test, you'll need to set a contact's lifecycle to subscriber—otherwise the action won’t work. HubSpot provides a contact by default that's great for testing.
- Click "Back to workflows."
- In the main navigation, click "contacts" and then "contacts" again.
- Open the contact named "Brian Halligan (Sample Contact)."
- Set the lifecycle stage for this contact to "Subscriber." If "Lifecycle stage" does not appear in the left panel, click "View all properties" in the search and enter "Lifecycle stage" at which point the field should appear.
- Click "Save."
- Return to your workflow via the main navigation: Automation > Workflows. Then, find the workflow you've been working on.
You're now ready to run the test.
- Open your custom code action.
- Below the code field in the custom coded action editor is a "Test action" section. Expand it, if it's not already expanded.
- Pick the "Brian Halligan (Sample Contact)" contact.
- Click "Test."
- You should get a success message.
- Next to the "Test" button is a link that says, "View Contact"—click that.
Now, if you go to the "Activities" tab in the contact record, you should see a note in the "Upcoming" section that reads "This user has been subscribed for 1 full year!"
Note (pun totally intended): The new note's date will be one year from the date you set as the lifecycle stage to "Subscriber," regardless of when the action is run. This prevents the time of the action running from influencing the time stored on the note.
Congratulations! You can now click "review and publish," then "Turn on" when you're ready for your new action to start getting processed.
Now, go build some time-based workflows, or "cron jobs"
You just learned that the terms for time-based jobs are different on HubSpot, but the same kinds of things can be done. You've seen how you can trigger a workflow not just based on time or date, but also by a time that is specific to an individual contact record. You've built (or at least read about how to build) a custom-coded action that creates a note on a contact record based on a contact's date or time property.
You can use the same techniques discussed here to make other time-based modifications to HubSpot data, or to use another application's APIs to take action based on time data in HubSpot. Get out there with your newfound time-wizard powers and build some stuff!