
This article was authored by a member of the HubSpot developer community, Roman Kozak.
HubSpot has a powerful search API that can be used to query any object in the CRM. We typically need to send a query in JSON format to get a search response, but writing the query in JSON is not a trivial task — even for a programmer. Life would be much easier if we could type our query in plain English to get search results, right?
Well, we can.
In this article, I will explain how to use GPT-3 to transform a natural language query into a JSON query, and how to use an existing CRM search API to pull the data from the CRM.
The ability to search for data using everyday language is what makes a service accessible and valuable. Such a plain language query is called a “natural language query” (NLQ) in scientific literature. Most of the time, in order to do a NLQ, we need to use some kind of AI. The best-known option for this task is GTP-3 from OpenAI.
GPT-3 is an AI model capable of performing a wide variety of natural language tasks. One of them is particularly useful for our issue: GPT-3 can be trained to translate natural language input (plain English) into any other format.
In order to do the translation, we need to provide it with an example. Here is what that might look like:
The format of the example can be anything that works for us — there are no strict rules on what an example should look like. I’ve decided to wrap a natural language phrase in hashes (#) followed by JSON. The pattern is an #english query# followed by a JSON query.
Providing the example with the last line, only an #english query#, the GPT-3 model will be able to generate a JSON query that matches the plain English query in the last line.
Here is what the GPT-3 API request looks like:
Now that you’re familiar with the core idea behind the system, I’ll take you through the key points of creating such a system from scratch.
1. Setting Up the Codebase
I’ve created a simple boilerplate to make it easy for you to test it locally. It’s written in JavaScript and uses NodeJS version 16 or higher. Follow the link to install it from GitHub.
2. Setting Up the AI
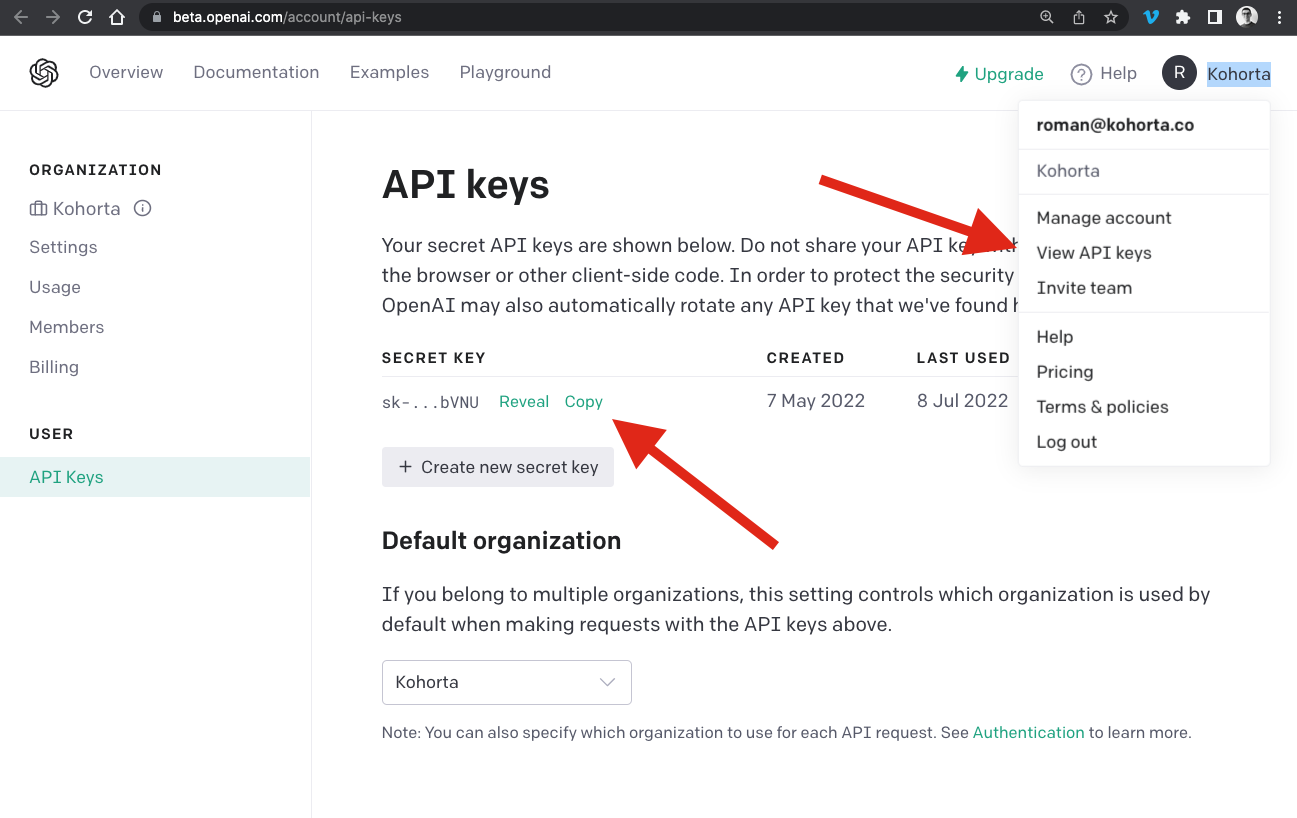
After cloning the repository, it's time to set up the AI side, meaning GPT-3, for further experiments. We need to add the OpenAI API key to perform an AI request. To obtain this key, we need to register for an OpenAI account. Once we get the account, there will be an initial credit of $18, which is enough for all experiments.
To start using the GPT-3 model, we also need to get a secret API key. Here is a screenshot showing where you can find it:
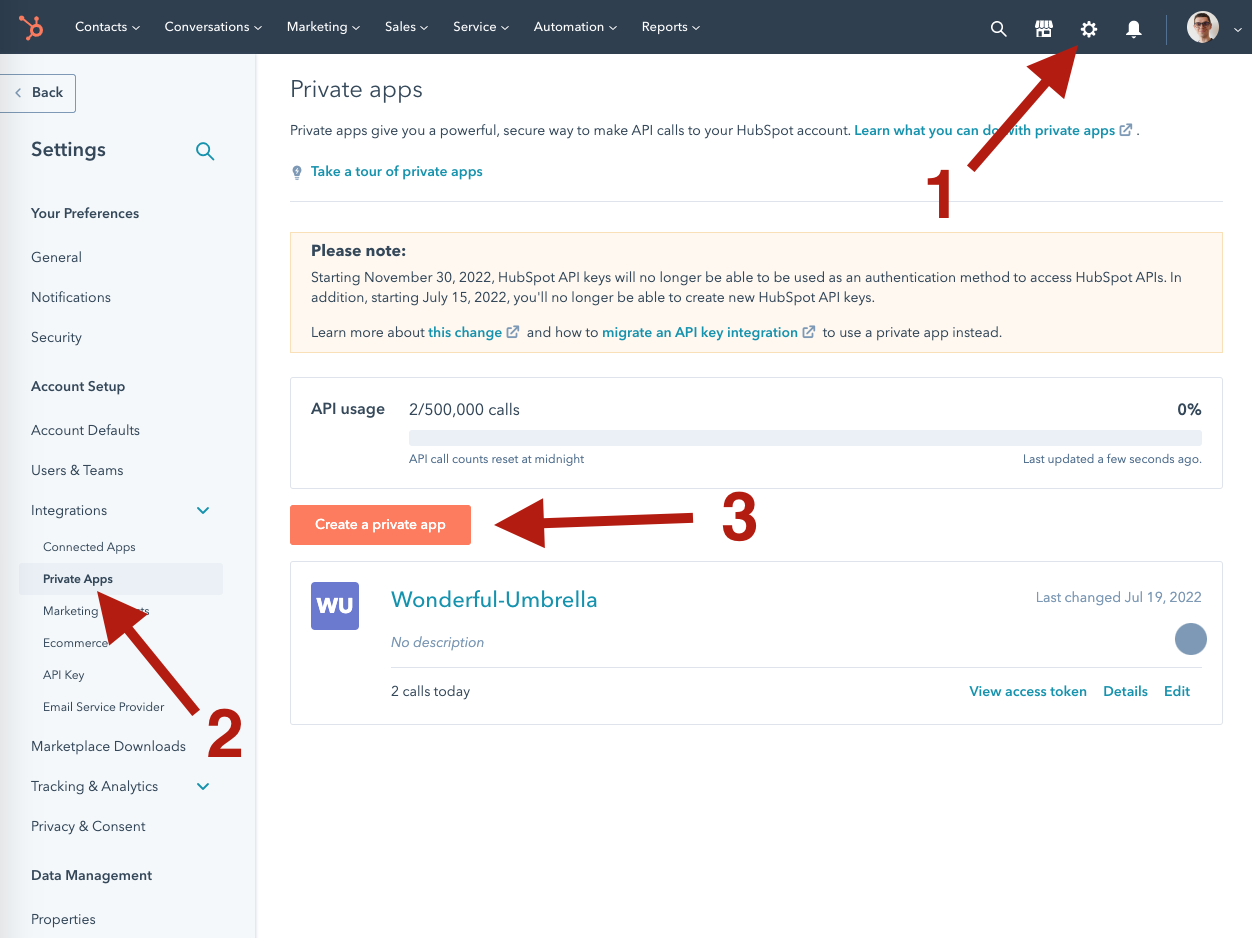
3. Setting Up the HubSpot Environment
For all of this to work, we also need a HubSpot API Access token to make HubSpot API CRM Search requests. This process starts with creating a private HubSpot app. Below is a set of screenshots with detailed guidance on how to do this. Also, you can read more about private apps in HubSpot documentation.
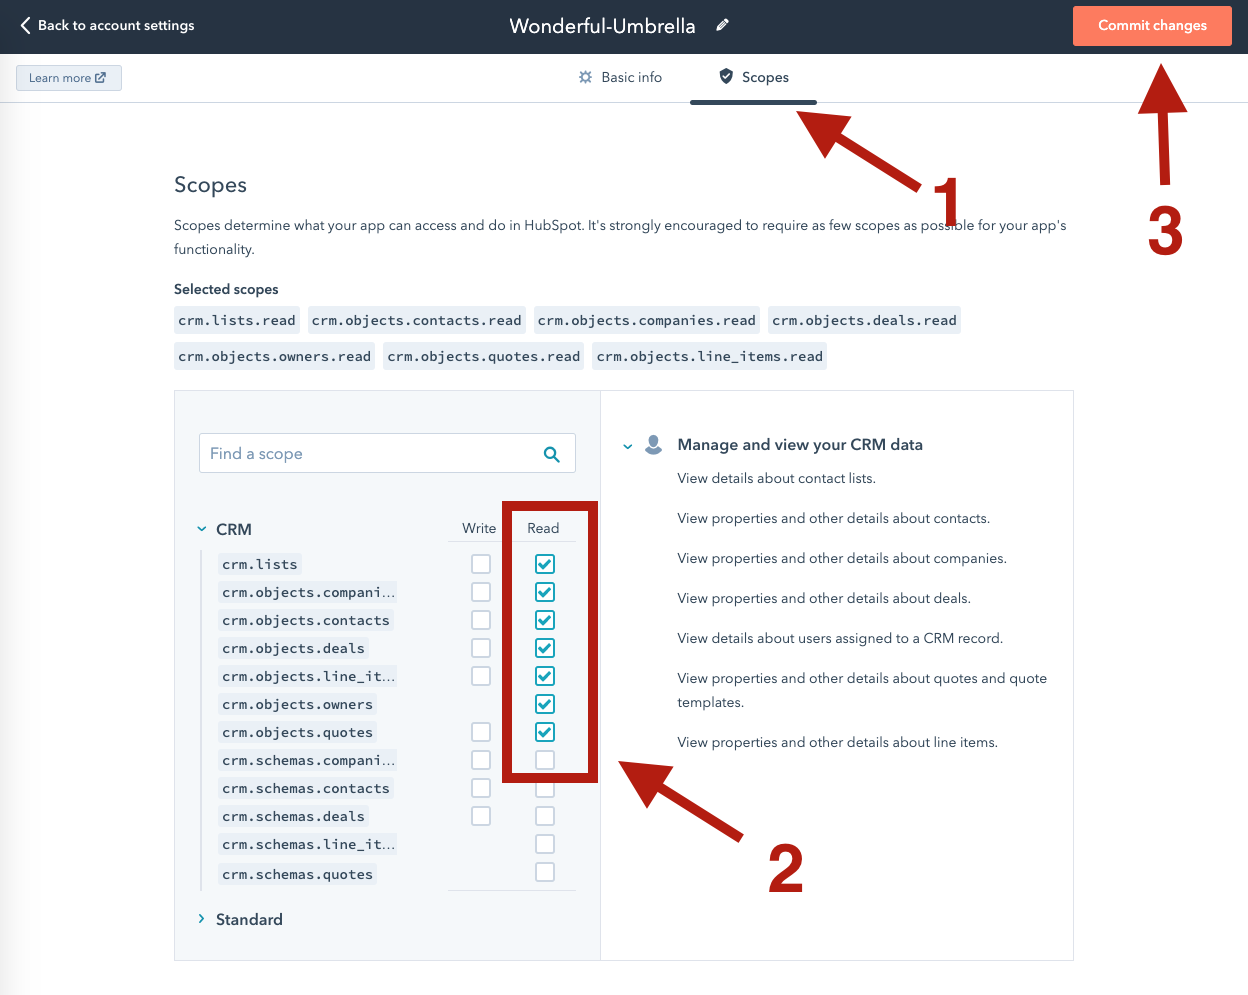
During installation, it’s important to check "Read" for all CRM object scopes.
4. Adding API Keys
The last step before making search requests with AI is to add the HubSpot and OpenAI API keys to the config file. Open index.js in the config folder and paste keys inside quotes, respectively. It allows us to use both OpenAI and HubSpot API services together. Below is the screenshot of the config file in my editor: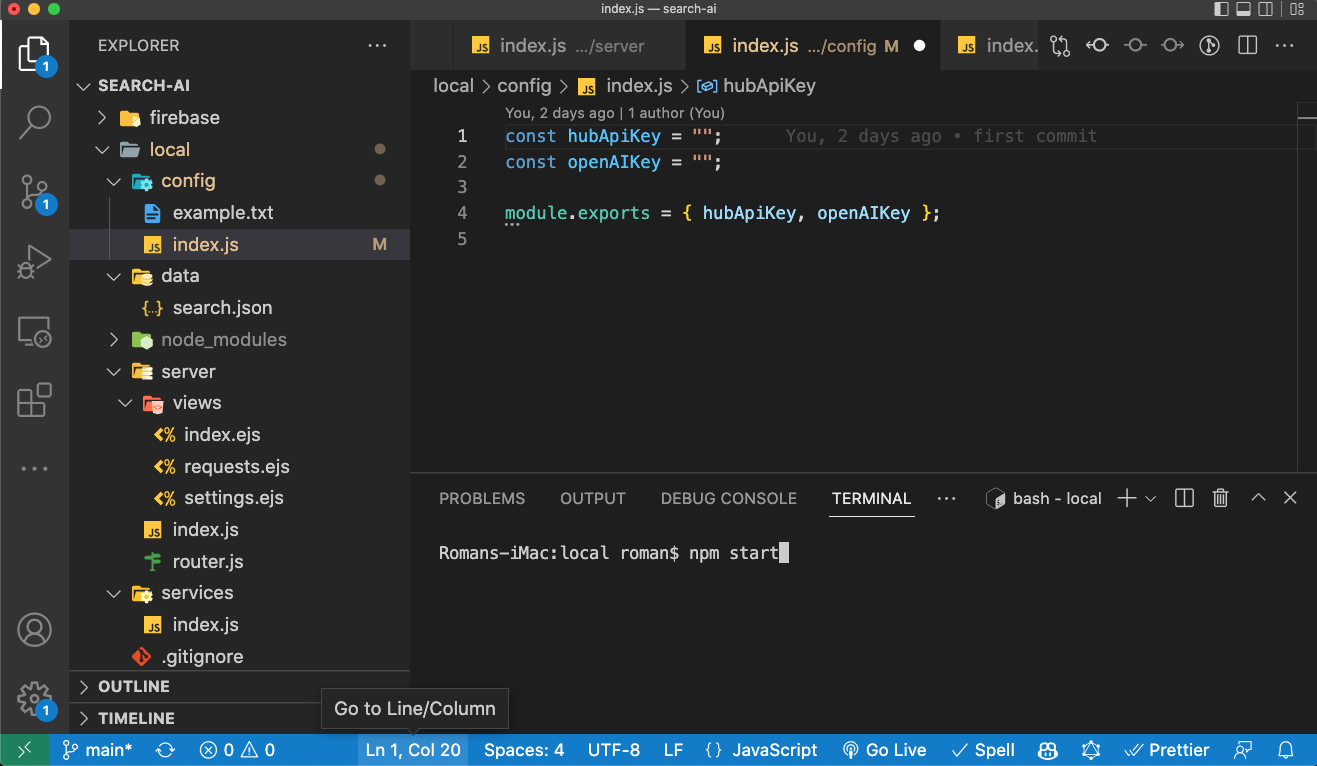
5. Final Step — Making Search Requests
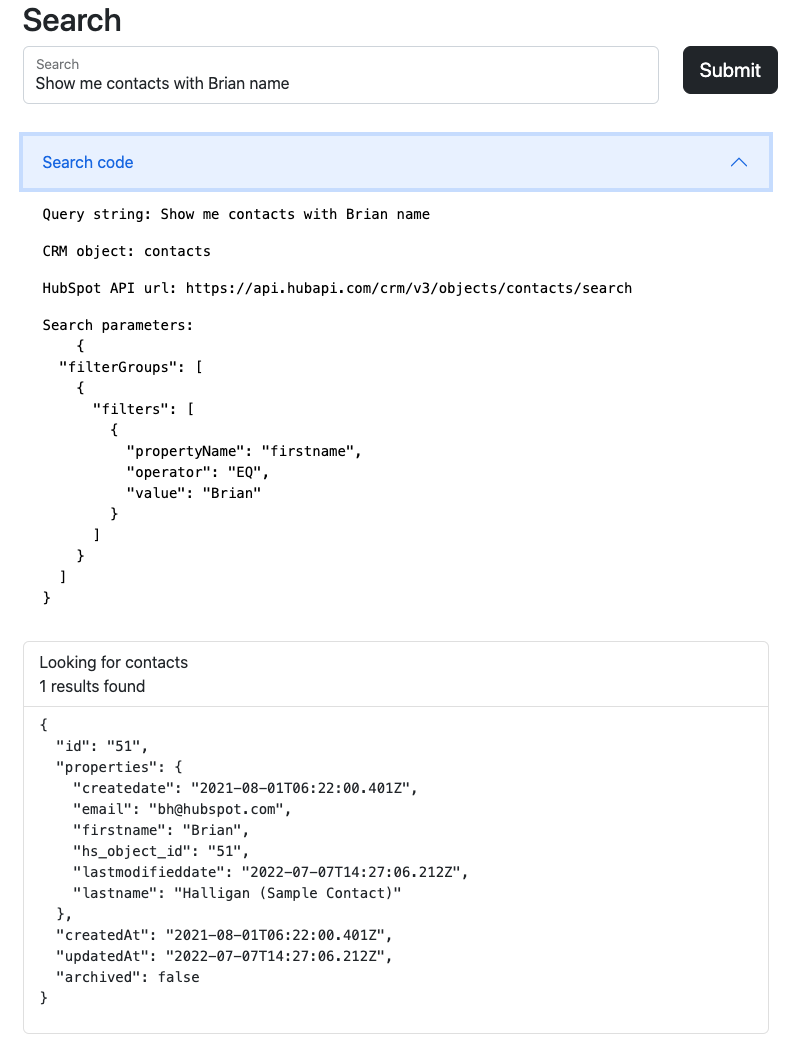
After adding config settings, type npm start in your terminal and press enter. This will spin up the local server, and you will be able to open it in your browser at localhost:5011. On that page, you will see the search input where you will be able to type the first search request.
After submitting a search request, you’ll get results and a dropdown menu under the search input, which shows the underhood transformation of natural language to query JSON and the HubSpot CRM API search endpoint.
6. Future Improvements — Making AI Smarter
At some point, search requests might become too complex for AI to transform into JSON correctly. This should pose no problem. Open the settings and manually add a new example line in the format #request# JSON query. The JSON query has to be created following HubSpot rules defined in the documentation. Once this is done, the AI should give you a better output.Conclusion
We have covered how to use GPT-3 to create a natural language query system and, more importantly, how to make it work with HubSpot CRM search API.
This is only one of the possible implementations of AI in HubSpot. For instance, it is relatively easy to create a custom code workflow action to do a sentiment analysis of all incoming letters or other communication means. For some inspiration, check out this set of examples of GPT-3 in use.
I'm planning to continue exploring AI in the realm of HubSpot. So, if you are also interested in this topic, reach out to me on LinkedIn and share your thoughts.
