
Webhooks and workflows improve efficiency and allow businesses to streamline their processes, saving time and increasing productivity. HubSpot webhooks and workflows are essential because they enable businesses to automate tasks like marketing, sales, and customer service. Webhooks and workflows also handle large volumes of leads and customers, making it ideal regardless of your business size and enforce automation for repetitive and time-consuming tasks, such as sending follow-up emails or updating a contact property.
You can create powerful automation by combining HubSpot workflows and webhooks to send and retrieve information between the CRM and external tools within the workflow. You can add an action to the workflow triggered when a webhook event is received. This action can be based on the event data received in the webhook payload, such as sending an email, creating a task, or updating a property.
A HubSpot event refers to a specified trigger that occurs within the CRM to initiate the action in a workflow. The webhooks allow you to receive real-time updates about events, such as when a contact is created, updated, or deleted. When the event occurs, it sends an HTTP POST or GET request to the specific webhook URL containing the event's information and any associated data.
See below an example that exemplifies a HubSpot workflow that is triggered based on whatever definition you specify. When the workflow reaches the webhook action, it sends a request to the webhook URL, including any relevant data from the workflow. Then an external app or service receives that webhook request and can perform whatever actions are based on the data received.

So, when designing a workflow with a webhook, some important factors should be considered:
- Limitations of CRM tool APIs such as restrictions in the number of records or rate limits.
- A scalable integration solution is best to handle large amounts of data and traffic, ensuring the integration remains reliable as a business grows or changes over time.
- Time to market allows you, as a developer, to streamline the development process, reduce errors, and increase efficiency, leading to a faster time to market.
- The number of users you need to serve ensures the workflow can handle various user volumes, implementing efficient algorithms and data structures and using a cloud-based infrastructure to scale up and down based on demand.
These factors are critical to consider the options available to an external serverless or function-as-a-service provider. So, let’s explore how a cloud provider with a function as a service can help us create an efficient and scalable workflow for our business.
Using HubSpot with a Cloud Provider
A cloud provider is a company that offers cloud computing services like Amazon Web Services (AWS), Microsoft Azure, or Google Cloud Platform, providing storage, networking, databases, and more. Choosing the right cloud provider is dependent on a business's specific needs. However, when processing webhooks with HubSpot, using a cloud provider can contribute to cost-effectiveness, scalability, reliability, integration, security, and ease of management. Using a cloud provider function with HubSpot saves time, reduces errors, and streamlines your process when developing workflows and applications. That said, the choice of which cloud provider to use depends on the specific needs of your business or client.
Lambda Functions to Process Webhooks Triggered by a Workflow
The AWS Lambda functions are serverless and allow you to run code without worrying about managing servers or infrastructure. We can use Amazon's API Gateway, Lambda, and other backend data services to support a bidirectional REST API flow between HubSpot and Lambda, making them an excellent fit for event-based data processing.
For example, suppose you have a workflow in HubSpot that triggers whenever a contact’s deal status changes and that workflow sends a webhook as one of its actions. You can process the webhook in a Lambda function and send an email notification to your sales team. The Lambda function can also log the contact and deal information in an external database or perform other necessary tasks. You can also process other webhook events from HubSpot with a Lambda function, such as a contact property change or form submission.
Now, let’s explore the approach of using a function as a service with HubSpot in more detail and how to use a Lambda function to process your HubSpot webhooks within a workflow.
Getting Started
To demonstrate how to use a Lambda function to process a webhook triggered by a workflow in HubSpot, you’ll need the following:
- A HubSpot developer account and a test account to create a workflow in app with a webhook action.
- An AWS account with an IAM role to create a Lambda function.
- AWS offers a free tier you can use for testing purposes.
- A Postman account for testing purposes.
- A general understanding of Lambda functions and HubSpot workflows and webhooks.
Step 1: Create a new Lambda function
The first step is to create an AWS Lambda function to process the webhook data. To do this, follow these steps:
- Create an account and log in to the AWS Management Console.
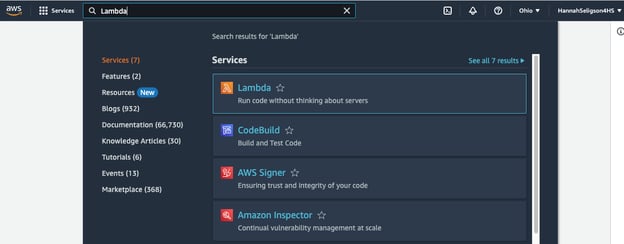
- Navigate to the AWS Lambda service. You can do this easily by searching for “Lambda” in the search bar.
- Click the "Create Function” button in the top right corner of the screen.
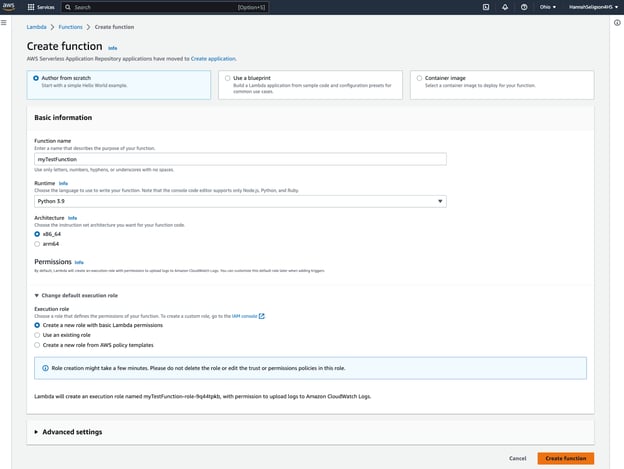
- Select “Author from scratch,” then enter the name of your function, and select “Python 3.X” or whatever language you use to write your code for the function as the runtime.
- Under “Change default execution role,” ensure that “Create a new role with basic Lambda permissions" is chosen.
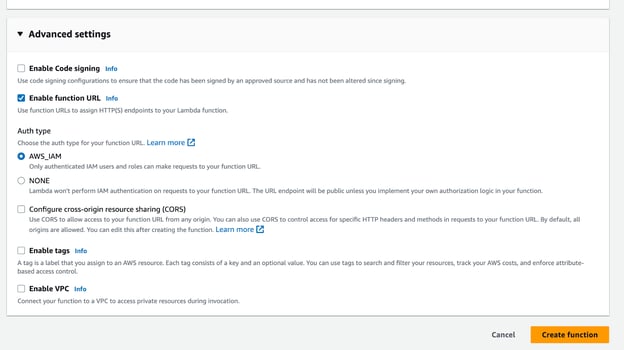
- In the “Advanced settings” tab, click “Enable function URL” and select the appropriate auth type.
- Click on the "Create function" button.
Step 2: Configure the Lambda function
AWS provides an in-line code editor to create your function. Or you can write your function locally, create a zip, then upload it within AWS. In the code section, you’ll replace the default code with whatever code you wrote for your Lambda function in your preferred language.
Essentially, you are writing a function that does something on an event, such as logging a record update in your database or posting a message to Slack based on an event you subscribed to in the HubSpot CRM. Whatever function you write, you want to ensure it is accessible via API. To learn more about writing Lambda functions, refer to the documentation in the AWS Developer Guide, “Create a Lambda function with the console” or “Creating a Lambda function with a function URL.”
Important note: A Lambda function handler is the method in your function code used to process your event when a function is invoked. Lambda will then run the handler method. AWS provides examples in its documentation for multiple languages to help you get started!
Here is a generic example of a Lambda function handler in Python that catches the event:
If we wanted to take this a step further, here’s an example of a Lambda function, including the handler that processes a webhook sent by a HubSpot workflow for a deal stage update that needs to be logged in a PostgreSQL database.
This Lambda function would process the webhook added as an action to your HubSpot workflow when a deal status changes, then it logs the update in a PostgreSQL database and returns a successful response to HubSpot.
Finally, when you’ve completed writing your function, you will deploy your function by clicking "Deploy" to save your function code and create a new version. Now, it’s time to make this Lambda function accessible via an API endpoint with the AWS API Gateway!
Step 3: Set up the API Gateway trigger for your Lambda function
For a webhook, you want to create a REST API. You can do this by adding a trigger to your AWS Lambda function or creating an API with the API Gateway service – the only difference is the source of the trigger event! However, I’d suggest using the API Gateway Service because it allows you to expose your function as a RESTful API endpoint that can be accessed and triggered by external applications or services - aka, HubSpot.
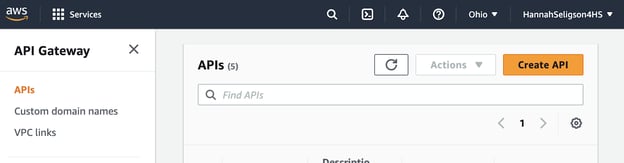
- First, you’ll navigate to the API Gateway within your AWS Services. You can do this easily by searching within the search bar for “API Gateway” and then clicking “Create API.”
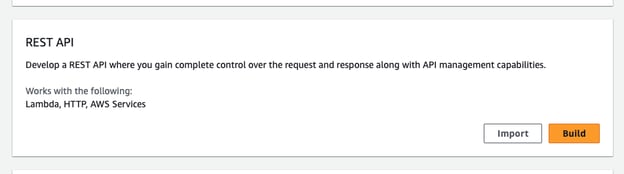
- Select “REST API” and choose whichever option suits your needs. For this example, I will select the one that offers this capability: “gain complete control over the request and response along with API management capabilities.” Click “Build.”
- You’ll then be directed to a form to create the new API.
- Select “REST” for the protocol, then “New API,” and then name your API whatever you’d like.
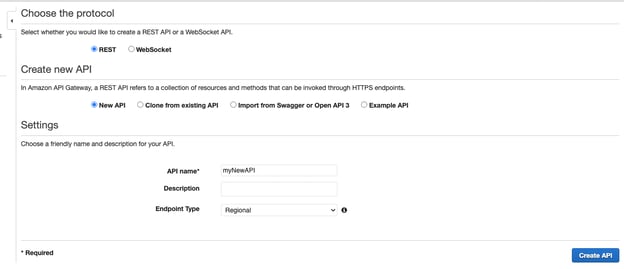
- Click “Create API.”
Step 4: Create a method for your Lambda function
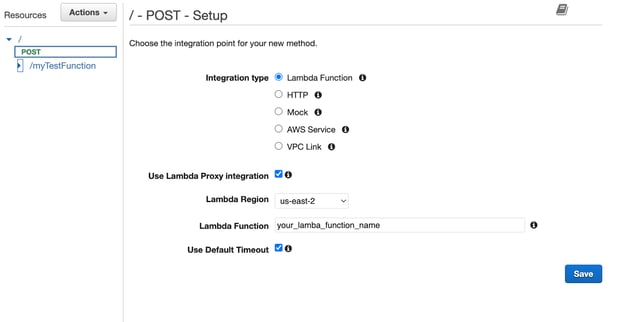
- Configure your API Gateway endpoint. In the API Gateway configuration, select your API and click on "Actions." Select "Create Method." Choose "POST" as the HTTP method and click the checkmark icon/button.
- Select "Lambda Function" as the integration type. Choose the Lambda function you created in step 2.
- Next, click the check mark for “Use Lambda Proxy Integration” - this ensures that the API Gateway is integrated with the Lambda function.
- Finally, click “Save.”
Step 5: Deploy the new API you created with the API Gateway
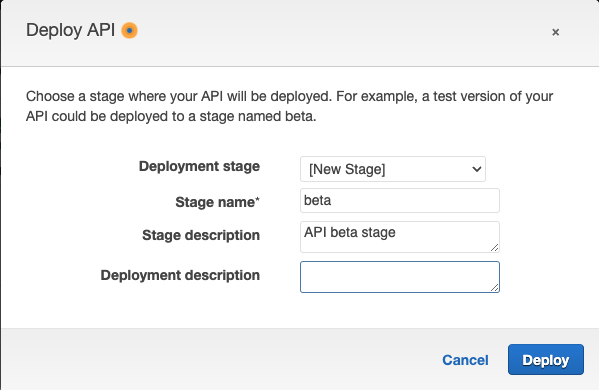
- Now you need to deploy your API Gateway. Click "Deploy API" in the "Actions" menu, and choose a deployment stage.
- Select “New Stage” if you haven’t created one already. A stage is a reference to the state of your API, i.e., dev, prod, beta, or versions like v1 or v2. API stages are identified by the API ID or stage name and are included in the URL used to invoke the API.
- Click “Deploy.”
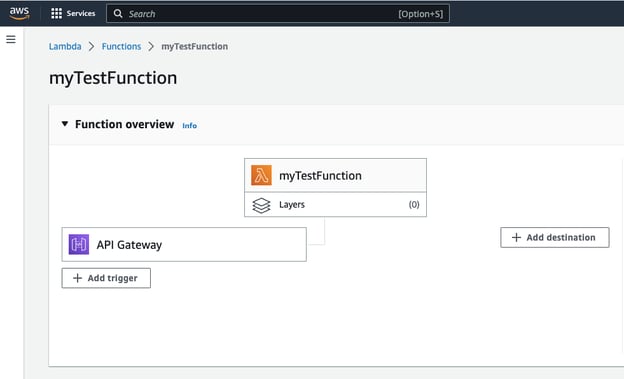
Now that you’ve deployed your API, if you navigate back to your function, you should see your API Gateway linked as a trigger to your function shown in the example below!
Optional Step: Setup a HubSpot Webhook Validation
Validating a webhook using the ‘X-HubSpot-Signature’ header is important to help ensure the webhook payload is authentic, the webhook hasn’t been tampered with during transmission, and that the request came from HubSpot. Should someone have access to your Lambda function URL, they could possibly send data pretending to be HubSpot. By using the signature header, it provides a hashed representation of the webhook payload, calculated using a secret key only you and HubSpot know.
Suppose you do not validate the ‘X-HubSpot-Signature’ header. In that case, as we mentioned before, an attacker can intercept and modify the payload, leading to unauthorized access to your system, or worse, the potential to leak sensitive data. So, by validating the header, you are preventing such attacks and ensuring the integrity of the webhook payload.
To validate the signature header, you can implement the following Python code for the validation:
The expected result will look something like this hash:

The hashlib.sha256() method is used to compute the SHA-256 hash of the source string, encoded as UTF-8. The hash value is stored in the hash_value variable as a hexadecimal string. Then the hash value is printed to the console for debugging purposes.
To validate the X-HubSpot-Signature header in the webhook request, the computed hash value must be compared to the actual X-HubSpot-Signature header value included in the request. If they match, the webhook request is valid and can be processed!
Step 5: Add your Webhook action to your Workflow
Now, it’s time to create a workflow and add your webhook action.
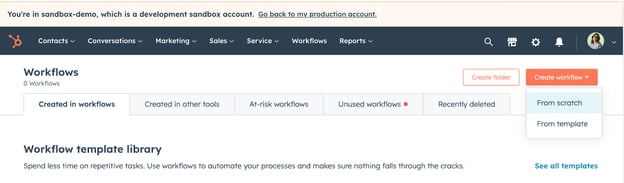
- First, create a workflow in your HubSpot account. Navigate to the Workflows dashboard by clicking “Workflows” in the top navigation menu and selecting “From scratch.”
- Select the type of workflow you want to create (e.g., “Contact-based,” “Company-based,” “Deal-based,” etc.). Then, select “Blank workflow,” click “Next,” and give your workflow a name.
- Configure the workflow and add an action.
- In the right panel, select “Send a webhook”. To do this, click on the plus sign (+) next to the “Contact enrollment trigger,” then select “Webhook” from the available actions.
- Select “POST,” and include the URL where the webhook will send data and authentication requirements. This will be the Lambda function URL, aka your API Gateway endpoint.
- Set up your “Authentication type” to authenticate requests to your webhook. You can do this by selecting “Include request signature in header” for the authentication type.
“Whenever a webhook is sent, the request headers will contain "X-Hubspot-Signature" (this will contain a hash value) to validate that the webhook came from HubSpot and hasn't been tampered with in transit; you need to create your hash and verify that it matches the one coming from HubSpot.”– Carter McKay, Lead Developer at PivIT Global.
You can reference the HubSpot documentation for more information about validating the HubSpot Signature here.
- Next, paste your App ID from the app you previously created and add it to the field.
- For the “Request body,” choose which properties to include in the webhook request body.
HubSpot offers an option for “Customize request body” with key/value pairs, enabling you to add static values or dynamic fields populated with data from the record in the workflow.
For example, if you use a customized body, you should only include the specific data specified, such as a workflow_id. This will inform the Lambda function which workflow the webhook is from or some other static item in the request that could be used to identify which workflow the webhook came from. However, you'd need to use the “Customize request body” option and manually include it.
You could also click “Add property,” which returns a dropdown box where you can select the property you want to include in the workflow; such as the deal stage we plan to log in our function example above.
Important note: When you customize the request body with the properties you choose, those properties will be the only properties returned. You won't get the entire record data, so please include the specific property data you need returned by the webhook.
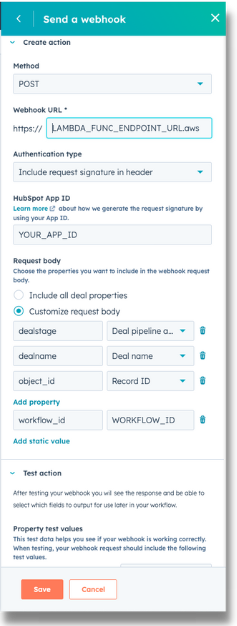
Above is an example of adding the property fields and the static property we mentioned above in the webhook request fields within the HubSpot UI.
- Once satisfied with your webhook, click "Save" and activate the workflow you created.
Whenever an event in HubSpot triggers your workflow, the webhook action will send the JSON payload to the API Gateway endpoint you created for your AWS Lambda function. The function will process the webhook as needed.
To learn more about creating a workflow, check out the HubSpot documentation for Workflows. As for your Lambda function, you can adjust settings (such as the timeout, firewall, throttling, etc.) based on what you need.
Conclusion
This blog post provides a high-level guide for anyone using AWS Lambda functions to process webhook actions triggered by a workflow in the HubSpot CRM. We’ve seen how Lambda functions with HubSpot can streamline workflows, reduce manual effort and errors, improve response times, and enable integration with other systems and tools.
By automating data processing and leveraging real-time processing of webhook data, a cloud provider integration can be a powerful tool for automating tasks and improving the efficiency and accuracy of workflows in HubSpot.
Here are some suggestions for further reading if you’d like to learn more about HubSpot workflows or webhooks:
- Choose your workflow actions
- Workflows | Frequently Asked Questions
- Use webhooks with HubSpot workflows
Here are some suggestions for further reading if you’d like to learn more about AWS Lambda:
- What is AWS Lambda?
- AWS Lambda foundations
- Configuring AWS Lambda functions
- Best practices for working with AWS Lambda functions
Please feel free to reach out with any questions or feedback!