
This article was authored by a member of the HubSpot developer community, Roman Kozak.
Recent advancements in conversational AI have unlocked exciting new possibilities that were unimaginable just a few years ago. Today, we can build AI agents capable of engaging in verbal conversations as naturally as a human would. With perfect voice recognition, human-like voice generation, and flexible conversation flow powered by the latest OpenAI GPT model, these technologies are now widely accessible to developers. This means we can start integrating them to provide our customers with a new conversational experience through websites and apps.
In this tutorial, you'll learn how to implement a voice AI agent on a HubSpot-hosted website. This agent can interact with customers through voice, collect their audio data, and store both the audio and its transcription in HubSpot CRM. Such a setup can be used for various scenarios, like gathering customer feedback or handling support requests. For example, here’s a demo of how to use this setup for feedback collection and another demo showcasing its use for support intake.
By the end of this tutorial, you'll be equipped to integrate a voice AI agent into your HubSpot and create a test environment for further experimentation. Embracing this cutting-edge technology will enable you to enhance your website, making it more personalized, practical, and user-friendly.
Prerequisites
Before we begin, there are a few prerequisites. You should be familiar with JavaScript and front-end development using React. Some experience with HubSpot CMS modules, the HubSpot command-line tool, HubSpot serverless functions, as well as basic knowledge of LLM prompt engineering will also be helpful for following the integration process. This tutorial includes boilerplate code and agent programming instructions, available in my Github repository, which you will use to create something similar to the demo example.
We will also use a third-party service called RetellAI. This service provides the foundation for building a conversational interface and voice AI agent programming environment. Therefore, you will need a registered account with RetellAI.
Importance of voice AI in web design
Traditionally, web design has relied on graphical user interfaces (GUIs) to enable human interaction with websites. Users navigate and manipulate visual elements like buttons, icons, and menus to interact with the computers and access information.
While this method is accessible and intuitive, it is somewhat limited to predefined user flows and responses, unable to adapt to various user contexts and needs. However, this was the best we could achieve with the available technology at the time.
Recently, we made a certain advancement by introducing chatbots. Chatbots allow humans to communicate with computers in their natural language, understanding context and adapting to the conversation flow accordingly. This brought us to a new level of human-computer interaction, which started to resemble human-to-human communication. This way of interaction greatly enhanced the user experience from what we saw earlier, so to reflect its uniqueness, it was recognized as a new type of user interface with its own name: conversational user interface(CUI).
Some may argue that chatbots have drawbacks and can sometimes be less efficient than traditional GUIs, causing user frustration. This is true; chatbots can’t replace GUI. That is why thorough planning is essential before implementing chatbots on websites. Additionally, inputting information via a keyboard can be tedious when performing simple tasks or explaining complex needs. However, the goal of making human-computer interaction more like human-to-human interaction is the right direction, promising a better user experience, increased customer loyalty, and business growth.
Today, advancements in AI offer us the opportunity to build an even better CUI. By combining voice recognition, voice generation, and large language models (LLMs), we can create genuine voice-based human-computer interaction. Which is a natural advancement in improving CUI, as most human interactions are vocal.
This doesn’t mean we should mindlessly replace GUIs with voice CUIs. Instead, we should offer users the option to choose their preferred interaction method. Adding voice interaction to your website can significantly improve user experience, especially in scenarios where dynamic interaction and extensive user input are required.
So, let’s build an example of a voice AI agent in your website and see how it can enhance the user experience.
Creating the AI agent
First, we need to create a Retell account. Once you have an account, go to the AI agents page and create a new agent by clicking the “Add Agent” button. The website will ask you about the agent type. Choose the “single prompt agent” and click the “start from blank” option. This will take you to the agent creation page.
The most essential settings for your agent are the voice, agent prompt, LLM model, and who initiates the conversation. Let's go through these step by step. Start by naming your agent something like "Product Feedback." Then, choose the agent’s voice according to your preference.
Next, create the agent’s personality and provide instructions on how it should communicate with users. You can do this in the agent Prompt field. We’ve prepared an agent prompt for this tutorial, which you can find in the companion GitHub repository. Copy the prompt from the repo and save it in the dashboard by clicking the “Save LLM” button. For more information on agent prompt engineering, refer to the Retell documentation site.
Below the Agent Prompt field, you’ll find the “LLM Option” dropdown. Select the LLM model to power your agent. At the time of writing, we recommend using GPT-4o as the best option. Lastly, in the “Who Speaks First” dropdown, choose the “AI Initiates: AI begins with a dynamic begin message” option.
You can keep the rest of the agent settings at their default values. To test the agent before integrating it into HubSpot, click the “Test Audio” button.
For visual learners, here is a short video demonstrating how to set up a Retell AI agent.
Integrating the voice AI agent in HubSpot
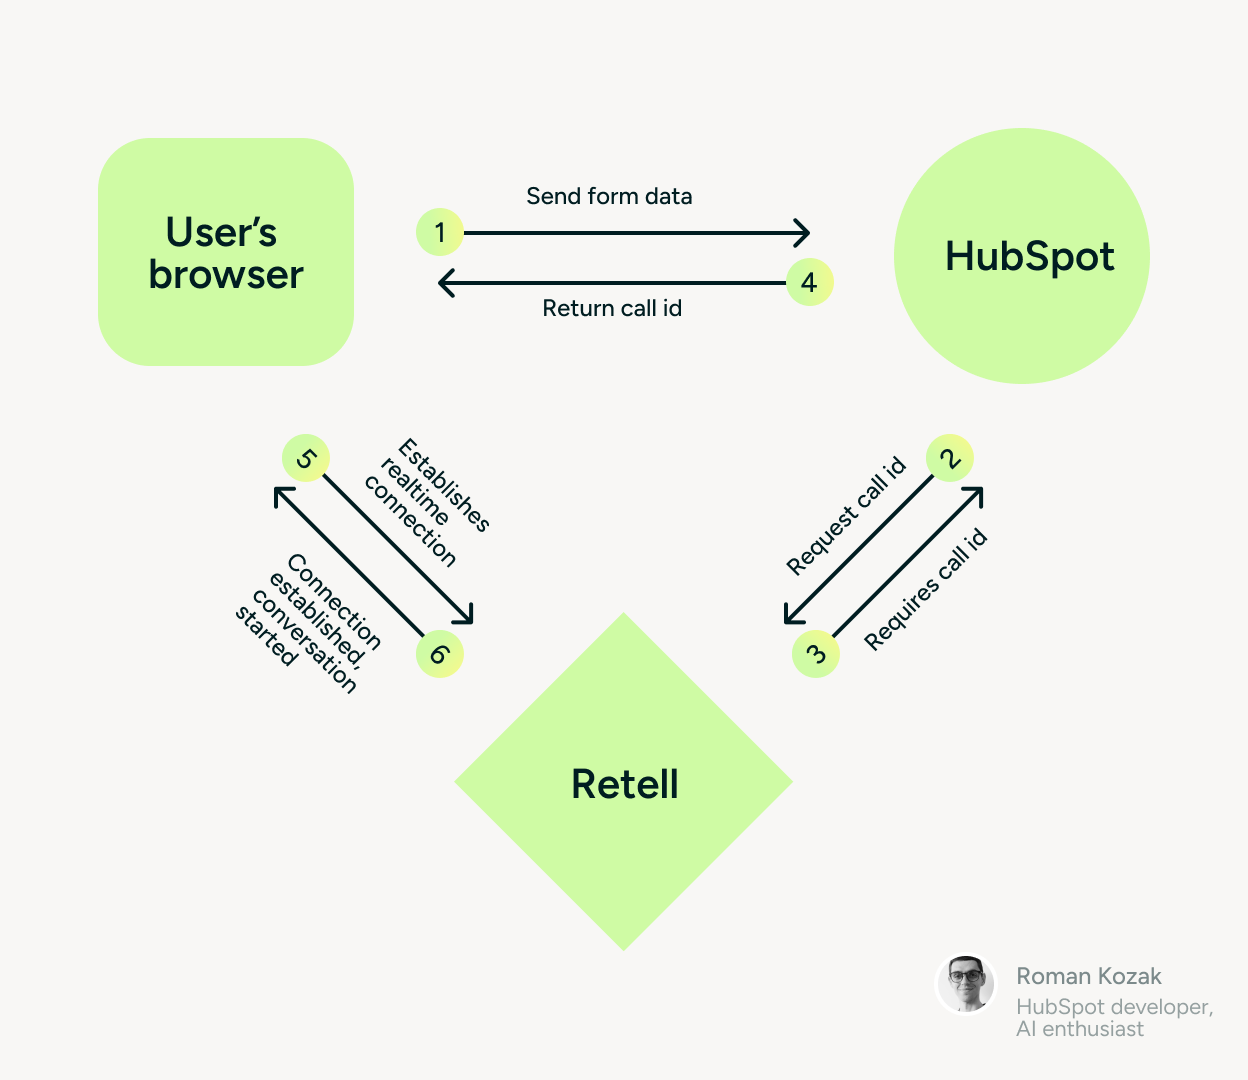
Now that we have created a voice agent, let’s integrate it with HubSpot so our users can interact with it. The architecture isn't obvious — it includes the front end and two backend servers. Let’s walk through the process.
The session starts with a user filling out a form to start a conversation. The form data is sent to a HubSpot serverless function for processing, which retrieves a call ID from the Retell server and sends it back to the front end. The front end, having the Retell’s call ID, establishes a real-time connection with the Retell server, allowing the user to start talking with the AI agent. See the graph below.
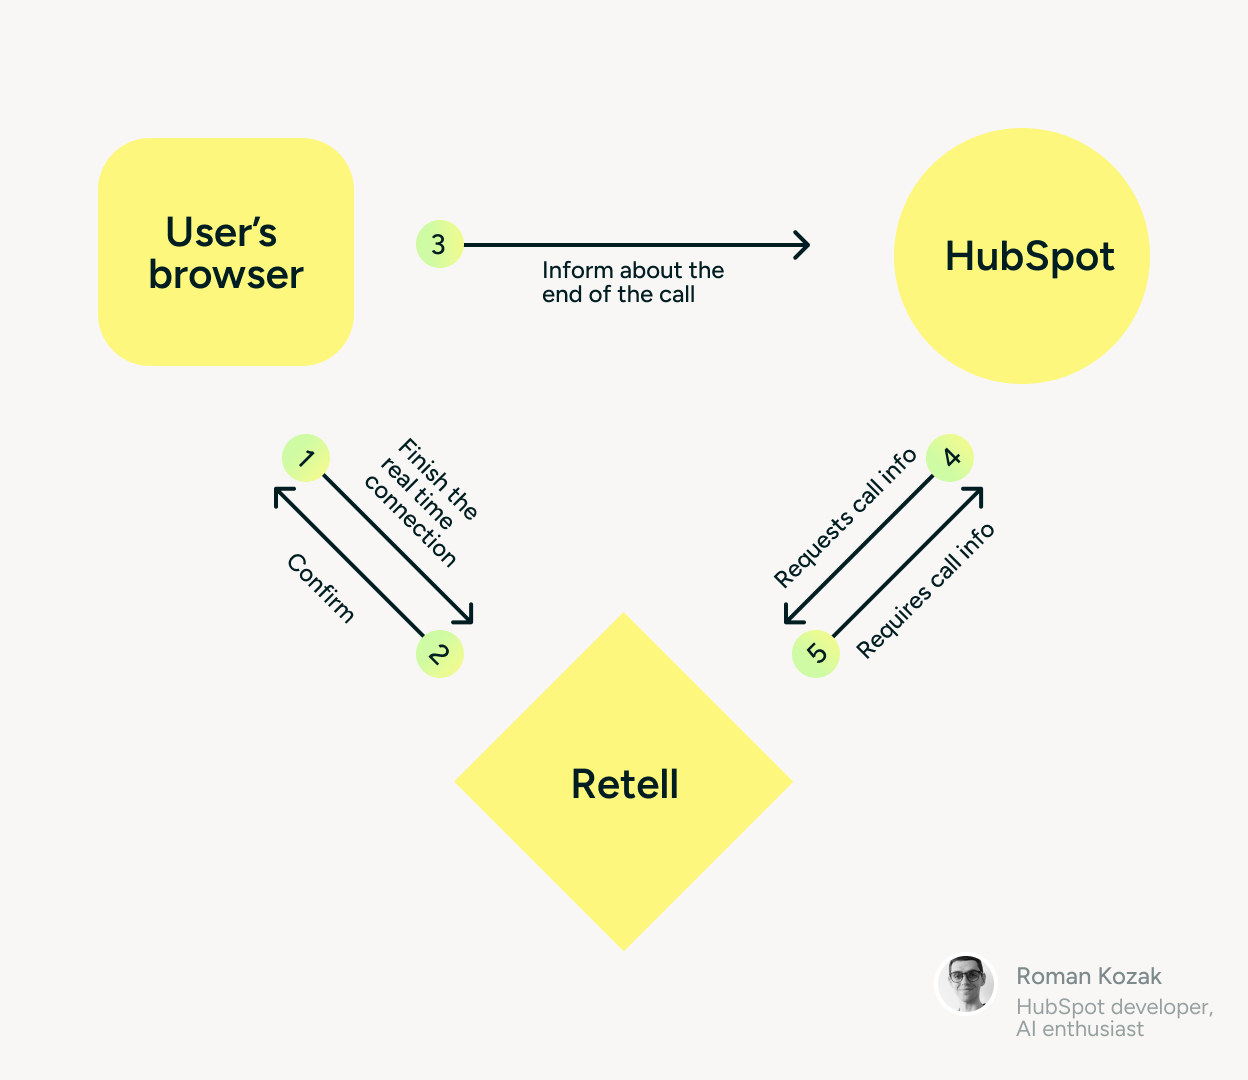
Once the conversation is finished, the front end sends the call ID to another HubSpot serverless function. This function retrieves the conversation transcription from Retell and stores it in HubSpot as a new ticket with custom fields.
To make the process work, we'll need to:
- Create serverless functions (for the back-end part) and a CMS module (for the front-end part). To make it easier, we will use the boilerplate from my GitHub Repo.
- Deploy the module and functions to HubSpot
- Add the module to a page for testing.
- Add custom fields to the tickets object to store the conversation.
Step-by-Step Instructions
- Create a HubSpot Private App
Let’s start by creating a HubSpot private app with tickets scopes in your testing HubSpot account. Keep the tab open with the private app. Keep the browser tab with the private app open, as you will need the Access Token later.
- Clone the GitHub Repository
Now open your terminal and navigate to the folder where you will store the boilerplate code. Then copy and paste the following line:
This command copies the voice AI boilerplate to your computer. Navigate to the newly created project folder in your terminal.
- Install the HubSpot CLI
Run the following command to install the HubSpot CLI:
- Initialize the HubSpot CLI Configuration
Once the CLI is installed, initialize the HubSpot CLI config in the project folder by typing:
Follow the on-screen instructions to complete the initialization process.
- Add Secret Variables
Now having HubSpot CLI, add values to two secret variables. First, type and run:
When prompted, enter the access token from the private app you created earlier.
Next, add the Retell API key:
Go to the Retell dashboard, copy the API key from the API Keys page, and paste it when prompted.
- Build and Deploy
Install the necessary packages by typing:
Once the installation is complete, deploy the project to HubSpot by typing:
- Add Custom Fields to the Tickets CRM Object
Follow the instructions in the HubSpot documentation to add the following custom fields with these exact names and types:
|
Field name |
Data type |
|
|
single-line text |
|
|
file |
|
|
multi-line text |
The integration uses these fields to link to the recorded audio file, conversation summary with a simple analysis, and Rettell call ID, which can be used to get more information from the Retell server.
- Add the Module to a Web Page
Navigate to your HubSpot account, create a new web page, and add the newly created module. You can find the module named "Voice AI Agent" in the add section. After placing the module on the page, go to the module’s settings. This module requires a Retell agent ID. Go to the Retell dashboard, navigate to the AI Agents page, open the agent we created earlier, copy the Agent ID, and paste it into module settings. Publish the page and open it to test.
I hope you’ve managed to create a working example by following these steps. If this process feels overwhelming, here is a video to help you navigate through the integration steps.
Customize the integration
You may want to customize the module or functions to better suit your needs. Here are a few recommendations and explanations to help you get started.
The voice module was built on top of the default HubSpot React module, so it's a good idea to familiarize yourself with it first. Additionally, review the Retell web call documentation to understand how the voice interface is implemented. These two toolkits will provide the foundation you need to start editing.
For module development, open the widget folder in your terminal and run the npm start command. This command will monitor changes and upload them to your HubSpot account in real time.
For the backend, we used HubSpot serverless, as it allows us to use the same domain for the server API, making user identification easy. However, you can use serverless solutions from other cloud service providers if you prefer.
To edit serverless functions, navigate to the functions folder and run the npm start command. This command monitors for changes in the folder and uploads them to your HubSpot account. To test and debug the newly modified function, open another terminal tab and run the following:
This command will display all server console messages that appear during execution on the HubSpot server.
To further familiarize yourself with developing HubSpot serverless and Retell server SDK, read more details in their respective documentation.
Conclusion
As developers, we play a crucial role in advancing modern web design and development, pushing the boundaries of technological limitations to enhance user experience and create more meaningful interactions. This tutorial provides an experimental environment to explore and demonstrate the potential of voice AI agents on web platforms. The ability to revolutionize how we interact with websites is vast, and we are only beginning to scratch the surface of what’s possible with this technology.
Thank you for reading to the end. Feel free to contact me on LinkedIn to discuss other use cases and voice AI agent implementations.
A special thanks to my partner, Olia Gozha, who assisted with module design and demo pages.
