
HubSpot’s new Developer Platform is a modern, modular way to build, customize, and distribute apps. It’s built for flexibility and scale, with a clear, file-based structure that makes your apps easier to manage, version, and extend - no matter how complex it gets.
At the heart of every developer project is the src/ directory - the home for all of your app logic and definitions. Inside it, you’ll find the app/ folder where configuration files and subfolders for key features live, like workflow actions, webhooks, etc.
Each feature has a dedicated configuration file, such as custom-action-hsmeta.json or webhooks-hsmeta.json. This setup ensures that your configurations are fully version-controlled, easy to review, and consistent across all environments. For example, to quickly spin up a new app with a webhook along with a custom action workflow, you can use the HubSpot CLI and execute 'hs project create':
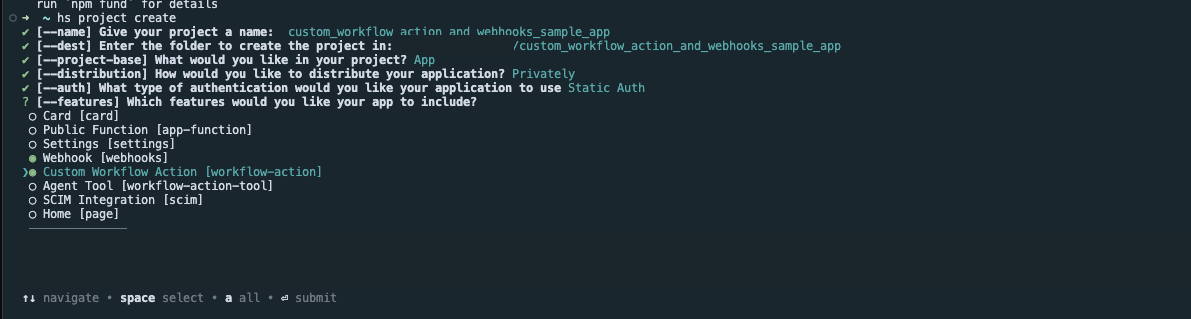
This command provides you with a boilerplate project. You can select the base contents of your project by choosing ‘App’ and following the prompts to configure your app details and select the features you need, which will provide subdirectories for the features.
Once your project structure is in place, the next step is to bring your app to life with features that extend HubSpot’s capabilities. One of the most powerful ways to do this is through custom workflow actions—purpose-built automations that connect HubSpot to the tools and logic your business relies on.
Build Smarter Automations with Custom Workflow Actions
Custom workflow actions let you expand what HubSpot workflows can do - connecting to external tools, triggering automations, or adding your own business logic directly into a workflow. You currently have two approaches to define workflow actions via a config file, and we’ll review them below.
File-Based Configuration vs. In-App Custom Workflows
File-based configuration
A file-based configuration allows you to manually create a *-hsmeta.json file in the /workflow-actions/ directory for the new Developer Platform framework and supply all required options and labels. This method is ideal for advanced users who want full control, need to automate deployment, or use version control for configurations.
In-app custom action builder
You can use HubSpot’s visual, in-app builder beta to create and preview workflow actions through a user interface. Once you’ve created an action, you can copy the JSON configuration and add it to your project’s /workflow-actions/ directory. This enables rapid prototyping and ensures your custom action is structured correctly.
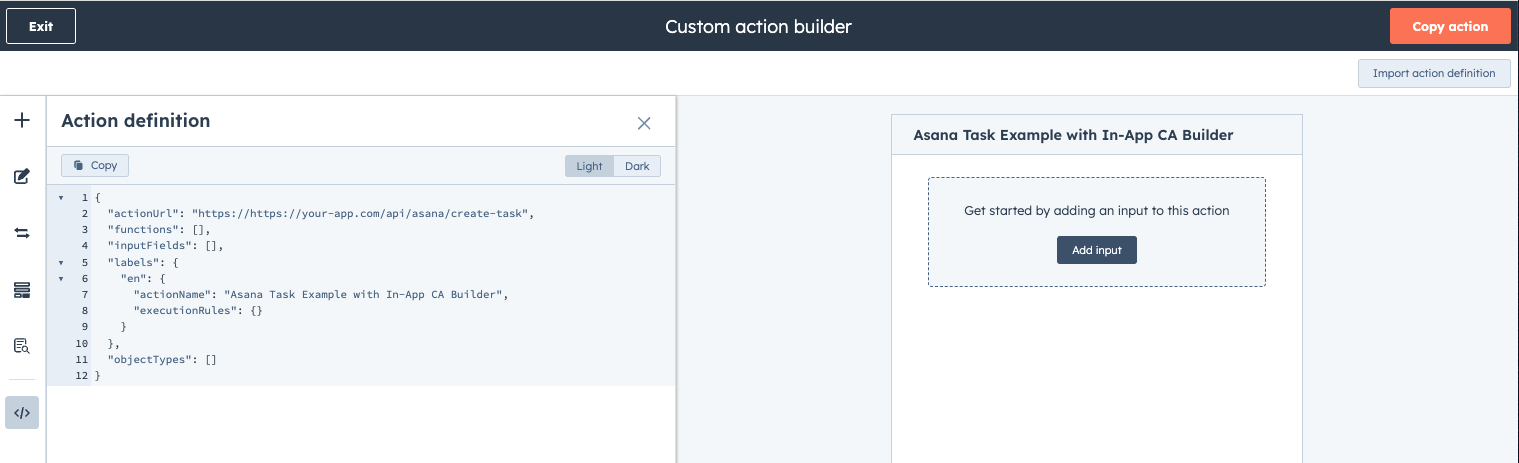
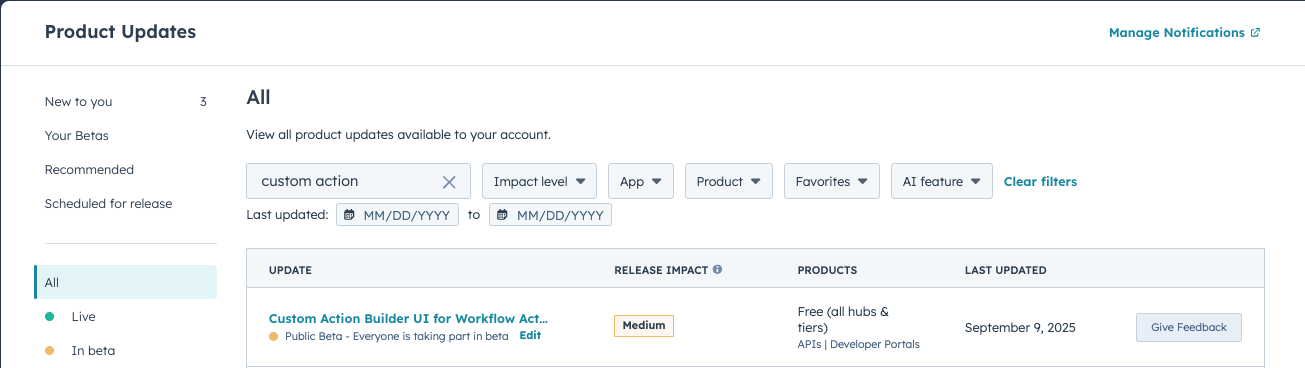
To access the in-app custom action builder, you must first enroll in the beta in your product updates of your HubSpot developer account.
You can leverage either approach or both in tandem for your workflow actions, creating a balance for prototyping and automated app delivery pipelines.
What About Custom-Coded Actions or the v4 Workflows API?
When it comes to the Developer Platform, you’ll want to leverage a configuration file. However, there are several ways developers can extend HubSpot workflows, each serving a different purpose. Let’s review those to avoid any confusion:
- Custom Coded Actions allow you to write JavaScript or Python code directly within workflows. These are ideal for simple logic or direct API calls within a workflow without the need for a separate integration.
- Custom Workflow Actions are app-based extensions that connect workflows to external services via a pre-configured
actionUrl. These are reusable integrations, often used for App Marketplace apps, where a connection to an external service's API is required. - v4 Workflows API is used for programmatically creating and managing workflows. Use this API when you need to automate workflow creation and management through code or when building tools that generate workflows.
You can leverage these tools together: for instance, you could build custom workflow actions for your integration, and then use the v4 Workflows API to create workflows that utilize those actions programmatically.
The following section will detail how to create a custom workflow action configuration file for an app below.
Defining Custom Workflow Actions
To add a custom workflow action in the new project framework, add your action definition as a *-hsmeta.json file in the /src/app/workflow-actions/ directory of your HubSpot developer project.
For instance, you could create a “Create Asana Task” action that automatically generates a new task when a contact hits a certain lifecycle stage—no manual updates or extra integrations required.
Key Attributes
These are the required fields you would need to configure for your custom action:
uid: The unique identifier for the action within your app/project. Choose something descriptive; this won’t be customer-facing, but it must remain unique.type:For workflow actions, always set this to “workflow-action”.actionUrl: This is the HTTPS endpoint your app exposes for HubSpot toPOSTworkflow execution requests. This is your integration point - your service receives all the data needed for the action and should return results/errors for HubSpot.supportedClients:Usually, this array is[{ "client": "WORKFLOWS" }], indicating that this action appears in the HubSpot workflow editor for users to select.inputFields:Defines which fields end users will fill out when configuring the action in a workflow. You can specify types (string, enumeration, textarea, etc.), labels, requirements, and even option lists.
labels.<locale>: Provides user-facing names, descriptions, and helper text for each locale you wish to support. You must include at least an English (“en”) label and its definition.-
labels.<locale>.actionName:This is the action’s name shown in the “Choose an Action” panel in the editor.labels.<locale>.appDisplayName:This refers to the name of the section within the "Choose an action" panel where all actions associated with the app are displayed. If appDisplayName is specified for multiple actions, the first instance encountered will be utilized.
-
objectTypes:An array of CRM object types that this action works with (e.g.,[“CONTACT”]). If you omit this, it’s usable with any object type.
Note: For custom workflow actions within an app, authentication is handled through your app’s OAuth or static token configuration in the app-hsmeta.json file. When HubSpot executes your custom workflow action, it sends a HTTPS request to the configured actionURL with authentication details included in the request upload.
Best Practices for Custom Workflow Actions
- Expose only necessary input fields: Avoid overwhelming users by restricting input fields to only those absolutely required for your action. The simpler the configuration, the less chance of user error.
- Leverage inputFieldDependencies for dynamic forms: Take advantage of the ability to show/hide and dynamically update form fields based on the values of other fields. This creates “smart” forms, improving user experience. For example, only show extra fields if a checkbox is enabled.
- Add custom execution messages with rules: This configuration controls the message shown on the workflow's history page after the action executes. The rule matches when the execution output corresponds to a specific value, enabling you to define fallback errors for critical error scenarios.
- Test and publish your custom action: You can test your custom action before publishing it (they are unpublished by default). One method is to use a tool like webhook.site. By configuring your action to point to webhook.site, you can execute it and retrieve the payload. This allows you to inspect the data and define the expected response. Additionally, you can test the action directly within your developer portal UI by adding it to a workflow using the workflows tool. The following is an example of testing a custom workflow action with webhook.site:
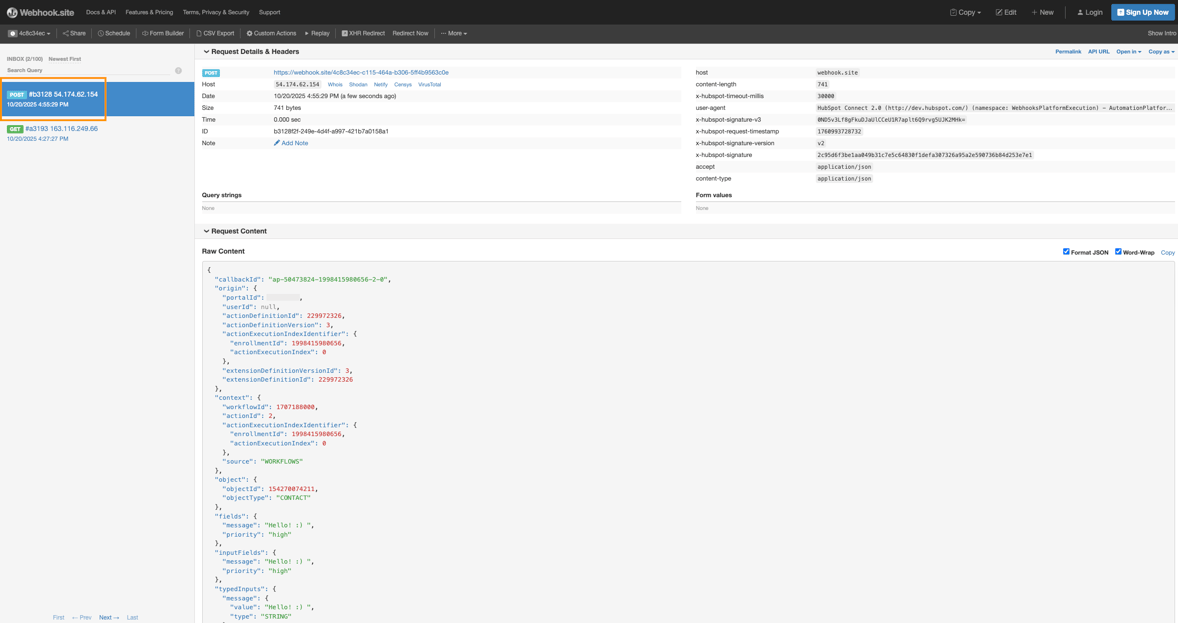
In the example above, we’re triggering a HubSpot workflow for contacts by making a POST request to the actionURL configured in the custom workflow action's config file in our app. This URL, referenced in the workflow tool UI, returns the message and priority data. This allows us to debug our app without first implementing a real backend.
Tip: Before testing a workflow, ensure the following:
- Your app, which contains the custom workflow action you intend to test, is uploaded and deployed.
- The app is also installed in your dev test account.
This step is crucial and must be completed before testing, as it allows you to access the custom action within the workflow tools UI of the account where you created the test workflow.

Keep Data in Sync with Webhooks
Webhooks let your app respond instantly when something changes in HubSpot - like when a contact updates, a deal closes, or a ticket is created. Instead of waiting for a sync or poll, HubSpot sends a notification to your app in real time, so your external systems are always up to date.
In the new framework, webhooks are defined in a simple configuration file under /src/app/webhooks/, such as contact-changes-hsmeta.json. You can configure your app to be instantly notified the moment a new deal hits your CRM. But, as HubSpot’s developer platform evolves, you now have several ways to receive these events.
Which Webhook Approach is Right for Your App?
Classic Webhooks (Traditional Push Model via v3 or Project Config)

HubSpot sends (POSTs) notifications directly to your endpoint as soon as an event happens. You must handle receiving, validating, and processing these events. If your endpoint fails to respond successfully, HubSpot will retry up to 10 times over 24 hours.
Setup:
- For legacy apps (private/public), configure via the developer portal UI or v3 API endpoints.
- For developer projects (new framework), define your webhook with a webhooks-hsmeta.json file under
/src/app/webhooksIn your project directory, subscribe to relevant events, which are easy to review and deploy.
Best for:
Real-time syncs, such as instantly updating your external CRM or messaging team chat whenever a contact or deal changes in HubSpot, are available.
Use case:
“Ping my app immediately when a deal closes so I can notify my team and update my project board.”
V4 Webhooks Journal API (Pull Model/Beta)

Instead of receiving pushes, your app regularly polls the HubSpot event journal to fetch the latest changes on your schedule. You can page through “journal files” using offsets and retrieve historical changes for up to 3 days. No targetUrl is required or utilized - HubSpot will not push data to you. Snapshots of object states can be triggered and retrieved on demand.
Setup:
- Managed entirely via API endpoints (/webhooks/v4/subscriptions) because they are install-specific (per account/portal, not app distributed).
- Note: This is because v4 Webhooks are not available via the project
*-hsmeta.jsonfile, and is not compatible with the Developer Platform feature component functionality for webhooks.
- Note: This is because v4 Webhooks are not available via the project
Best for:
The V4 Webhooks API is best for high-scale, enterprise, or analytics-driven integrations needing reliable, ordered, and resumable event processing. Scenarios where your system’s availability to receive HTTP requests cannot be guaranteed, or you want more control over ingestion and processing rates.
Use case:
“My app needs to ingest tens of thousands of contact updates nightly, processing them in order, even if we went offline temporarily.”
Generic Webhooks (Unified Approach/Beta)
Subscribe in bulk to a wide range of object events, including CRM, commerce, and even custom objects - all from the app or developer portal settings. The payload format is unified, making it easy to code and scale.
Setup:
- For legacy apps (public), toggle “use expanded object support” in your webhook settings UI, then choose the objects and event types you care about.
Best for:
Generic webhooks are best for integrations that need visibility across multiple types of data (think: contacts, companies, orders, invoices, feedback, and more) in one place.
Use case:
“Monitor every key change in our sales funnel across deals, line items, and subscriptions - with a single integration endpoint.”
Bottom line…
- If you want instant notifications, start with v3/project config or generic webhooks.
- If you need scale, reliability, and replay, explore the v4 Webhooks Journal API.
- Building for lots of object types? Try generic webhooks for a future-proof, unified approach.
Best Practices for Reliable Webhooks
- Process webhooks asynchronously for reliability and scalability: When your system receives a webhook payload from HubSpot, immediately enqueue or store the payload (e.g., in a message queue, database, or buffer) for later background processing. You’ll want to confirm receipt of the payload quickly, returning a
2XXresponse. However, do not process the payload while HubSpot’s request is still open. This keeps response times low, prevents HubSpot timeouts, and ensures you don’t use up HubSpot webhook delivery concurrency limits.
Tip: Fast acknowledgment allows HubSpot to free up the webhook slot for your endpoint, avoids potential backlogs, and maximizes throughput, especially during high traffic periods.
- Handle errors and retries thoughtfully: If you can’t receive, parse, or enqueue a payload, return an appropriate
4XXor5XXstatus. HubSpot will NOT retry except for rate limiting, returning a4XXfor a bad request, authentication, etc. Additionally, HubSpot will retry with exponential backoff for up to 3 days, returning a5XXfor a temporary/transient/server error. For rate limit errors (429), include a Retry-After header - HubSpot will respect it and retry accordingly.
Tip: Always log errors with detailed information such as a timestamp, payload sample, error message, and a correlated ID if possible, for effective debugging and monitoring.
- Secure your webhook endpoints: Always use HTTPS for your webhook endpoint URLs. Validate all incoming requests - check HubSpot’s X-HubSpot-Signature header (
HMAC SHA-256) to verify the payload’s authenticity and prevent spoofing. - Monitor and audit: Make sure to instrument your endpoint to monitor volume, failure rates, and processing times. Alert if you see high retry rates or persistent failures - this could indicate parsing, validation, authentication, or performance issues. You can also track message IDs and journal offsets (for v4) to guarantee idempotent processing and avoid duplicate work.
There are several places you can monitor and audit webhooks, such as the Webhooks Log Tab of your project (see screenshot below). You can filter by subscription, type, status, timeframe, and search by batch/log ID. You can also refer to the Monitoring page by navigating to Development > Monitoring > Logs > Webhooks, where you can identify successful/unsuccessful API requests, response codes, timeouts, connection failures, and individual request details with metadata. Additionally, you can refer to your app settings or test your webhook endpoint directly from there to verify your configuration.
Tip: You can review logs and monitor your webhooks within your project if you leverage the latest version of the Developer Platform within your developer portal by clicking on the project.
.png?width=1300&height=748&name=Copy%20of%20In-Post%20Blog%20Graphics_2025%20(1).png)
Why This Matters for Developers
HubSpot's new Developer Platform empowers developers to enhance workflow automation and data synchronization significantly.
- Custom Workflow Actions: Inject unique business logic, integrate third-party tools, and trigger external automations directly within HubSpot workflows.
- Webhooks: Achieve real-time data consistency and seamless communication by instantly responding to CRM events.
By leveraging webhooks and custom workflow actions, you can create more powerful, connected, and scalable integrations with HubSpot. Start building your new app today.