
This article was authored by a member of the HubSpot developer community, Erin Wiggers.
This guide is designed for HubSpot developers of all proficiency levels. It covers everything from basic solutions architecture to comprehensive full stack development and everything in between!
In this guide, I'll demonstrate how to add a fantastic feature to your HubSpot portal - bookmarks! By following the steps outlined here, you'll enable your users to bookmark your content in a user-friendly way that's also easy to monitor and report.
Why You Should Try It
I'll guide you on how to let users bookmark your content in HubSpot in a way that's easy to track and report. Besides being relatively easy to set up and fun for tech-savvy developers like me, it's also a valuable functionality to add to any blog or resource center.
Increase User Engagement
Enable users to quickly revisit content without having to navigate through the website, saving time and making it more convenient to return to a favorite page.
Improve the User Experience
Empower users to create a personalized collection of links to pages that intrigue them and keep track of their favorite content.
Encourage Repeat Visits
If users can easily find and access content they enjoy, they may be more likely to return to the site and continue engaging with it over time, leading to higher retention rates and more repeat visits to your site over time.
What We’re Building
In this post, I'll guide you through the process of setting up a bookmarking system for your HubSpot blog using a membership portal and custom object. One of the best things about this feature is that it's not just fun for us tech-savvy developers (although we do love it!).
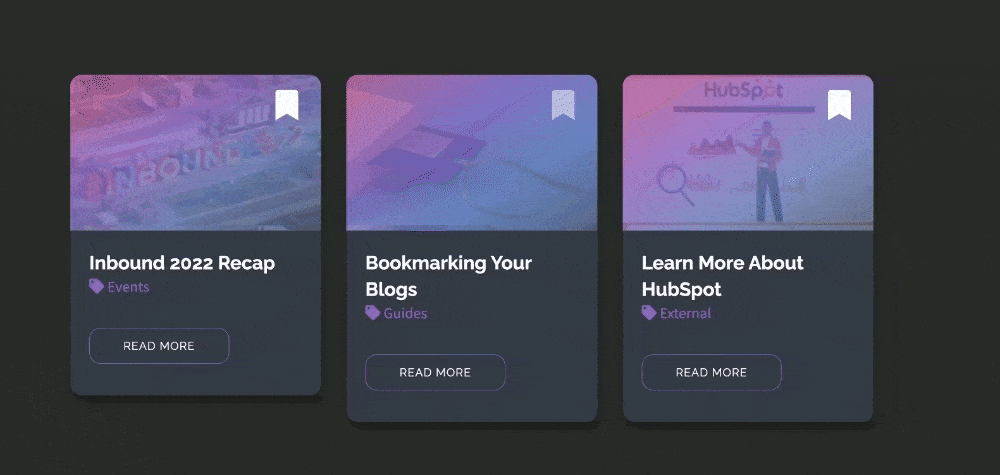
Here's a glimpse of what we’ll be building:
- Resource Blog Listing
- Dynamic Blog Listing
The resource blog listing displays all of the blogs, allowing users to bookmark specific blogs and see which blogs have been bookmarked. The dynamic blog listing displays only posts that the user has bookmarked.
By the end of this article, you'll have a clear understanding of how to implement this bookmark feature on your own website. If you can only get through some parts now, keep practicing and come back when you’re ready.
I'll provide plenty of code snippets to guide you in the right direction. And if you need more help, don't hesitate to reach out to the developer community or consult a partner for expert advice.
Resources Blog Listing
First, we need some content to bookmark. In this case, I’m going to use a blog, but please note that this could also work with some slight modification for a HubDB based resource center.
When it comes to HubSpot blogs, there are two primary components: the blog listing pages and the individual blog posts. But that's not all - the blog listing template actually serves multiple purposes! While it's primarily used to display your individual blog posts, it also plays a key role in rendering your author and tag listing pages.
But first, you’ll need to know how to create a blog, and then set one up in your desired portal on the appropriate domain with a few published articles for testing purposes.
Listing Template
With just one template, you can create a cohesive look and feel across all of your blog-related pages. Whether you're showcasing a particular author's work or highlighting content related to a specific topic or tag, the blog listing template can help you do it all.
You can learn more about blog templates here, and find some specific code examples in the boilerplate templates.
Custom Module
The custom module contained within the template is arguably the most important part of our build for several reasons.
First, this is what the marketer will see when they are using the template. Furthermore, the most functionally significant parts of our code are contained here.
Creating custom modules is one of my favorite things to do in HubSpot.
Learn how to configure a module
Dynamic Bookmarked Blog Listing
Once users can bookmark content, we’ll want to give them quick and easy access to the content they have saved. We can do this by creating a dynamic page that uses a custom module to bring in bookmark data based on the contact viewing the page.
Bookmark Custom Object
As always in data-driven design, step one of this process is to set up the data infrastructure that will enable us to build and test the rest of our assets as we go. In this case, it’s our custom CRM object for Bookmarks.
Private App
Private apps allow you to use HubSpot's APIs to access specific data from your HubSpot account. You can authorize what each private app can request or change in your account, which will generate an access token that's unique to your app. We are going to use this app to create the new object schema.
Custom Object
When it comes to your business needs, sometimes the standard CRM objects just don't cut it. That's where custom objects come in - they're an excellent option if you need to manage a specific relationship or process that goes beyond what the standard objects can handle. In fact, custom objects can be a powerful tool for streamlining your operations and improving efficiency.
Users with super admin permissions in Enterprise accounts can define a custom object in the custom object settings or via API.
Once we have our custom object defined, you can create properties, manage pipelines, and customize the associations between these objects and other objects. You can also use custom objects in other HubSpot tools, such as marketing emails, workflows, and reports.
Later in this guide, we will create a frontend trigger to initiate our bookmarking function. Once the user clicks on our bookmark trigger, we'll create a custom object that's associated with their contact profile. This object will capture key information about the content they interacted with, including the blog ID and title.
Membership Page
Requiring membership on your website to access valuable features like bookmarking content can have several benefits for your business. While it’s not necessary for this particular bit of functionality, there are a few key advantages to consider.
By requiring users to sign up for membership to access valuable features, you can incentivize them to engage more deeply with your website. This can lead to increased time on site, more frequent visits, and ultimately, greater loyalty to your brand.
This also allows you to collect valuable data about your users, such as their email address and demographic information. This data can help you personalize your content, create targeted marketing campaigns, and better understand your audience.
Bookmarks Listing Module
Like blogs, dynamic pages consist of a listing page view and a unique details page for each record. The listing page displays a list of all records in the object, and the details pages display information about each record based on the record's property values. In this case we will be using our Bookmark custom object to pull in the data that we need.
For custom object dynamic pages, you'll need a CMS Hub Enterprise subscription, or a Marketing Hub Enterprise account with CMS Hub Professional.
For standard CRM object dynamic pages, you'll need a CMS Hub Professional or Enterprise account.
Dynamic pages with CRM objects
Functions
This will be the most advanced part of our guide and will include a combination of JavaScript, jQuery, and Node.js to achieve our bookmarking functionality.
Serverless
We are going to be making changes to the backend of a HubSpot portal, which requires some added security measures. APIs requiring authentication like HubSpot’s are not safe for the front-end of a website, as your credentials would be exposed. Serverless functions provide a way to write server-side code that interacts with HubSpot and third-party services through API, acting as an intermediary and enabling you to keep credentials secret.
There’s no need here to spin up new servers, which means that serverless functions require less overhead and as a result they are easier to scale as a business grows.
Overview of Serverless Functions
Portal Limits
Serverless functions are intended to be fast and have a narrow focus which enables them to be perfect companions to the front-end of websites and apps. In order to enable a quick call and response, developers must keep in mind specific limitations to maintain performance.
HubSpot serverless functions are limited to:
- 50 secrets per account.
- 128MB of memory.
- no more than 100 endpoints per HubSpot account.
- the contentType application/json when calling a function.
- 6MB per invocation payload, which you might encounter when trying to upload a file with a serverless function, for example.
- 4KB for the amount of data that can be logged. When hitting this limit, it's recommended to log after individual actions, rather than the final output.
Execution limits
- Each function has a maximum of 10 seconds of execution time
- Each account is limited to 600 total execution seconds per minute.
This means either of these scenarios can happen within 1 minute:
- Up to 60 function executions that take 10 seconds each to complete.
- Up to 6,000 function executions that take 100 milliseconds to complete.
- Functions that exceed those limits will throw an error. Execution count and time limits will return a 429 response. The execution time of each function is included in the serverless function logs.
JavaScript
HubSpot APIs
All HubSpot APIs are built using REST conventions and designed to have a predictable URL structure. They use many standard HTTP features, including methods (POST, GET, PUT, DELETE) and error response codes. All HubSpot API calls are made under https://api.hubapi.com and all responses return standard JSON.
One of the best features of the HubSpot API documentation is that it simplifies the testing process and reduces the time and effort required to test APIs. By clicking on the dropdown in the sidebar, developers can quickly and easily test API endpoints, perform load testing, and simulate different scenarios without having to write any scripts or code.
Getting started with the HubSpot API
For our purposes, we will use Node.js and Axios to call the API and handle the JSON data that is returned.
How To Build Custom Bookmarks
Now that we’ve covered the basics of what we are trying to accomplish, let’s dive into the nitty gritty with a step-by-step guide to creating this functionality.
1. Configuring the Bookmark Object
Every time a user clicks to add a bookmark, we will create a Bookmark object, give it a property that indicates the blog post ID of the selected bookmark, and associate it to the contact. First, we need to build out the backend assets that will make that possible.
Create a Private App to Access the HubSpot API
Go to Settings > Integrations > Private Apps
Click Create a private app

When creating a custom app for an API integration, it's important to only choose the scopes that you will use in the configuration for several reasons.
Give your app the following scopes:
-
crm.schemas.custom.read crm.schemas.custom.writecrm.objects.custom.readcrm.objects.custom.write
Scopes define the level of access your app has to the API. If you choose more scopes than your app actually needs, it could potentially expose sensitive data to your app that you didn't intend to have access to. Limiting the scopes to only what your app needs can reduce the risk of a data breach.
Furthermore, in limiting the scope you can ensure that your app only accesses the data that it requires. This can help to reduce the amount of data transfer and processing needed, leading to faster and more efficient app performance.
By choosing only the scopes that your app needs, you can make it easier for other developers to understand what your app is doing and what level of access it requires. This can be important for maintaining transparency and trust with users and other stakeholders.
Create a Custom Object
To create a custom object, you'll first need to define the object schema. The schema includes the object name, properties, and associations to other CRM objects. You can find the full schema request details in the Object schema tab at the top of this article. You can also view a sample request in the example walkthrough below.
To create the custom object schema, make a POST request to crm/v3/schemas. In the request body, include definitions for your object schema, including its name, properties, and associations.
When naming your custom object, keep the following in mind:
- Once you create an object, the object's name and label cannot be changed.
- The name can only contain letters, numbers, underscores, and hyphens.
- The first character of the name must be a letter.
- Long labels may be cut off in certain parts of the product.
These days it is very easy to do this in the UI (thank you Product Team!), so if this next section gets too technical, just skip down here to keep moving through this guide.
Using Postman
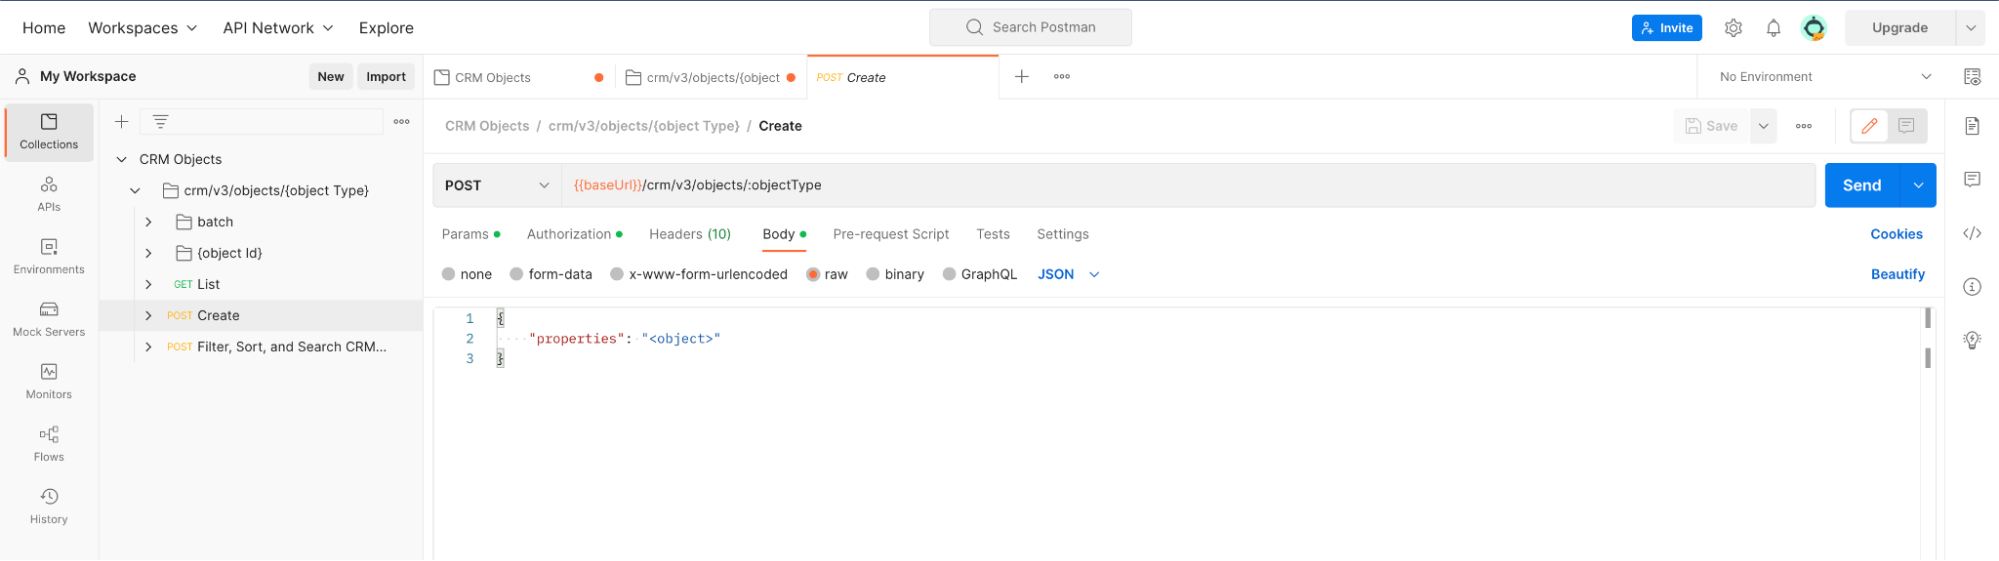
Postman is a popular API testing tool that simplifies the process of building, testing, and documenting APIs. It offers a user-friendly interface that allows developers to send HTTP requests, inspect responses, and test API endpoints without writing complex scripts or code.
One of the biggest advantages of using Postman is that it simplifies the testing process and reduces the time and effort required to test APIs. With Postman, developers can quickly and easily test API endpoints, perform load testing, and simulate different scenarios without having to write complex scripts or code.
Learn more about Postman for working with APIs. You can access the HubSpot Postman collection from any API documentation page via the button at the top.
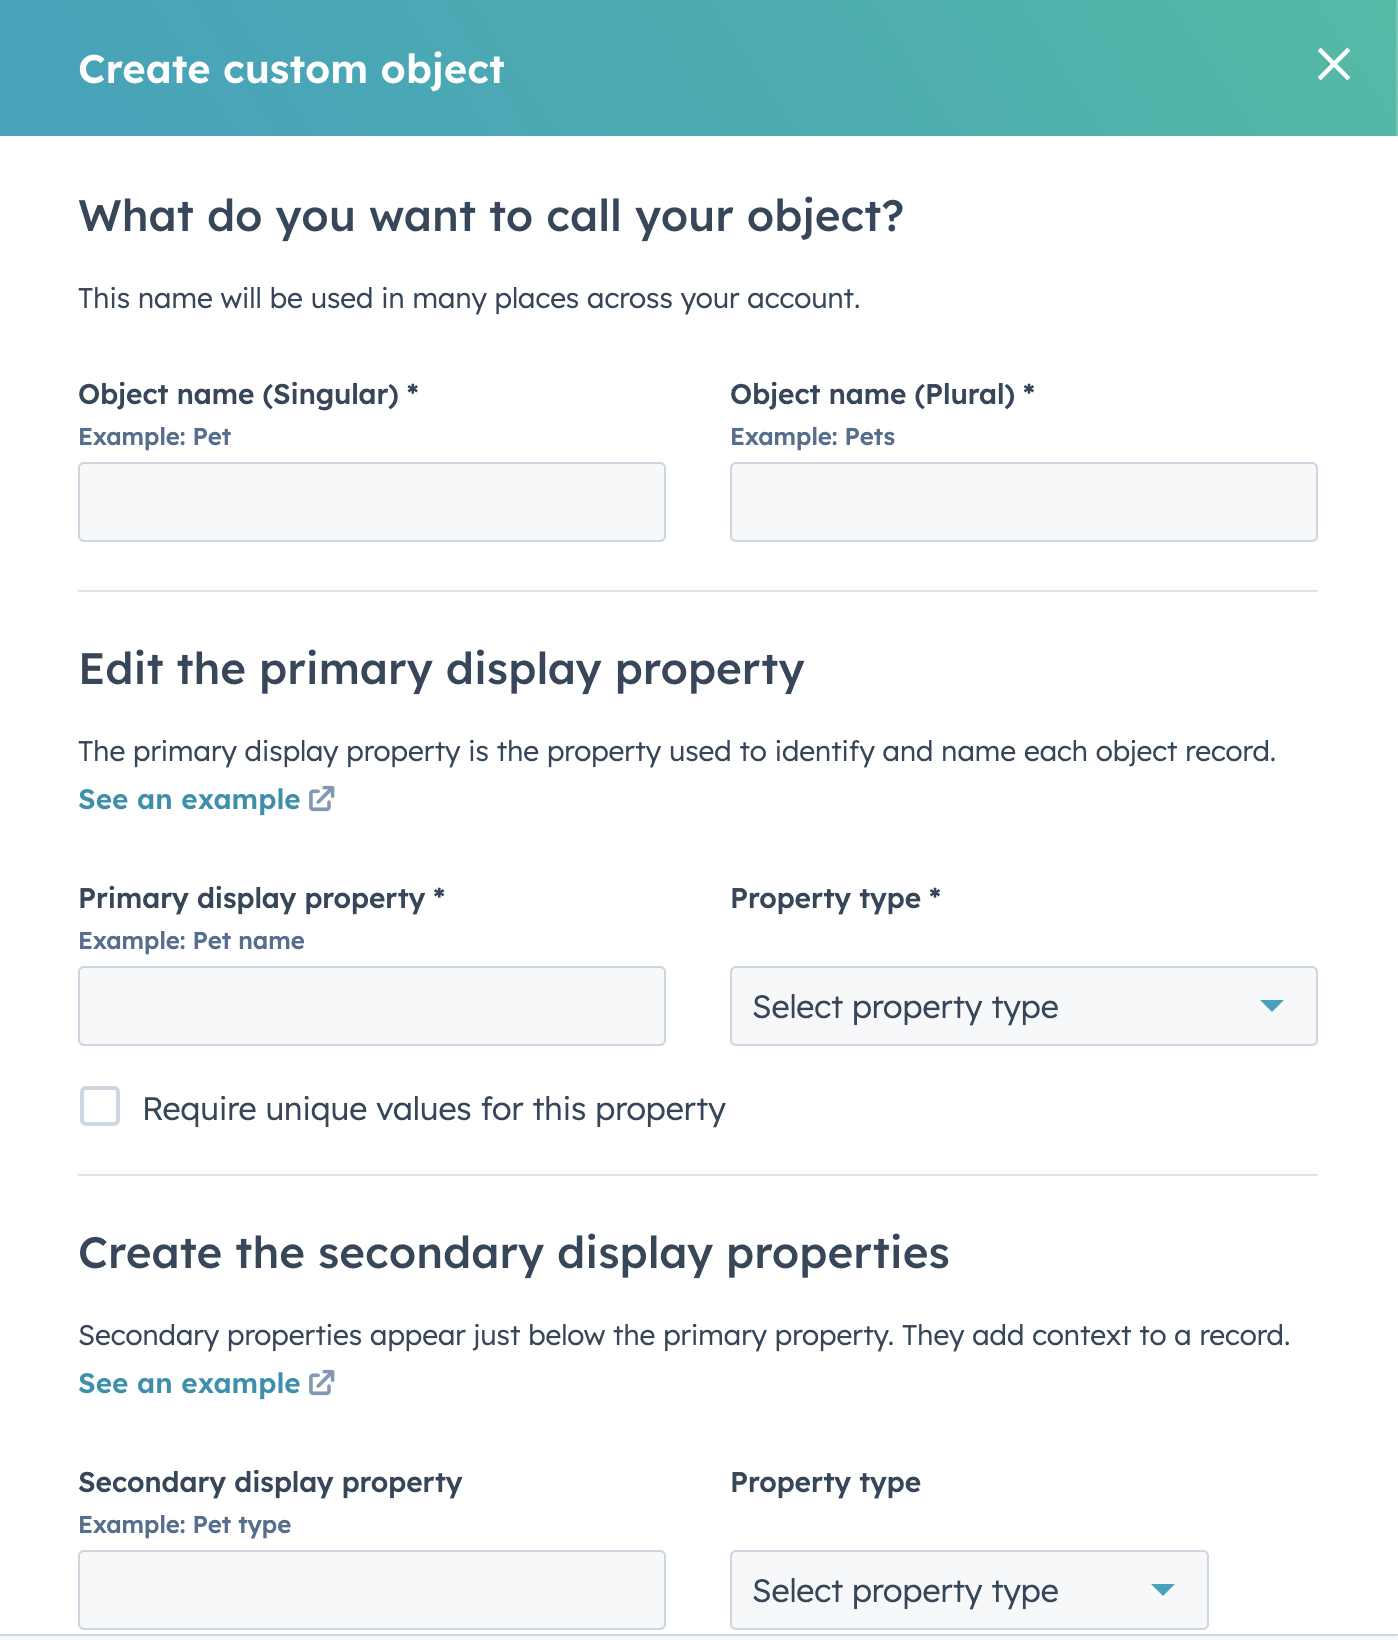
Using the UI
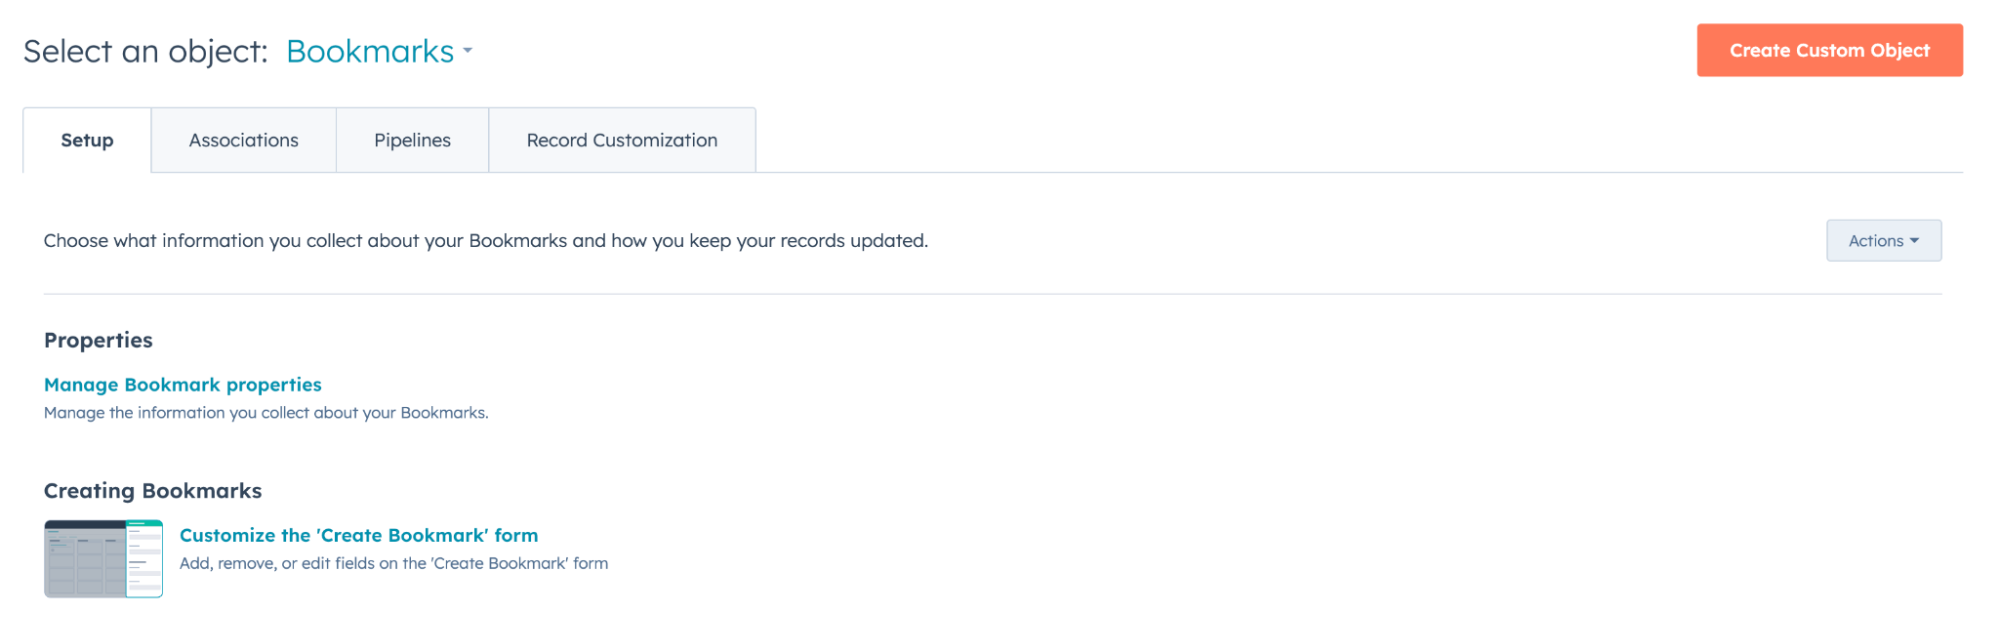
Thanks to the magical people on the HubSpot Product team, creating custom objects can actually be much easier! You can now build and deploy your custom objects directly from your portal.
Navigate to Settings > Objects > Custom Objects and click Create Custom Object and fill in the appropriate fields.
Viewing the Object in the UI
Navigate to your new custom object by clicking on Contacts in the top menu and then selecting the label you created from the Contacts > Custom Objects dropdown menu. Note: If your portal only has one custom object, this will be accessible from the contacts menu and choosing your custom object's name.
Create an association to contacts
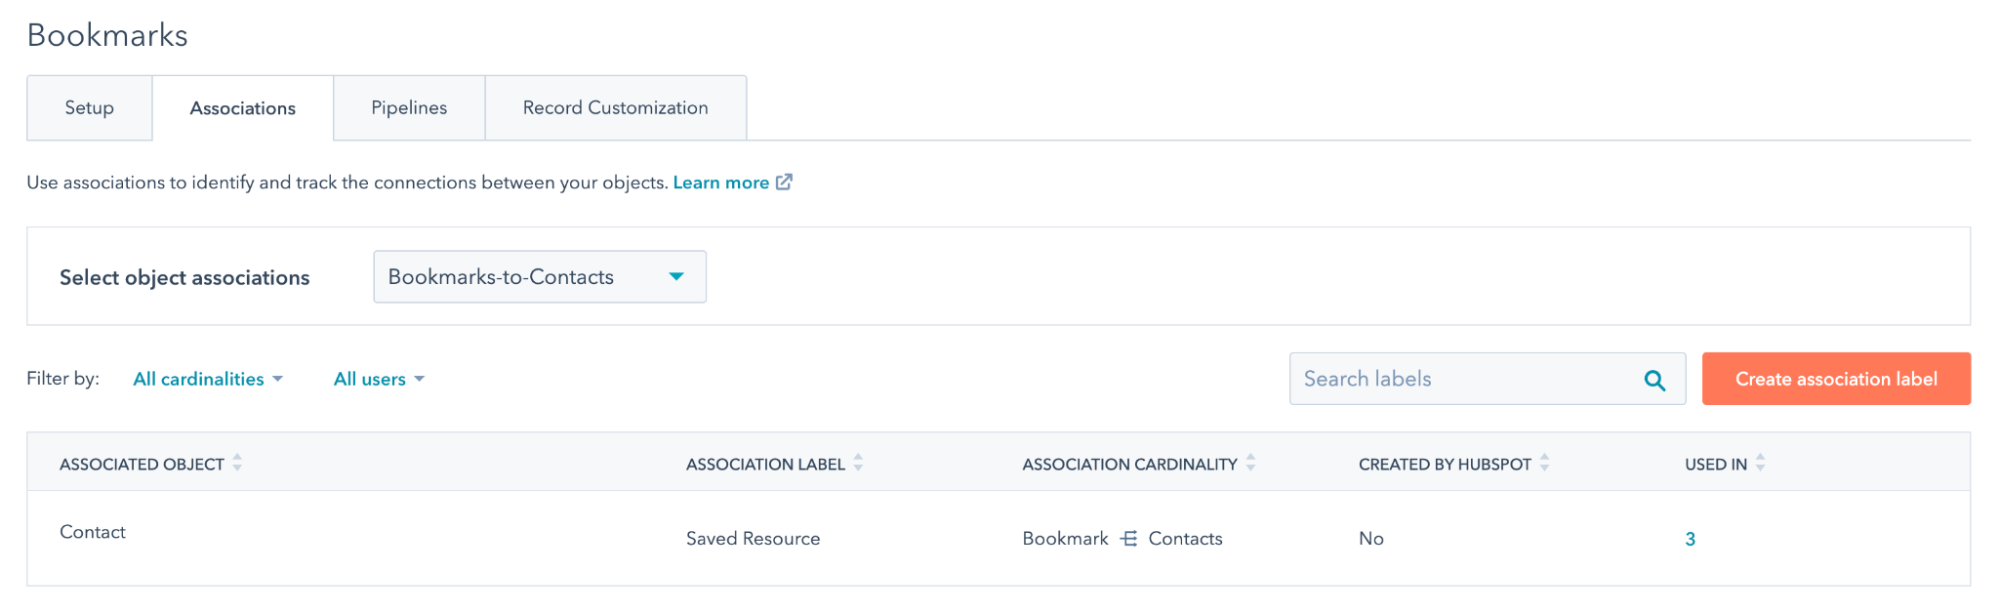
Associations are a crucial part of understanding the relationships between objects and activities in the HubSpot CRM. With the associations endpoints, you can easily create, retrieve, or remove associations in bulk, streamlining your workflows and improving your efficiency.
It's important to note that associations are defined by both object and direction. This means that association types are unidirectional and require different definitions depending on the starting object type. This might sound a bit confusing at first, and cause some issues when hitting the right API endpoint. But once you get the hang of it, it can be a powerful tool for managing your data and processes in HubSpot.
Create and use association labels.
Modify associations cards
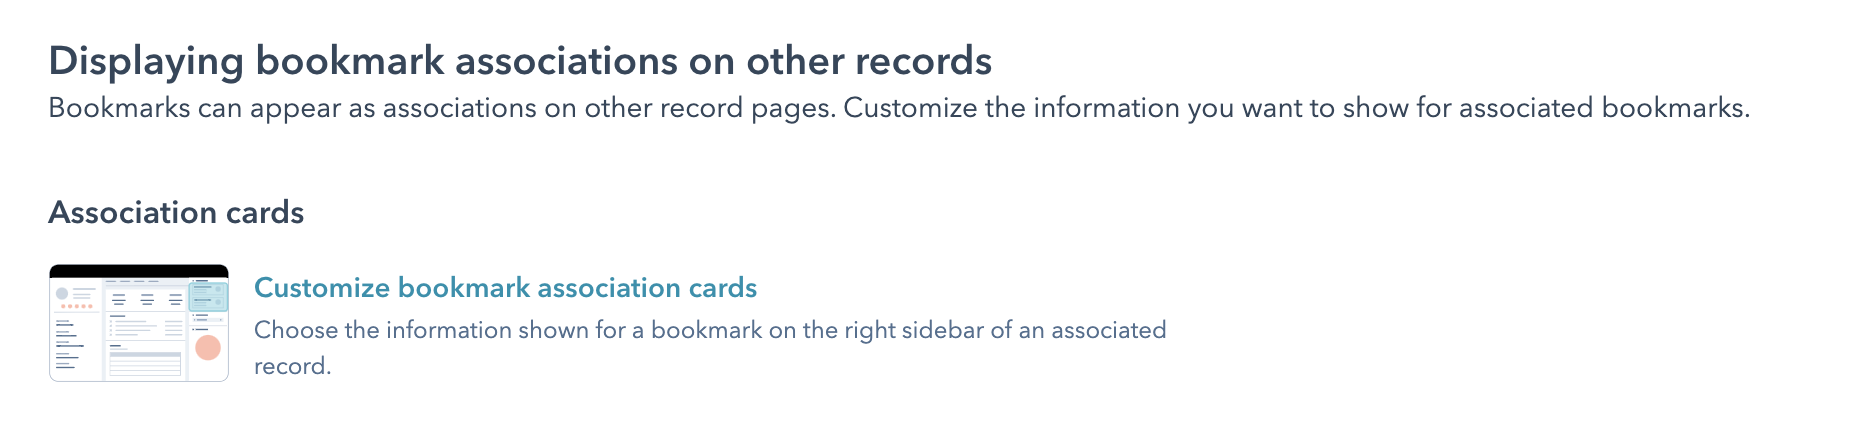
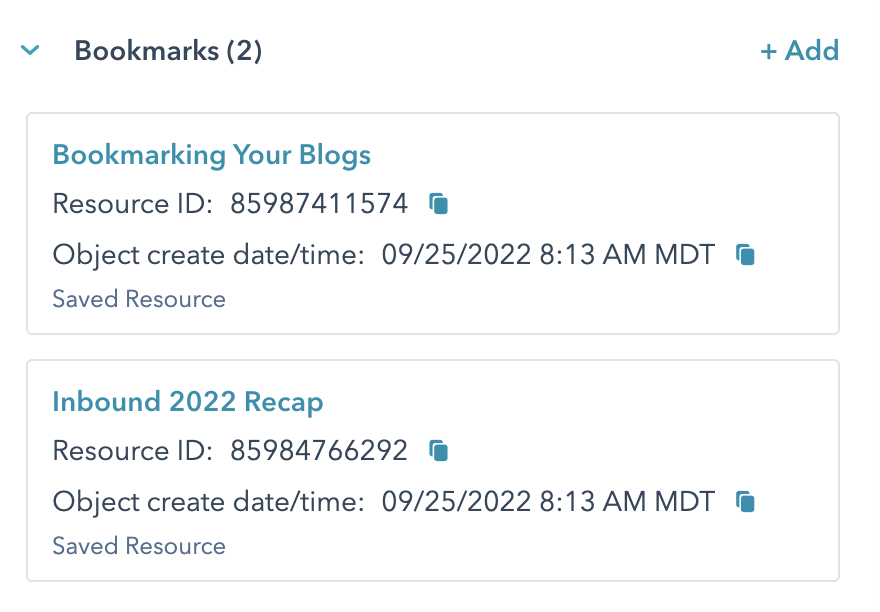
In HubSpot, when a record is associated with another record, the association is displayed in the right sidebar of the record with certain properties. You can customize the association cards of each object to include specific properties, which will be shown across all associated records.
Select properties to show on record association cards.
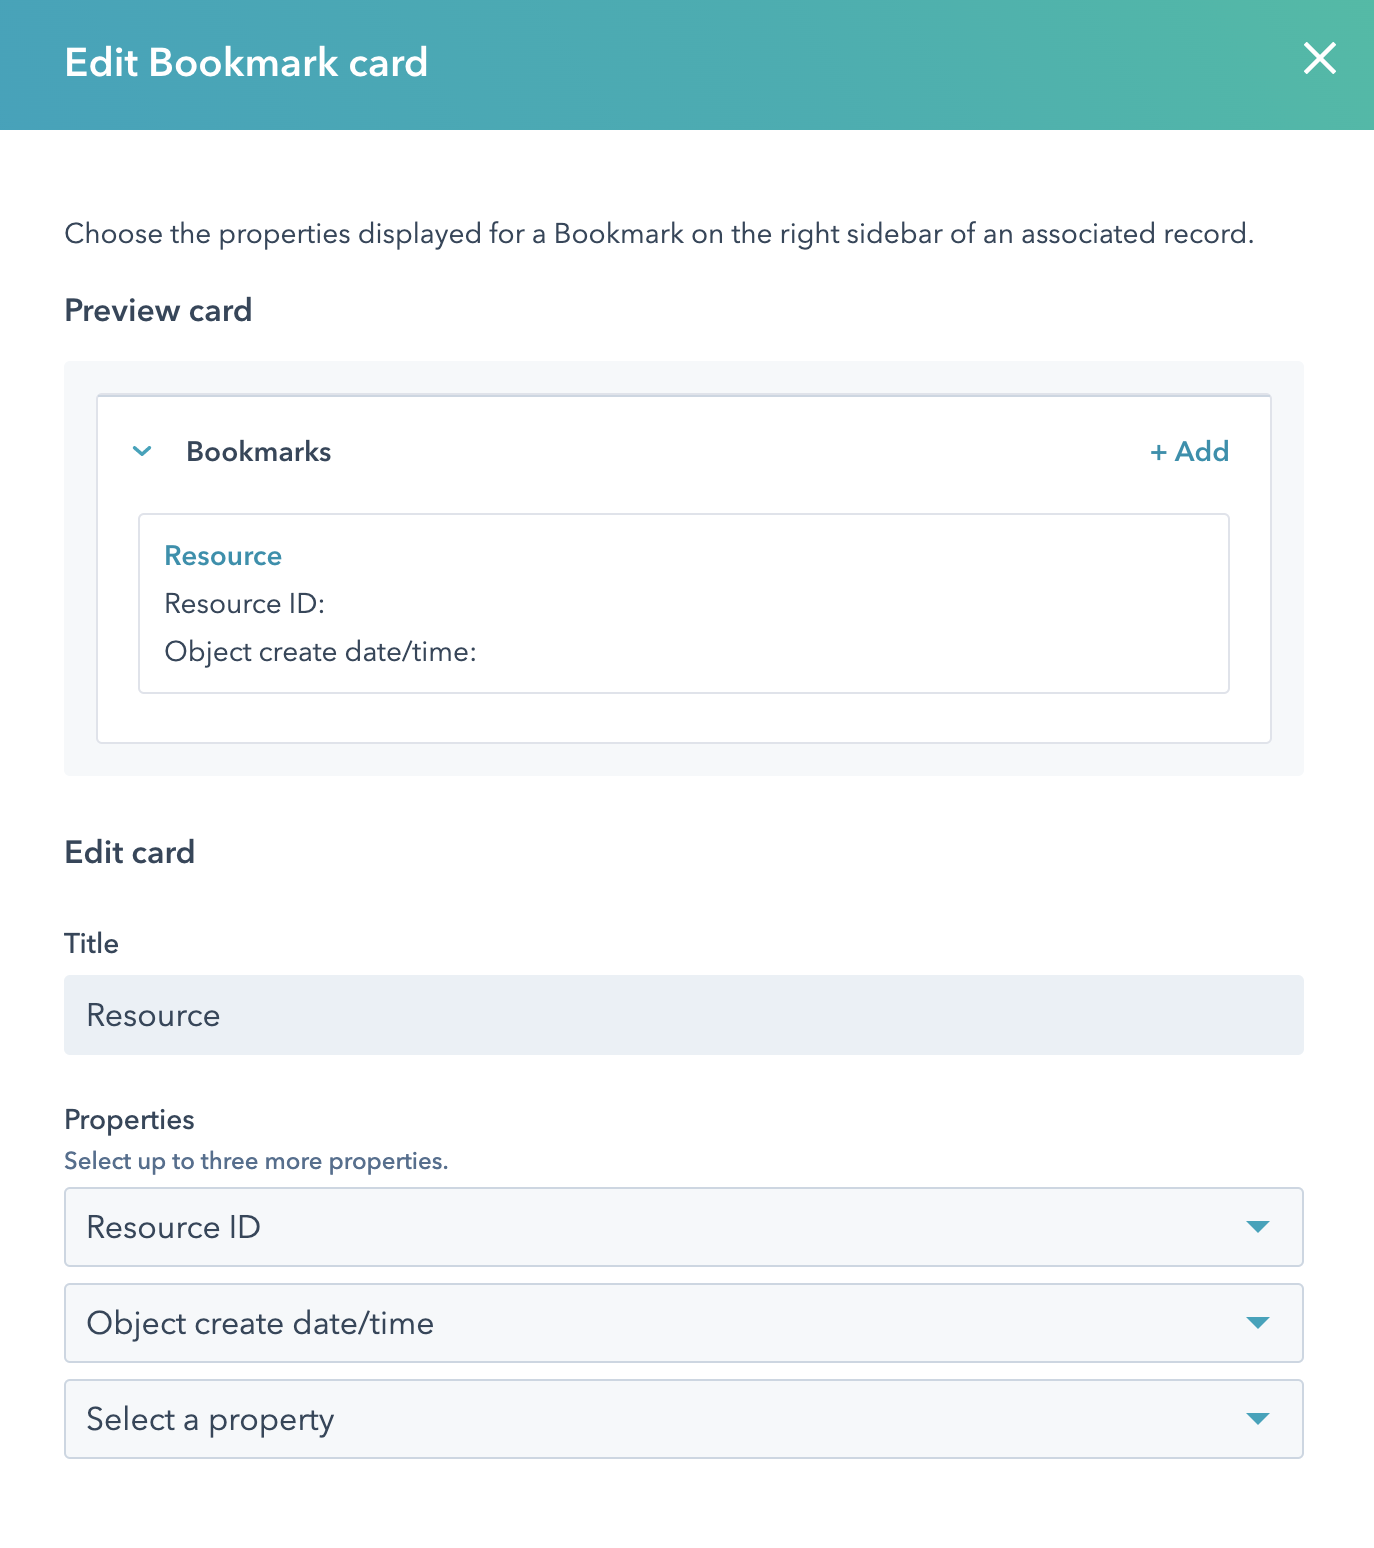
The result is a much more useful insight into the associated object.
2. Building a Resources Blog Listing
Blog templates now support drag-and-drop areas (thank you Product Team)!
Drag and drop areas enable you to create areas of pages and global partials where content creators can place modules, change layout, and add styling within the content editor. Using drag and drop areas, you can create fewer templates, as content creators are able to create layouts on their own.
Template Setup
Let’s take a look at a standard drag-and-drop template for a blog listing. This will typically go in the templates folder of your theme file structure.
As you can see, this template extends the base template for our theme, and contains the modules that we want to include on the page wrapped in a DND_AREA tag.
When a content creator uses a template with drag and drop areas to create a page, they will initially see the page populated with predefined modules arranged according to the layout you, the developer, have defined.
Using drag and drop areas, the content creator can then build the page, including:
- Adding modules, sections, rows, and columns.
- Resizing modules and updating their content and styling, such as adjusting alignment and adding backgrounds.
This gives content creators enough flexibility to make simple page changes without needing a developer for every item that comes up.
Building the Resources Module
Basic Setup
Let’s now focus on the primary module within our template which will render our listing content. First, we’ll need to set up the module with a few theme fields to make it marketer-friendly.
Module
By adding a field for selecting blog in the module gives the marketer the ability to use this module across multiple blog instances in the same portal.

You may also want to add options for post limit, pagination, or even style variations. This is where your creativity and long-term, scalable thinking comes in!
Recent Posts Function
Please note: this function has a limit of 200 posts and 10 calls per page.
The blog_recent_posts function returns a sequence of blog post objects for the specified blog, sorted by most recent first. This sequence of posts can be saved into a variable and iterated through with a for loop, creating a custom post listing of your most popular posts.
The function takes two parameters. The first parameter specifies which blog to collect popular posts from. The value should be "default" or the blog ID of a particular blog (available in the URL of the Blog dashboard). The second parameter specifies how many posts are retrieved.
The first line of the example below demonstrates how the function returns a sequence. The sequence is saved in a variable and looped through. Any blog post variables should use the name of the individual loop item rather than content. In the example, rec_post.name is used. This technique can be used, not only on blog templates, but also regular pages.
Blog Listing HTML
With the blog_listing template type you can make the template available for selection under blog settings specifically for the listing view and content creators can also edit the listing page within the page editor. You can also include drag and drop areas in the template so that modules can be added and removed in the page editor.
The listing of posts is generated by a for loop that iterates through your blog posts. contents is a predefined sequence of content that contains all the posts contained in that blog.
Name Variable
The name variable represents a unique value for the instance of that module which is useful when you want to target a single module on a page where that module is repeated.
For Loop
For loops can be used in HubL to iterate through sequences of objects. They will most commonly be used with rendering blog content in a listing format, but they can also be used to sort through other sequence variables.
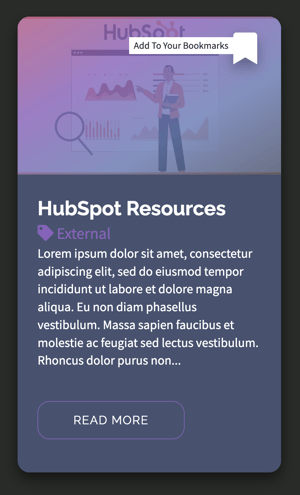
Resource Card
In UI/UX design, a card is an element that usually consists of a combination of image, text, and link/button, all bundled into one interactive component. The purpose of a card is to provide a preview or digest of the content (like a blog post), while also serving as a doorway to the full content.
Because this is a fairly standard UI component, you will very likely find yourself using a similar HTML structure for multiple instances and variations. In that case, you’ll want to be strategic about how you set up that code structure.
The DRY principle states that a piece of code should be written once and reused wherever necessary, rather than being duplicated throughout the codebase. This reduces redundancy, minimizes the chance of errors, and makes the code more maintainable.
To follow the DRY principle (Don't Repeat Yourself), look for opportunities to modularize code and abstract away common functionality. This could involve creating reusable functions, classes, or modules that can be used in multiple parts of the codebase.
One of the best ways to modularize your code in HubSpot is by using HubL macros. HubL macros allow you to print multiple statements with a dynamic value. For example, if there is a block of code that you find yourself writing over and over again, a macro may be a good solution, because it will print the code block while swapping out certain arguments that you pass it.
The macro is defined, named, and given arguments within a HubL statement. The macro is then called in a statement that passes its dynamic values, which prints the final code block with the dynamic arguments.
Post Macro
We can make a modular card component using HubL and HTML by passing the resource object to a formatter macro. You can either include this macro at the top of your module HTML file or place it in a separate macros.html file that you then import at the top of your module or template.
If you are only utilizing a few macros, then including them in the HTML file itself is the easiest option. However, if you are using more than a handful or so and your module code starts to get too long to be manageable, then switching to an include statement is a great way to simplify your setup.
Resource Object
The resource object refers to the array of data returned from a HubL function like crm_objects() or recent_blog_posts(). This should include the variables for the post image, title, content, and link.
Bookmark Tag
If the user is logged in, they will see the options to add or remove bookmarks on hover. Otherwise, they will be prompted to register for an account.
Optimized Images
Alot of developers struggle with responsive design at first. One consistent issue I’ve seen is with making varying sized images responsive without any distortion.
HTML
Alt Tag
This is crucial for accessibility purposes! Always include this tag and the most relevant text possible.
Width & Height
Images that do not have a set width and height will cause Cumulative Layout Shift errors.
CSS
The aspect ratio is the key here! That’s what makes it look the same across screen sizes. The next big piece is the object-fit property which controls the image similar to the background-size property.
This should leave us with our cards now looking like the image below:
3. Building the Dynamic Listing Page
The dynamic listing page for Bookmarks is where users will be able to view all of their bookmarks at once, giving them quick access to all their favorite content.
Dynamic pages are CMS pages that get their content from a structured data source, such as HubDB or CRM objects. Based on how you configure your dynamic page template or modules, HubSpot will then use that data to automatically create and populate a set of pages. This includes a listing page that displays summaries of the data, and individual pages for each data source entry (HubDB row or CRM object record).
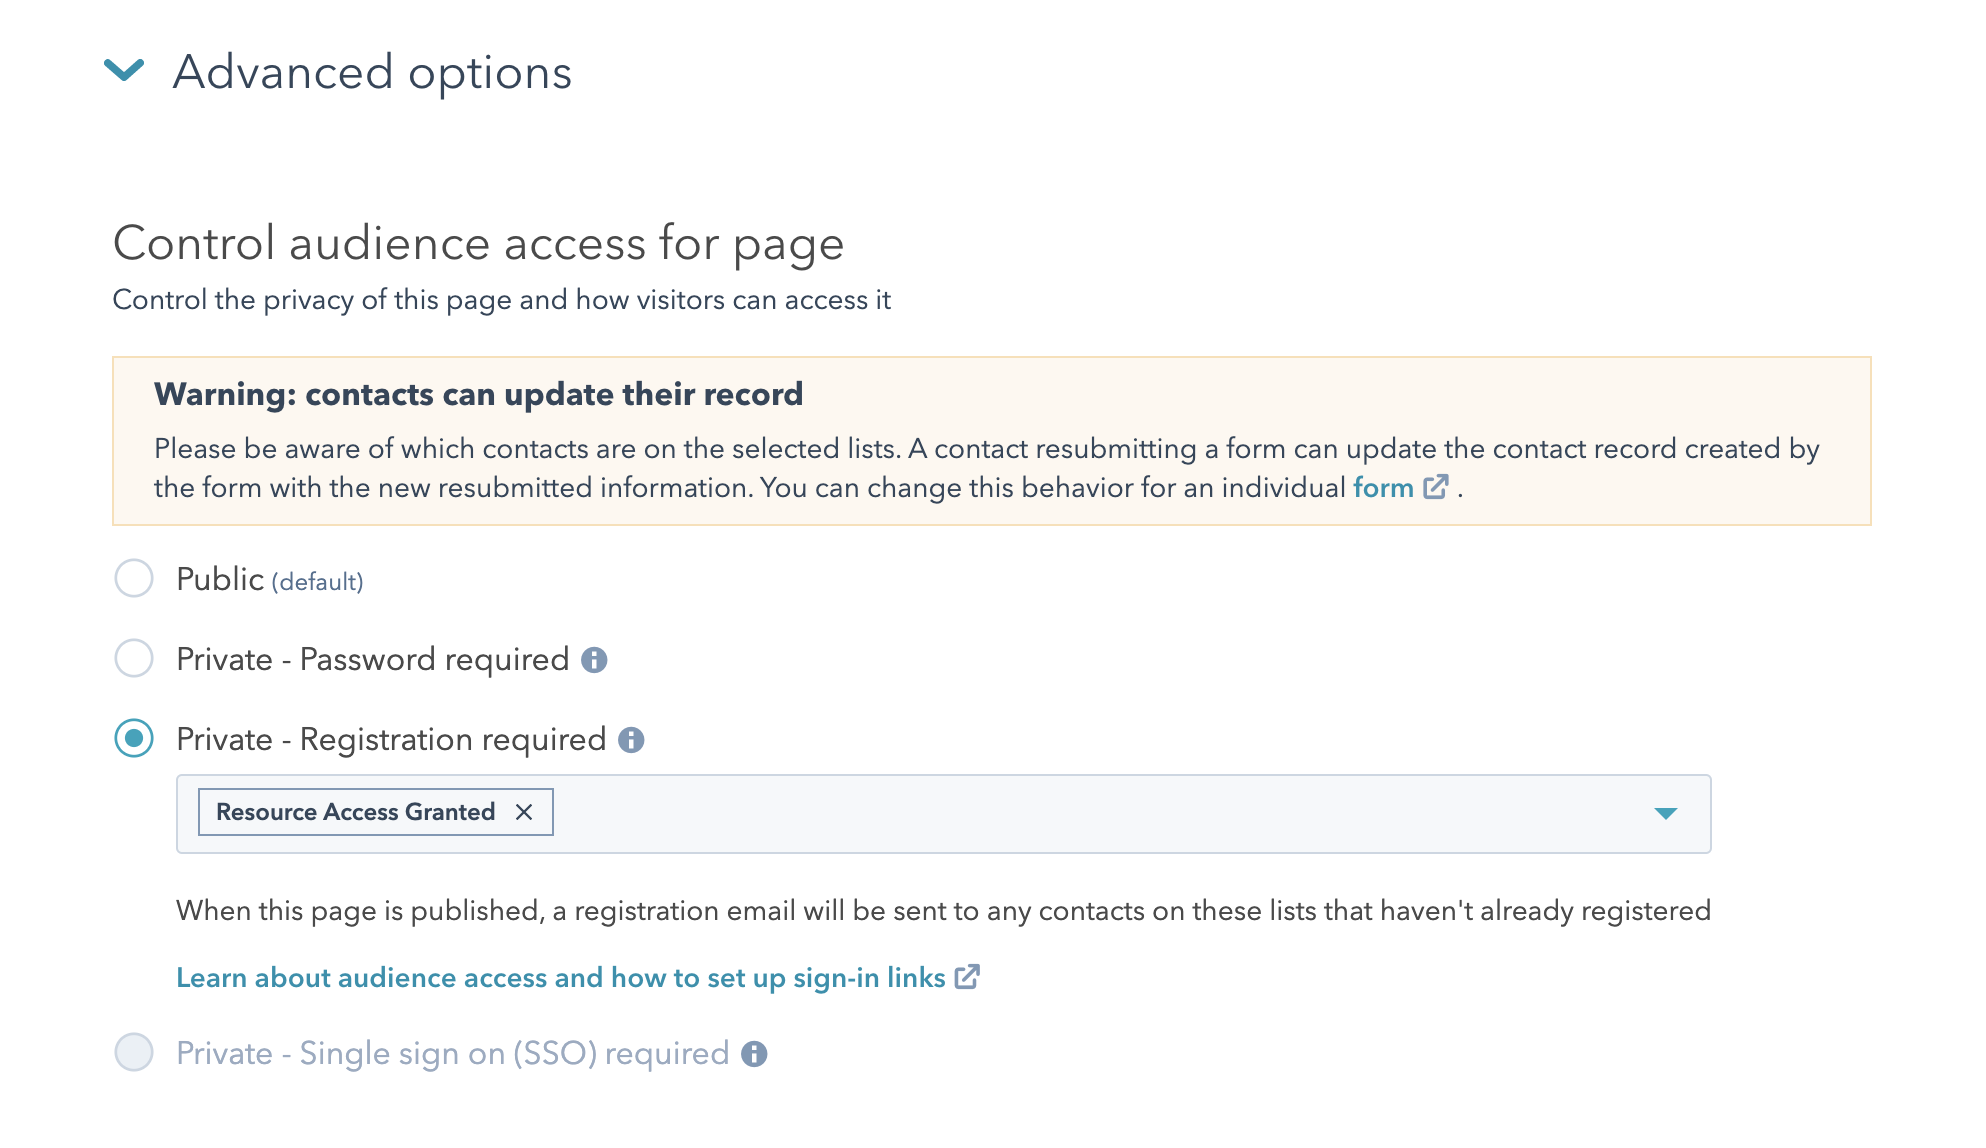
Require member registration to access private content.
Create a List to Grant Access to Restricted Pages
The lists tool in HubSpot allows you to create a list of contacts or companies based on property values and other characteristics.
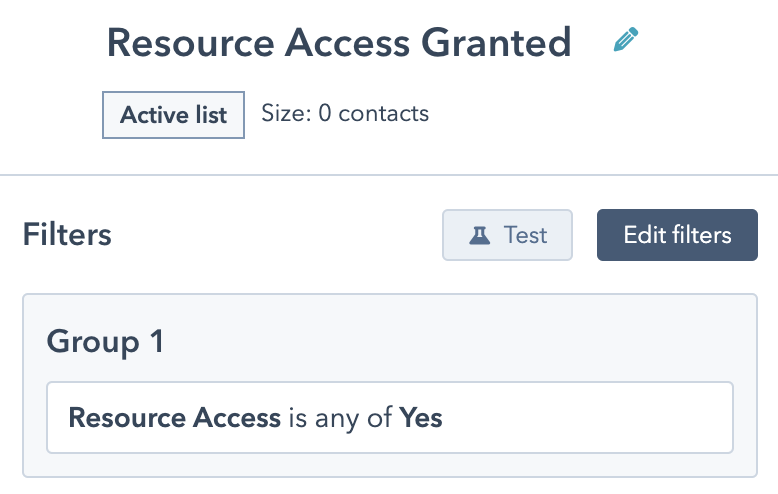
Configure an active list for your implementation and setup parameters for allowing membership to that list.
In this case, I’m using a custom boolean property called Resource Access which when set to “Yes” will add the contact to this active list.
Configure Page Advanced Options to Restrict Access
Now, let’s make sure only contacts who are on that list can view the bookmarks page.
In the Page Editor of the Blog Listing that you just created, click to the Settings tab and scroll down to Advanced Options.
Building the Bookmarks Module
Next, we need a module to display only the bookmarks associated with the contact on a page.
First, define your variables at the top of the template.
CRM Associations Function
Gets a list of associated objects from the HubSpot CRM based on the given object id, association category, and association definition id. Supported object types that can be retrieved are HubSpot built-in objects, portal specific objects, and integrator objects. Objects are returned as a dict of properties and values.
For security, only portal specific objects and product can be retrieved on any public page. Any other built-in object types (except product) or integrator object types must be hosted on a page which is either password protected or requires a CMS Membership login.
Use CRM object data in CMS Hub
Request Contact ID
Get the ID of the contact requesting the page.
Append Method
I use this alot. Very handy especially with various filters or combinations thereof later in the template.
Here’s what the main part of the module looks like:
Content By IDs Loop
Given a list of content ids, returns a dict of landing page, website page or blog posts matching those ids.
Format Post Macro
Reusing the one from the Resources module
4. Building the Bookmark Toggle Function
Front-end JavaScript
Now, let’s discuss the frontend code that will send data to our serverless function. You will want to place this code in the HTML portion of your module wrapped in a {% require_js %} statement so that you can access variables such as whether or not the user is logged in and the domain for the custom API call.
On-click Functions
Build Payload
This function above, build_add_bookmark_payload creates a JavaScript object with four properties based on the given arguments. The resulting object can be sent as data to our serverless function.
API Submission
The submit_to_api function submits data to an API endpoint through an HTTP POST request. It takes three arguments: URL, method, and object. The object argument is converted to a JSON string using JSON.stringify and set as the request body. The fetch method is then used to request with the POST method, using the URL, request body, and headers that specify the content type as 'application/JSON. A console log message is printed if the request is successful or an error message if it fails.
UI Handling
Toggling classes in a website's user interface can indicate to the user that an action is being performed. This provides feedback to reduce uncertainty and anxiety and improves the user experience by showing progress. It also helps prevent user errors by indicating that an action has already been completed and can improve the perceived performance of a website by creating the impression of responsiveness.
Back-end Node.js
Node.js is a powerful and versatile runtime environment that can be used for a wide range of server-side applications. Its lightweight and scalable architecture, combined with its extensive package ecosystem and developer community, make it an excellent choice for building modern, high-performance web applications.
Serverless Function JSON
Adding a Secret
You can add your API key to your project securely using the following HubSpot CLI command.
You will then be prompted to enter your Private App key.
Configuring the Endpoint
Name
Goes at the end of the api endpoint URL.
Method
Must match what you send from the frontend.
File
Relative path of the JS file for this endpoint.
Serverless Function JavaScript
This is a Node.js module that exports a single asynchronous function named main. The function takes two parameters: context and sendResponse. Inside the main function, the headers object is created, which contains an Authorization header with the authToken as a bearer token.
Next, the module extracts several properties from the context.body object. These properties include action, contact_id, bookmarked_resource, bookmark_name, and existing_bookmark.
The main function then defines two nested asynchronous functions named create_bookmark and remove_bookmark. These functions use the axios library to make API requests to HubSpot, a popular CRM platform.
Finally, the main function checks the action property from the context.body object to determine whether to call the create_bookmark or remove_bookmark function. Once the appropriate function has been called, the sendResponse function is called with the resulting data from the HubSpot API response.
Required Libraries
The module first requires the Axios library, which is a popular HTTP client for Node.js, and sets the authToken constant using an environment variable named API_KEY.
Authorization
Header that includes your Private App key as a bearer token.
Exports Parameters
Context
The body and parameters sent from the frontend.
sendResponse
Sends data from the serverless back to the frontend.
Create Bookmark with Association
The create_bookmark function sends a POST request to create a new bookmark in HubSpot's CRM. It uses the axios.post method to make the request to the url endpoint with the SimplePublicObjectInputForCreate payload and the headers object.
The payload contains the bookmark's resource (bookmark_name) and resource_id (bookmarked_resource) properties, as well as an association to the contact_id specified in the context.body.
Async Functions
Asynchronous programming lets code run "in the background," without halting the main thread. It's achieved in JavaScript using async functions, defined with the 'async' keyword, signaling they handle asynchronous operations differently than standard functions.
In our case, we'll use the fetch function to obtain server data. The 'await' keyword, usable only within an async function, ensures each asynchronous operation completes before progressing.
Async functions can prevent "callback hell," a scenario in nested asynchronous programming which complicates code readability and maintenance. While there's more to learn about asynchronous programming and async functions, this serves as a basic introduction.
Properties
Include everything needed for the Association Card (at least) so that the data displayed to the user in the portal is consistent and helpful to their goals.
Delete Bookmark
Use ID from context with the remove_bookmark function which sends a DELETE request to remove an existing bookmark in HubSpot's CRM. It uses the axios.delete method to make the request to the url endpoint with the headers object.
Conclusion
Throughout this guide, we've gone deep into the weeds on how to integrate a bookmark feature on your HubSpot portal. This fantastic feature doesn't only improve your website's user experience but also encourages repeat visits, fostering higher retention rates.
We delved into building a dynamic bookmarking system for your HubSpot blog, utilizing a membership portal and custom object. Whether you're a novice or experienced HubSpot developer, the instructions and code snippets provided should enable you to implement this feature at your own pace.
Remember, there's always room for growth. Even if you can't get through all sections now, persist and revisit them when ready. The developer community and partners are also invaluable resources for additional guidance.
This is just the beginning, and I look forward to guiding you on many more exciting HubSpot adventures. Stay tuned, keep exploring, and most importantly, continue building dope stuff!
Thank you for reading! If you made it this far, I would love to hear from you! Did you try this out? Is there anything you would add or change? Reach out to me on LinkedIn!
