
UI Extensions are one of the newest and most powerful additions for customizing your HubSpot CRM. With UI Extensions you are able to customize your CRM record UI to fit the needs of your business and allow end users to quickly access both HubSpot data and external data from within and outside of your account. In this post, we are going to create a simple “Fulfillment” card that utilizes the React library along with GraphQL to pull Custom Object data related to our CRM records so we can view it all in one place. We have hosted all the code that we will be using in a repo on GitHub for your reference.
Note: This article has been updated to reflect the most recent update in the developer projects platform version 2023.2
We’ll be looking at this from the viewpoint of a school supply kit manufacturer who ships products on a yearly cadence and has a sales team that needs to be able to:
- View information on past shipments to schools (tracked as companies in the HubSpot CRM).
- View information on current shipments.
- Drill down into a shipment to see the current status of the line items (kits) in our warehouse.
Before we begin creating our custom card, we need to make sure we have the proper setup for coding, testing, and deploying. We have a detailed setup guide that you can follow along with to get your environment setup. We won’t reiterate everything that is in there so feel free to open the link above in a new tab and then come on back when you’re ready to begin. Below is a quick summary of what we’ll need for setup.
- A HubSpot Account with either a Sales Enterprise or Service Enterprise subscription.
- Using a sandbox account for testing is optional but strongly recommended. It’s also a safe way to interact with data without causing potential conflicts or issues in a production environment.
- A code editor such as VSCode coupled with our official HubSpot extension.
- Installing Node.js - an open-source, cross-platform JavaScript runtime environment which enables HubSpot’s local development tooling.
- Installing the HubSpot CLI - Our command line interface that allows you to connect and interact with your HubSpot account in local development tooling.
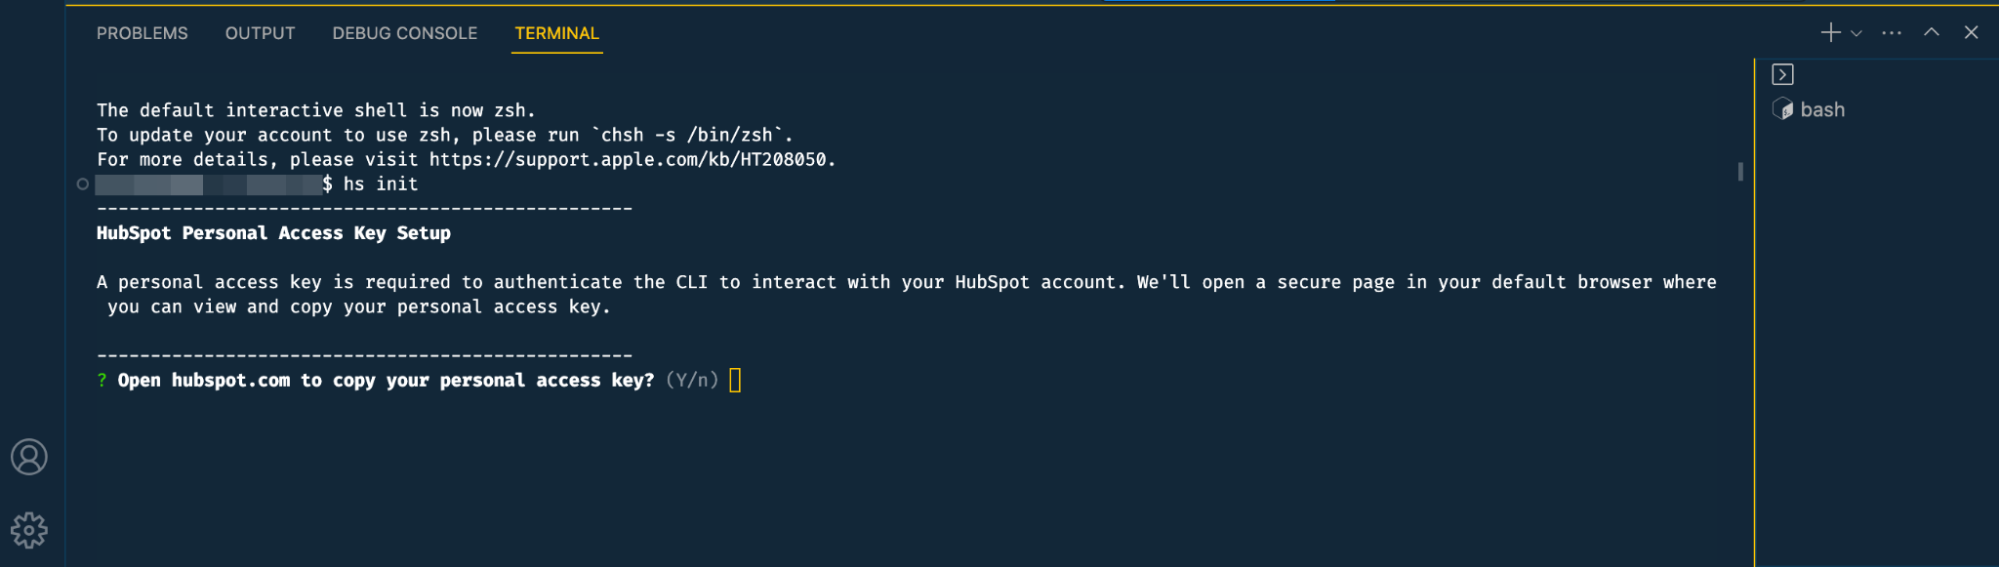
Once we have the above items ready to go, let’s connect our HubSpot account using the CLI by going into a new terminal window within VSCode (this can be done by going to the Terminal > New Terminal menu option) and running the hs init command which will prompt us to open HubSpot, choose our portal and bring us to a screen for our Personal Access Key (PAK) that is required in order for us to interact with our account.
When creating your PAK, you will need to make sure it includes the following scopes:
developer.projects.writedeveloper.app_functions.readanddeveloper.app_functions.writesandboxes.write(required if you have chosen to use a standard sandbox for development)
Note: If you have an existing PAK, and it does not include the scopes above. You will need to deactivate your current PAK and regenerate a new one with the required scopes
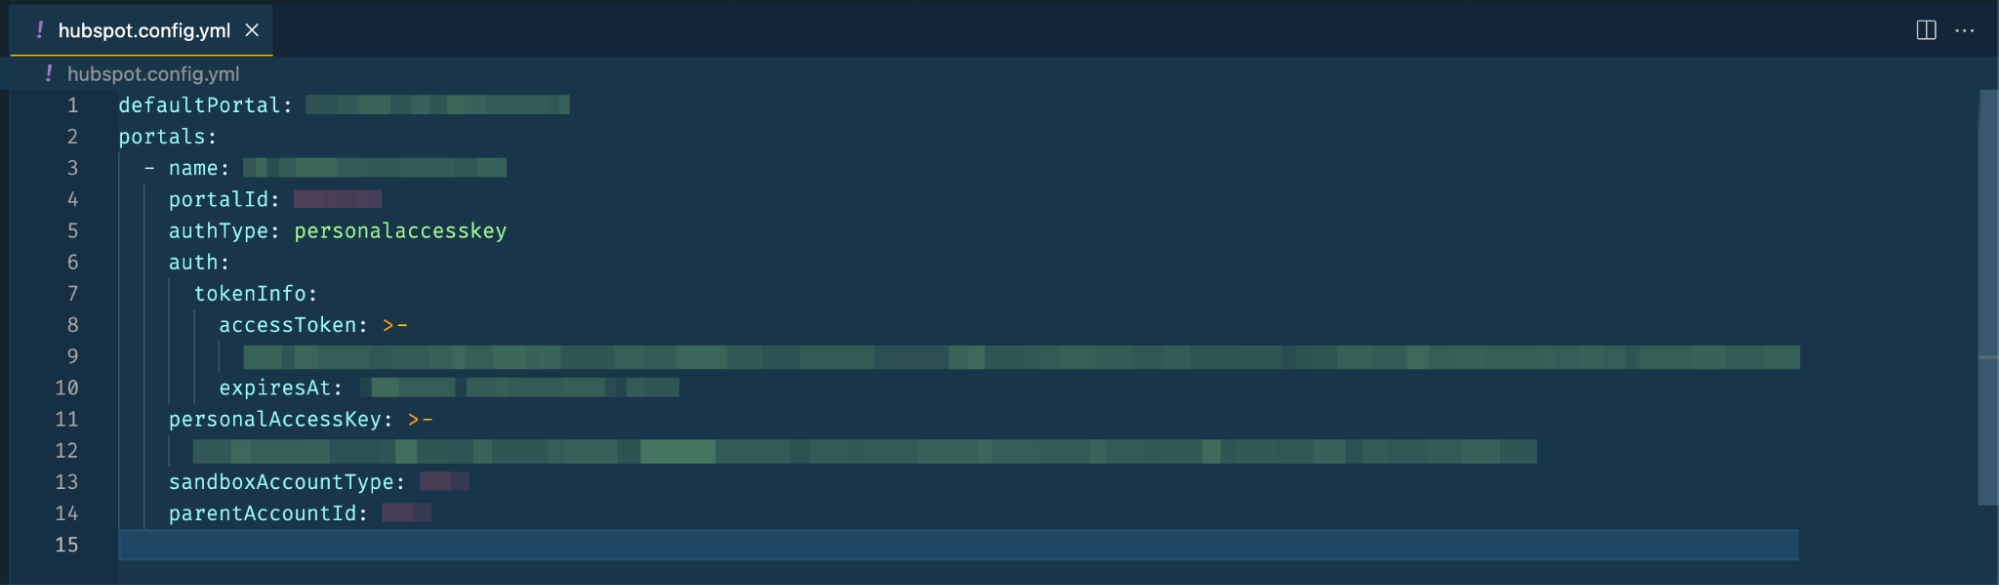
With our PAK now created (or updated), let's go back to our VSCode terminal and paste our PAK into the terminal and press enter/return. You'll be prompted to enter a unique name for your account. Make sure to choose a name that will help identify your account as you are working (this is especially helpful when working with multiple accounts). Enter your unique name and press enter/return. You should now see a hubspot.config.yaml file created that contains all the information for working with our account. Below is an example of a config file with sensitive information redacted.
Important Note: If you are using a versioning system (another thing we strongly recommend) such as GitHub, make sure to add this file to your .gitignore file as not to expose this information and cause security concerns. To learn more about using GitHub, I recommend looking at the GitHub's own quickstart guide.
If you are working with multiple HubSpot accounts locally, you can use the hs auth command to connect them to your local tooling and set a default account using the hs accounts use [accountName] command where [accountName] is the name you have assigned to the account above.
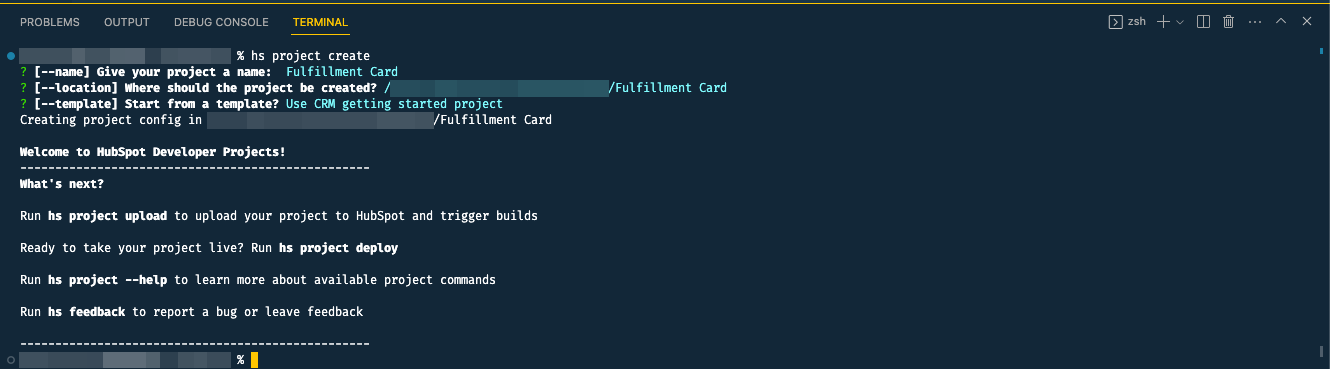
With our environment all setup and our HubSpot Account connected using our CLI, we can begin creating our first project for our custom card. Let’s go back to our terminal in VS Code and enter the following command hs project create. We will now be prompted for the following information:
- [--name] Give your project a name: For this, we will use
Fulfillment Card. - [--location] Where should the project be created? We’ll keep the location that is provided for us by default.
- [--template] Start from a template? Let’s choose the
Use CRM getting started projectoption.
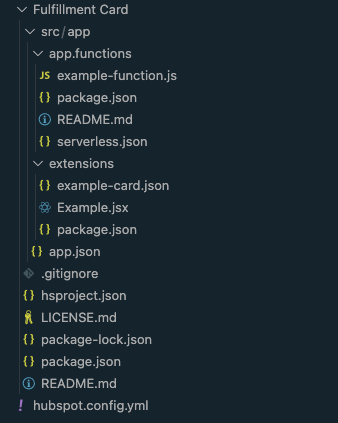
The getting started project files will then be added to our chosen location. Your folder structured should look like the following:
Now, let’s start by renaming some of the files to something that will be able to better express what the files are intended to do. Rename the following files as such:
- Fulfillment Card/src/app/app.functions/example-function.js -> fetchAssociatedShipments.js
This is our functions file where our code (both JS and GraphQL) will be contained for grabbing our shipments and kits data to be displayed in the custom card. - Fulfillment Card/src/app/extensions/example-card.json -> fulfillment-card.json
This is the informational file that will tell HubSpot the name of the custom card to be displayed as well as the location of the custom card and what file we will use for the custom cards content. - Fulfillment Card/src/app/extensions/Example.jsx -> card-frontend.jsx
This is the file that contains the code for the custom card that users will see.
To get a full breakdown of what these files do along with descriptions of their properties, please review the create an extension page under the extensions section of the CRM Developer tab.
When working with our custom card, it’s important that we assign the appropriate scopes for the app that will be installed with it. By default, we include some details in this file, but for our needs, we will rename some things and add more scopes. It’s important to make sure you are adding a unique uid value. This helps to prevent issues in the event you rename your application or update its description. Below is what our app.json info should look like.
Our serverless.json file is our configuration file for our serverless function that powers our custom card. Let’s update ours to rename the myFunc function to something that reflects its use (remember, we want to use descriptive naming conventions) and update the example-function.js value to reference the rename of that file we did earlier. This should have our serverless.json file looking like this:
The last thing we want to do before we upload our project is update the information that is within our fulfillment-card.json configuration file. This information tells HubSpot what the name of the custom card should be on the front end when displayed, where the custom card should be located in the record tab, and what file should be referenced for displaying the custom card on the frontend. We will also want to make sure to change the uid in the file to something that reflects the custom card. Similar to its usage in the app.json configuration file, the uid in our custom card JSON is added in order to prevent issues if we were to ever update details of the custom card later on. Below is the final contents of our file:
With our files renamed, our app/serverless configurations done, and our fulfillment-card.json information updated, we can now upload our project using our CLI by using the hs project upload command. We should see the status of the build happening within our terminal and once completed, we will see a success message. When running this command, make sure you are in the directory that houses your hsproject.json file. In our example, this would be the Fulfillment Card folder. Once you run this command, you will be prompted with a message that says:
“The project [Your Project Name] does not exist in [Account Name} ([Account ID Num]). Would you like to create it?”
We will select "Y" and continue. You should then see your custom card build and be deployed on your account.
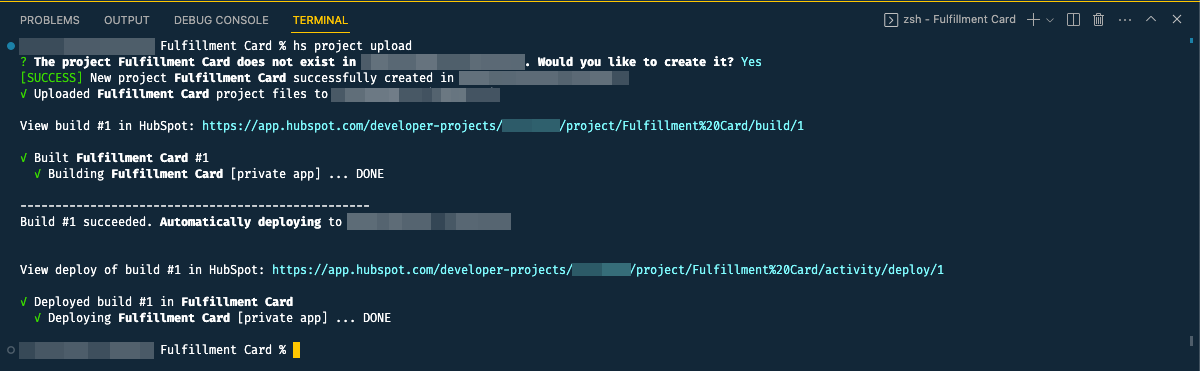
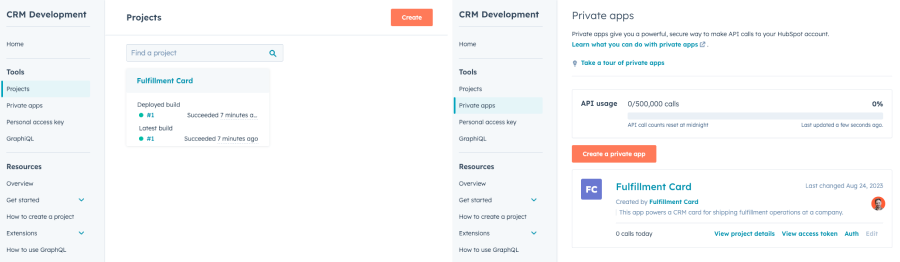
You can verify both your custom card and your app have been deployed by going to your projects area and private apps area respectively within the CRM Development Tab.
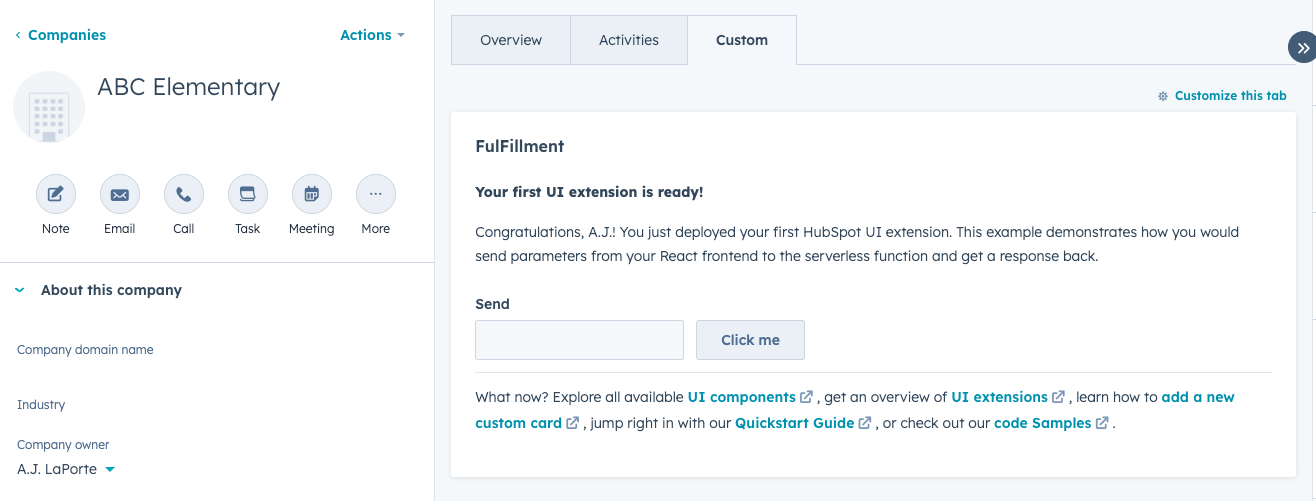
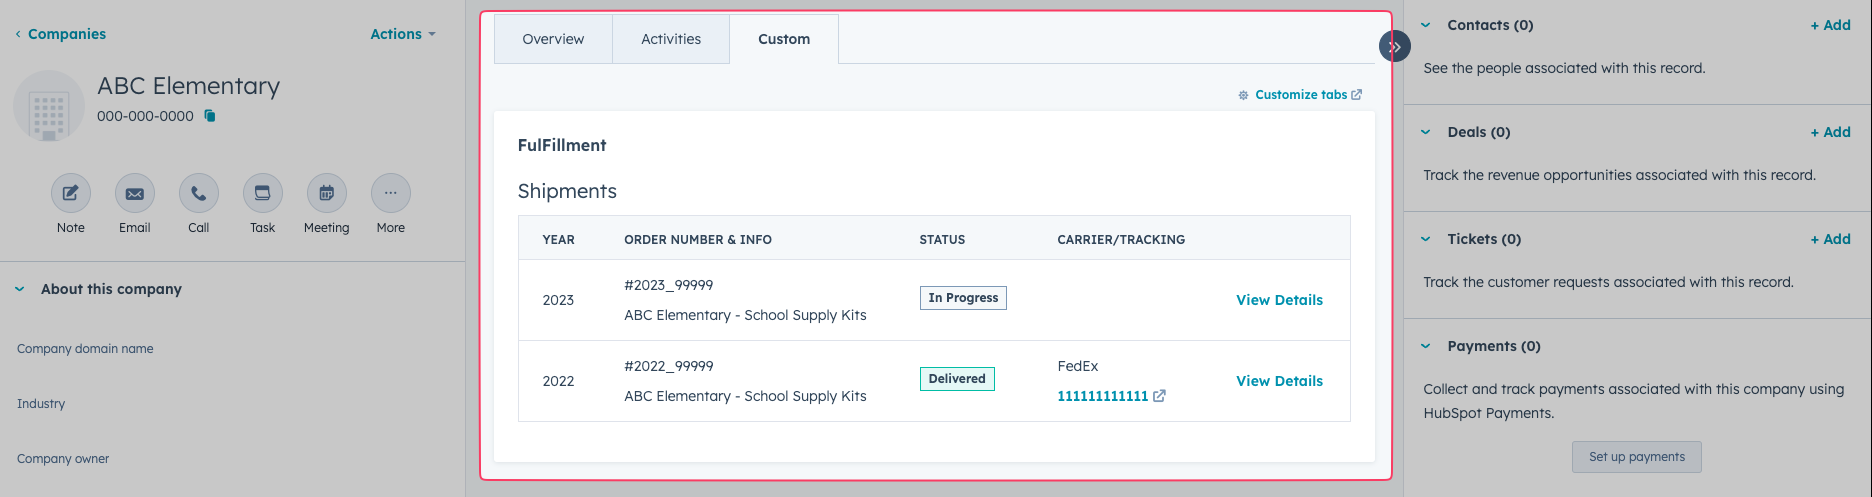
To check that our custom card is showing correctly, go ahead and navigate to the companies area under your account and open up a company record then go to the “Custom” tab. You should see the custom card loaded with some sample information that we currently have in our files.
Because our custom card will be interacting with a custom object, we will need to create the custom object before we begin working on our custom card. There are two ways to create your custom objects: either within your account settings or through our Custom Objects API. If you are using the API, it will require you to also use/create a private app for authentication. Whichever method you choose is completely up to you. It's always best to plan out your custom objects for scalability. We have a great resource on our blog that we highly recommend reading.
For this article, we will be using the API method to create our custom objects and using Postman as our tool to make the calls.
To make this portion of the article easier, we have provided a collection with the information for this example and you can access them by using the “Run in Postman” button below.
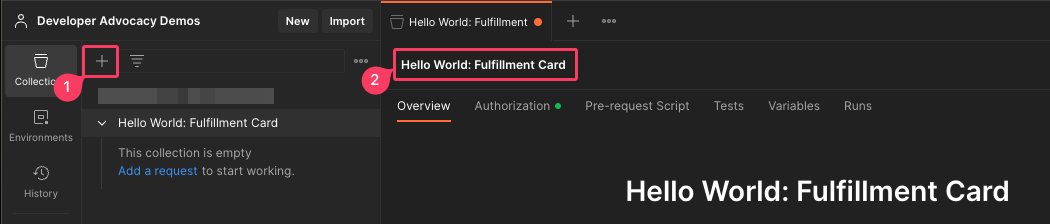
- Click the + icon in the upper left of Postman that is located to the right of the “Collections” option.
- With our new collection now open, change the name to something we can use to identify our project. For our article, we will call it “Hello World: Fulfillment Card”.
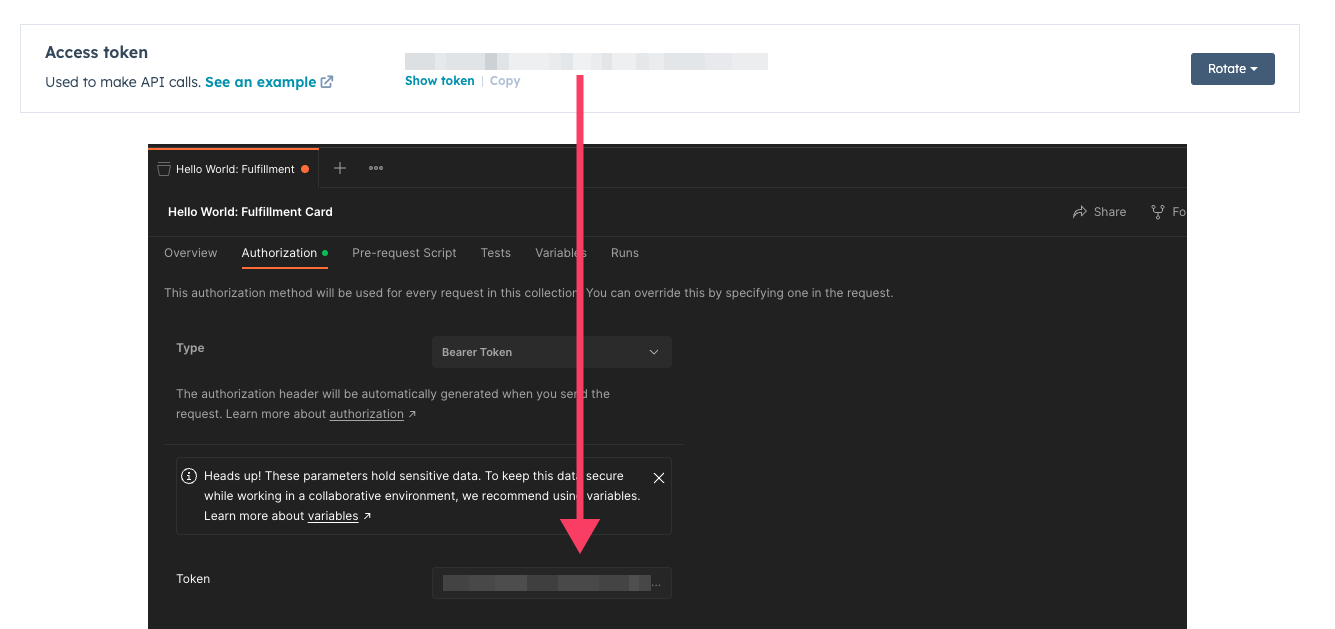
Now we’ll setup our Postman collection to always use our Apps access token when making calls.
- Go to the Authorization tab and choose Bearer Token we will be adding the token from our Application we created above in order make our API calls.
- Go to your HubSpot Account and the Private Apps area.
- Click on your newly created Private App and go to the Authorization tab.
- Under the Access token section, click Show token, then click Copy.
- Now go back to Postman and paste your key into the Token field then save your changes.
We are now ready to create our custom objects!
Our kits object will hold line item level data for our shipments. We are going to create this object first as the “shipments” object (which we will be creating next) will be associated with this object. Inside of postman, let’s create a POST request to the /crm/v3/schemas API endpoint. Not familiar with API endpoints? We recommend checking out this article about them.
- Click the Add a request text in our left panel under our new collection. This will open a new request tab for us.
- Let’s rename our request to reflect it’s intended use. We’ll call ours "Create Custom Object Schema".
- Click the dropdown under the request name where it says
GETand change this to thePOSTmethod. - To the right of this dropdown, we will add the url to the create custom object schema API endpoint:
https://api.hubapi.com/crm/v3/schemas - Now, click on the Body tab under our endpoint and choose the “raw” radio button. A new dropdown will appear after the button group. Change this dropdown from “Text” to “JSON” and save the request.
- Copy the JSON listed below and paste this into the provided textarea inside of postman for our request.
- Click the Send button to execute our request. Within the success response, make sure to document and make note of our Kit/s
objectTypeIdproperty and the value that is returned, we will make use of this value in the next section to associate our Shipment/s and Kit/s objects. For our article, this value is2-17958009.
With the code above, we have also created the following properties along with our custom object:
- Kit Number - Primary display property for our kits that identifies each kit.
- Year - Represents the year for which the kit was created.
- Status - The current build status of the kit.
- Hold Reason - If our status ever shows a kit is on hold, this will provide the reasoning why.
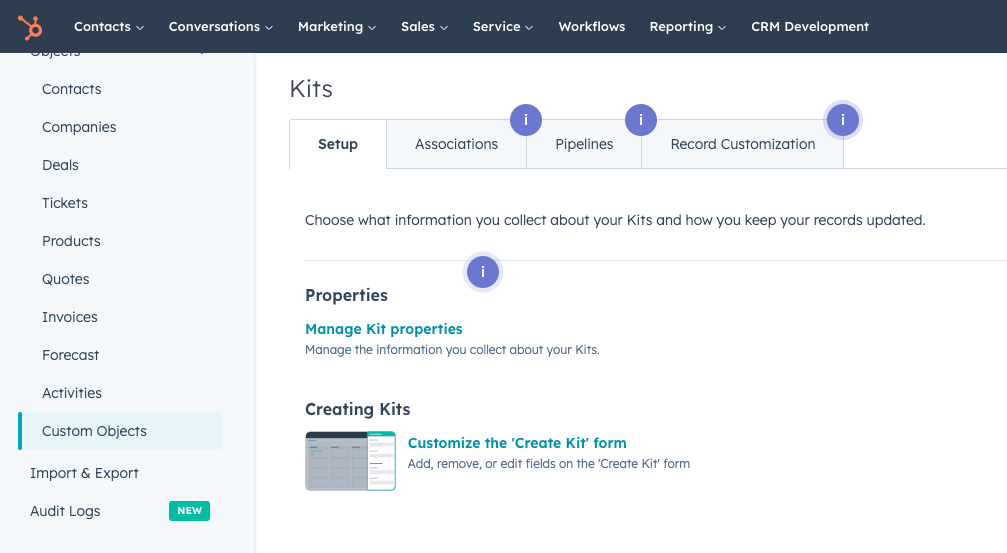
We can verify our Kit(s) object was created successfully by going to the custom objects area within our account.
Our Shipment(s) object will hold top level information on the main shipment that is sent to Schools (companies). This step is a bit easier as we did a lot of the setup work in the previous objects creation. For this, we just simply need to replace the Body JSON from the previous call with the JSON below and click the Send button again.
Take note of the associatedObjects array in the code on line 12. This is where we have added the objectTypeId property that was assigned to our Kit(s) object from the previous section.
With the code above, we have also created the following properties along with our custom object:
- Order Num - Primary display property for our shipments that identifies each shipment.
- Description - Describes the shipment.
- Year - Represents the year for which the shipment was made.
- Status - The current build status of the shipment.
- Carrier - The carrier that is responsible for transporting the shipment.
- Tracking Number - The tracking number associated with the shipment.
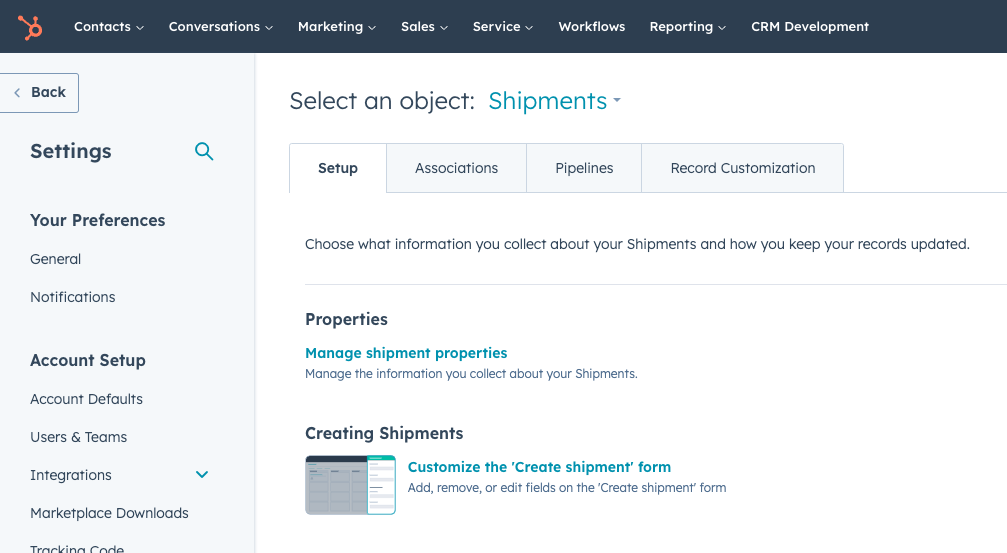
Returning back to our custom objects area inside of our account, we can now see the Shipment(s) object has been created:
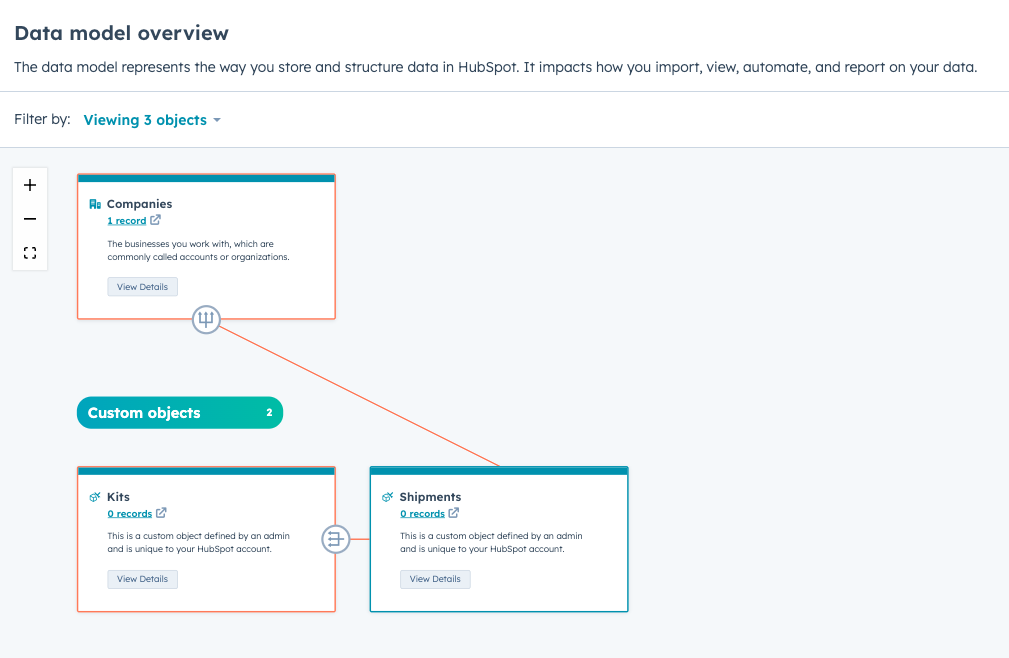
With the creation of our Kits and Shipments objects complete, we can review the overall associations within our Data Model overview to verify they have been setup correctly. This tool is very helpful when you are trying to see how all of your data is connected with your HubSpot account. To learn more about this, see our knowledge base article.
The last step in creating our custom objects is to populate them with some sample data. There are multiple methods to do this. We recommend using our imports tool, we have prepared a few sample files below with data for your use. You may also choose to manually create these records for our objects and associate them yourself.
Sample Files:
- companies_import.xlsx - contains one company (school) record.
- shipments_import.xlsx - contains two shipment records to associate to our company (school).
- kits_import.xlsx - contains 10 kit records to be used for associating to our shipments.
Earlier, when we created our project through the CLI and chose the “CRM getting started project", this provided us with both an example custom card and function that we renamed in order to better convey their uses. We are going to be modifying these files to customize the current card to reference the data we just imported into our Custom Objects.
We’re going to begin by first creating our serverless function that will be grabbing the data we need as this will aid in building our custom cards frontend. Go ahead and open the fetchAssociatedShipments.js file from earlier. You should see a sample exports.main function inside, let’s start by modifying this to our needs.
Want to skip ahead? Jump right to the full code for our fetchAssociatedShipments.js at the end of this section.
We’ll begin by replacing our sample code with the following:
In this code, we start by requiring axios, which is a JavaScript library used for making HTTP requests. Then, within our main function, we are setting two constant variables to values that are pulled from the parameters we are passing in. These values are our object’s id and the access token from our private app. After that we use a try…catch statement in JavaScript to set another variable equal to the data that is pulled back (our return) from a fetchAssociatedShipments function that we will add next. If an exception is thrown during this process, we have the error sent back instead.
Under our exports.main function, let’s declare our fetchAssociatedShipments function. This function will make an HTTP request (using axios) to our GraphQL API endpoint with parameters attached and pass HTTP headers that convey what type of content we are sending in our request body while providing our authorization which uses our private app’s access token. Below is our code for this:
Last, we are going define our query in a constant underneath our previous function. The easiest path to creating this query is to utilize the GraphiQL explorer within your account. You can use this tool to test your query in order to validate it’s returning the correct values then copy and paste it into your code. Below is a sample of our query in the GraphiQL explorer.
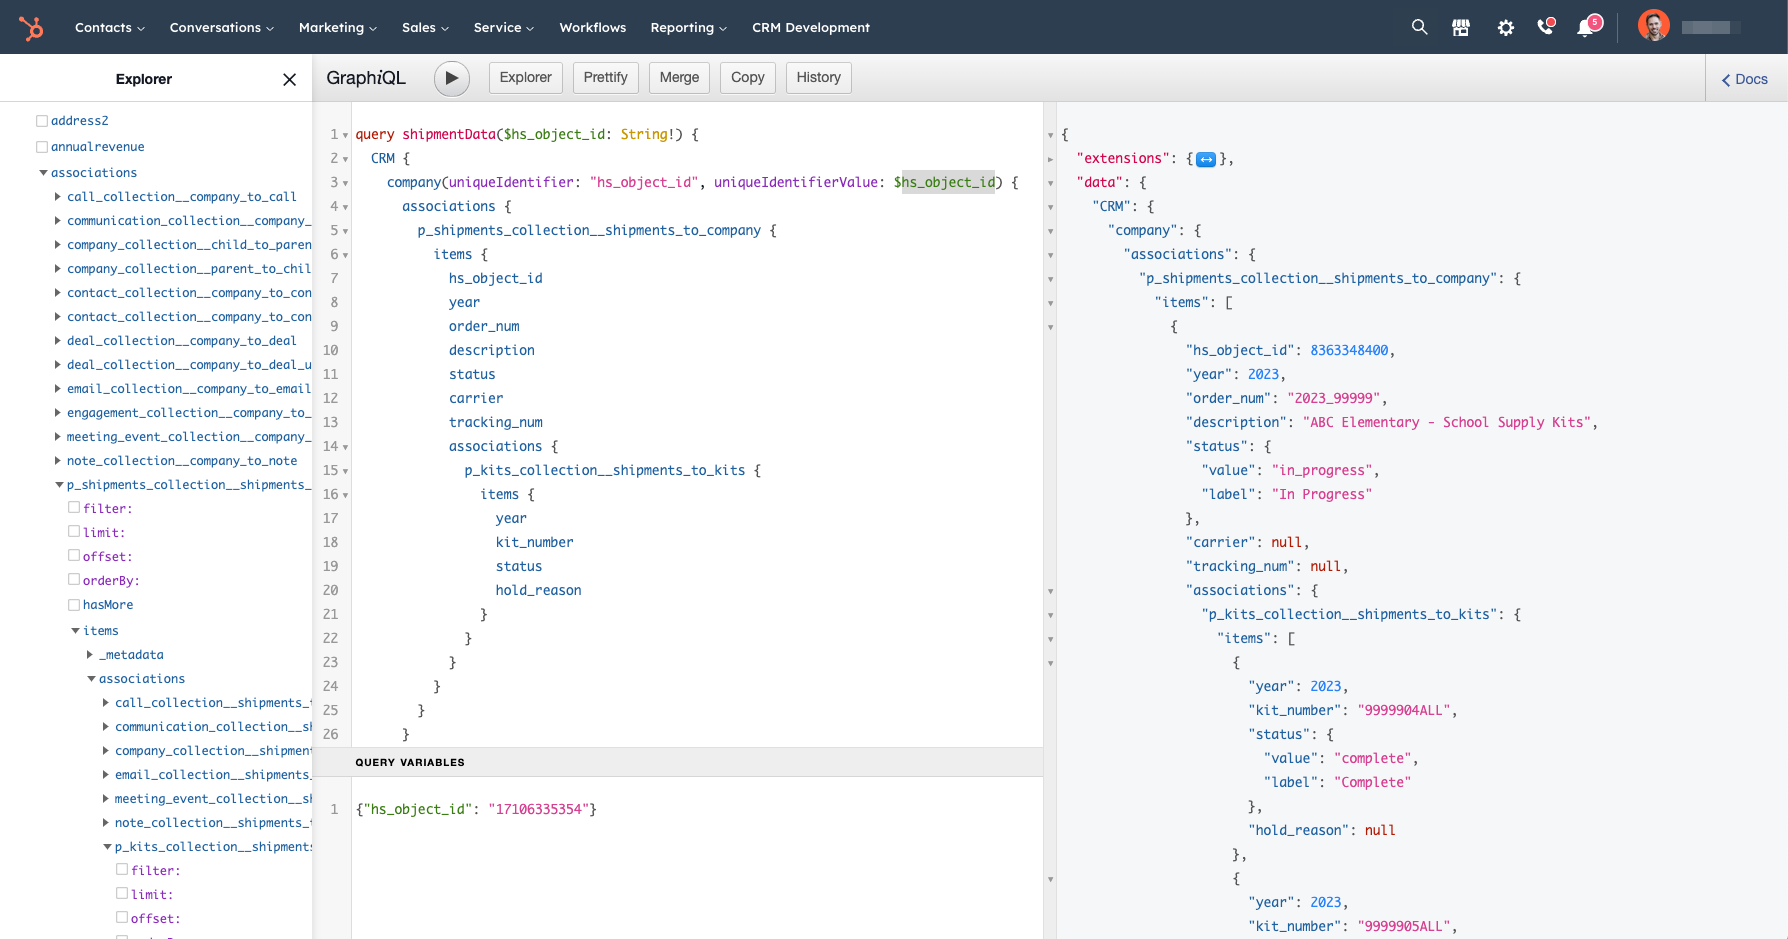
Notice that we have added a query variable (hs_object_id) and set this to a static value within GraphiQL that is equal to that of one of our companies. This is to ensure we are able to pull back data when a companies object id is passed along. You can find the id of a company by browsing to their record in the CRM and using the strong of numbers in the URL.

Let’s now add the code from our GraphiQL query to our file:
With our servless function now completed, our final fetchAssociatedShipments.js file should reflect the contents below. We have provided comments inside of this code to reiterate what each part does.
We can now move onto creating the frontend of the custom card.
Let’s open our card-frontend.jsx file and clear everything inside of it so we can start anew with creating our custom card.
Want to skip ahead? Jump right to the full code for our card-frontend.jsx at the end of this section.
We are going to start our file by importing React as well as the useEffect and useState React hooks into our custom card. Then, we will import the HubSpot components we will be using within our custom card. Go ahead and add the following to the card-frontend.jsx file.
Next, we will define our extension to be run within the HubSpot CRM using the following code.
The hubspot.extend() function takes an object that contains three parameters. It then returns an <Extension /> React component that has the values for context, runServerless, and CRM properties method.
Next, we define our Extension component taking in context, runServerless, and fetchCRMObjectProperties as props:
Within the Extension component, we will create constant variables that will hold data throughout our custom card’s functionality. We will also set useState’s for each one of these constants initializations. We have provided comments below to explain what each variable represents.
After we have defined our constants, we will create a useEffect hook underneath them that contains a dependency of the currentObjectId. When this value changes, it will cause the hook to run again using the new value. Let’s add the following:
Within our hook, we are fetching the hs_object_id of our object (the company object) in which the custom card is going to be running from. We are then setting this id to our currentObjectID variable and then we are telling the custom card to run our fetchAssociatedShipments code from the file we created in the previous section and pass our object’s ID to that file. Next, when we get a response from the file, we are then setting the shipments variable to the returned items from the GraphQL query. Lastly, we are setting our loading variable to false which we'll use for communicating to the user when data is loading.
We will now create three functions underneath our hook. These functions are:
- openShipmentDetails: This will run when someone decides to view details of a shipment
- renderTag: This will control the color of the tags to be shown to users for statuses
- renderShipmentDetails: This filters the “Shipment” details and renders the associated kit data. Note, we are using the
<TableRow>components with this data as it will be nested inside of a<Table>component on our screens (more on those next).
Add the following code after the useEffect hook:
With our imports, hubspot.extend function, useEffect hook, and other functions added, we can now begin working on our screens. As we mentioned screens are simply the different portions of the custom card that will be viewed.
We will have two screens in our custom card:
- Main View (shipments): Where a user can see all shipments for a company
- Shipment Details screen: Where a user can view the details of a specific shipment
We’ll begin by adding the following code for our Shipment Details screen underneath our previous functions.
With this, we are telling the custom card to show our screen if the showShipmentDetails boolean is true which is set when a user clicks the “View Details” button from the main shipments screen. This was set inside of our openShipmentDetails function. Once this screen is shown, we are then rendering a table and populating the contents of the table through our earlier function of renderShipmentDetails.
Lastly, we will now add code for our Main View (shipments) screen right after the previous screen:
For this code, we are telling the custom card to conditionally load our loading component and our main shipments table. In react you can use the logical AND operator (&&) to direct the code to render something when the left side of the operator is true. In our example above, we are telling the custom card:
“If the loading/shipments variable are true then render our components”
The rest of our code simply outputs the appropriate components and populates them with our data. Below is the final code in our file. We have provided comments inside of this code to reiterate what each part does:
With our files now completed. We can save our work and upload our project to our account using the hs project upload command. Once our project has been built and deployed, which you will be notified of in the CLI, we can now browse to our sample company and navigate to the “Custom” tab. We should now see our custom card load with the associated custom object data.
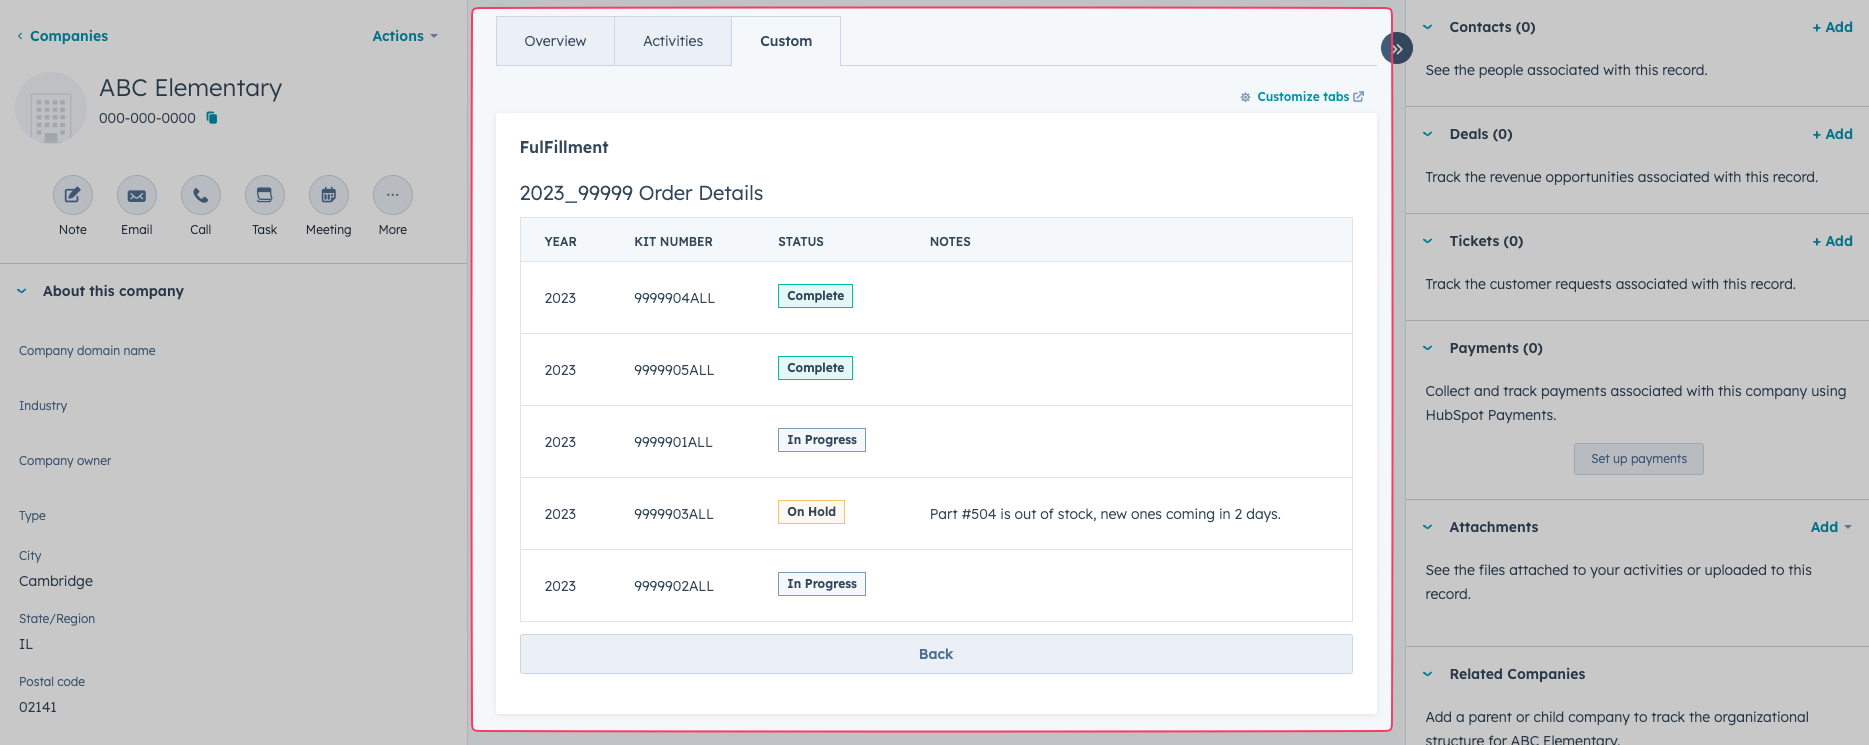
If we click on the “View Details” link, we should now be able to drill down into each order and see the line items associated with it:
As you can see from our example, you can create some pretty amazing custom cards within HubSpot’s CRM using the power of React + GraphQL. We encourage you to go forward and create something amazing or iterate of our example we just did. When you do, make sure to share it on your LinkedIn as we would love to see your work!