
Author's note (April 2026):
This post was originally published in October 2025 to help developers move off projects using built-in serverless functions to version 2025.2, which did not support HubSpot-hosted serverless. As of platformVersion
2026.03, serverless functions are fully supported again for project-based apps, with app functions and public endpoint functions on the new Projects framework.For the current platform behavior, see the serverless functions overview and Determine your migration path to 2026.03.
HubSpot just dropped what might be the most significant developer platform update we’ve ever seen. From developer projects becoming the foundation for everything you build, to new features like Custom Workflow Actions and Agent Tools, to completely revamping our UI Extensions with dedicated App Home pages, the new platform represents a fundamental evolution in how we build on HubSpot.

For many developers, this announcement brings both excitement and questions. The new capabilities are impressive, but you’re probably wondering, “What does this mean for my existing apps?” especially if your private app uses serverless functions. The migration path for apps with serverless functions isn’t a one-size-fits-all solution. However, please note that support for v2023.2 was deprecated on October 1, 2025. Therefore, all apps relying on serverless features should plan to migrate to at least v2025.1 before this date. Therefore, apps should migrate to v2025.1 or v2025.2, and this guide will help you navigate the serverless function landscape in HubSpot’s new Developer Platform.
Your Next Step: v2025.2
If you’re migrating off 2023.2 or 2025.1 and want to keep your logic on an external host, 2025.2 is still a supported platform version and remains a good fit for apps that rely on third-party serverless platforms or custom backends exposed via hubspot.fetch(). However, as of platformVersion 2026.03, project-based apps can once again use HubSpot-hosted serverless functions; if you want native serverless inside HubSpot, migrating directly to 2026.03 is the recommended path.
Why Third-Party Hosting?
By moving to v2025.2, you gain immediate access to the latest HubSpot app capabilities, ensuring you’re always working with the newest features. Hosting your functions externally also gives you full control over scale, allowing you to handle everything from lightweight proxies to complex processors without encountering platform limits. Most importantly. This approach future-proofs your apps, giving you the flexibility to adapt as HubSpot evolves while reducing the amount of migration work you’ll need down the road.
Migration at a Glance
For simple proxies:
- Move wrapper functions to a third-party host.
- Replace frontend calls with
hubspot.fetch() - Easiest migration path, minimal code changes.
For complex processors:
- Host processors externally, where you control scaling, runtimes, and dependencies.
- Connect them to HubSpot via
hubspot.fetch() - Run heavier logic while taking advantage of v2025.2 features today.
For apps that choose to keep their backend logic outside HubSpot, the destination remains the same: third-party hosting (for example, AWS Lambda, Vercel, Netlify, or DigitalOcean Functions) accessed from 2025.2 or 2026.03 via
hubspot.fetch(). You can keep your app private and still call your own backend or third-party serverless from UI extensions, moving to a public app on 2025.2 does not restore HubSpot-hosted serverless functions today.
Important note: If you’re still on 2025.1, you can continue using HubSpot-hosted serverless functions for now, but you’ll need to migrate to 2026.03 (recommended, with serverless support) or 2025.2 (no HubSpot serverless) by August 1, 2026, when 2025.1 support ends.
Ultimately, each path leads forward, unlocks more capabilities, and keeps your apps ready for the future.
Migration Steps for Leveraging Third-Party Hosting
Assuming you have already manually migrated your existing private app to the projects framework and followed the migration guide. You should have been advised to create a backup of your functions folder from your older project, along with any associated references to the serverless function within your project, and exclude these files from the upload as part of your new app. Once you have uploaded your project without your severless functions, you can begin the migration steps for your serverless functions.
You’ll start by creating your own backend service leveraging our hubspot.fetch() API to fetch data. So, any existing logic defined in your HubSpot-hosted serverless functions can be moved to a third-party hosting platform.
Don’t worry, it’s not as scary as it seems!
Step 1: Remove Existing Serverless Functions
You can move your proxy logic to platforms like Vercel Function, AWS Lambda, DigitalOcean Functions, or Netlify Functions. I will demonstrate the migration of a private app's existing serverless functions as an example. The relevant repository I’ll use to demonstrate this migration can be found on the HubSpot Developer Relations GitHub. If you’d like to cross-reference the Legacy app card with the migrated app card, you can refer to this GitHub repository with the completed migration.
For this example, we’ll leverage AWS Lambda Functions, so here’s a quick setup:
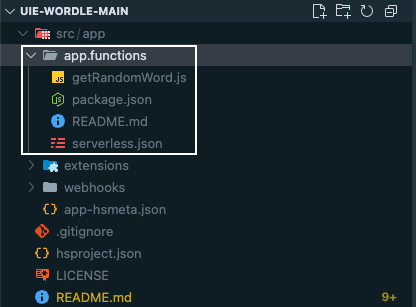
- Locate your existing serverless function in your private app by navigating to
src/app/app.functionsor wherever your functions live within your directory, along with any associated references to your serverless function elsewhere in your project.
Step 2: Extract and Migrate Your Current Function Logic to a Third-Party Platform
- Copy the function's logic, ensuring that parameter names are consistent when defining and creating your new function.
Before (HubSpot):
After (AWS):
HubSpot functions often handle all HTTP methods in one function, and with AWS, you’ll export separate functions for each method - it’ll likely be the same approach for any other third-party service.
Key Migration Points
When converting your function, depending on which third party you will leverage, you will need to pay attention to the following changes:
- Export pattern: Notice the change from
exports.main = async (context = {}) => {...} to exports.handler = async (event, context).The event object contains all HTTP request data, which you must manually parse, unlike HubSpot, which pre-processes it for you. - Response format: The response is now a specific structure:
- CORS headers are essential: Without these headers, HubSpot’s browser-based
hubspot.fetch()call will fail:
Even error responses need CORS headers, or HubSpot won’t be able to read the error details.
- Manual JSON parsing is required since the HubSpot serverless function did this automatically.
- You’ll need to pass any required data from your HubSpot frontend because there is no longer a built-in HubSpot context. Therefore, no automatic accountId, userId, or contact data, and no built-in authentication to HubSpot APIs.
The beauty of this migration is that your core business logic remains unchanged! The complexity between HubSpot's serverless functionality and AWS primarily lies in HTTP handling and CORS configuration.
Step 3: Update Your App Configuration
To properly configure your application and ensure it can interact with external services, you need to modify the configuration file.
- In your app-hsmeta.json file, you’ll need to add the
permittedUrlsproperty to the config file:
Step 4: Update Your Frontend Code
You’ll need to update your frontend code to call the new function and replace your runServerless calls with hubspot.fetch() API to fetch the data.
- Next, you’ll need to update your frontend React code to call the new function’s endpoint and replace
runServerless()calls withhubspot.fetch():
Before (main extension component via Wordle.tsx):
After (main extension component via Wordle.tsx):
Before (GameBoard.tsx component):
After (GameBoard.tsx component):
Make sure to replace the endpoint URL with your actual Lambda/Versel/Netlify URL and remove any references to runServerless throughout your codebase. The good news is that your app logic stays exactly the same!
Important note: When migrating, ensure that you rename your "extensions" folder to "cards". I missed this step and wondered why I couldn’t see the new migrated app card in my HubSpot account!
Step 5: Deploy and Test
The process for this step varies depending on the service you use. If you're using AWS, you'll need to deploy the function before testing. This ensures that both the function and HubSpot extensions are using a reliable API endpoint. This endpoint enables the HubSpot app to make calls and receive expected responses, such as the random words required for our Wordle game example.
- Deploy your function. Once you’ve written your function in whatever third-party you are leveraging, you will need to deploy it to test it.
- Test your function locally. With AWS, you can create test events in the Lambda console on the left side of your source code to verify functionality.

In case you run into any issues, here are some common ones I encountered that might help you:
Timeout errors: Increase the function timeouts to 10 seconds. Mine returned errors because it was only set to 3 seconds.Handler errors: Verify that the handler is set to the appropriate name, for example,
index.handler.Import errors: Make sure to leverage ES6 syntax (export const handler) as this will be the case for most functions, regardless of which service you choose to use.
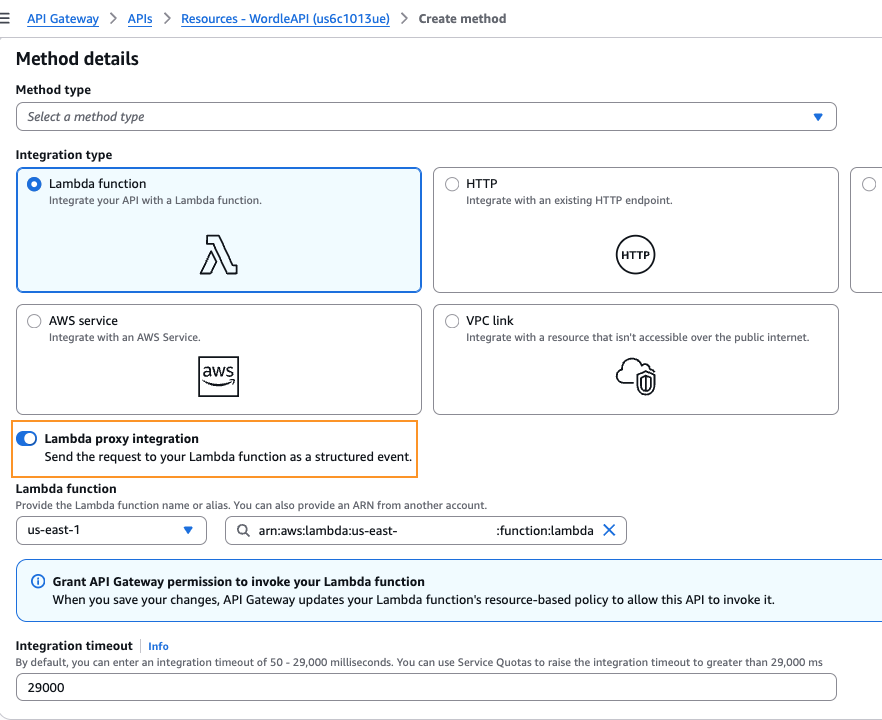
- Create an API Gateway for public access. While not all third-party services require this, it is crucial for AWS. This is because your Lambda function requires a public URL that HubSpot can access. To achieve this, navigate to the API Gateway console within your AWS account.
From there, you will create a REST API, provide a name for it, create a resource, and a method. Set your integration type to a Lambda Function and select the function you previously created. Finally, test the method using the “Test” tab and deploy the API. Once you deploy, ensure that you copy the invoke URL for HubSpot.

A vital note for those using AWS when creating your GET method: make sure to click on the Lambda Proxy Integration checkbox! This is the most important setting, and without it, your function won’t receive the correct data format. See example below:
- Update the API endpoint URL in your HubSpot project so the function can be invoked via the HubSpot app. For this example, you need to update the URL in the
Wordle.tsx,GameBoard.tsx, and yourapp-hsmeta.jsonfiles if you’re following along.
Note for AWS users: Ensure that you include the resource you created at the end of the URL path; that is what your Lambda function responds to.
- Now it’s time to deploy to HubSpot and test. Make sure to upload your changes by exciting
hs project upload. Then, executehs project dev, which will prompt you to use or create a test account where you’ll install the app. If, for any reason, it doesn’t prompt you to install, execute,hs project openand follow these steps in the developer documentation. - To view the app you’ve just installed, navigate to the record type where your app card is assigned. For example, ours is for a contact. Next, click “Customize”, select “Default view”, click the + button, then choose “Card library”. You should then see the app you installed, which you can select to add to your record. See example below:

- After installing the app on your test account and adding it to your CRM, you can now view and test it to ensure it behaves as expected. To quickly iterate through your app when testing, you can execute
hs project devin your terminal to start the server, then navigate back to your card and test any changes. For additional information on this step, please refer to the following documents. See the example below of our app card installed on a contact record:

Now that you have successfully migrated your private app with serverless functions to the new project framework and are leveraging a third-party service for your proxy, you should be able to access the new features, such as creating a Home or Settings Page for your app, or other new UI components. For example, I was able to add a new Home Page after migrating the legacy app to the new v2025.2 framework, which allows you to create a custom landing experience for users when they navigate to your app in HubSpot that you can access via the Marketplace icon in the top navigation bar:
.png?width=1080&height=719&name=Copy%20of%20Featured%20Images_Blog%20Title%20Templates%20(4).png)
Common Gotchas and Solutions
As with any new product release, users may encounter "gotchas" or learning curves. Below, I'll share my experience to clarify any confusion you might have.
Environment Variables
Ask yourself this: Does your function call HubSpot APIs?
If your function doesn’t call for any HubSpot data, then you don’t need to add environment variables to your new function. If your function DOES need HubSpot data, then yes, you need an access token if your new third-party function is executing the following:
- Gets contact/company data from HubSpot
- Creates/updates HubSpot records
- Calls any HubSpot APIs
- Needs account-specific information
Here is how you would add the environment variables if you need access to HubSpot data:
- Get your access token. To do this, go to your HubSpot "Settings" > "Integrations" > "Private Apps" > "Create/View your private app", and then copy the access token from the Auth tab.
- Add the access token to your third-party system. For AWS, you would access the "AWS Lambda Console" > "Go to your function" > "Configuration" > "Environment variables", and then you would click “Edit”, and add a new variable:
- Key:
HUBSPOT_ACCESS_TOKEN - Value:
your-actual-access-token
- Key:
- Update your code:
How to Test Functions and APIs
This will entirely depend on which service you are leveraging, but a similar approach should apply to all!
Function Unit Testing
Testing severless functions requires a systematic approach that works regardless of your cloud provider, framework, or integration. Here are some examples that could apply to AWS Lambda, Vercel Functions, Netlify Functions, Azure Functions, or Google Cloud Functions and beyond.
The goal: Verify your function logic works correctly without any external dependencies.
Regardless of which system you choose, test with synthetic request objects that match your platform's format, and use a mock external API call and dependencies. Also, validate the response format and business logic, as well as test for error handling and edge cases.
Platform Integration Testing
When testing your function and app, ensure you leverage local development capabilities to validate request/response transformations, check for environment variable injections, and test routing and middleware, if applicable.
The goal: Verify that your HubSpot app correctly invokes your function and handles the response.
Platform Examples:
|
Platform |
Local Testing Tool |
Integration Test |
|
AWS Lambda |
SAM CLI, Serverless |
Test with API Gateway locally |
|
Vercel |
vercel dev |
Test routing and middleware |
|
Netlify |
netlify dev |
Test build and deployment process |
|
Azure Functions |
Azure Functions Core Tools |
Test triggers and bindings |
|
Google Cloud |
Functions Framework |
Test HTTP triggers |
HTTP API Testing
Test your deployed function as a black box through real HTTP requests using a cURL, browsers, or tools like Postman.
The goal: Verify the API works correctly when called over HTTP like real clients.
This testing is crucial because it can catch CORS problems, authentication failures, and networking issues that only appear in production-like environments.
End-to-End Integration Testing
Test from your actual application (frontend or other backend services) to ensure everything works together in real-world conditions.
The goal: Verify your application can successfully call the API.
Common Integration Issues:
|
Issue |
Symptoms |
Solution |
|
CORS blocked |
Browser console errors |
Add domain to CORS headers |
|
400 Bad Request |
Different request format |
Check service logs for actual vs expected format |
|
Network timeout |
Long delays, no response |
Optimize the function, add timeouts |
|
Unexpected response |
Wrong data structure |
Validate API contract matches expectations |
Remember that each layer of testing catches different types of issues. A comprehensive testing strategy that validates your function works in isolation AND integrates properly with all systems. Your severless functions are only as reliable as your testing strategy, so invest in thorough testing to ensure smooth production deployments.
Developer Platform Framework Versioning
HubSpot’s developer platform has evolved significantly across versions, fundamentally changing how serverless functions work and are tested. Understanding these changes is essential both for migrating existing apps and building new integrations.
2025.2 (Latest) - Serverless Functions are Deprecated
Built-in serverless functions are entirely removed, and all external API calls must use hubspot.fetch() to call functions hosted on third-party platforms.
Downgrading clarification: It is not possible to downgrade an app from v2025.2 back to v2025.1.
2025.1 - Node.js v20 Requirement
Minimum Node.js version increased to v20 for all serverless functions. Any legacy code may lose compatibility and require updates. However, modern JavaScript features are available (top-level await, etc.), offering better performance and security, including native fetch() support, so there is no need for node-fetch polyfills.
2023.2 (Deprecated) - Last Version with Built-in Serverless
Unified app functions and endpoints functionality were included in this version. However, the runtime and version fields were removed from the serverless.json. This version also required mandatory async/await; callbacks (sendResponse) are no longer supported, and it’s fixed to Node.js 18.
Important note: This version will be deprecated as of October 1, 2025.
If you’re building new apps, start with v2025.2 and external hosting. However, if you’re on legacy versions, plan your migration carefully and use the testing approach above to validate each step. In the meantime, please subscribe to the Developer Changelog to stay up-to-date on new framework changes and receive notifications about additional support for serverless functions so you don’t miss any updates.